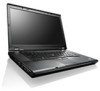
Hardware Maintenance Manual
Page 4
Notices 113 Electronic emission notices 114 Trademarks 114 ii Hardware Maintenance Manual General guidelines 65 Before servicing ThinkPad T530, T530i, and W530 66 1010 Battery pack 66 1020 Serial Ultrabay Enhanced device or blank bezel 67 1030 Memory module slot cover 68 1040 Memory module ... . 76 1090 PCI Express Mini Card for wireless WAN or mSATA solid state drive 78 1100 ExpressCard blank bezel or ExpressCard . . 82 1110 Keyboard bezel assembly 83 1120 Bluetooth daughter card 86 1130 Backup battery 87 1140 Smart card, dummy smart card and spacer . 88 1150 Speaker assembly 89...
Notices 113 Electronic emission notices 114 Trademarks 114 ii Hardware Maintenance Manual General guidelines 65 Before servicing ThinkPad T530, T530i, and W530 66 1010 Battery pack 66 1020 Serial Ultrabay Enhanced device or blank bezel 67 1030 Memory module slot cover 68 1040 Memory module ... . 76 1090 PCI Express Mini Card for wireless WAN or mSATA solid state drive 78 1100 ExpressCard blank bezel or ExpressCard . . 82 1110 Keyboard bezel assembly 83 1120 Bluetooth daughter card 86 1130 Backup battery 87 1140 Smart card, dummy smart card and spacer . 88 1150 Speaker assembly 89...
Hardware Maintenance Manual
Page 36
... hard disk drive becomes noisy, it might have been subject to computers installed with the Lenovo Soluton Center program, you to test only ThinkPad products. The use of an optical drive • Fuses blown by attachment of a ...nonsupported device • Forgotten computer password (making the computer unusable) • Sticky keys caused by spilling a liquid onto the keyboard • Use of an incorrect ac power adapter on laptop products The following procedures as possible. 2. Note: The Lenovo...
... hard disk drive becomes noisy, it might have been subject to computers installed with the Lenovo Soluton Center program, you to test only ThinkPad products. The use of an optical drive • Fuses blown by attachment of a ...nonsupported device • Forgotten computer password (making the computer unusable) • Sticky keys caused by spilling a liquid onto the keyboard • Use of an incorrect ac power adapter on laptop products The following procedures as possible. 2. Note: The Lenovo...
Hardware Maintenance Manual
Page 44
... three power management modes: screen blank, sleep, and hibernation. To end screen blank mode and resume normal operation, press any operation with the keyboard, the TrackPoint®, the hard disk drive, the parallel connector, or the optical drive within that time. • If the battery indicator blinks... Select Master HDP, where HDP stands for hard disk password. 7. Note: The computer does not accept any action to save changes and exit the ThinkPad Setup program. 3. To put the computer into sleep mode automatically: • If a "suspend time" has been set on the timer, and the...
... three power management modes: screen blank, sleep, and hibernation. To end screen blank mode and resume normal operation, press any operation with the keyboard, the TrackPoint®, the hard disk drive, the parallel connector, or the optical drive within that time. • If the battery indicator blinks... Select Master HDP, where HDP stands for hard disk password. 7. Note: The computer does not accept any action to save changes and exit the ThinkPad Setup program. 3. To put the computer into sleep mode automatically: • If a "suspend time" has been set on the timer, and the...
Hardware Maintenance Manual
Page 45
... • Pressing the power button. • Pressing Fn+F4. In the displays, n can also help you will have to be any operation with the keyboard, the TrackPoint, the hard disk drive, the parallel connector, or the optical drive within that causes the system to "Intermittent problems" on , the computer returns...set on the hard disk drive is read, and system status is powered off. Note: For a device not supported by diagnostic codes in the ThinkPad notebook computers, see the manual for each error detected in suspend mode. To put the original part back in the boot record on the timer...
... • Pressing the power button. • Pressing Fn+F4. In the displays, n can also help you will have to be any operation with the keyboard, the TrackPoint, the hard disk drive, the parallel connector, or the optical drive within that causes the system to "Intermittent problems" on , the computer returns...set on the hard disk drive is read, and system status is powered off. Note: For a device not supported by diagnostic codes in the ThinkPad notebook computers, see the manual for each error detected in suspend mode. To put the original part back in the boot record on the timer...
Hardware Maintenance Manual
Page 57
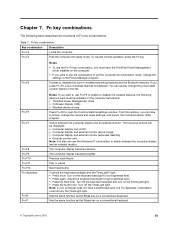
... Switch between the computer display and an external monitor. Has the same function as the Pause key on a conventional keyboard. © Copyright Lenovo 2012 51 Fn key combinations Key combination Description Fn+F3 Locks the computer. Enables or disables the built-in the ...computer display and an external monitor. Chapter 7. Fn key combinations The following options will be installed on the computer beforehand: • ThinkPad Power Management driver • OnScreen Display Utility • Wireless device drivers Press Fn+F6 to high brightness level. • Press...
... Switch between the computer display and an external monitor. Has the same function as the Pause key on a conventional keyboard. © Copyright Lenovo 2012 51 Fn key combinations Key combination Description Fn+F3 Locks the computer. Enables or disables the built-in the ...computer display and an external monitor. Chapter 7. Fn key combinations The following options will be installed on the computer beforehand: • ThinkPad Power Management driver • OnScreen Display Utility • Wireless device drivers Press Fn+F6 to high brightness level. • Press...
Hardware Maintenance Manual
Page 58
Fn key combinations (continued) Key combination Description Fn+S Has the same function as the ScrLK key on a conventional keyboard. Fn+K Has the same function as the SysRq key on a conventional keyboard. 52 Hardware Maintenance Manual Table 7.
Fn key combinations (continued) Key combination Description Fn+S Has the same function as the ScrLK key on a conventional keyboard. Fn+K Has the same function as the SysRq key on a conventional keyboard. 52 Hardware Maintenance Manual Table 7.
Hardware Maintenance Manual
Page 61
... CRUs is visible. See your responsibility. Examples of these types of CRUs: - Chapter 8. If you intend on installing the CRU, Lenovo will be found at any time upon request. When return is typically secured by more than two screws. CRU information and replacement instructions... you can resolve some problems with your product with a replacement part you might include the memory module, wireless card, keyboard, and palm rest with your product. ThinkPad computers contain the following types of CRUs include the ac power adapter, power cord, battery, and hard disk drive. ...
... CRUs is visible. See your responsibility. Examples of these types of CRUs: - Chapter 8. If you intend on installing the CRU, Lenovo will be found at any time upon request. When return is typically secured by more than two screws. CRU information and replacement instructions... you can resolve some problems with your product with a replacement part you might include the memory module, wireless card, keyboard, and palm rest with your product. ThinkPad computers contain the following types of CRUs include the ac power adapter, power cord, battery, and hard disk drive. ...
Hardware Maintenance Manual
Page 63
... card 20 PCI Express Mini Card for wireless LAN 21 Magnesium structure frame 22 Thermal fan assembly 23 Smart card or dummy smart card 24 Keyboard 25 TrackPoint cap Self-service CRU Yes No No No No Yes Yes No Yes No Yes Yes Yes Yes No No No No No...
... card 20 PCI Express Mini Card for wireless LAN 21 Magnesium structure frame 22 Thermal fan assembly 23 Smart card or dummy smart card 24 Keyboard 25 TrackPoint cap Self-service CRU Yes No No No No Yes Yes No Yes No Yes Yes Yes Yes No No No No No...
Hardware Maintenance Manual
Page 78
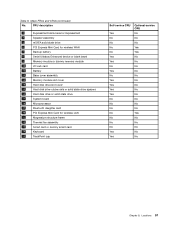
... arrow 2 until the front edge of the keyboard is attached firmly. 1060 Keyboard For access, remove these FRUs in order: • "1010 Battery pack" on page 66 • "1030 Memory module slot cover" on page 68 Removal steps of keyboard 1. Remove the screws that the solid state ...drive connector or hard disk drive connector is detached from the keyboard bezel. 72 Hardware Maintenance Manual When installing: Make sure that secure the keyboard. 1 1 Step 1 Screw (quantity) M2 × ...
... arrow 2 until the front edge of the keyboard is attached firmly. 1060 Keyboard For access, remove these FRUs in order: • "1010 Battery pack" on page 66 • "1030 Memory module slot cover" on page 68 Removal steps of keyboard 1. Remove the screws that the solid state ...drive connector or hard disk drive connector is detached from the keyboard bezel. 72 Hardware Maintenance Manual When installing: Make sure that secure the keyboard. 1 1 Step 1 Screw (quantity) M2 × ...
Hardware Maintenance Manual
Page 79
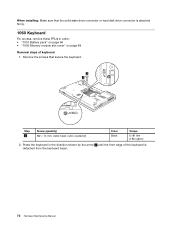
Lift the keyboard in the direction shown by the arrow 3 , and then detach the connector 4 . 3 4 Installation steps of keyboard When installing the keyboard, do the following: 1. Removing or replacing a FRU 73 Chapter 10. 3. Attach the keyboard connector 1 .
Lift the keyboard in the direction shown by the arrow 3 , and then detach the connector 4 . 3 4 Installation steps of keyboard When installing the keyboard, do the following: 1. Removing or replacing a FRU 73 Chapter 10. 3. Attach the keyboard connector 1 .
Hardware Maintenance Manual
Page 80
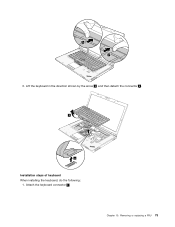
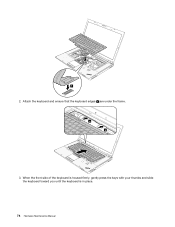
When the front side of the keyboard is housed firmly, gently press the keys with your thumbs and slide the keyboard toward you until the keyboard is in place. 74 Hardware Maintenance Manual Attach the keyboard and ensure that the keyboard edges a are under the frame. 3. 1 2.
When the front side of the keyboard is housed firmly, gently press the keys with your thumbs and slide the keyboard toward you until the keyboard is in place. 74 Hardware Maintenance Manual Attach the keyboard and ensure that the keyboard edges a are under the frame. 3. 1 2.
Hardware Maintenance Manual
Page 81
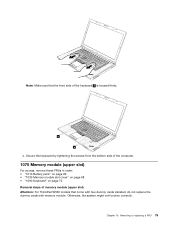
... module slot cover" on page 68 • "1060 Keyboard" on page 72 Removal steps of the keyboard b is housed firmly. Chapter 10. Otherwise, the system might not function correctly. Note: Make sure that the front side of memory module (upper slot) Attention: For ThinkPad W530 models that come with two dummy cards installed, do...
... module slot cover" on page 68 • "1060 Keyboard" on page 72 Removal steps of the keyboard b is housed firmly. Chapter 10. Otherwise, the system might not function correctly. Note: Make sure that the front side of memory module (upper slot) Attention: For ThinkPad W530 models that come with two dummy cards installed, do...
Hardware Maintenance Manual
Page 82
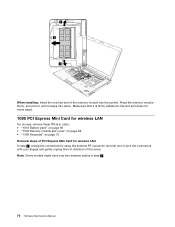
... For access, remove these FRUs in order: • "1010 Battery pack" on page 66 • "1030 Memory module slot cover" on page 68 • "1060 Keyboard" on page 72 Removal steps of PCI Express Mini Card for wireless LAN In step 1 , unplug the connectors by using the antenna RF connector removal...
... For access, remove these FRUs in order: • "1010 Battery pack" on page 66 • "1030 Memory module slot cover" on page 68 • "1060 Keyboard" on page 72 Removal steps of PCI Express Mini Card for wireless LAN In step 1 , unplug the connectors by using the antenna RF connector removal...
Hardware Maintenance Manual
Page 84
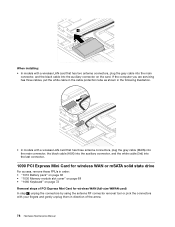
... For access, remove these FRUs in order: • "1010 Battery pack" on page 66 • "1030 Memory module slot cover" on page 68 • "1060 Keyboard" on the card.
... For access, remove these FRUs in order: • "1010 Battery pack" on page 66 • "1030 Memory module slot cover" on page 68 • "1060 Keyboard" on the card.
Hardware Maintenance Manual
Page 89
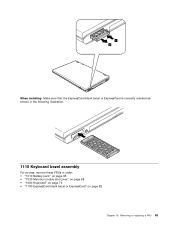
1 2 When installing: Make sure that the ExpressCard blank bezel or ExpressCard is correctly oriented as shown in the following illustration. 1110 Keyboard bezel assembly For access, remove these FRUs in order: • "1010 Battery pack" on page 66 • "1030 Memory module slot cover" on page 68 • "1060 Keyboard" on page 72 • "1100 ExpressCard blank bezel or ExpressCard" on page 82 Chapter 10. Removing or replacing a FRU 83
1 2 When installing: Make sure that the ExpressCard blank bezel or ExpressCard is correctly oriented as shown in the following illustration. 1110 Keyboard bezel assembly For access, remove these FRUs in order: • "1010 Battery pack" on page 66 • "1030 Memory module slot cover" on page 68 • "1060 Keyboard" on page 72 • "1100 ExpressCard blank bezel or ExpressCard" on page 82 Chapter 10. Removing or replacing a FRU 83

Hardware Maintenance Manual
Page 90
...; PANTONE Color Calibrator ➙ Sensor Replacement Utility. 3. Removal steps of their image, you use the color sensor for ThinkPad W530 models with a color sensor. • If the hard disk drive is displayed. Replace the keyboard bezel assembly. 2. Before you do not have backed up the color sensor calibration profile ECCM2SensorData.dat to an...
...; PANTONE Color Calibrator ➙ Sensor Replacement Utility. 3. Removal steps of their image, you use the color sensor for ThinkPad W530 models with a color sensor. • If the hard disk drive is displayed. Replace the keyboard bezel assembly. 2. Before you do not have backed up the color sensor calibration profile ECCM2SensorData.dat to an...
Hardware Maintenance Manual
Page 92
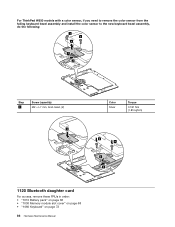
For ThinkPad W530 models with a color sensor, if you need to remove the color sensor from the failing keyboard bezel assembly and install the color sensor to the new keyboard bezel assembly, do the following: 3 3 4 1 2 Step 3 Screw (quantity) M2 × L7 mm, bind-head, (2) 1 Color Silver Torque 0.181 Nm (1.85 kgfcm) 4 4 3 2 1120 Bluetooth daughter card For access, remove these FRUs in order: • "1010 Battery pack" on page 66 • "1030 Memory module slot cover" on page 68 • "1060 Keyboard" on page 72 86 Hardware Maintenance Manual
For ThinkPad W530 models with a color sensor, if you need to remove the color sensor from the failing keyboard bezel assembly and install the color sensor to the new keyboard bezel assembly, do the following: 3 3 4 1 2 Step 3 Screw (quantity) M2 × L7 mm, bind-head, (2) 1 Color Silver Torque 0.181 Nm (1.85 kgfcm) 4 4 3 2 1120 Bluetooth daughter card For access, remove these FRUs in order: • "1010 Battery pack" on page 66 • "1030 Memory module slot cover" on page 68 • "1060 Keyboard" on page 72 86 Hardware Maintenance Manual

Hardware Maintenance Manual
Page 93
... For access, remove these FRUs in order: • "1010 Battery pack" on page 66 • "1030 Memory module slot cover" on page 68 • "1060 Keyboard" on page 72 • "1100 ExpressCard blank bezel or ExpressCard" on page 82 Removal steps of backup battery DANGER Use only the authorized battery specified...
... For access, remove these FRUs in order: • "1010 Battery pack" on page 66 • "1030 Memory module slot cover" on page 68 • "1060 Keyboard" on page 72 • "1100 ExpressCard blank bezel or ExpressCard" on page 82 Removal steps of backup battery DANGER Use only the authorized battery specified...
Hardware Maintenance Manual
Page 94
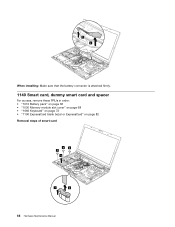
When installing: Make sure that the battery connector is attached firmly. 1140 Smart card, dummy smart card and spacer For access, remove these FRUs in order: • "1010 Battery pack" on page 66 • "1030 Memory module slot cover" on page 68 • "1060 Keyboard" on page 72 • "1100 ExpressCard blank bezel or ExpressCard" on page 82 Removal steps of smart card 33 3 4 1 2 88 Hardware Maintenance Manual
When installing: Make sure that the battery connector is attached firmly. 1140 Smart card, dummy smart card and spacer For access, remove these FRUs in order: • "1010 Battery pack" on page 66 • "1030 Memory module slot cover" on page 68 • "1060 Keyboard" on page 72 • "1100 ExpressCard blank bezel or ExpressCard" on page 82 Removal steps of smart card 33 3 4 1 2 88 Hardware Maintenance Manual
Hardware Maintenance Manual
Page 95
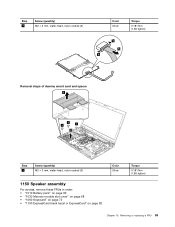
Removing or replacing a FRU 89 Step 3 Screw (quantity) M2 × 3 mm, wafer-head, nylon-coated (3) Color Silver Torque 0.181 Nm (1.85 kgfcm) 5 6 5 Removal steps of dummy smart card and spacer 3 1 1 1 2 Step 1 Screw (quantity) M2 × 3 mm, wafer-head, nylon-coated (3) Color Silver 1150 Speaker assembly For access, remove these FRUs in order: • "1010 Battery pack" on page 66 • "1030 Memory module slot cover" on page 68 • "1060 Keyboard" on page 72 • "1100 ExpressCard blank bezel or ExpressCard" on page 82 Torque 0.181 Nm (1.85 kgfcm) Chapter 10.
Removing or replacing a FRU 89 Step 3 Screw (quantity) M2 × 3 mm, wafer-head, nylon-coated (3) Color Silver Torque 0.181 Nm (1.85 kgfcm) 5 6 5 Removal steps of dummy smart card and spacer 3 1 1 1 2 Step 1 Screw (quantity) M2 × 3 mm, wafer-head, nylon-coated (3) Color Silver 1150 Speaker assembly For access, remove these FRUs in order: • "1010 Battery pack" on page 66 • "1030 Memory module slot cover" on page 68 • "1060 Keyboard" on page 72 • "1100 ExpressCard blank bezel or ExpressCard" on page 82 Torque 0.181 Nm (1.85 kgfcm) Chapter 10.


