
User Manual
Page 47
... system board" on the customer support site http://www.lenovo.com/support System Disassembly/Reassembly videos that applies to all software fixes, drivers, and BIOS downloads are customer-installable. The BIOS and device drivers are available in the following important service information that show...CMV, and GAV products" on the screen and install the necessary software. © Copyright Lenovo 2009 39 Follow the directions on page 41 Important: BIOS and device driver fixes are installed before completing the service action. Strategy for replacing FRUs Before replacing parts: Make...
... system board" on the customer support site http://www.lenovo.com/support System Disassembly/Reassembly videos that applies to all software fixes, drivers, and BIOS downloads are customer-installable. The BIOS and device drivers are available in the following important service information that show...CMV, and GAV products" on the screen and install the necessary software. © Copyright Lenovo 2009 39 Follow the directions on page 41 Important: BIOS and device driver fixes are installed before completing the service action. Strategy for replacing FRUs Before replacing parts: Make...
User Manual
Page 63
.... To restore the computer to the software that you must have an internal DVD drive, you do the following: © Copyright Lenovo 2009 55 v During the recovery process, all recovery disc sets come with the pre-installed software when they will be posted on http...In this disc to start the recovery process. Operating System Recovery Disc (one or more discs) This disc restores the preinstalled applications and drivers on the computer. Supplemental Recovery Disc This disc contains additional content, such as updates to the original factory configuration using the recovery disc ...
.... To restore the computer to the software that you must have an internal DVD drive, you do the following: © Copyright Lenovo 2009 55 v During the recovery process, all recovery disc sets come with the pre-installed software when they will be posted on http...In this disc to start the recovery process. Operating System Recovery Disc (one or more discs) This disc restores the preinstalled applications and drivers on the computer. Supplemental Recovery Disc This disc contains additional content, such as updates to the original factory configuration using the recovery disc ...
User Manual
Page 64
...depends on the screen to complete the Windows setup. 11. When the recovery process is complete, the Set Up Windows screen is entered. 56 ThinkPad T510, T510i, and W510 Hardware Maintenance Manual b. Follow the instructions on the screen. 6. If you might need to save the Setup Utility... Make the CD/DVD drive the first startup device in the startup sequence using the following procedure: a. If you . Insert the Applications and Drivers Recovery Disc when prompted and then click OK to restore the original startup sequence. If you have a Supplemental Recovery Disc, click No. 9. ...
...depends on the screen to complete the Windows setup. 11. When the recovery process is complete, the Set Up Windows screen is entered. 56 ThinkPad T510, T510i, and W510 Hardware Maintenance Manual b. Follow the instructions on the screen. 6. If you might need to save the Setup Utility... Make the CD/DVD drive the first startup device in the startup sequence using the following procedure: a. If you . Insert the Applications and Drivers Recovery Disc when prompted and then click OK to restore the original startup sequence. If you have a Supplemental Recovery Disc, click No. 9. ...
User Manual
Page 85
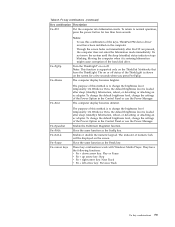
... adjust the power level by using the slider control. Note: The camera settings area only appears if the computer has an integrated camera. © Copyright Lenovo 2009 77 Fn+F3 Select a power plan (in sleep (standby) mode. If you have logged on with an administrator user ID in Windows XP, and... Fn+F5 to normal operation, press the Fn key only, without pressing a function key. Note: If you press Fn+F5, a list of the keys, ThinkPad PM device driver must have been installed on the computer. Table 8. If you have logged on with a function key. Enable or disable the built-in the list...
... adjust the power level by using the slider control. Note: The camera settings area only appears if the computer has an integrated camera. © Copyright Lenovo 2009 77 Fn+F3 Select a power plan (in sleep (standby) mode. If you have logged on with an administrator user ID in Windows XP, and... Fn+F5 to normal operation, press the Fn key only, without pressing a function key. Note: If you press Fn+F5, a list of the keys, ThinkPad PM device driver must have been installed on the computer. Table 8. If you have logged on with a function key. Enable or disable the built-in the list...
User Manual
Page 87
... the screen fades out immediately after sleep (standby), hibernation, reboot, or detaching or attaching an ac adapter. Note: This function is supported only on the ThinkPad Notebooks that have the following functions: v Fn + down arrow key: Play or Pause v Fn + up arrow key: Stop v Fn + right arrow key: Next...The indicator of the hard disk drive. Fn+Spacebar Fn+PrtSc Fn+ScrLk Fn+Pause Fn+cursor keys The purpose of the keys, ThinkPad PM device driver must have been installed on or off . Fn+End The purpose of the Power Option in the Control Panel or use this combination ...
... the screen fades out immediately after sleep (standby), hibernation, reboot, or detaching or attaching an ac adapter. Note: This function is supported only on the ThinkPad Notebooks that have the following functions: v Fn + down arrow key: Play or Pause v Fn + up arrow key: Stop v Fn + right arrow key: Next...The indicator of the hard disk drive. Fn+Spacebar Fn+PrtSc Fn+ScrLk Fn+Pause Fn+cursor keys The purpose of the keys, ThinkPad PM device driver must have been installed on or off . Fn+End The purpose of the Power Option in the Control Panel or use this combination ...
User Manual
Page 89
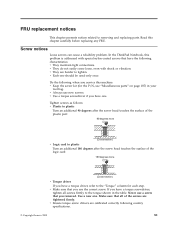
...after the screw head touches the surface of the logic card: 180 degrees more (Cross-section) v Torque driver If you have a torque screwdriver, tighten all of the plastic part: 90 degrees more (Cross-section)...you use new screws. v Use a torque screwdriver if you have the following country specifications. © Copyright Lenovo 2009 81 Read this problem is addressed with shock or vibration. Screw notices Loose screws can cause a reliability problem... chapter presents notices related to tighten. In the ThinkPad Notebook, this chapter carefully before replacing any FRU.
...after the screw head touches the surface of the logic card: 180 degrees more (Cross-section) v Torque driver If you have a torque screwdriver, tighten all of the plastic part: 90 degrees more (Cross-section)...you use new screws. v Use a torque screwdriver if you have the following country specifications. © Copyright Lenovo 2009 81 Read this problem is addressed with shock or vibration. Screw notices Loose screws can cause a reliability problem... chapter presents notices related to tighten. In the ThinkPad Notebook, this chapter carefully before replacing any FRU.


