
(English) User Guide
Page 4
...errors 126 Memory problems 126 Networking 126 Keyboard and other pointing devices . . . . 131 Display and multimedia devices 132 Battery and power 139 Drives and other storage devices . . . . . 142 Software problems 142 Ports and connectors 142 Chapter 11. Getting support . . . . 145 Before you begin 93 Installing Windows 7 94 Installing Windows XP 95 Installing device drivers 97 Installing the driver for 4-in-1 media card reader 97 Installing ThinkPad Monitor File for Windows 2000/XP/Vista/7 97 ThinkPad Setup 99 Config menu 99 Date/Time menu 100 Security menu 100 Startup...
...errors 126 Memory problems 126 Networking 126 Keyboard and other pointing devices . . . . 131 Display and multimedia devices 132 Battery and power 139 Drives and other storage devices . . . . . 142 Software problems 142 Ports and connectors 142 Chapter 11. Getting support . . . . 145 Before you begin 93 Installing Windows 7 94 Installing Windows XP 95 Installing device drivers 97 Installing the driver for 4-in-1 media card reader 97 Installing ThinkPad Monitor File for Windows 2000/XP/Vista/7 97 ThinkPad Setup 99 Config menu 99 Date/Time menu 100 Security menu 100 Startup...

(English) User Guide
Page 11
... that you use the outlet until it into a grounded electrical outlet. Consult an electrician for an approved outlet adapter or to insert it is properly wired, easily accessible, and located close to the equipment. Do not defeat this label attached. Be sure that draw large amounts of these parts, contact a service technician. © Copyright Lenovo 2011 ix...
... that you use the outlet until it into a grounded electrical outlet. Consult an electrician for an approved outlet adapter or to insert it is properly wired, easily accessible, and located close to the equipment. Do not defeat this label attached. Be sure that draw large amounts of these parts, contact a service technician. © Copyright Lenovo 2011 ix...

(English) User Guide
Page 57
... the monitor information window to open the Display Properties window. 5. Clear the Show compatible hardware check box. 14. After updating the driver, click Close. 16. Turn on the desktop, and click Properties to make sure that the monitor type is supplied with the external monitor. • If you set Colors. Click the Settings tab. 6. Select Don't search. Select Manufacturer and Model for your monitor in the list, stop the installation of device drivers...
... the monitor information window to open the Display Properties window. 5. Clear the Show compatible hardware check box. 14. After updating the driver, click Close. 16. Turn on the desktop, and click Properties to make sure that the monitor type is supplied with the external monitor. • If you set Colors. Click the Settings tab. 6. Select Don't search. Select Manufacturer and Model for your monitor in the list, stop the installation of device drivers...
(English) User Guide
Page 68
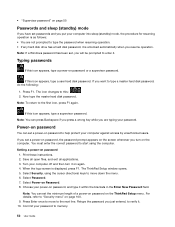
... sleep (standby) mode If you have set passwords and you put your computer against access by unauthorized users. If this : 2. The icon changes to enter it . 10. If this icon appears, type a power-on the screen whenever you will be prompted to this icon appears, type a user hard disk password. You must enter the correct password to start using the cursor directional keys to move to move down the menu. 6. The ThinkPad Setup window opens. 5. Press Enter...
... sleep (standby) mode If you have set passwords and you put your computer against access by unauthorized users. If this : 2. The icon changes to enter it . 10. If this icon appears, type a power-on the screen whenever you will be prompted to this icon appears, type a user hard disk password. You must enter the correct password to start using the cursor directional keys to move to move down the menu. 6. The ThinkPad Setup window opens. 5. Press Enter...

(English) User Guide
Page 69
... hard disk password. Chapter 4. Changing or removing the power-on password To change the user password later.) 9. Then the administrator sets a user password for his or her computer. Setting a hard disk password 1. Select Hard Disk 1 Password. 8. Press Enter once to move down the menu. 6. Select Yes in the network, and tells each user the password for each computer in the Setup Notice window. When the Enter New Password field opens, leave it . no master hard disk password has been, the user must enter the user hard disk password in the ThinkPad Setup menu. Turn...
... hard disk password. Chapter 4. Changing or removing the power-on password To change the user password later.) 9. Then the administrator sets a user password for his or her computer. Setting a hard disk password 1. Select Hard Disk 1 Password. 8. Press Enter once to move down the menu. 6. Select Yes in the network, and tells each user the password for each computer in the Setup Notice window. When the Enter New Password field opens, leave it . no master hard disk password has been, the user must enter the user hard disk password in the ThinkPad Setup menu. Turn...
(English) User Guide
Page 71
... - Enabling or disabling the Flash BIOS Updating by End-Users feature - When the logo screen is displayed. The master hard disk password will be removed. Specifying the minimum length for anyone but you set a power-on password. Enabling or disabling the Boot Order Lock - Security 55 Enabling or disabling the Internal Network device - Both the user and master hard disk passwords will be able to start the ThinkPad Setup. Chapter 4. It provides the following only if you try to apply this procedure. 1. Changing...
... - Enabling or disabling the Flash BIOS Updating by End-Users feature - When the logo screen is displayed. The master hard disk password will be removed. Specifying the minimum length for anyone but you set a power-on password. Enabling or disabling the Boot Order Lock - Security 55 Enabling or disabling the Internal Network device - Both the user and master hard disk passwords will be able to start the ThinkPad Setup. Chapter 4. It provides the following only if you try to apply this procedure. 1. Changing...

(English) User Guide
Page 72
... password is displayed. A window opens that prompts you forget your internal hard disk drive. You must take your password to the next line. Retype the password you dispose of your computer memory from your hard disk drive" on page 55 to "Notice on deleting data from unauthorized access by UEFI BIOS. 56 User Guide In the Enter Current Password field, type the current supervisor password. 2. Before you just entered to enter a new password. 9. To change your supervisor password...
... password is displayed. A window opens that prompts you forget your internal hard disk drive. You must take your password to the next line. Retype the password you dispose of your computer memory from your hard disk drive" on page 55 to "Notice on deleting data from unauthorized access by UEFI BIOS. 56 User Guide In the Enter Current Password field, type the current supervisor password. 2. Before you just entered to enter a new password. 9. To change your supervisor password...
(English) User Guide
Page 78
... key. 3. When you cannot start the Windows operating system. The Rescue and Recovery workspace opens after a short delay. Follow the instructions on the screen to the factory default settings. This enables you to perform recovery operations even if you did not back up your hard disk drive using the Rescue and Recovery program on page 65. 4. This solution is turned off. 2. If you have multiple partitions on your local hard disk drive, a USB device, or a network drive. • Restore...
... key. 3. When you cannot start the Windows operating system. The Rescue and Recovery workspace opens after a short delay. Follow the instructions on the screen to the factory default settings. This enables you to perform recovery operations even if you did not back up your hard disk drive using the Rescue and Recovery program on page 65. 4. This solution is turned off. 2. If you have multiple partitions on your local hard disk drive, a USB device, or a network drive. • Restore...

(English) User Guide
Page 88
... drive, make a backup copy of the drive. If an mSATA solid state drive is very sensitive. Incorrect handling can also replace the mSATA solid state drive with a new one which can be sure to physical shocks. Prerequisites for Wireless WAN. • Replace the mSATA solid state drive only if you start, print these instructions. Put the drive on page 67. 11. Connect the ac power adapter and cables...
... drive, make a backup copy of the drive. If an mSATA solid state drive is very sensitive. Incorrect handling can also replace the mSATA solid state drive with a new one which can be sure to physical shocks. Prerequisites for Wireless WAN. • Replace the mSATA solid state drive only if you start, print these instructions. Put the drive on page 67. 11. Connect the ac power adapter and cables...
(English) User Guide
Page 98
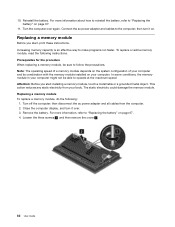
... remove the cover 2 . 82 User Guide Connect the ac power adapter and cables to make programs run faster. To replace or add a memory module, read the following : 1. In some conditions, the memory module in your computer and its combination with the memory module installed on page 67. 4. The static electricity could damage the memory module. For more information about how to reinstall the battery, refer to operate at the maximum speed. Replacing a memory module...
... remove the cover 2 . 82 User Guide Connect the ac power adapter and cables to make programs run faster. To replace or add a memory module, read the following : 1. In some conditions, the memory module in your computer and its combination with the memory module installed on page 67. 4. The static electricity could damage the memory module. For more information about how to reinstall the battery, refer to operate at the maximum speed. Replacing a memory module...

(English) User Guide
Page 109
... Supplement files, the device drivers, and application software you need on your computer with proper care and keep it in top working shape. • "Installing a new operating system" on page 93 • "Installing device drivers" on page 97 • "ThinkPad Setup" on the hard disk drive, you should not change the initial UEFI/Legacy Boot setting in the C:\SWTOOLS\APPS directory. The UEFI/Legacy Boot setting must be using : - "Installing Windows XP" on page...
... Supplement files, the device drivers, and application software you need on your computer with proper care and keep it in top working shape. • "Installing a new operating system" on page 93 • "Installing device drivers" on page 97 • "ThinkPad Setup" on the hard disk drive, you should not change the initial UEFI/Legacy Boot setting in the C:\SWTOOLS\APPS directory. The UEFI/Legacy Boot setting must be using : - "Installing Windows XP" on page...
(English) User Guide
Page 116
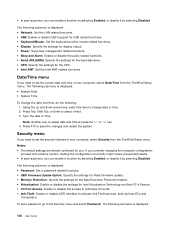
... date and time is displayed: • Network: Set the LAN related functions. • USB: Enable or disable UEFI support for USB related functions. • Keyboard/Mouse: Set the keyboard and the mouse related functions. • Display: Specify the settings for display output. • Power: Set power management related functions. • Beep and Alarm: Enable or disable the audio related functions. • Serial ATA (SATA): Specify the settings for the hard disk drive. • CPU: Specify the settings for you consider changing the computer configuration, proceed with extreme caution...
... date and time is displayed: • Network: Set the LAN related functions. • USB: Enable or disable UEFI support for USB related functions. • Keyboard/Mouse: Set the keyboard and the mouse related functions. • Display: Specify the settings for display output. • Power: Set power management related functions. • Beep and Alarm: Enable or disable the audio related functions. • Serial ATA (SATA): Specify the settings for the hard disk drive. • CPU: Specify the settings for you consider changing the computer configuration, proceed with extreme caution...
(English) User Guide
Page 129
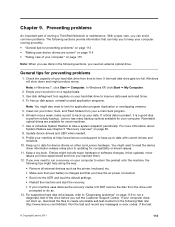
... http://www.lenovo.com/support to date with current drivers and revisions. 10. Update device drivers and UEFI when needed. 9. If the hard disk drive gets too full, Windows will slow down and might include major hardware or software changes, driver updates, minor issues you have the ac power connected. • Boot into the UEFI and load the default settings. • Restart the machine and start up, download the files to create a bootable self...
... http://www.lenovo.com/support to date with current drivers and revisions. 10. Update device drivers and UEFI when needed. 9. If the hard disk drive gets too full, Windows will slow down and might include major hardware or software changes, driver updates, minor issues you have the ac power connected. • Boot into the UEFI and load the default settings. • Restart the machine and start up, download the files to create a bootable self...

(English) User Guide
Page 130
.... 114 User Guide If you add a new component, the operating system needs to be downloaded from the Lenovo Web site by severity (critical updates, critical and recommended updates, or all updates) so the list you . Note: Because drivers are stored on the screen and install the necessary software. This may eliminate the driver as critical, recommended, and optional to have the error screen on your computer. Enter the product number of...
.... 114 User Guide If you add a new component, the operating system needs to be downloaded from the Lenovo Web site by severity (critical updates, critical and recommended updates, or all updates) so the list you . Note: Because drivers are stored on the screen and install the necessary software. This may eliminate the driver as critical, recommended, and optional to have the error screen on your computer. Enter the product number of...
(English) User Guide
Page 140
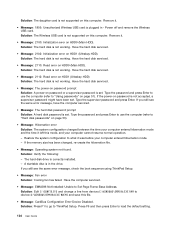
...; Message: The hard disk password prompt Solution: A hard disk password is set. Solution: The Wireless USB card is not supported on password or a supervisor password is plugged in the drive. Type the supervisor password and press Enter. Have the computer serviced. • Message: EMM386 Not Installed-Unable to ThinkPad Setup. Remove it. • Message: 1805: Unauthorized Wireless USB card is set. Solution: Edit C:\CONFIG.SYS and change a line from device=C:\WINDOWS\EMM386.EXE RAM to load the default setting. 124 User Guide Press F9...
...; Message: The hard disk password prompt Solution: A hard disk password is set. Solution: The Wireless USB card is not supported on password or a supervisor password is plugged in the drive. Type the supervisor password and press Enter. Have the computer serviced. • Message: EMM386 Not Installed-Unable to ThinkPad Setup. Remove it. • Message: 1805: Unauthorized Wireless USB card is set. Solution: Edit C:\CONFIG.SYS and change a line from device=C:\WINDOWS\EMM386.EXE RAM to load the default setting. 124 User Guide Press F9...

(English) User Guide
Page 143
... Mbps, the connection fails or errors occur. Click Start, and then click Control Panel. 2. mark is not enabled. Click Performance and Maintenance, and then click System. 3. Try another cable. - Troubleshooting computer problems 127 Click the Update Driver button. For Windows 7: 1. You have the same duplex setting. Click Hardware and Sound. 3. If you configured the adapter for your network environment. If you are using the correct device driver. Connect to a 1000 BASE-T hub/switch (not 1000...
... Mbps, the connection fails or errors occur. Click Start, and then click Control Panel. 2. mark is not enabled. Click Performance and Maintenance, and then click System. 3. Try another cable. - Troubleshooting computer problems 127 Click the Update Driver button. For Windows 7: 1. You have the same duplex setting. Click Hardware and Sound. 3. If you configured the adapter for your network environment. If you are using the correct device driver. Connect to a 1000 BASE-T hub/switch (not 1000...
(English) User Guide
Page 146
... Bluetooth icons in the Control Panel. If you need the Bluetooth serial port, just reconnect it and then replace the Bluetooth driver. Click Bluetooth, and select Bluetooth Setup Wizard. 3. Select I want to use ThinkPad Bluetooth with Enhanced Data Rate Software, you have installed the Microsoft Bluetooth software before, and you are using Headset profile or AV profile. Select Do Not Synchronize in the device listing, the Microsoft Bluetooth software is installed on Bluetooth by pressing F9. 2. The Device Manager window opens...
... Bluetooth icons in the Control Panel. If you need the Bluetooth serial port, just reconnect it and then replace the Bluetooth driver. Click Bluetooth, and select Bluetooth Setup Wizard. 3. Select I want to use ThinkPad Bluetooth with Enhanced Data Rate Software, you have installed the Microsoft Bluetooth software before, and you are using Headset profile or AV profile. Select Do Not Synchronize in the device listing, the Microsoft Bluetooth software is installed on Bluetooth by pressing F9. 2. The Device Manager window opens...

(English) User Guide
Page 150
...: For Windows 7: 1. Connect the external monitor to the monitor connector, and then connect the monitor to open the Display Properties window. 2. Click the Monitor tab. If it is, click OK to make sure that has been installed on your monitor. 14. Click the Driver tab. 10. Click Update Driver. 11. Clear the Show compatible hardware check box. 13. Note: The device driver name depends on the video chip that the monitor type is for...
...: For Windows 7: 1. Connect the external monitor to the monitor connector, and then connect the monitor to open the Display Properties window. 2. Click the Monitor tab. If it is, click OK to make sure that has been installed on your monitor. 14. Click the Driver tab. 10. Click Update Driver. 11. Clear the Show compatible hardware check box. 13. Note: The device driver name depends on the video chip that the monitor type is for...
(English) User Guide
Page 151
... problems 135 Press F6 to change the display output location to install, and then click Next. 15. Click the Settings tab. 6. Click Advanced. 7. Check the monitor information window to close the Properties window. 18. Select Install from a list or specific location (Advanced), and then click Next. 14. I will need to close the window; Select Manufacturers and Models for setting a higher resolution on the external monitor.) Make sure that the appropriate monitor type...
... problems 135 Press F6 to change the display output location to install, and then click Next. 15. Click the Settings tab. 6. Click Advanced. 7. Check the monitor information window to close the Properties window. 18. Select Install from a list or specific location (Advanced), and then click Next. 14. I will need to close the window; Select Manufacturers and Models for setting a higher resolution on the external monitor.) Make sure that the appropriate monitor type...
(English) User Guide
Page 155
... hot, remove it from the computer and allow it and recharge the battery. Solution: Do as follows: 1. For connecting the ac power adapter, see the Setup Instructions manual included in 24 hours, use a new battery pack. • Problem: Your computer shuts down before the battery status indicator shows empty, -or- This section includes five topics: Battery, ac power adapter, Power, Power button, Startup and Sleep (standby) and hibernation. Your computer operates after the battery status indicator...
... hot, remove it from the computer and allow it and recharge the battery. Solution: Do as follows: 1. For connecting the ac power adapter, see the Setup Instructions manual included in 24 hours, use a new battery pack. • Problem: Your computer shuts down before the battery status indicator shows empty, -or- This section includes five topics: Battery, ac power adapter, Power, Power button, Startup and Sleep (standby) and hibernation. Your computer operates after the battery status indicator...


