

Safety and Warranty guide
Page 9
... power cords shall be H05VV-F, 3G, 0.75 mm2, or better. Improper handling of static-sensitive parts can cause damage to you install a static-sensitive option or CRU, touch the static-protective package containing the part to a metal expansion-slot cover or other unpainted metal surface on the computer cover or other countries, the suitable types shall be used accordingly. Handle adapters, memory...
... power cords shall be H05VV-F, 3G, 0.75 mm2, or better. Improper handling of static-sensitive parts can cause damage to you install a static-sensitive option or CRU, touch the static-protective package containing the part to a metal expansion-slot cover or other unpainted metal surface on the computer cover or other countries, the suitable types shall be used accordingly. Handle adapters, memory...

Safety and Warranty guide
Page 17
... when open. Hazardous voltage, current, and energy levels are present inside these parts, contact a service technician. Users and installers in other countries should follow local codes and ordinances when installing appliances that has the following . Danger Some laser products contain an embedded Class 3A or Class 3B laser diode. Power supply statement Never remove the cover on a power supply or any component that the cable...
... when open. Hazardous voltage, current, and energy levels are present inside these parts, contact a service technician. Users and installers in other countries should follow local codes and ordinances when installing appliances that has the following . Danger Some laser products contain an embedded Class 3A or Class 3B laser diode. Power supply statement Never remove the cover on a power supply or any component that the cable...
Safety and Warranty guide
Page 18
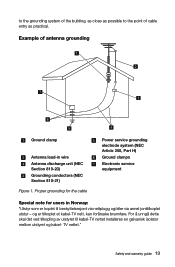
Example of cable entry as practical. og er tilkoplet et kabel-TV nett, kan for users in wire Antenna discharge unit (NEC Section 810-20) Grounding conductors (NEC Section 810-21) Figure 1. TV nettet." to the grounding system of the...Norway: "Utstyr som er koplet til beskyttelsesjord via nettplugg og/eller via annet jordtilkoplet utstyr - Proper grounding for the cable Power service grounding electrode system (NEC Article 250, Part H) Ground clamps Electronic service equipment Special note for årsake brannfare. For å unngå dette skal det ved tilkopling av utstyret ...
Example of cable entry as practical. og er tilkoplet et kabel-TV nett, kan for users in wire Antenna discharge unit (NEC Section 810-20) Grounding conductors (NEC Section 810-21) Figure 1. TV nettet." to the grounding system of the...Norway: "Utstyr som er koplet til beskyttelsesjord via nettplugg og/eller via annet jordtilkoplet utstyr - Proper grounding for the cable Power service grounding electrode system (NEC Article 250, Part H) Ground clamps Electronic service equipment Special note for årsake brannfare. For å unngå dette skal det ved tilkopling av utstyret ...

Safety and Warranty guide
Page 30
... for the product starts on your product are set forth below in writing. The warranty period and type of purchase specified on the original date of warranty service that you purchase is free from defects in materials and workmanship under normal use and conditions during the warranty period, Lenovo will provide you otherwise in Part 3 - Telephone: +61 2 8003...
... for the product starts on your product are set forth below in writing. The warranty period and type of purchase specified on the original date of warranty service that you purchase is free from defects in materials and workmanship under normal use and conditions during the warranty period, Lenovo will provide you otherwise in Part 3 - Telephone: +61 2 8003...

Safety and Warranty guide
Page 31
... for repair may be replaced by Lenovo may not be in good working order and at least functionally equivalent to the original product or part. Products and parts presented for replacement. TO THE EXTENT PERMITTED BY LAW, UNDER NO CIRCUMSTANCES AND NOTWITHSTANDING THE FAILURE OF ESSENTIAL PURPOSE OF ANY REMEDY SET FORTH HEREIN, SHALL LENOVO, ITS AFFILIATES, SUPPLIERS, RESELLERS, OR SERVICE...
... for repair may be replaced by Lenovo may not be in good working order and at least functionally equivalent to the original product or part. Products and parts presented for replacement. TO THE EXTENT PERMITTED BY LAW, UNDER NO CIRCUMSTANCES AND NOTWITHSTANDING THE FAILURE OF ESSENTIAL PURPOSE OF ANY REMEDY SET FORTH HEREIN, SHALL LENOVO, ITS AFFILIATES, SUPPLIERS, RESELLERS, OR SERVICE...

Safety and Warranty guide
Page 38
.... After the product has been repaired or exchanged, it in the instructions shipped with a replacement CRU. An optional service offering may be charged for the replacement CRU if the Service Provider does not receive the defective CRU from a Service Provider or Lenovo under which Self-service CRUs would be available for you to the service center at Lenovo's risk and expense, unless the...
.... After the product has been repaired or exchanged, it in the instructions shipped with a replacement CRU. An optional service offering may be charged for the replacement CRU if the Service Provider does not receive the defective CRU from a Service Provider or Lenovo under which Self-service CRUs would be available for you to the service center at Lenovo's risk and expense, unless the...

(English) User Guide - Lenovo S50-30
Page 22
... Lenovo hardware. The manual installation function can only be used after the software has been installed. Follow the on the computer. 2. After starting the operating system. Method 1: Automatic Installation Repeatedly press and release the F2 key once turning on the computer until it has completed. User Guide 17 Do not install software which is already installed on -screen prompts to install the Lenovo drivers and applications. Method 2: Manual Installation In the Windows system, Select Driver...
... Lenovo hardware. The manual installation function can only be used after the software has been installed. Follow the on the computer. 2. After starting the operating system. Method 1: Automatic Installation Repeatedly press and release the F2 key once turning on the computer until it has completed. User Guide 17 Do not install software which is already installed on -screen prompts to install the Lenovo drivers and applications. Method 2: Manual Installation In the Windows system, Select Driver...

(English) User Guide - Lenovo S50-30
Page 25
... problem, contact Lenovo Customer Service. Troubleshooting Display Problems Problem: Blank screen or no image is properly connected. • If an error message appears on the monitor. Problem: You need to : • Change the desktop background • Select a screen saver • Select Windows color options for borders and taskbar • Select a themes 3. Make sure the power cord is plugged into your computer: • If you added or removed a part before the problem started, review the installation procedures to change the display property settings...
... problem, contact Lenovo Customer Service. Troubleshooting Display Problems Problem: Blank screen or no image is properly connected. • If an error message appears on the monitor. Problem: You need to : • Change the desktop background • Select a screen saver • Select Windows color options for borders and taskbar • Select a themes 3. Make sure the power cord is plugged into your computer: • If you added or removed a part before the problem started, review the installation procedures to change the display property settings...

(English) User Guide - Lenovo S50-30
Page 26
... Settings Charm or click the arrow on screen. User Guide 21 If the problem persists, contact Lenovo Service. Troubleshooting Audio Problems Problem: No sound from the speakers is not muted. Troubleshooting and problem resolution: • Check the headphone cable connection - Ensure that the volume is turned up and the sound is securely inserted into the headphone connector. • Adjust the Windows volume control - Troubleshooting and problem resolution: • Adjust the Windows volume control - sound from the integrated speakers...
... Settings Charm or click the arrow on screen. User Guide 21 If the problem persists, contact Lenovo Service. Troubleshooting Audio Problems Problem: No sound from the speakers is not muted. Troubleshooting and problem resolution: • Check the headphone cable connection - Ensure that the volume is turned up and the sound is securely inserted into the headphone connector. • Adjust the Windows volume control - Troubleshooting and problem resolution: • Adjust the Windows volume control - sound from the integrated speakers...

(English) User Guide - Lenovo S50-30
Page 29
... the Windows Help and Support file on your computer. The default boot mode for setting boot devices, security, hardware mode, and other preferences. The BIOS setup utility is the BIOS setup utility? Shut down the computer. 2. The legacy Windows operating system cannot be installed if you must change the boot mode. 24 User Guide To open the Windows Help and Support file, do I change the boot mode, start the BIOS setup utility? To change the boot mode? To start the Setup Utility program. You can I need to install a legacy Windows operating system (any operating system...
... the Windows Help and Support file on your computer. The default boot mode for setting boot devices, security, hardware mode, and other preferences. The BIOS setup utility is the BIOS setup utility? Shut down the computer. 2. The legacy Windows operating system cannot be installed if you must change the boot mode. 24 User Guide To open the Windows Help and Support file, do I change the boot mode, start the BIOS setup utility? To change the boot mode? To start the Setup Utility program. You can I need to install a legacy Windows operating system (any operating system...

(English) User Guide - Lenovo S50-30
Page 33
... manual applies only to the Hardware Maintenance Manual (HMM) for parts ordering information. It is intended to as trained service personnel who are replacing Field Replaceable Units (FRUs). This guide contains procedures for replacing the following parts: • Frame stand • Monitor stand • Hard disk drive • Optical drive Safety information for replacing CRUs Do not open your computer. If you no longer have a TV-Tuner card installed. Note: Use only parts...
... manual applies only to the Hardware Maintenance Manual (HMM) for parts ordering information. It is intended to as trained service personnel who are replacing Field Replaceable Units (FRUs). This guide contains procedures for replacing the following parts: • Frame stand • Monitor stand • Hard disk drive • Optical drive Safety information for replacing CRUs Do not open your computer. If you no longer have a TV-Tuner card installed. Note: Use only parts...

(English) User Guide - Lenovo S50-30
Page 46
... to instructions and requirements in the manuals included with your computer. For the configuration of the computer that you purchase.You are responsible if you fail to operate the product according to contact us about the manuals included with your computer before you install and use Lenovo's products appropriately. The software interface and function and hardware configuration described in the manuals included...
... to instructions and requirements in the manuals included with your computer. For the configuration of the computer that you purchase.You are responsible if you fail to operate the product according to contact us about the manuals included with your computer before you install and use Lenovo's products appropriately. The software interface and function and hardware configuration described in the manuals included...

Lenovo S50-30 All-In-One PC Hardware Maintenance Manual
Page 5
... 4. Symptom-to-FRU Index . . 19 Hard disk drive boot error 19 Power Supply Problems 19 POST error codes 20 Undetermined problems 20 Chapter 7. Additional Service Information 57 © Copyright Lenovo 2015, 2015 iii Locations 21 Chapter 8. General Checkout . . . . . 11 Chapter 5. Using the Setup Utility. . . 13 Starting the Lenovo BIOS Setup Utility program . 13 Viewing and changing settings 13 Using passwords 13 Enabling or disabling a device 15 Selecting a startup device 16 Changing booting mode 17 Exiting the Lenovo BIOS Setup Utility program . . 17 Chapter 6. Safety...
... 4. Symptom-to-FRU Index . . 19 Hard disk drive boot error 19 Power Supply Problems 19 POST error codes 20 Undetermined problems 20 Chapter 7. Additional Service Information 57 © Copyright Lenovo 2015, 2015 iii Locations 21 Chapter 8. General Checkout . . . . . 11 Chapter 5. Using the Setup Utility. . . 13 Starting the Lenovo BIOS Setup Utility program . 13 Viewing and changing settings 13 Using passwords 13 Enabling or disabling a device 15 Selecting a startup device 16 Changing booting mode 17 Exiting the Lenovo BIOS Setup Utility program . . 17 Chapter 6. Safety...

Lenovo S50-30 All-In-One PC Hardware Maintenance Manual
Page 12
... electrical storm. • Connect all power cords to a properly wired and grounded electrical outlet. • Connect any equipment when there is insulative and retains a charge even when you open the device covers, unless instructed otherwise in the installation and configuration procedures. • Connect and disconnect cables as described in the language of the AC plug on a double-insulated or battery-operated system. Use an ESD common...
... electrical storm. • Connect all power cords to a properly wired and grounded electrical outlet. • Connect any equipment when there is insulative and retains a charge even when you open the device covers, unless instructed otherwise in the installation and configuration procedures. • Connect and disconnect cables as described in the language of the AC plug on a double-insulated or battery-operated system. Use an ESD common...

Lenovo S50-30 All-In-One PC Hardware Maintenance Manual
Page 19
... settings in the Lenovo BIOS Setup Utility program menu. You must use your computer, regardless of your computer. However, the operating system settings might override any passwords to set passwords, read the following : 1. We suggest that cannot be displayed until you start the Lenovo BIOS Setup Utility program, do not have to 16 characters (a-z and 0-9). Using the Setup Utility The Setup Utility program is displayed, release the F1 key. Viewing and changing settings System configuration options are listed in the Setup Utility...
... settings in the Lenovo BIOS Setup Utility program menu. You must use your computer, regardless of your computer. However, the operating system settings might override any passwords to set passwords, read the following : 1. We suggest that cannot be displayed until you start the Lenovo BIOS Setup Utility program, do not have to 16 characters (a-z and 0-9). Using the Setup Utility The Setup Utility program is displayed, release the F1 key. Viewing and changing settings System configuration options are listed in the Setup Utility...
Lenovo S50-30 All-In-One PC Hardware Maintenance Manual
Page 20
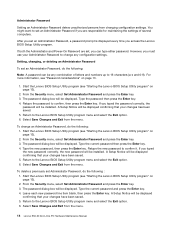
... Password and press the Enter key. 3. If you access the Lenovo BIOS Setup Utility program. The password dialog box will be installed. However, you typed the password correctly, the password will be any configuration settings. From the Security menu, select Set Administrator Password and press the Enter key. 3. If you must use your changes has been saved. 5. Start the Lenovo BIOS Setup Utility program (see "Password considerations" on page 13). 2. Leave each new password line item blank, then press the Enter key. Setting, changing...
... Password and press the Enter key. 3. If you access the Lenovo BIOS Setup Utility program. The password dialog box will be installed. However, you typed the password correctly, the password will be any configuration settings. From the Security menu, select Set Administrator Password and press the Enter key. 3. If you must use your changes has been saved. 5. Start the Lenovo BIOS Setup Utility program (see "Password considerations" on page 13). 2. Leave each new password line item blank, then press the Enter key. Setting, changing...
Lenovo S50-30 All-In-One PC Hardware Maintenance Manual
Page 22
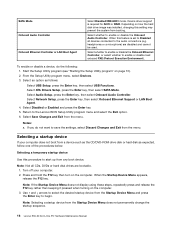
... Network Setup, press the Enter key, then select Onboard Ethernet Support or LAN Boot Agent. 4. Selecting a startup device If your computer. 2. Turn off your computer does not boot from the Startup Device Menu and press the Enter key to enable or disable the Onboard Audio Controller. When the Startup Device Menu appears, release the F12 key. Select ATA Drivers Setup, press the Enter key, then select SATA Mode. Note: Selecting a startup device from the menu. Start the Setup Utility program (see "Starting the Setup Utility program" on how the hard disk drive image was installed, changing...
... Network Setup, press the Enter key, then select Onboard Ethernet Support or LAN Boot Agent. 4. Selecting a startup device If your computer. 2. Turn off your computer does not boot from the Startup Device Menu and press the Enter key to enable or disable the Onboard Audio Controller. When the Startup Device Menu appears, release the F12 key. Select ATA Drivers Setup, press the Enter key, then select SATA Mode. Note: Selecting a startup device from the menu. Start the Setup Utility program (see "Starting the Setup Utility program" on how the hard disk drive image was installed, changing...

Lenovo S50-30 All-In-One PC Hardware Maintenance Manual
Page 23
... Startup option. 3. If you must change the boot mode. The default boot mode for your computer, you have to the Lenovo BIOS Setup Utility program menu and select the Exit option. 6. If you need to install a legacy Windows operating system (any operating system before Windows 8) on page 13). 2. You might have changed these settings and want to Legacy support. When the Reset Without Saving window shows, select the Yes button, and then press the Enter key to move a device...
... Startup option. 3. If you must change the boot mode. The default boot mode for your computer, you have to the Lenovo BIOS Setup Utility program menu and select the Exit option. 6. If you need to install a legacy Windows operating system (any operating system before Windows 8) on page 13). 2. You might have changed these settings and want to Legacy support. When the Reset Without Saving window shows, select the Yes button, and then press the Enter key to move a device...
Lenovo S50-30 All-In-One PC Hardware Maintenance Manual
Page 26
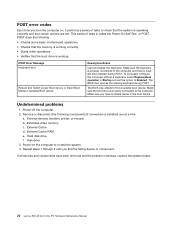
... problem continues, replace the system board. 20 Lenovo S50-30 All-In-One PC Hardware Maintenance Manual Make sure the boot drive is operating correctly and that no keys are set the option to the computer. a. This series of tests to check that the system is properly connected to Enabled. Remove or disconnect the following : • Checks some basic motherboard operations • Checks that the memory is working POST Error Message Keyboard error Reboot and Select proper Boot device or Insert Boot Media...
... problem continues, replace the system board. 20 Lenovo S50-30 All-In-One PC Hardware Maintenance Manual Make sure the boot drive is operating correctly and that no keys are set the option to the computer. a. This series of tests to check that the system is properly connected to Enabled. Remove or disconnect the following : • Checks some basic motherboard operations • Checks that the memory is working POST Error Message Keyboard error Reboot and Select proper Boot device or Insert Boot Media...

Lenovo S50-30 All-In-One PC Hardware Maintenance Manual
Page 52
... bracket". Refer to "Replacing the optical disk". Lenovo recommends that are connected to the computer. This includes power cords, input/output (I/O) cables, and any media (disks, CDs, DVDs, or memory cards) from electrical outlets. Refer to "Replacing the camera". 46 Lenovo S50-30 All-In-One PC Hardware Maintenance Manual Step 12. Remove the speaker system. Refer to "Replacing the converter". Remove the button board. To replace the LED panel: Step 1. Step 2. Refer to "Replacing the motherboard". Refer to "Left...
... bracket". Refer to "Replacing the optical disk". Lenovo recommends that are connected to the computer. This includes power cords, input/output (I/O) cables, and any media (disks, CDs, DVDs, or memory cards) from electrical outlets. Refer to "Replacing the camera". 46 Lenovo S50-30 All-In-One PC Hardware Maintenance Manual Step 12. Remove the speaker system. Refer to "Replacing the converter". Remove the button board. To replace the LED panel: Step 1. Step 2. Refer to "Replacing the motherboard". Refer to "Left...


