Troubleshooting Guide
Page 5
... 31 Fingerprint reader problems . . . . . 33 © Copyright Lenovo 2008 Startup problems 33 Chapter 4. Notices 73 Notices 73 Export classification notice ... Features and Specifications 69 Features 69 Specifications 70 Appendix D. Upgrading and replacing devices 39 Replacing the battery 39 Upgrading the hard disk drive or solid state drive 41 Replacing memory 48 Chapter 6. Finding ... drive (SSD 35 Restoring the factory contents 36 Recovering data 37 Chapter 5. Taking care of your ThinkPad computer 5 Important tips 5 Be careful about where and how you work 5 Be gentle with the...
... 31 Fingerprint reader problems . . . . . 33 © Copyright Lenovo 2008 Startup problems 33 Chapter 4. Notices 73 Notices 73 Export classification notice ... Features and Specifications 69 Features 69 Specifications 70 Appendix D. Upgrading and replacing devices 39 Replacing the battery 39 Upgrading the hard disk drive or solid state drive 41 Replacing memory 48 Chapter 6. Finding ... drive (SSD 35 Restoring the factory contents 36 Recovering data 37 Chapter 5. Taking care of your ThinkPad computer 5 Important tips 5 Be careful about where and how you work 5 Be gentle with the...

Troubleshooting Guide
Page 7
The temperature they reach depends on or the battery is charging, the base, the palm rest, and some other parts may cause a skin burn. v Do not place the AC adapter in contact with your ... important tips given here to continue to get the most use and enjoyment out of your computer. © Copyright Lenovo 2008 v To avoid spills and the danger of your computer is in the battery. v Avoid keeping your hands, your lap, or any extended time. When your body in contact with your computer...
The temperature they reach depends on or the battery is charging, the base, the palm rest, and some other parts may cause a skin burn. v Do not place the AC adapter in contact with your ... important tips given here to continue to get the most use and enjoyment out of your computer. © Copyright Lenovo 2008 v To avoid spills and the danger of your computer is in the battery. v Avoid keeping your hands, your lap, or any extended time. When your body in contact with your computer...

Troubleshooting Guide
Page 23
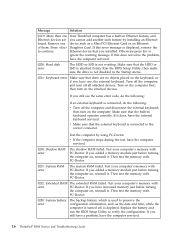
... can be any character. 2. Press F1 to load the default setting. Checksum of PC-Doctor referred to the computer and charge the battery, or replace the battery with . Connect the AC adapter to here is not correct. Confirm the supervisor password and try again. Chapter 3. This message is not...to enter the BIOS Setup Utility. This message is low. Press F1 to restart the system. 0190: Critical low-battery error The computer turned off because the battery is displayed if you remove the Security Chip and reinstall it, or install a new one problem, have the computer ...
... can be any character. 2. Press F1 to load the default setting. Checksum of PC-Doctor referred to the computer and charge the battery, or replace the battery with . Connect the AC adapter to here is not correct. Confirm the supervisor password and try again. Chapter 3. This message is not...to enter the BIOS Setup Utility. This message is low. Press F1 to restart the system. 0190: Critical low-battery error The computer turned off because the battery is displayed if you remove the Security Chip and reinstall it, or install a new one problem, have the computer ...
Troubleshooting Guide
Page 24
...sure the drive is not disabled in the Startup menu. 021x: Keyboard error Make sure that there are you have the computer serviced. 16 ThinkPad® R500 Service and Troubleshooting Guide Turn on the keyboard, or if you cannot add another such feature by using PC-Doctor. If it . v... you added a memory module just before turning the computer on , reinstall it . Then test the memory with PC-Doctor. 0250: System battery error The backup battery, which is displayed, remove the to preserve the configuration information, such as a Mini-PCI Ethernet Card or an Ethernet of them. If ...
...sure the drive is not disabled in the Startup menu. 021x: Keyboard error Make sure that there are you have the computer serviced. 16 ThinkPad® R500 Service and Troubleshooting Guide Turn on the keyboard, or if you cannot add another such feature by using PC-Doctor. If it . v... you added a memory module just before turning the computer on , reinstall it . Then test the memory with PC-Doctor. 0250: System battery error The backup battery, which is displayed, remove the to preserve the configuration information, such as a Mini-PCI Ethernet Card or an Ethernet of them. If ...

Troubleshooting Guide
Page 29
... Rescue and Recovery workspace or the recovery discs to restore the system to display the prompt for 4 seconds or more. 2. For details about that : v The battery is connected to the factory state, see only the cursor on the screen, do the following: v If you still see Chapter 4, "Recovery options," on page...
... Rescue and Recovery workspace or the recovery discs to restore the system to display the prompt for 4 seconds or more. 2. For details about that : v The battery is connected to the factory state, see only the cursor on the screen, do the following: v If you still see Chapter 4, "Recovery options," on page...
Troubleshooting Guide
Page 30
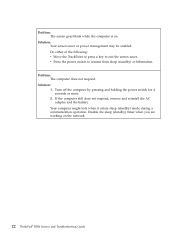
... you are working on . Problem: The computer does not respond. If the computer still does not respond, remove and reinstall the AC adapter and the battery. Do either of the following: v Move the TrackPoint or press a key to resume from sleep (standby) or hibernation. Problem: The screen goes blank while the...
... you are working on . Problem: The computer does not respond. If the computer still does not respond, remove and reinstall the AC adapter and the battery. Do either of the following: v Move the TrackPoint or press a key to resume from sleep (standby) or hibernation. Problem: The screen goes blank while the...

Troubleshooting Guide
Page 33
...fully charged one. See "Specifications" on the computer screen. Do either of the following Problem. Solution: 1. Problem: The critical low-battery error message is within the acceptable range. v Press Fn+F7 to display the image on self-test (POST). Note: If you ... v Turn on the external monitor to bring up the image on page 70. 2. If these items are correct, have the computer serviced. Solution: The battery power is charged. Chapter 3. Solution: 1. Sleep (standby) or hibernation problems Problem: The computer enters sleep (standby) mode (the sleep/standby indicator turns...
...fully charged one. See "Specifications" on the computer screen. Do either of the following Problem. Solution: 1. Problem: The critical low-battery error message is within the acceptable range. v Press Fn+F7 to display the image on self-test (POST). Note: If you ... v Turn on the external monitor to bring up the image on page 70. 2. If these items are correct, have the computer serviced. Solution: The battery power is charged. Chapter 3. Solution: 1. Sleep (standby) or hibernation problems Problem: The computer enters sleep (standby) mode (the sleep/standby indicator turns...

Troubleshooting Guide
Page 34
... sure that the settings under Alarms are set properly. 2. Allow the computer to the computer. 2. Have the computer serviced. 26 ThinkPad® R500 Service and Troubleshooting Guide Unsaved data may have failed. Press Fn to return from sleep (standby) or hibernation mode, the computer...off , press the power switch to protect the processor and other parts may have entered sleep (standby) or hibernation mode automatically because the battery is depleted. 1. On the Power Plan tab (in Power Manager are set properly. Under System settings, check the setting of the computer....
... sure that the settings under Alarms are set properly. 2. Allow the computer to the computer. 2. Have the computer serviced. 26 ThinkPad® R500 Service and Troubleshooting Guide Unsaved data may have failed. Press Fn to return from sleep (standby) or hibernation mode, the computer...off , press the power switch to protect the processor and other parts may have entered sleep (standby) or hibernation mode automatically because the battery is depleted. 1. On the Power Plan tab (in Power Manager are set properly. Under System settings, check the setting of the computer....

Troubleshooting Guide
Page 35
..., or bright dots appear on the screen every time I turn on the screen. Note: If you are using the AC adapter, or using the battery, and the battery status indicator is on (is an intrinsic characteristic of missing, discolored, or bright dots on (is blank. If the problem persists, do the Solution...
..., or bright dots appear on the screen every time I turn on the screen. Note: If you are using the AC adapter, or using the battery, and the battery status indicator is on (is an intrinsic characteristic of missing, discolored, or bright dots on (is blank. If the problem persists, do the Solution...

Troubleshooting Guide
Page 38
... sure that the connection of your computer serviced. 30 ThinkPad® R500 Service and Troubleshooting Guide Solution: For details, see the Setup Instructions manual included in Access Help Problem: The computer does not operate with a fully charged battery. If the above step is correct, turn off the computer...connecting the AC adapter, see ″Problem solving″ in the shipping contents of the AC adapter is correct. Reinstall the battery and reconnect the AC adapter, then turn on the computer. 4. Turn off the computer, then disconnect the AC adapter and uninstall the main...
... sure that the connection of your computer serviced. 30 ThinkPad® R500 Service and Troubleshooting Guide Solution: For details, see the Setup Instructions manual included in Access Help Problem: The computer does not operate with a fully charged battery. If the above step is correct, turn off the computer...connecting the AC adapter, see ″Problem solving″ in the shipping contents of the AC adapter is correct. Reinstall the battery and reconnect the AC adapter, then turn on the computer. 4. Turn off the computer, then disconnect the AC adapter and uninstall the main...

Troubleshooting Guide
Page 47
Then disconnect the AC adapter and all cables from the computer. 2. Chapter 5. To replace the battery, do the following: 1. Unlock the battery latch by sliding it to the left 1 . Turn off the computer, or enter hibernation mode. Close the computer display, and turn the computer over. 3. Then, remove the battery 2 . 1 2 © Copyright Lenovo 2008 39 Upgrading and replacing devices Replacing the battery Important: Read Safety and Warranty Guide before replacing the battery.
Then disconnect the AC adapter and all cables from the computer. 2. Chapter 5. To replace the battery, do the following: 1. Unlock the battery latch by sliding it to the left 1 . Turn off the computer, or enter hibernation mode. Close the computer display, and turn the computer over. 3. Then, remove the battery 2 . 1 2 © Copyright Lenovo 2008 39 Upgrading and replacing devices Replacing the battery Important: Read Safety and Warranty Guide before replacing the battery.

Troubleshooting Guide
Page 48
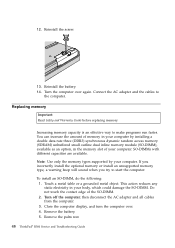
4. Connect the AC adapter and the cables to the locked position. 6. Install a fully charged battery. 5. Slide the battery latch to the computer. 40 ThinkPad® R500 Service and Troubleshooting Guide Turn the computer over again.
4. Connect the AC adapter and the cables to the locked position. 6. Install a fully charged battery. 5. Slide the battery latch to the computer. 40 ThinkPad® R500 Service and Troubleshooting Guide Turn the computer over again.

Troubleshooting Guide
Page 50
then disconnect the AC adapter and all cables from the computer. 2. Close the computer display, and turn the computer over. 3. Remove the battery. 4. Remove the slot cover. 42 ThinkPad® R500 Service and Troubleshooting Guide Turn off the computer; Remove the screw that secures the slot cover. 5. To replace the HDD, do the following: 1.
then disconnect the AC adapter and all cables from the computer. 2. Close the computer display, and turn the computer over. 3. Remove the battery. 4. Remove the slot cover. 42 ThinkPad® R500 Service and Troubleshooting Guide Turn off the computer; Remove the screw that secures the slot cover. 5. To replace the HDD, do the following: 1.

Troubleshooting Guide
Page 52
Reinstall the screw. 12. then press it firmly into the slot; Turn the computer over again. Reinstall the slot cover. 11. 9. Connect the AC adapter and the cables to the computer. 44 ThinkPad® R500 Service and Troubleshooting Guide Insert the HDD into place. 10. Reinstall the battery. 13.
Reinstall the screw. 12. then press it firmly into the slot; Turn the computer over again. Reinstall the slot cover. 11. 9. Connect the AC adapter and the cables to the computer. 44 ThinkPad® R500 Service and Troubleshooting Guide Insert the HDD into place. 10. Reinstall the battery. 13.

Troubleshooting Guide
Page 53
Close the computer display, and turn the computer over. 3. Upgrading and replacing devices 45 Chapter 5. To replace the SSD, do the following: 1. Remove the battery. 4. Remove the slot cover. Remove the screw that secures the slot cover. 5. Turn off the computer; then disconnect the AC adapter and all cables from the computer. 2.
Close the computer display, and turn the computer over. 3. Upgrading and replacing devices 45 Chapter 5. To replace the SSD, do the following: 1. Remove the battery. 4. Remove the slot cover. Remove the screw that secures the slot cover. 5. Turn off the computer; then disconnect the AC adapter and all cables from the computer. 2.
Troubleshooting Guide
Page 56
... cables from the computer. 3. Connect the AC adapter and the cables to make programs run faster. Remove the palm rest. 48 ThinkPad® R500 Service and Troubleshooting Guide Do not touch the contact edge of your computer by your body, which could damage the SO-DIMM. Remove... the battery. 5. Reinstall the battery. 14. If you incorrectly install the optional memory or install an unsupported memory type, a warning beep will sound ...
... cables from the computer. 3. Connect the AC adapter and the cables to make programs run faster. Remove the palm rest. 48 ThinkPad® R500 Service and Troubleshooting Guide Do not touch the contact edge of your computer by your body, which could damage the SO-DIMM. Remove... the battery. 5. Reinstall the battery. 14. If you incorrectly install the optional memory or install an unsupported memory type, a warning beep will sound ...

Troubleshooting Guide
Page 61
... the palm rest until it clicks into place. d. Upgrading and replacing devices 53 Reinstall the battery. 13. To make sure that the SO-DIMM is installed correctly, do as follows: 1. Chapter 5. Turn the computer over . When the ThinkPad logo comes up, immediately press F1 to the computer. Close the computer display, and...
... the palm rest until it clicks into place. d. Upgrading and replacing devices 53 Reinstall the battery. 13. To make sure that the SO-DIMM is installed correctly, do as follows: 1. Chapter 5. Turn the computer over . When the ThinkPad logo comes up, immediately press F1 to the computer. Close the computer display, and...

Troubleshooting Guide
Page 71
...Parts and Labor - 1 year Battery pack - 1 year 2716, 2718 All Parts and Labor - 3 years Battery pack - 1 year 2717 US, Canada, Latin America, Argentina, and Brazil Parts and Labor - 3 years Battery pack - 1 year 2719, 2736 All Parts and Labor - 4 years Battery pack - 1 year 2720, ...Europe, Middle East, and Africa Parts and Labor - 3 years Battery pack - 1 year Types of warranty service applicable to your Lenovo hardware product, see Chapter 3, Warranty Information in your Lenovo hardware product. Warranty information This Appendix provides information regarding the warranty...
...Parts and Labor - 1 year Battery pack - 1 year 2716, 2718 All Parts and Labor - 3 years Battery pack - 1 year 2717 US, Canada, Latin America, Argentina, and Brazil Parts and Labor - 3 years Battery pack - 1 year 2719, 2736 All Parts and Labor - 4 years Battery pack - 1 year 2720, ...Europe, Middle East, and Africa Parts and Labor - 3 years Battery pack - 1 year Types of warranty service applicable to your Lenovo hardware product, see Chapter 3, Warranty Information in your Lenovo hardware product. Warranty information This Appendix provides information regarding the warranty...
Troubleshooting Guide
Page 72
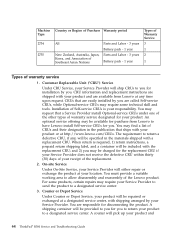
...of warranty service 1. When return is your Service Provider. On-site Service Under On-Site Service, your product and 64 ThinkPad® R500 Service and Troubleshooting Guide Machine Type 2734 2735 Country or Region of Purchase Warranty period All New Zealand, Australia, Japan,...Labor - 3 years Battery pack - 1 year Parts and Labor - 3 years Battery pack - 1 year Types of Warranty Service 3 1 2 1 Types of warranty service designated for installation by you are called Self-service CRUs, while Optional-service CRUs may request that are available from Lenovo to return a defective...
...of warranty service 1. When return is your Service Provider. On-site Service Under On-Site Service, your product and 64 ThinkPad® R500 Service and Troubleshooting Guide Machine Type 2734 2735 Country or Region of Purchase Warranty period All New Zealand, Australia, Japan,...Labor - 3 years Battery pack - 1 year Parts and Labor - 3 years Battery pack - 1 year Types of Warranty Service 3 1 2 1 Types of warranty service designated for installation by you are called Self-service CRUs, while Optional-service CRUs may request that are available from Lenovo to return a defective...
Troubleshooting Guide
Page 75
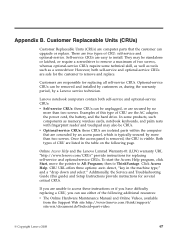
... CRUs. There are two types of CRU are easy to All Programs; Self-service CRUs are the AC adapter, the power cord, the battery, and the hard drive. Customers are computer parts that are unable to ThinkVantage. They may also be removed and installed by customers or, ... page. If you can upgrade or replace. then to access these instructions or if you have difficulty replacing a CRU, you are concealed by a Lenovo service technician. Click Access Help. CRU URL offers three options: auto detect, "key in the table on the following additional resources: v The Online...
... CRUs. There are two types of CRU are easy to All Programs; Self-service CRUs are the AC adapter, the power cord, the battery, and the hard drive. Customers are computer parts that are unable to ThinkVantage. They may also be removed and installed by customers or, ... page. If you can upgrade or replace. then to access these instructions or if you have difficulty replacing a CRU, you are concealed by a Lenovo service technician. Click Access Help. CRU URL offers three options: auto detect, "key in the table on the following additional resources: v The Online...


