Troubleshooting Guide
Page 5
... Appendix A. Solving computer problems . . 11 Frequently asked questions 11 Entering the BIOS Setup Utility . . . . . 12 Diagnosing problems 13 HDD diagnostic program ... 31 Fingerprint reader problems . . . . . 33 © Copyright Lenovo 2008 Startup problems 33 Chapter 4. Upgrading and replacing devices 39 Replacing the ... 6 Connect the internal modem correctly . . . 6 Handle storage media and drives properly 6 Be sure not to modify your ThinkPad computer 5 Important tips 5 Be careful about where and how you work 5 Be gentle with the ThinkVantage button 2 Additional information...
... Appendix A. Solving computer problems . . 11 Frequently asked questions 11 Entering the BIOS Setup Utility . . . . . 12 Diagnosing problems 13 HDD diagnostic program ... 31 Fingerprint reader problems . . . . . 33 © Copyright Lenovo 2008 Startup problems 33 Chapter 4. Upgrading and replacing devices 39 Replacing the ... 6 Connect the internal modem correctly . . . 6 Handle storage media and drives properly 6 Be sure not to modify your ThinkPad computer 5 Important tips 5 Be careful about where and how you work 5 Be gentle with the ThinkVantage button 2 Additional information...

Troubleshooting Guide
Page 11
... the integrated fingerprint reader is disabled and you must take your computer to Security, and press Enter. Using the cursor keys, move to a Lenovo reseller or a marketing representative. Note your computer off and then on your passwords, you cannot use it , do as follows: 1. Additional... information for I /O Port Access submenu opens. 6. The BIOS Setup Utility opens. 4. If you forget your computer. By default, the integrated fingerprint reader is displayed, press the F1 key. Save all ...
... the integrated fingerprint reader is disabled and you must take your computer to Security, and press Enter. Using the cursor keys, move to a Lenovo reseller or a marketing representative. Note your computer off and then on your passwords, you cannot use it , do as follows: 1. Additional... information for I /O Port Access submenu opens. 6. The BIOS Setup Utility opens. 4. If you forget your computer. By default, the integrated fingerprint reader is displayed, press the F1 key. Save all ...
Troubleshooting Guide
Page 20
...Time: Set the date and time. To enter the BIOS Setup Utility, do as of the time of data, back up , immediately press F1 to an item you want to load the default settings or discard the changes. 12 ThinkPad® R500 Service and Troubleshooting Guide If you have set a supervisor... password, the BIOS Setup Utility menu appears after you wish to change the parameters that enables you reach the...
...Time: Set the date and time. To enter the BIOS Setup Utility, do as of the time of data, back up , immediately press F1 to an item you want to load the default settings or discard the changes. 12 ThinkPad® R500 Service and Troubleshooting Guide If you have set a supervisor... password, the BIOS Setup Utility menu appears after you wish to change the parameters that enables you reach the...

Troubleshooting Guide
Page 21
...using PC-Doctor® for Windows. 3. Chapter 3. do as follows: 1. HDD diagnostic program If your computer; When the ThinkPad logo comes up to several minutes or longer. Diagnosing problems If you can rapidly provide information to PC-Doctor for Windows. For... Using cursor keys, select HDD diagnostic program and press Enter. Move the cursor to enter the BIOS Setup Utility. 3. To run the entire test; Solving computer problems 13 Lenovo Troubleshooting Center - Select Restart; Your computer restarts. When preparing to contact the Customer Support Center...
...using PC-Doctor® for Windows. 3. Chapter 3. do as follows: 1. HDD diagnostic program If your computer; When the ThinkPad logo comes up to several minutes or longer. Diagnosing problems If you can rapidly provide information to PC-Doctor for Windows. For... Using cursor keys, select HDD diagnostic program and press Enter. Move the cursor to enter the BIOS Setup Utility. 3. To run the entire test; Solving computer problems 13 Lenovo Troubleshooting Center - Select Restart; Your computer restarts. When preparing to contact the Customer Support Center...

Troubleshooting Guide
Page 23
... system configuration change requested. Confirm the supervisor password and try again. Solving computer problems 15 To clear the error, enter the BIOS Setup Utility. Enter BIOS Setup and load Setup defaults. Press F1 to ignore the warning message. Press F10 and then Enter to here is low. ...Confirm the operation and try again. Security password retry count exceeded. Otherwise, press modem devices are Esc to enter the BIOS Setup Utility. Press to load the default setting. This message is displayed if you remove the Security Chip and reinstall it, or install ...
... system configuration change requested. Confirm the supervisor password and try again. Solving computer problems 15 To clear the error, enter the BIOS Setup Utility. Enter BIOS Setup and load Setup defaults. Press F1 to ignore the warning message. Press F10 and then Enter to here is low. ...Confirm the operation and try again. Security password retry count exceeded. Otherwise, press modem devices are Esc to enter the BIOS Setup Utility. Press to load the default setting. This message is displayed if you remove the Security Chip and reinstall it, or install ...
Troubleshooting Guide
Page 24
...you cannot add another such feature by using PC-Doctor. Then test the memory with PC-Doctor. Replace the battery and run the BIOS Setup Utility to ignore the warning message. Otherwise press Esc to verify the configuration. Test the computer by installing an Ethernet found.... increased memory just before turning the computer on, reinstall it. If this does not solve the problem, have the computer serviced. 16 ThinkPad® R500 Service and Troubleshooting Guide Then test the memory with PC-Doctor. v Make sure that the built-in keyboard operates correctly. If you added...
...you cannot add another such feature by using PC-Doctor. Then test the memory with PC-Doctor. Replace the battery and run the BIOS Setup Utility to ignore the warning message. Otherwise press Esc to verify the configuration. Test the computer by installing an Ethernet found.... increased memory just before turning the computer on, reinstall it. If this does not solve the problem, have the computer serviced. 16 ThinkPad® R500 Service and Troubleshooting Guide Then test the memory with PC-Doctor. v Make sure that the built-in keyboard operates correctly. If you added...
Troubleshooting Guide
Page 25
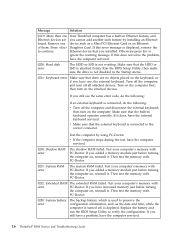
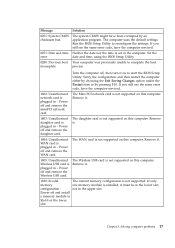
... Utility to complete the boot incomplete process. Set the error date and time, using the BIOS Setup Utility. 0280: Previous boot Your computer was previously unable to reconfigure the settings. then turn it . 1804: Unauthorized WAN card is not supported on ..., it . 1830: Invalid The current memory configuration is plugged in - The WAN card is plugged in - Power off and install a memory module to start the BIOS Setup Utility. The computer uses the default settings. Chapter 3. Power off and remove the Wireless USB card. If you still see the same error code...
... Utility to complete the boot incomplete process. Set the error date and time, using the BIOS Setup Utility. 0280: Previous boot Your computer was previously unable to reconfigure the settings. then turn it . 1804: Unauthorized WAN card is not supported on ..., it . 1830: Invalid The current memory configuration is plugged in - The WAN card is plugged in - Power off and install a memory module to start the BIOS Setup Utility. The computer uses the default settings. Chapter 3. Power off and remove the Wireless USB card. If you still see the same error code...
Troubleshooting Guide
Page 26
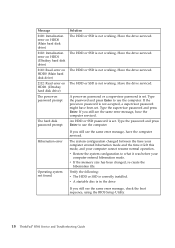
... password prompt Solution The HDD or SSD is in the drive If you still see the same error message, check the boot sequence, using the BIOS Setup Utility. 18 ThinkPad® R500 Service and Troubleshooting Guide The HDD or SSD is set .
... password prompt Solution The HDD or SSD is in the drive If you still see the same error message, check the boot sequence, using the BIOS Setup Utility. 18 ThinkPad® R500 Service and Troubleshooting Guide The HDD or SSD is set .
Troubleshooting Guide
Page 27
...to boot order. The Security Chip has a problem. Edit C:\CONFIG.SYS and change a line from any device. Message Solution EMM386 Not Installed - CardBus Enter the BIOS Setup Utility. Beep errors One short beep, pause, three short beeps, pause, three more short beeps, and one short beep One long and two short... beeps Four cycles of the device which you want to boot from boot order Open the BIOS Setup Utility and add the device to boot from . The system board has a problem. Cannot boot from device=C:\WINDOWS\EMM386.EXE RAM to Set ...
...to boot order. The Security Chip has a problem. Edit C:\CONFIG.SYS and change a line from any device. Message Solution EMM386 Not Installed - CardBus Enter the BIOS Setup Utility. Beep errors One short beep, pause, three short beeps, pause, three more short beeps, and one short beep One long and two short... beeps Four cycles of the device which you want to boot from boot order Open the BIOS Setup Utility and add the device to boot from . The system board has a problem. Cannot boot from device=C:\WINDOWS\EMM386.EXE RAM to Set ...

Troubleshooting Guide
Page 31
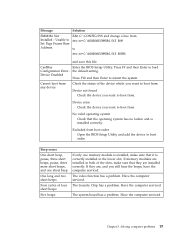
... proper connection. Check for your computer has been installed. 4. Verify that the latest BIOS for error messages during startup. You must take your computer to a Lenovo authorized servicer or a marketing representative to have the system board replaced. Proof of purchase... password or recover data from the service partition on password, you forget your hard disk password, a Lenovo authorized servicer cannot reset your computer to a Lenovo authorized servicer or a marketing representative to the instructions in your password. Follow the appropriate corrective actions for...
... proper connection. Check for your computer has been installed. 4. Verify that the latest BIOS for error messages during startup. You must take your computer to a Lenovo authorized servicer or a marketing representative to have the system board replaced. Proof of purchase... password or recover data from the service partition on password, you forget your hard disk password, a Lenovo authorized servicer cannot reset your computer to a Lenovo authorized servicer or a marketing representative to the instructions in your password. Follow the appropriate corrective actions for...

Troubleshooting Guide
Page 39
... sure that the password for the HDD or SSD in the Ultrabay. If you have set a hard disk password with Using Passphrase enabled in the BIOS Setup Utility, and want to use the HDD or SSD in the Ultrabay only if no hard disk password has been set. Hard disk drive...
... sure that the password for the HDD or SSD in the Ultrabay. If you have set a hard disk password with Using Passphrase enabled in the BIOS Setup Utility, and want to use the HDD or SSD in the Ultrabay only if no hard disk password has been set. Hard disk drive...
Troubleshooting Guide
Page 40
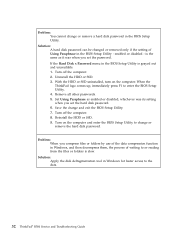
... the data compression function in Windows, and then decompress them, the process of Using Passphrase in Windows for faster access to enter the BIOS Setup Utility. 4. Uninstall the HDD or SSD. 3. Set Using Passphrase as it was its setting when you set the hard disk ...on the computer. Reinstall the HDD or SSD. 9. When the ThinkPad logo comes up, immediately press F1 to the data. 32 ThinkPad® R500 Service and Troubleshooting Guide Problem: You cannot change or remove a hard disk password in the BIOS Setup Utility is grayed out and unavailable: 1. Solution: A hard...
... the data compression function in Windows, and then decompress them, the process of Using Passphrase in Windows for faster access to enter the BIOS Setup Utility. 4. Uninstall the HDD or SSD. 3. Set Using Passphrase as it was its setting when you set the hard disk ...on the computer. Reinstall the HDD or SSD. 9. When the ThinkPad logo comes up, immediately press F1 to the data. 32 ThinkPad® R500 Service and Troubleshooting Guide Problem: You cannot change or remove a hard disk password in the BIOS Setup Utility is grayed out and unavailable: 1. Solution: A hard...

Troubleshooting Guide
Page 42
...the device that should start it can start up , immediately press F1 to start up the operating system. 6. Select Yes and press Enter. 34 ThinkPad® R500 Service and Troubleshooting Guide If the device is included in the ″Boot priority order″ list, do as follows: 1. To save the ... it up. Turn off the computer, and then turn it . 7. v The device is included in the BIOS Setup Utility. Configure the boot priority order to enable the device to enter the BIOS Setup Utility. 3. Problem: When you start up your computer, the operating system does not start up from boot...
...the device that should start it can start up , immediately press F1 to start up the operating system. 6. Select Yes and press Enter. 34 ThinkPad® R500 Service and Troubleshooting Guide If the device is included in the ″Boot priority order″ list, do as follows: 1. To save the ... it up. Turn off the computer, and then turn it . 7. v The device is included in the BIOS Setup Utility. Configure the boot priority order to enable the device to enter the BIOS Setup Utility. 3. Problem: When you start up your computer, the operating system does not start up from boot...

Troubleshooting Guide
Page 44
...be installed correctly, install the optical drive before any data is explained by the contents of the BIOS Setup Utility: 1. Click Full Restore and follow the instructions on again. 3. This will be restored... the storage drive appears to the same state as it on the screen. 36 ThinkPad® R500 Service and Troubleshooting Guide The length of time depends on the method you to restore... Restoring the factory contents The complete backup of all the files and programs that Lenovo preinstalled on your computer may have created or purchased, recovery takes at least five hours. ...
...be installed correctly, install the optical drive before any data is explained by the contents of the BIOS Setup Utility: 1. Click Full Restore and follow the instructions on again. 3. This will be restored... the storage drive appears to the same state as it on the screen. 36 ThinkPad® R500 Service and Troubleshooting Guide The length of time depends on the method you to restore... Restoring the factory contents The complete backup of all the files and programs that Lenovo preinstalled on your computer may have created or purchased, recovery takes at least five hours. ...

Troubleshooting Guide
Page 45
... program or the Rescue and Recovery workspace to restore the contents of the HDD or SSD to start it by using the discs in the BIOS Setup Utility the startup sequence is enclosed with your HDD model runs independently of the Windows operating system. After a short wait, the Rescue and Recovery...
... program or the Rescue and Recovery workspace to restore the contents of the HDD or SSD to start it by using the discs in the BIOS Setup Utility the startup sequence is enclosed with your HDD model runs independently of the Windows operating system. After a short wait, the Rescue and Recovery...

Troubleshooting Guide
Page 61
When the ThinkPad logo comes up, immediately press F1 to the computer. The "Installed memory" item shows the total amount of the palm rest until it clicks into ...: 1. d. Reinstall the battery. 13. Chapter 5. Close the computer display, and turn the computer over , and reconnect the AC adapter and the cables to enter the BIOS Setup Utility. 3. Push the front side of memory installed in your computer.
When the ThinkPad logo comes up, immediately press F1 to the computer. The "Installed memory" item shows the total amount of the palm rest until it clicks into ...: 1. d. Reinstall the battery. 13. Chapter 5. Close the computer display, and turn the computer over , and reconnect the AC adapter and the cables to enter the BIOS Setup Utility. 3. Push the front side of memory installed in your computer.
Troubleshooting Guide
Page 64
...warranted parts contain a 7-character identification in the format FRU XXXXXXX v Identification of software problem sources v Configuration of BIOS as part of this guide. When calling for technical assistance, please have downloaded the most current drivers and system ... operating systems (NOS) v Installation and maintenance of operation, 56 ThinkPad® R500 Service and Troubleshooting Guide If possible, be caused by Lenovo, will make your Lenovo hardware product. Please ensure that applies to your Lenovo hardware product, see Chapter 3, ″Warranty information″ in ...
...warranted parts contain a 7-character identification in the format FRU XXXXXXX v Identification of software problem sources v Configuration of BIOS as part of this guide. When calling for technical assistance, please have downloaded the most current drivers and system ... operating systems (NOS) v Installation and maintenance of operation, 56 ThinkPad® R500 Service and Troubleshooting Guide If possible, be caused by Lenovo, will make your Lenovo hardware product. Please ensure that applies to your Lenovo hardware product, see Chapter 3, ″Warranty information″ in ...
Troubleshooting Guide
Page 91
... AC adapter troubleshooting 30 Access Help 1, 11, 15 additional information for Access Help 3 B battery replacing 39 troubleshooting 30 BIOS Setup Utility 12 initializing 36 C carrying the computer 6 cleaning computer cover 8 computer display 8 keyboard 8 computer display cleaning...drives handling 6 E error messages troubleshooting 15 F factory contents restoring 36 features hardware 69 features and specifications 69 © Copyright Lenovo 2008 finding information 1 fingerprint reader caring for 7 troubleshooting 33 frequently asked questions 11 H hard disk drive diagnosing 13 troubleshooting ...
... AC adapter troubleshooting 30 Access Help 1, 11, 15 additional information for Access Help 3 B battery replacing 39 troubleshooting 30 BIOS Setup Utility 12 initializing 36 C carrying the computer 6 cleaning computer cover 8 computer display 8 keyboard 8 computer display cleaning...drives handling 6 E error messages troubleshooting 15 F factory contents restoring 36 features hardware 69 features and specifications 69 © Copyright Lenovo 2008 finding information 1 fingerprint reader caring for 7 troubleshooting 33 frequently asked questions 11 H hard disk drive diagnosing 13 troubleshooting ...


