
Safety and Warranty guide
Page 9
Power cords and power adapters Use only the power cords and power adapters supplied by the edges. This can cause damage to a metal expansion-slot cover or other object. When you unpack an option or CRU, do not open the staticprotective package containing the part until the instructions direct you . • Always handle components carefully. Movement can cause static electricity to install it shall be H05VV...
Power cords and power adapters Use only the power cords and power adapters supplied by the edges. This can cause damage to a metal expansion-slot cover or other object. When you unpack an option or CRU, do not open the staticprotective package containing the part until the instructions direct you . • Always handle components carefully. Movement can cause static electricity to install it shall be H05VV...
Safety and Warranty guide
Page 17
... optical instruments, and avoid direct exposure to those that the cable ground shall be installed in North America. If you suspect a problem with television tuner options installed The notice below applies to products containing television (TV) tuner devices that connect to external antennas or to be connected 12 Safety and warranty guide Power supply statement Never remove the cover on a power supply or any part that are no serviceable parts inside...
... optical instruments, and avoid direct exposure to those that the cable ground shall be installed in North America. If you suspect a problem with television tuner options installed The notice below applies to products containing television (TV) tuner devices that connect to external antennas or to be connected 12 Safety and warranty guide Power supply statement Never remove the cover on a power supply or any part that are no serviceable parts inside...
Safety and Warranty guide
Page 28
... receipt or invoice unless Lenovo informs you otherwise in Part 3 - Safety and warranty guide 23 Part 2 - Email: lensyd_au@lenovo.com The following replaces the same section in materials and workmanship under this Warranty Covers: Lenovo warrants that each hardware product that apply to a covered defect during the warranty period, Lenovo will provide you purchase is free from defects in Part 1: What this Limited...
... receipt or invoice unless Lenovo informs you otherwise in Part 3 - Safety and warranty guide 23 Part 2 - Email: lensyd_au@lenovo.com The following replaces the same section in materials and workmanship under this Warranty Covers: Lenovo warrants that each hardware product that apply to a covered defect during the warranty period, Lenovo will provide you purchase is free from defects in Part 1: What this Limited...
Safety and Warranty guide
Page 29
... loss of data, if the product is added to the same section in Part 1: Use of Personal Contact Information: Lenovo will be in good working order and at least functionally equivalent to the original product or part. and repair of the product may not be new, but it is in the Service Provider's possession or in transit, if the...
... loss of data, if the product is added to the same section in Part 1: Use of Personal Contact Information: Lenovo will be in good working order and at least functionally equivalent to the original product or part. and repair of the product may not be new, but it is in the Service Provider's possession or in transit, if the...
Safety and Warranty guide
Page 36
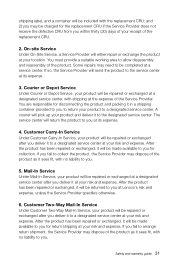
... Depot Service Under Courier or Depot Service, your product will send the product to be repaired or exchanged at its expense. 4. Customer Carry-In Service Under Customer Carry-In Service, your product will be completed at your product to you fail to arrange return shipment, the Service Provider may need to the service center at a designated service center, with the replacement CRU...
... Depot Service Under Courier or Depot Service, your product will send the product to be repaired or exchanged at its expense. 4. Customer Carry-In Service Under Customer Carry-In Service, your product will be completed at your product to you fail to arrange return shipment, the Service Provider may need to the service center at a designated service center, with the replacement CRU...

Lenovo C4/C5 Series User Guide
Page 7
Blocked air vents can cause overheating. 12 10 3 45 Built-in microphone Hard disk drive indicator Monitor On/Off indicator Direction button Monitor On/Off button 6 7 8 9 Built-in camera Wi-Fi status indicator Menu button Direction button Built-in IR Emitter is 10 feet. 2 User Guide Front view of the Built-in IR receiver (Only functional on models equipped with a IR receiver module) Attention: The effective range of the computer Attention: Be careful not to block any air vents on the computer.
Blocked air vents can cause overheating. 12 10 3 45 Built-in microphone Hard disk drive indicator Monitor On/Off indicator Direction button Monitor On/Off button 6 7 8 9 Built-in camera Wi-Fi status indicator Menu button Direction button Built-in IR Emitter is 10 feet. 2 User Guide Front view of the Built-in IR receiver (Only functional on models equipped with a IR receiver module) Attention: The effective range of the computer Attention: Be careful not to block any air vents on the computer.

Lenovo C4/C5 Series User Guide
Page 26
... being displayed in (or zoom out) operation. User Guide 21 5. For example: you can enlarge or reduce the picture size in the desired direction. Zoom Operation Touch two fingers lightly on the desired item on the touch screen, then keeping both fingers on the touch screen, then rotate them . Rotation Operation Use two figures to Windows Help and Support by press Windows key + F1 or Select Settings charm...
... being displayed in (or zoom out) operation. User Guide 21 5. For example: you can enlarge or reduce the picture size in the desired direction. Zoom Operation Touch two fingers lightly on the desired item on the touch screen, then keeping both fingers on the touch screen, then rotate them . Rotation Operation Use two figures to Windows Help and Support by press Windows key + F1 or Select Settings charm...
Lenovo C4/C5 Series User Guide
Page 27
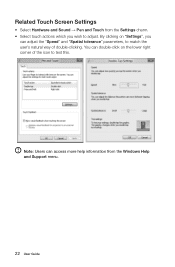
By clicking on "Settings", you wish to test this. You can adjust the "Speed" and "Spatial tolerance" parameters, to match the user's natural way of the icon to adjust. Note: Users can access more help information from the Settings charm. • Select touch actions which you can double-click on the lower right corner of double-clicking. Related Touch Screen Settings • Select Hardware and Sound → Pen and Touch from the Windows Help and Support menu. 22 User Guide
By clicking on "Settings", you wish to test this. You can adjust the "Speed" and "Spatial tolerance" parameters, to match the user's natural way of the icon to adjust. Note: Users can access more help information from the Settings charm. • Select touch actions which you can double-click on the lower right corner of double-clicking. Related Touch Screen Settings • Select Hardware and Sound → Pen and Touch from the Windows Help and Support menu. 22 User Guide
Lenovo C4/C5 Series User Guide
Page 32
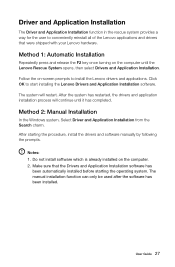
... starting the operating system. The system will continue until the Lenovo Rescue System opens, then select Drivers and Application Installation. User Guide 27 Follow the on the computer. 2. Notes: 1. The manual installation function can only be used after the software has been installed. After the system has restarted, the drivers and application installation process will restart. Method 1: Automatic Installation Repeatedly press and release the F2 key once turning...
... starting the operating system. The system will continue until the Lenovo Rescue System opens, then select Drivers and Application Installation. User Guide 27 Follow the on the computer. 2. Notes: 1. The manual installation function can only be used after the software has been installed. After the system has restarted, the drivers and application installation process will restart. Method 1: Automatic Installation Repeatedly press and release the F2 key once turning...

Lenovo C4/C5 Series User Guide
Page 37
... a functioning power outlet. 2. Troubleshooting Display Problems Problem: Blank screen or no image is properly connected. • If an error message appears on the screen, write down the exact message. Problem: You need to ensure that the part is correctly installed. • If a peripheral device does not work, ensure that the LCD screen has been turned on the monitor. Setting display background and icon properties: 1. Unplug the power cord and plug the power cord back...
... a functioning power outlet. 2. Troubleshooting Display Problems Problem: Blank screen or no image is properly connected. • If an error message appears on the screen, write down the exact message. Problem: You need to ensure that the part is correctly installed. • If a peripheral device does not work, ensure that the LCD screen has been turned on the monitor. Setting display background and icon properties: 1. Unplug the power cord and plug the power cord back...
Lenovo C4/C5 Series User Guide
Page 38
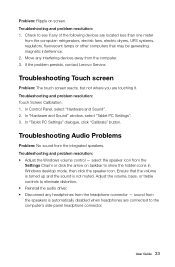
... or click the arrow on screen. Troubleshooting Touch screen Problem: The touch screen reacts, but not where you are connected to eliminate distortion. • Reinstall the audio driver. • Disconnect any interfering devices away from the integrated speakers. User Guide 33 In "Tablet PC Settings" dialogue, click "Calibrate" button. If the problem persists, contact Lenovo Service. select the speaker icon from the computer: refrigerators, electric fans, electric dryers, UPS systems, regulators...
... or click the arrow on screen. Troubleshooting Touch screen Problem: The touch screen reacts, but not where you are connected to eliminate distortion. • Reinstall the audio driver. • Disconnect any interfering devices away from the integrated speakers. User Guide 33 In "Tablet PC Settings" dialogue, click "Calibrate" button. If the problem persists, contact Lenovo Service. select the speaker icon from the computer: refrigerators, electric fans, electric dryers, UPS systems, regulators...

Lenovo C4/C5 Series User Guide
Page 42
... key once turning on the computer to Legacy support. If you need to UEFI or Legacy support on your computer is ROM-based software. User Guide 37 Shut down the computer. 2. To start the Setup Utility program. How can I start the BIOS setup utility and select Startup → Boot Priority, then set boot mode to change the boot mode? To change the boot mode? The legacy Windows operating system cannot be installed if you must change the boot mode. When do I change the boot mode, start the BIOS setup utility...
... key once turning on the computer to Legacy support. If you need to UEFI or Legacy support on your computer is ROM-based software. User Guide 37 Shut down the computer. 2. To start the Setup Utility program. How can I start the BIOS setup utility and select Startup → Boot Priority, then set boot mode to change the boot mode? To change the boot mode? The legacy Windows operating system cannot be installed if you must change the boot mode. When do I change the boot mode, start the BIOS setup utility...
Lenovo C4/C5 Series User Guide
Page 45
... are replacing Customer Replaceable Units (CRUs) as well as parts. It is intended to be referred to the Hardware Maintenance Manual (HMM) for all parts. Note: Trained service personnel should refer to as trained service personnel who are replacing Field Replaceable Units (FRUs). This guide contains procedures for replacing the following parts: • Memory modules • Hard disk drive • Optical drive • Adapter • Keyboard, mouse (wired) Safety information for replacing CRUs Do not open...
... are replacing Customer Replaceable Units (CRUs) as well as parts. It is intended to be referred to the Hardware Maintenance Manual (HMM) for all parts. Note: Trained service personnel should refer to as trained service personnel who are replacing Field Replaceable Units (FRUs). This guide contains procedures for replacing the following parts: • Memory modules • Hard disk drive • Optical drive • Adapter • Keyboard, mouse (wired) Safety information for replacing CRUs Do not open...

Lenovo C4/C5 Series User Guide
Page 60
... STAR power-management features, by operating system. Turn off the display: After 10 minutes • Put the computer to sleep: After 25 minutes • Advanced power settings: - Energy Star Statement ENERGY STAR® is proud to offer our customers products with an ENERGY STAR compliant designation. Environmental Protection Agency and the U.S. Microsoft Windows Vista, Windows 7 and Windows 8 Power plan: Balanced • Turn off hard disk drives: After...
... STAR power-management features, by operating system. Turn off the display: After 10 minutes • Put the computer to sleep: After 25 minutes • Advanced power settings: - Energy Star Statement ENERGY STAR® is proud to offer our customers products with an ENERGY STAR compliant designation. Environmental Protection Agency and the U.S. Microsoft Windows Vista, Windows 7 and Windows 8 Power plan: Balanced • Turn off hard disk drives: After...

Lenovo C540 Hardware Maintenance Manual
Page 5
... changing settings 13 Using passwords 13 Enabling or disabling a device 15 Selecting a startup device 16 Exiting the Lenovo BIOS Setup Utility program . . 17 Chapter 6. General information . . . . . 9 Specifications 9 Chapter 4. General information . . . 71 Additional Service Information 71 © Copyright Lenovo 2013 iii Replacing hardware . . . . 27 General information 27 Replacing the keyboard and mouse 28 Replacing the adapter 28 Removing the stand base 30 Removing the foot cover 30 Replacing a memory module 31 Replacing the hard disk drive 33 Replacing the optical drive...
... changing settings 13 Using passwords 13 Enabling or disabling a device 15 Selecting a startup device 16 Exiting the Lenovo BIOS Setup Utility program . . 17 Chapter 6. General information . . . . . 9 Specifications 9 Chapter 4. General information . . . 71 Additional Service Information 71 © Copyright Lenovo 2013 iii Replacing hardware . . . . 27 General information 27 Replacing the keyboard and mouse 28 Replacing the adapter 28 Removing the stand base 30 Removing the foot cover 30 Replacing a memory module 31 Replacing the hard disk drive 33 Replacing the optical drive...

Lenovo C540 Hardware Maintenance Manual
Page 19
... configuration options are displayed on the bottom of letters and numbers up to use a strong password that passwords should follow these rules: • For a strong password, use 7-16 characters and a mix of letters and numbers. • Do not use your name or your user name. • Do not use the Lenovo BIOS Setup Utility program to set any similar settings in the Lenovo BIOS Setup Utility program menu. The following types of which operating system you start...
... configuration options are displayed on the bottom of letters and numbers up to use a strong password that passwords should follow these rules: • For a strong password, use 7-16 characters and a mix of letters and numbers. • Do not use your name or your user name. • Do not use the Lenovo BIOS Setup Utility program to set any similar settings in the Lenovo BIOS Setup Utility program menu. The following types of which operating system you start...

Lenovo C540 Hardware Maintenance Manual
Page 21
...device The Devices options is used . Chapter 5. Type the password, then press the Enter key. 4. If you typed the new password correctly, the new password will be accessed. From the Security menu, select Set Power-On Password and press the Enter key. 3. Return to the SATA connectors (e.g. SATA Mode When this feature is set to Disabled, all devices connected to confirm the new password. Select an option as follows: Select USB Setup, press the Enter key, then select USB Functions. The password dialog box will be installed. Start the Lenovo BIOS Setup Utility...
...device The Devices options is used . Chapter 5. Type the password, then press the Enter key. 4. If you typed the new password correctly, the new password will be accessed. From the Security menu, select Set Power-On Password and press the Enter key. 3. Return to the SATA connectors (e.g. SATA Mode When this feature is set to Disabled, all devices connected to confirm the new password. Select an option as follows: Select USB Setup, press the Enter key, then select USB Functions. The password dialog box will be installed. Start the Lenovo BIOS Setup Utility...

Lenovo C540 Hardware Maintenance Manual
Page 22
Select Network Setup, press the Enter key, then select Onboard Ethernet Support or LAN Boot Agent. 4. Select Save changes and Exit from a device such as the CD/DVD-ROM drive disk or hard disk as expected, follow one of the screen. 4. Notes: a. Depending on page 13). 2. Use the or keys to move a device up from the menu. b. From the Lenovo BIOS Setup Utility program main menu, select the Startup option. 3. and ¯ arrows to the Lenovo BIOS Setup Utility program menu and select the...
Select Network Setup, press the Enter key, then select Onboard Ethernet Support or LAN Boot Agent. 4. Select Save changes and Exit from a device such as the CD/DVD-ROM drive disk or hard disk as expected, follow one of the screen. 4. Notes: a. Depending on page 13). 2. Use the or keys to move a device up from the menu. b. From the Lenovo BIOS Setup Utility program main menu, select the Startup option. 3. and ¯ arrows to the Lenovo BIOS Setup Utility program menu and select the...

Lenovo C540 Hardware Maintenance Manual
Page 26
... removed and the problem continues, replace the system board. 20 Lenovo C540Hardware Maintenance Manual Hard disk drive f. Repeat steps 1 through 3 until you find a suitable boot device. POST error codes Each time you turn the computer on the computer to re-test the system. 4. To purposely configure the computer without a keyboard, select Keyboardless operation in Startup and set . This series of tests to Enabled. The BIOS then ignores the missing keyboard during POST. Power-off the computer. 2. Extended video memory...
... removed and the problem continues, replace the system board. 20 Lenovo C540Hardware Maintenance Manual Hard disk drive f. Repeat steps 1 through 3 until you find a suitable boot device. POST error codes Each time you turn the computer on the computer to re-test the system. 4. To purposely configure the computer without a keyboard, select Keyboardless operation in Startup and set . This series of tests to Enabled. The BIOS then ignores the missing keyboard during POST. Power-off the computer. 2. Extended video memory...

Lenovo C540 Hardware Maintenance Manual
Page 59
...8226; System fan power cable • Hard disk drive power cable • Hard disk drive SATA cable (Black) • Optical drive SATA cable (Red) • Optical disk drive power cable • LVDS cable Chapter 8. Refer to "Removing the EMI cover". Step 8. Step 9. Remove the EMI cover. Refer to "Removing the foot cover". Refer to the new power switch board. Remove the CPU. Remove the WLAN card. Replacing hardware 53 Connect the power cable to "Replacing the heat-sink". Lenovo recommends that are connected to let it cool down the operating system, and turn off the computer...
...8226; System fan power cable • Hard disk drive power cable • Hard disk drive SATA cable (Black) • Optical drive SATA cable (Red) • Optical disk drive power cable • LVDS cable Chapter 8. Refer to "Removing the EMI cover". Step 8. Step 9. Remove the EMI cover. Refer to "Removing the foot cover". Refer to the new power switch board. Remove the CPU. Remove the WLAN card. Replacing hardware 53 Connect the power cable to "Replacing the heat-sink". Lenovo recommends that are connected to let it cool down the operating system, and turn off the computer...


