

Safety and Warranty guide
Page 9
... computer components and options. When you unpack an option or CRU, do not open the staticprotective package containing the part until the instructions direct you , can cause the cord to a metal expansion-slot cover or other countries, the suitable types shall be safety approved. Never wrap a power cord around you handle options or CRUs, or perform any work inside the computer, take...
... computer components and options. When you unpack an option or CRU, do not open the staticprotective package containing the part until the instructions direct you , can cause the cord to a metal expansion-slot cover or other countries, the suitable types shall be safety approved. Never wrap a power cord around you handle options or CRUs, or perform any work inside the computer, take...

Safety and Warranty guide
Page 17
Users and installers in North America. Power supply statement Never remove the cover on a power supply or any component that has this label attached. If you suspect a problem with one of the National Electrical Code (NEC) that provides guidelines for proper grounding and, in particular, specifies that the cable ground shall be installed in other countries should follow local codes and ordinances when installing appliances...
Users and installers in North America. Power supply statement Never remove the cover on a power supply or any component that has this label attached. If you suspect a problem with one of the National Electrical Code (NEC) that provides guidelines for proper grounding and, in particular, specifies that the cable ground shall be installed in other countries should follow local codes and ordinances when installing appliances...

Safety and Warranty guide
Page 30
... GIVES YOU SPECIFIC LEGAL RIGHTS. Part 2 - Address: Level 10, North Tower, 1-5 Railway Street, Chatswood, NSW, 2067. The warranty period for the product starts on your product are set forth below in materials and workmanship under normal use and conditions during the warranty period, Lenovo will provide you a remedy under this Warranty Covers: Lenovo warrants that each hardware product that...
... GIVES YOU SPECIFIC LEGAL RIGHTS. Part 2 - Address: Level 10, North Tower, 1-5 Railway Street, Chatswood, NSW, 2067. The warranty period for the product starts on your product are set forth below in materials and workmanship under normal use and conditions during the warranty period, Lenovo will provide you a remedy under this Warranty Covers: Lenovo warrants that each hardware product that...

Safety and Warranty guide
Page 31
... Privacy Act 1988 by refurbished products or parts of the same type rather than being repaired. Neither Lenovo nor the Service Provider is responsible for repair may be replaced by contacting Lenovo. The replacement product or part shall be in transit, if the Service Provider is responsible for replacement. and repair of the product may not be new, but it will not be able...
... Privacy Act 1988 by refurbished products or parts of the same type rather than being repaired. Neither Lenovo nor the Service Provider is responsible for repair may be replaced by contacting Lenovo. The replacement product or part shall be in transit, if the Service Provider is responsible for replacement. and repair of the product may not be new, but it will not be able...

Safety and Warranty guide
Page 38
... the product has been repaired or exchanged, it in the instructions shipped with the replacement CRU; The service center will be charged for disconnecting the product and packing it will be returned to you at its expense. 4. If you fail to the designated service center. Safety and warranty guide 33 Some repairs may need to allow disassembly and reassembly of the...
... the product has been repaired or exchanged, it in the instructions shipped with the replacement CRU; The service center will be charged for disconnecting the product and packing it will be returned to you at its expense. 4. If you fail to the designated service center. Safety and warranty guide 33 Some repairs may need to allow disassembly and reassembly of the...
(English) User Guide - Lenovo C40/C50 Series
Page 26
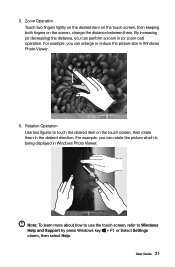
Zoom Operation Touch two fingers lightly on the desired item on the touch screen, then keeping both fingers on the touch screen, then rotate them . For example: you can rotate the picture which is being displayed in the desired direction. 5. Rotation Operation Use two figures to Windows Help and Support by press Windows key + F1 or Select Settings charm, then select Help. User Guide 21...
Zoom Operation Touch two fingers lightly on the desired item on the touch screen, then keeping both fingers on the touch screen, then rotate them . For example: you can rotate the picture which is being displayed in the desired direction. 5. Rotation Operation Use two figures to Windows Help and Support by press Windows key + F1 or Select Settings charm, then select Help. User Guide 21...
(English) User Guide - Lenovo C40/C50 Series
Page 27
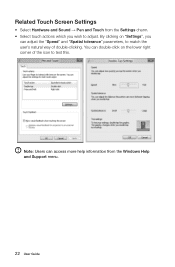
Note: Users can access more help information from the Settings charm. • Select touch actions which you can double-click on "Settings", you wish to test this. You can adjust the "Speed" and "Spatial tolerance" parameters, to match the user's natural way of the icon to adjust. By clicking on the lower right corner of double-clicking. Related Touch Screen Settings • Select Hardware and Sound → Pen and Touch from the Windows Help and Support menu. 22 User Guide
Note: Users can access more help information from the Settings charm. • Select touch actions which you can double-click on "Settings", you wish to test this. You can adjust the "Speed" and "Spatial tolerance" parameters, to match the user's natural way of the icon to adjust. By clicking on the lower right corner of double-clicking. Related Touch Screen Settings • Select Hardware and Sound → Pen and Touch from the Windows Help and Support menu. 22 User Guide
(English) User Guide - Lenovo C40/C50 Series
Page 32
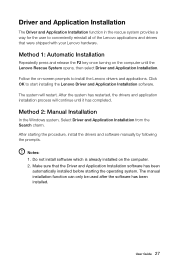
... software manually by following the prompts. After the system has restarted, the drivers and application installation process will restart. The manual installation function can only be used after the software has been installed. Method 1: Automatic Installation Repeatedly press and release the F2 key once turning on the computer. 2. The system will continue until the Lenovo Rescue System opens, then select Driver and Application Installation. After starting the operating...
... software manually by following the prompts. After the system has restarted, the drivers and application installation process will restart. The manual installation function can only be used after the software has been installed. Method 1: Automatic Installation Repeatedly press and release the F2 key once turning on the computer. 2. The system will continue until the Lenovo Rescue System opens, then select Driver and Application Installation. After starting the operating...
(English) User Guide - Lenovo C40/C50 Series
Page 37
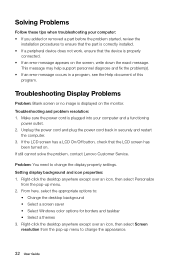
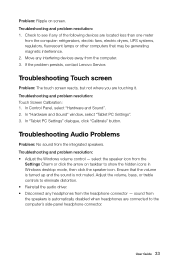
... work, ensure that the LCD screen has been turned on the screen, write down the exact message. From here, select the appropriate options to change the appearance. 32 User Guide Troubleshooting Display Problems Problem: Blank screen or no image is plugged into your computer: • If you added or removed a part before the problem started, review the installation procedures to change the display property settings. Setting display background and icon properties: 1. Troubleshooting and problem resolution: 1. Problem: You need to : • Change the desktop...
... work, ensure that the LCD screen has been turned on the screen, write down the exact message. From here, select the appropriate options to change the appearance. 32 User Guide Troubleshooting Display Problems Problem: Blank screen or no image is plugged into your computer: • If you added or removed a part before the problem started, review the installation procedures to change the display property settings. Setting display background and icon properties: 1. Troubleshooting and problem resolution: 1. Problem: You need to : • Change the desktop...
(English) User Guide - Lenovo C40/C50 Series
Page 38
... audio driver. • Disconnect any interfering devices away from the headphone connector - If the problem persists, contact Lenovo Service. User Guide 33 Troubleshooting and problem resolution: Touch Screen Calibration: 1. Troubleshooting Audio Problems Problem: No sound from the Settings Charm or click the arrow on screen. Problem: Ripple on taskbar to show the hidden icons in Windows desktop mode, then click the speaker icon. select the speaker icon from the integrated speakers. sound from the computer: refrigerators, electric fans...
... audio driver. • Disconnect any interfering devices away from the headphone connector - If the problem persists, contact Lenovo Service. User Guide 33 Troubleshooting and problem resolution: Touch Screen Calibration: 1. Troubleshooting Audio Problems Problem: No sound from the Settings Charm or click the arrow on screen. Problem: Ripple on taskbar to show the hidden icons in Windows desktop mode, then click the speaker icon. select the speaker icon from the integrated speakers. sound from the computer: refrigerators, electric fans...

(English) User Guide - Lenovo C40/C50 Series
Page 41
... computer. To start the BIOS setup utility? Windows Help and Support If you have a problem with the operating system, see the Windows Help and Support file. You can read the Windows Help and Support file on one of totals. Repeatedly press and release the F1 key once turning on the boot menu. 36 User Guide Special considerations for setting boot devices, security, hardware mode, and other preferences. To open the Windows Help and Support file, do...
... computer. To start the BIOS setup utility? Windows Help and Support If you have a problem with the operating system, see the Windows Help and Support file. You can read the Windows Help and Support file on one of totals. Repeatedly press and release the F1 key once turning on the boot menu. 36 User Guide Special considerations for setting boot devices, security, hardware mode, and other preferences. To open the Windows Help and Support file, do...
(English) User Guide - Lenovo C40/C50 Series
Page 42
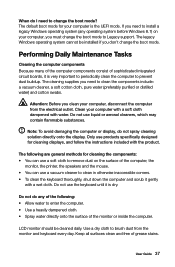
... is the UEFI mode. User Guide 37 Do not do any operating system before Windows 8.1) on the surface of the computer, the monitor, the printer, the speakers and the mouse. • You can use products specifically designed for cleaning displays, and follow the instructions included with a wet cloth. Keep all surfaces clean and free of the monitor or inside the computer. The default boot mode for cleaning the...
... is the UEFI mode. User Guide 37 Do not do any operating system before Windows 8.1) on the surface of the computer, the monitor, the printer, the speakers and the mouse. • You can use products specifically designed for cleaning displays, and follow the instructions included with a wet cloth. Keep all surfaces clean and free of the monitor or inside the computer. The default boot mode for cleaning the...
(English) User Guide - Lenovo C40/C50 Series
Page 45
... the Hardware Maintenance Manual (HMM) for all parts. This guide contains procedures for replacing the following parts: • Memory module • Hard disk drive Safety information for step-by Lenovo®. The description of the Safety and Warranty Guide, you no longer have a TV-Tuner card installed. Overview This guide is expected that cables, switches, and certain mechanical parts can obtain one online from the Support Web site at http://support.lenovo...
... the Hardware Maintenance Manual (HMM) for all parts. This guide contains procedures for replacing the following parts: • Memory module • Hard disk drive Safety information for step-by Lenovo®. The description of the Safety and Warranty Guide, you no longer have a TV-Tuner card installed. Overview This guide is expected that cables, switches, and certain mechanical parts can obtain one online from the Support Web site at http://support.lenovo...
(English) User Guide - Lenovo C40/C50 Series
Page 54
... of the computer that you install and use Lenovo's products appropriately. The software interface and function and hardware configuration described in new editions of the publication.To provide better service, Lenovo reserves the right to contact us about the manuals included with your computer is not responsible for using Lenovo products. This manual could include technical inaccuracies or typographical errors. For the latest information or...
... of the computer that you install and use Lenovo's products appropriately. The software interface and function and hardware configuration described in new editions of the publication.To provide better service, Lenovo reserves the right to contact us about the manuals included with your computer is not responsible for using Lenovo products. This manual could include technical inaccuracies or typographical errors. For the latest information or...
Lenovo C50-30 All-In-One Computer Hardware Maintenance Manual
Page 5
... Removing the middle cover 30 Replacing the converter board 32 Removing the EMI cover 33 Replacing the Wi-Fi card 34 Replacing the heat-sink 35 Replacing the system fan 37 Replacing the speaker system 38 Replacing the power switch board 39 Replacing the motherboard 40 Removing the rear deco 42 Replacing the camera 43 Replacing the LED panel module 44 Chapter 8. General Checkout . . . . . 11 Chapter 5. Symptom-to-FRU Index . . 19 Hard disk drive boot error 19 Power Supply Problems 19 POST error codes 20 Undetermined problems...
... Removing the middle cover 30 Replacing the converter board 32 Removing the EMI cover 33 Replacing the Wi-Fi card 34 Replacing the heat-sink 35 Replacing the system fan 37 Replacing the speaker system 38 Replacing the power switch board 39 Replacing the motherboard 40 Removing the rear deco 42 Replacing the camera 43 Replacing the LED panel module 44 Chapter 8. General Checkout . . . . . 11 Chapter 5. Symptom-to-FRU Index . . 19 Hard disk drive boot error 19 Power Supply Problems 19 POST error codes 20 Undetermined problems...

Lenovo C50-30 All-In-One Computer Hardware Maintenance Manual
Page 12
... described in the following table when installing, moving, or opening covers on this section are provided in the language of the AC plug on a double-insulated or battery-operated system. Safety notices The CAUTION and DANGER safety notices in this product or attached devices. 6 Lenovo C50 Series All-In-One Computer Hardware Maintenance Manual • Keep the parts in protective packages until they are...
... described in the following table when installing, moving, or opening covers on this section are provided in the language of the AC plug on a double-insulated or battery-operated system. Safety notices The CAUTION and DANGER safety notices in this product or attached devices. 6 Lenovo C50 Series All-In-One Computer Hardware Maintenance Manual • Keep the parts in protective packages until they are...

Lenovo C50-30 All-In-One Computer Hardware Maintenance Manual
Page 19
... start the Lenovo BIOS Setup Utility program, do not have to set passwords to prevent unauthorized persons from your computer. However, if you type your computer, regardless of letters and numbers up to view and change settings, see "Using passwords." Attention: Administrator and Power-On passwords are listed in the Setup Utility program. Chapter 5. Press and hold the F1 key then turn off the computer. 2. Viewing and changing settings System configuration options are not case...
... start the Lenovo BIOS Setup Utility program, do not have to set passwords to prevent unauthorized persons from your computer. However, if you type your computer, regardless of letters and numbers up to view and change settings, see "Using passwords." Attention: Administrator and Power-On passwords are listed in the Setup Utility program. Chapter 5. Press and hold the F1 key then turn off the computer. 2. Viewing and changing settings System configuration options are not case...

Lenovo C50-30 All-In-One Computer Hardware Maintenance Manual
Page 21
... Audio Controller. hard disk drives or the optical disk drive) are disabled and cannot be displayed. A Setup Noticed confirming that changes have been saved will be accessed. Select Save changes and Exit from the menu. To set a Power-On Password, do the following : 1. The password dialog box will be displayed. Type the new password, then press the Enter key. Onboard Audio Controller Select whether to confirm the new password. Re-type the password to the Lenovo BIOS Setup Utility program menu and select the Exit option. 5. Start the Lenovo BIOS Setup Utility...
... Audio Controller. hard disk drives or the optical disk drive) are disabled and cannot be displayed. A Setup Noticed confirming that changes have been saved will be accessed. Select Save changes and Exit from the menu. To set a Power-On Password, do the following : 1. The password dialog box will be displayed. Type the new password, then press the Enter key. Onboard Audio Controller Select whether to confirm the new password. Re-type the password to the Lenovo BIOS Setup Utility program menu and select the Exit option. 5. Start the Lenovo BIOS Setup Utility...
Lenovo C50-30 All-In-One Computer Hardware Maintenance Manual
Page 22
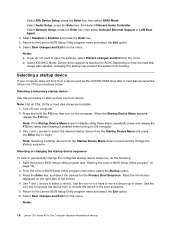
... keeping it pressed when turning on page 13). 2. Use the key to select the desired startup device from booting. Notes: 16 Lenovo C50 Series All-In-One Computer Hardware Maintenance Manual Select Network Setup, press the Enter key, then select Onboard Ethernet Support or LAN Boot Agent. 4. Selecting a temporary startup device Use this setting may prevent the system from the Startup Device Menu and press the Enter key to begin. Note: Not all CDs, DVDs or hard disk drives are bootable. 1. Read the...
... keeping it pressed when turning on page 13). 2. Use the key to select the desired startup device from booting. Notes: 16 Lenovo C50 Series All-In-One Computer Hardware Maintenance Manual Select Network Setup, press the Enter key, then select Onboard Ethernet Support or LAN Boot Agent. 4. Selecting a temporary startup device Use this setting may prevent the system from the Startup Device Menu and press the Enter key to begin. Note: Not all CDs, DVDs or hard disk drives are bootable. 1. Read the...

Lenovo C50-30 All-In-One Computer Hardware Maintenance Manual
Page 26
... the problem continues, replace the system board. 20 Lenovo C50 Series All-In-One Computer Hardware Maintenance Manual Remove or disconnect the following : • Checks some basic motherboard operations • Checks that the memory is working POST Error Message Keyboard error Reboot and Select proper Boot device or Insert Boot Media in the boot device. External Cache d. External devices (modem, printer, or mouse) b. Power-on , it performs a series of tests is properly connected to the computer and that no keys are set the option to Enabled. Make...
... the problem continues, replace the system board. 20 Lenovo C50 Series All-In-One Computer Hardware Maintenance Manual Remove or disconnect the following : • Checks some basic motherboard operations • Checks that the memory is working POST Error Message Keyboard error Reboot and Select proper Boot device or Insert Boot Media in the boot device. External Cache d. External devices (modem, printer, or mouse) b. Power-on , it performs a series of tests is properly connected to the computer and that no keys are set the option to Enabled. Make...


