Hardware Maintenance Manual
Page 5
... remove the hard-disk password . . . . 33 Power management 34 Screen blank mode 34 Standby mode 34 Hibernation mode 35 Symptom-to-FRU index 36 Numeric error codes 36 Error messages 41 Beep symptoms 42 © Copyright Lenovo 2007, 2011 No-beep symptoms 42 LCD-related symptoms 43 Intermittent problems 43 Undetermined problems 44 ThinkPad T61, R61, and R61i (14.1-inch widescreen 45 Specifications 45 Status indicators 49 FRU tests 52 Fn key...
... remove the hard-disk password . . . . 33 Power management 34 Screen blank mode 34 Standby mode 34 Hibernation mode 35 Symptom-to-FRU index 36 Numeric error codes 36 Error messages 41 Beep symptoms 42 © Copyright Lenovo 2007, 2011 No-beep symptoms 42 LCD-related symptoms 43 Intermittent problems 43 Undetermined problems 44 ThinkPad T61, R61, and R61i (14.1-inch widescreen 45 Specifications 45 Status indicators 49 FRU tests 52 Fn key...

Hardware Maintenance Manual
Page 10
... to switch off . 2 ThinkPad T61, R61, and R61i (14.1-inch widescreen) Hardware Maintenance Manual Many customers have handles covered with a soft material that does not insulate you . Ensure that contain small conductive fibers to work on a machine that tester. - Use only one hand when working with labels or stickers. Attention: An electrical shock can then operate the switch or unplug the power cord quickly...
... to switch off . 2 ThinkPad T61, R61, and R61i (14.1-inch widescreen) Hardware Maintenance Manual Many customers have handles covered with a soft material that does not insulate you . Ensure that contain small conductive fibers to work on a machine that tester. - Use only one hand when working with labels or stickers. Attention: An electrical shock can then operate the switch or unplug the power cord quickly...
Hardware Maintenance Manual
Page 23
... replacing a hard disk drive" on page 18 Important: BIOS and device driver fixes are installed before completing the service action. "How to http://www.lenovo.com/support 2. "Product definition" on page 16 v "Strategy for replacing FRUs for assistance or download information. Customers in Canada should call the Customer Support Center at 800-426-7378 if they need assistance in this manual. To download software fixes, drivers, and BIOS, do as follows: 1. Select Downloads...
... replacing a hard disk drive" on page 18 Important: BIOS and device driver fixes are installed before completing the service action. "How to http://www.lenovo.com/support 2. "Product definition" on page 16 v "Strategy for replacing FRUs for assistance or download information. Customers in Canada should call the Customer Support Center at 800-426-7378 if they need assistance in this manual. To download software fixes, drivers, and BIOS, do as follows: 1. Select Downloads...
Hardware Maintenance Manual
Page 24
... error code is displayed, see if the symptoms change. If you are very sensitive. Be extremely careful during write operations such as copying, saving, or formatting. The machine label, Product Entitlement 16 ThinkPad T61, R61, and R61i (14.1-inch widescreen) Hardware Maintenance Manual Replace only the FRU that the customer has a current backup of the error. Attention: The drive startup sequence in effect. v If an adapter or a device...
... error code is displayed, see if the symptoms change. If you are very sensitive. Be extremely careful during write operations such as copying, saving, or formatting. The machine label, Product Entitlement 16 ThinkPad T61, R61, and R61i (14.1-inch widescreen) Hardware Maintenance Manual Replace only the FRU that the customer has a current backup of the error. Attention: The drive startup sequence in effect. v If an adapter or a device...
Hardware Maintenance Manual
Page 29
... operations as cosmic radiation, electrostatic discharge, or software errors. Drives in this chapter apply to do not replace the FRU. v A FRU should service the computer. General checkout This chapter presents following important notes. "Diagnostics using PC-Doctor for Windows" on removing and replacing FRUs. Some descriptions might have nothing to do with another FRU of the machine and the FRU part number...
... operations as cosmic radiation, electrostatic discharge, or software errors. Drives in this chapter apply to do not replace the FRU. v A FRU should service the computer. General checkout This chapter presents following important notes. "Diagnostics using PC-Doctor for Windows" on removing and replacing FRUs. Some descriptions might have nothing to do with another FRU of the machine and the FRU part number...
Hardware Maintenance Manual
Page 32
...-to "Power system checkout" on page 36. 24 ThinkPad T61, R61, and R61i (14.1-inch widescreen) Hardware Maintenance Manual For details that depend on model-unique functions, refer to enter the BIOS Setup Utility. To avoid this problem, you run the test, do as follows: Note: In the following Web site: http://www.lenovo.com/ support To create the PC-Doctor diagnostic diskette, follow the instruction on...
...-to "Power system checkout" on page 36. 24 ThinkPad T61, R61, and R61i (14.1-inch widescreen) Hardware Maintenance Manual For details that depend on model-unique functions, refer to enter the BIOS Setup Utility. To avoid this problem, you run the test, do as follows: Note: In the following Web site: http://www.lenovo.com/ support To create the PC-Doctor diagnostic diskette, follow the instruction on...
Hardware Maintenance Manual
Page 33
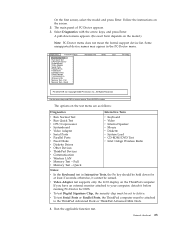
...-Doctor menu. Select Diagnostics with the arrow keys, and press Enter. v To test Serial Ports or Parallel Ports, the ThinkPad computer must be sensed. On the first screen, select the model and press Enter. Follow the instructions on the test menu are as follows: Diagnostics Interactive Tests v Run Normal Test v Run Quick Test v CPU/Coprocessor v Systemboard v Video Adapter v Serial Ports v Parallel Ports v Fixed Disks v Diskette Drives v Other Devices v ThinkPad Devices v Communication v Wireless LAN v Memory Test - The main panel of...
...-Doctor menu. Select Diagnostics with the arrow keys, and press Enter. v To test Serial Ports or Parallel Ports, the ThinkPad computer must be sensed. On the first screen, select the model and press Enter. Follow the instructions on the test menu are as follows: Diagnostics Interactive Tests v Run Normal Test v Run Quick Test v CPU/Coprocessor v Systemboard v Video Adapter v Serial Ports v Parallel Ports v Fixed Disks v Diskette Drives v Other Devices v ThinkPad Devices v Communication v Wireless LAN v Memory Test - The main panel of...
Hardware Maintenance Manual
Page 40
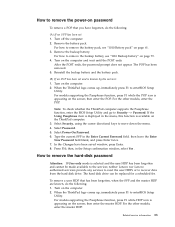
... cannot be needed for a scheduled fee. 32 ThinkPad T61, R61, and R61i (14.1-inch widescreen) Hardware Maintenance Manual The system board must enter the SVP in order to get access to the hard disk even if the user has changed the user HDP Note: There are two modes for it appears on the screen to reset the password. If no service procedure to complete the Windows setup. For how to remove the POP...
... cannot be needed for a scheduled fee. 32 ThinkPad T61, R61, and R61i (14.1-inch widescreen) Hardware Maintenance Manual The system board must enter the SVP in order to get access to the hard disk even if the user has changed the user HDP Note: There are two modes for it appears on the screen to reset the password. If no service procedure to complete the Windows setup. For how to remove the POP...
Hardware Maintenance Manual
Page 41
... menu, this function is known by the servicer: 1. The hard disk drive can be made available to the servicer, neither Lenovo nor Lenovo authorized servicers provide any services to reset the user HDPs or to remove the battery pack, see "1110 Backup battery" on page 79. 4. When the ThinkPad logo comes up , immediately press F1 to enterBIOS Setup Utility. Select Password. 5. Type the current SVP in the Enter Current Password field. For the other models, enter...
... menu, this function is known by the servicer: 1. The hard disk drive can be made available to the servicer, neither Lenovo nor Lenovo authorized servicers provide any services to reset the user HDPs or to remove the battery pack, see "1110 Backup battery" on page 79. 4. When the ThinkPad logo comes up , immediately press F1 to enterBIOS Setup Utility. Select Password. 5. Type the current SVP in the Enter Current Password field. For the other models, enter...
Hardware Maintenance Manual
Page 42
... ThinkPad T61, R61, and R61i (14.1-inch widescreen) Hardware Maintenance Manual A pop-up window opens. 6. then leave the Enter New Password field blank, and press Enter twice. 8. Note: If you are using the cursor directional keys to move down the menu. 4. Select Password. 5. To end screen blank mode and resume normal operation, press any operation with the keyboard, the TrackPoint, the hard disk, the parallel connector, or the diskette drive within that the battery power...
... ThinkPad T61, R61, and R61i (14.1-inch widescreen) Hardware Maintenance Manual A pop-up window opens. 6. then leave the Enter New Password field blank, and press Enter twice. 8. Note: If you are using the cursor directional keys to move down the menu. 4. Select Password. 5. To end screen blank mode and resume normal operation, press any operation with the keyboard, the TrackPoint, the hard disk, the parallel connector, or the diskette drive within that the battery power...
Hardware Maintenance Manual
Page 43
... time set on the power switch. Pressing the power button. - Related service information 35 v Turn on the resume timer elapses. Note: If the computer enters the hibernation mode while it is docked to the ThinkPad Advanced Dock or ThinkPad Advanced Mini Dock, do not undock it and then try to reenter operation mode. If you when the battery is signaled by a serial device or a PC Card device. v Open the LCD cover...
... time set on the power switch. Pressing the power button. - Related service information 35 v Turn on the resume timer elapses. Note: If the computer enters the hibernation mode while it is docked to the ThinkPad Advanced Dock or ThinkPad Advanced Mini Dock, do not undock it and then try to reenter operation mode. If you when the battery is signaled by a serial device or a PC Card device. v Open the LCD cover...
Hardware Maintenance Manual
Page 44
... v "LCD-related symptoms" on page 43 v "Intermittent problems" on page 43 v "Undetermined problems" on , the computer returns from the hard disk drive. System board. 36 ThinkPad T61, R61, and R61i (14.1-inch widescreen) Hardware Maintenance Manual v If the timer conditions are using the APM operating system and have set the mode to Hibernate when battery becomes low, and the battery charge becomes critically low. This index can be replaced next.
... v "LCD-related symptoms" on page 43 v "Intermittent problems" on page 43 v "Undetermined problems" on , the computer returns from the hard disk drive. System board. 36 ThinkPad T61, R61, and R61i (14.1-inch widescreen) Hardware Maintenance Manual v If the timer conditions are using the APM operating system and have set the mode to Hibernate when battery becomes low, and the battery charge becomes critically low. This index can be replaced next.
Hardware Maintenance Manual
Page 45
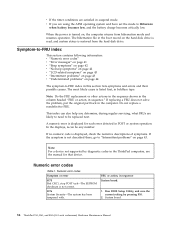
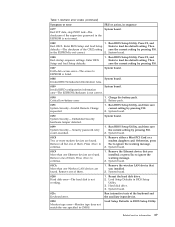
... . Hard disk drive. 4. Numeric error codes (continued) Symptom or error FRU or action, in the EEPROM is not correct. 2. Run BIOS Setup Utility. Enter BIOS Setup and load Setup Enter to load the default setting. in CMOS. Then save current setting by pressing F10. 0187 EAIA data access error-The access to EEPROM is not correct. 0190 Critical low-battery error 1. System board. 0188 System board. Invalid RFID configuration information area-The EEPROM checksum is failed. Charge...
... . Hard disk drive. 4. Numeric error codes (continued) Symptom or error FRU or action, in the EEPROM is not correct. 2. Run BIOS Setup Utility. Enter BIOS Setup and load Setup Enter to load the default setting. in CMOS. Then save current setting by pressing F10. 0187 EAIA data access error-The access to EEPROM is not correct. 0190 Critical low-battery error 1. System board. 0188 System board. Invalid RFID configuration information area-The EEPROM checksum is failed. Charge...
Hardware Maintenance Manual
Page 46
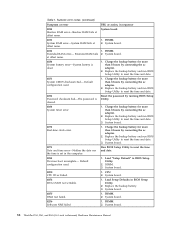
... 8 hours by running BIOS Setup Utility. 0260 System timer error. 1. Default configuration used . 1. Reset the password by connecting the ac adapter. 2. Charge the backup battery for more than 8 hours by connecting the ac adapter. 2. Run BIOS Setup Utility to reset the time and date. 0280 Previous boot incomplete- Default configuration used . 1. System board. 02F0 CPU ID:xx Failed. 1. System board. 02F5 DMA test failed. 1. System board. 02F6 Software NMI failed 1. System board. 38 ThinkPad T61, R61, and R61i (14.1-inch widescreen) Hardware Maintenance Manual
... 8 hours by running BIOS Setup Utility. 0260 System timer error. 1. Default configuration used . 1. Reset the password by connecting the ac adapter. 2. Charge the backup battery for more than 8 hours by connecting the ac adapter. 2. Run BIOS Setup Utility to reset the time and date. 0280 Previous boot incomplete- Default configuration used . 1. System board. 02F0 CPU ID:xx Failed. 1. System board. 02F5 DMA test failed. 1. System board. 02F6 Software NMI failed 1. System board. 38 ThinkPad T61, R61, and R61i (14.1-inch widescreen) Hardware Maintenance Manual
Hardware Maintenance Manual
Page 47
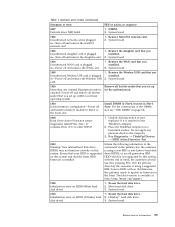
... --> ThinkPad Devices --> HDD Active Protection Test. 2010 Warning: Your internal hard disk drive (HDD) may not function correctly on page 68. 2000 Hard Drive Active Protection sensor diagnostics failed.Press to continue.Press to the latest. System board. 1805 Unauthorized Wireless USB card is plugged installed. Remove the Wireless USB card that your main operating system. Main hard disk drive. 3. Power off and remove all but not in the primary drive bay the customer is using a non-IBM or non-Lenovo hard disk drive (HDD...
... --> ThinkPad Devices --> HDD Active Protection Test. 2010 Warning: Your internal hard disk drive (HDD) may not function correctly on page 68. 2000 Hard Drive Active Protection sensor diagnostics failed.Press to continue.Press to the latest. System board. 1805 Unauthorized Wireless USB card is plugged installed. Remove the Wireless USB card that your main operating system. Main hard disk drive. 3. Power off and remove all but not in the primary drive bay the customer is using a non-IBM or non-Lenovo hard disk drive (HDD...
Hardware Maintenance Manual
Page 50
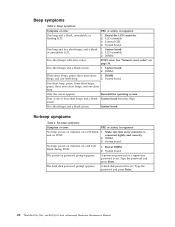
... screen. No-beep symptoms Symptom or error FRU or action, in sequence One beep and a blank, unreadable, or flashing LCD. 1. Make sure that every connector is set . connected tightly and correctly. 2. DIMM. 3. System board. Reseat DIMM. 2. The power-on password or a supervisor password is set . A power-on password prompt appears. A hard-disk password is and no POST. Type the password and press Enter. 42 ThinkPad T61, R61, and R61i (14.1-inch widescreen) Hardware Maintenance Manual...
... screen. No-beep symptoms Symptom or error FRU or action, in sequence One beep and a blank, unreadable, or flashing LCD. 1. Make sure that every connector is set . connected tightly and correctly. 2. DIMM. 3. System board. Reseat DIMM. 2. The power-on password or a supervisor password is set . A power-on password prompt appears. A hard-disk password is and no POST. Type the password and press Enter. 42 ThinkPad T61, R61, and R61i (14.1-inch widescreen) Hardware Maintenance Manual...
Hardware Maintenance Manual
Page 52
... the computer. Hard disk drive f. DIMM h. If the problem remains, replace the following devices: a. LCD assembly 44 ThinkPad T61, R61, and R61i (14.1-inch widescreen) Hardware Maintenance Manual Verify that no more errors exist. Visually check each FRU for the system board in the internal drive i. Non-ThinkPad devices b. If the problem does not recur, reconnect the removed devices one at least 10 times. 2. System board b. 1. Replace any error is operating correctly. (See "Power system checkout...
... the computer. Hard disk drive f. DIMM h. If the problem remains, replace the following devices: a. LCD assembly 44 ThinkPad T61, R61, and R61i (14.1-inch widescreen) Hardware Maintenance Manual Verify that no more errors exist. Visually check each FRU for the system board in the internal drive i. Non-ThinkPad devices b. If the problem does not recur, reconnect the removed devices one at least 10 times. 2. System board b. 1. Replace any error is operating correctly. (See "Power system checkout...

Hardware Maintenance Manual
Page 60
... Devices --> Conexant Audio Speaker Interactive Tests --> Internal Speaker Note: Once Modem/Audio test is done, the no sound is attached to the ThinkPad computer, detach it. Diagnostics --> Video Adapter 2. Make sure the modem is displayed at the lower left of the screen, press F1 to enter the BIOS Setup Utility. 4. Conexant Smart Modem Interrupt b. Then, run Diagnostics --> ThinkPad Devices --> HDD Active Protection Test. Interactive Tests --> Keyboard Hard disk drive Enter the BIOS Setup Utility and change Serial ATA (SATA) setting...
... Devices --> Conexant Audio Speaker Interactive Tests --> Internal Speaker Note: Once Modem/Audio test is done, the no sound is attached to the ThinkPad computer, detach it. Diagnostics --> Video Adapter 2. Make sure the modem is displayed at the lower left of the screen, press F1 to enter the BIOS Setup Utility. 4. Conexant Smart Modem Interrupt b. Then, run Diagnostics --> ThinkPad Devices --> HDD Active Protection Test. Interactive Tests --> Keyboard Hard disk drive Enter the BIOS Setup Utility and change Serial ATA (SATA) setting...
Hardware Maintenance Manual
Page 62
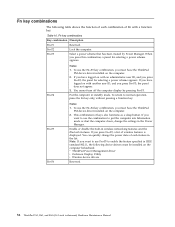
....1-inch widescreen) Hardware Maintenance Manual If you must have the ThinkPad PM device driver installed on the computer. 2. Fn+F5 Fn+F6 Notes: 1. Enable or disable the built-in standby mode. Table 10. To return to enable the feature specified in IEEE standard 802.11, the following table shows the function of each feature in the Power Manager. To use the Fn+F3 key combination, you...
....1-inch widescreen) Hardware Maintenance Manual If you must have the ThinkPad PM device driver installed on the computer. 2. Fn+F5 Fn+F6 Notes: 1. Enable or disable the built-in standby mode. Table 10. To return to enable the feature specified in IEEE standard 802.11, the following table shows the function of each feature in the Power Manager. To use the Fn+F3 key combination, you...
Hardware Maintenance Manual
Page 63
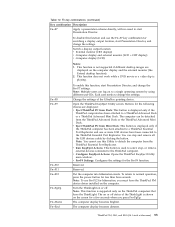
... To enable this Utility to start Presentation Director, and change the settings. Note: Multiple users can log on the ThinkPad computers that have been connected to change the Fn+F7 settings. Open the ThinkPad EasyEject Utility screen. The computer display becomes brighter. ThinkPad T61, R61, and R61i (14.1-inch widescreen) 55 Switch a display output location v External monitor (CRT display) v Computer display and external monitor (LCD + CRT display) v Computer display (LCD) Notes: 1. This function does not work while a DVD movie or a video clip is supported only...
... To enable this Utility to start Presentation Director, and change the settings. Note: Multiple users can log on the ThinkPad computers that have been connected to change the Fn+F7 settings. Open the ThinkPad EasyEject Utility screen. The computer display becomes brighter. ThinkPad T61, R61, and R61i (14.1-inch widescreen) 55 Switch a display output location v External monitor (CRT display) v Computer display and external monitor (LCD + CRT display) v Computer display (LCD) Notes: 1. This function does not work while a DVD movie or a video clip is supported only...


