
Owner's Manual
Page 4
... the appliance is properly grounded. WARNING! Close supervision of children is necessary when the washer is used for such a period, before using the washing machine, turn on or in accordance with a cord having an equipment-grounding conductor and grounding plug. This appliance is properly installed and grounded in the washer. The...
... the appliance is properly grounded. WARNING! Close supervision of children is necessary when the washer is used for such a period, before using the washing machine, turn on or in accordance with a cord having an equipment-grounding conductor and grounding plug. This appliance is properly installed and grounded in the washer. The...
Owner's Manual
Page 8
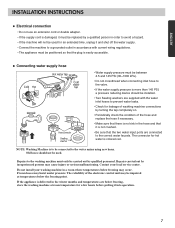
... the machine to a grounded outlet in accordance with the water inlet hoses to prevent water leaks. • Check for leakage of washing machine connections by turning the tap completely on. • Periodically check the condition of the electronic control unit may be carried out by inexperienced persons may burst under pressure...
... the machine to a grounded outlet in accordance with the water inlet hoses to prevent water leaks. • Check for leakage of washing machine connections by turning the tap completely on. • Periodically check the condition of the electronic control unit may be carried out by inexperienced persons may burst under pressure...
Owner's Manual
Page 9
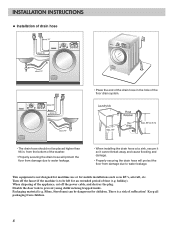
... be left for an extended period of the floor drain system. • The drain hose should not be dangerous for mobile installations such as in . Turn off the power cable, and destroy the plug. Disable the door lock to water leakage. There is not designed for maritime use or for children...
... be left for an extended period of the floor drain system. • The drain hose should not be dangerous for mobile installations such as in . Turn off the power cable, and destroy the plug. Disable the door lock to water leakage. There is not designed for maritime use or for children...
Owner's Manual
Page 15
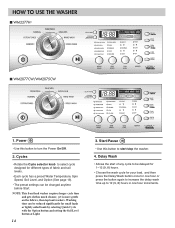
Cycles • Rotate the Cycle selector knob to turn the Power On/Off. 2. HOW TO USE THE WASHER I WM2277H* I WM2077CW/WM2075CW 1. Washing time can be reduced significantly for one hour or press the button again to increase the delay wash time up to start/stop ...
Cycles • Rotate the Cycle selector knob to turn the Power On/Off. 2. HOW TO USE THE WASHER I WM2277H* I WM2077CW/WM2075CW 1. Washing time can be reduced significantly for one hour or press the button again to increase the delay wash time up to start/stop ...
Owner's Manual
Page 16
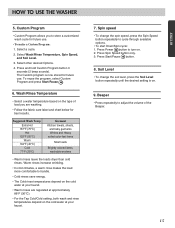
... Speed button only. 3. Soil Level • To change the spin speed, press the Spin Speed button repeatedly to adjust the volume of load you to turn on . 9. Select other desired Options. 4. Select a cycle. 2. Warm rinses increase wrinkling. • In cold climates, a warm rinse makes the load more comfortable to handle. •...
... Speed button only. 3. Soil Level • To change the spin speed, press the Spin Speed button repeatedly to adjust the volume of load you to turn on . 9. Select other desired Options. 4. Select a cycle. 2. Warm rinses increase wrinkling. • In cold climates, a warm rinse makes the load more comfortable to handle. •...
Owner's Manual
Page 18
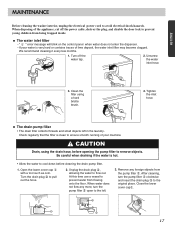
.... CAUTION Drain, using a hard bristle brush. 4. When water does not flow any foreign objects from flowing onto the floor. Remove any more, turn the pump filter clockwise and insert the drain plug to prevent young children from being trapped inside. Close the lower cover cap . 3 1 2 ...allowing the water to avoid electrical shock hazards. ENGLISH MAINTENANCE Before cleaning the washer interior, unplug the electrical power cord to flow out. Turn the drain plug to prevent water from the pump filter . When disposing of lime deposit, the water inlet filter may become clogged. At...
.... CAUTION Drain, using a hard bristle brush. 4. When water does not flow any foreign objects from flowing onto the floor. Remove any more, turn the pump filter clockwise and insert the drain plug to prevent young children from being trapped inside. Close the lower cover cap . 3 1 2 ...allowing the water to avoid electrical shock hazards. ENGLISH MAINTENANCE Before cleaning the washer interior, unplug the electrical power cord to flow out. Turn the drain plug to prevent water from the pump filter . When disposing of lime deposit, the water inlet filter may become clogged. At...
Owner's Manual
Page 20
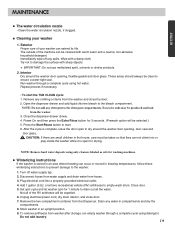
... with a damp cloth. Do not add laundry. 19 Remove any water in an upright position. 9. Excessive suds may be expelled. 6. Close the dispenser drawer slowly. 4. Turn off any detergent to the washer: 1. Not all the water. ENGLISH MAINTENANCE The water circulation nozzle • Clean the water circulation nozzle, if clogged. NOTE...
... with a damp cloth. Do not add laundry. 19 Remove any water in an upright position. 9. Excessive suds may be expelled. 6. Close the dispenser drawer slowly. 4. Turn off any detergent to the washer: 1. Not all the water. ENGLISH MAINTENANCE The water circulation nozzle • Clean the water circulation nozzle, if clogged. NOTE...
Owner's Manual
Page 22
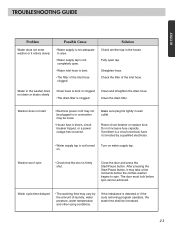
... removing program operates, the wash time shall be achieved. Fully open . • Water inlet hose is bent. • The filter of the inlet hose clogged. Turn on . After pressing the Start/Pause button, it may vary by a qualified electrician. • Water supply tap is not... turned on water supply tap. Wash cycle time delayed • The washing time may take a few moments before spin can be increased. 21 TROUBLESHOOTING GUIDE ENGLISH ...
... removing program operates, the wash time shall be achieved. Fully open . • Water inlet hose is bent. • The filter of the inlet hose clogged. Turn on . After pressing the Start/Pause button, it may vary by a qualified electrician. • Water supply tap is not... turned on water supply tap. Wash cycle time delayed • The washing time may take a few moments before spin can be increased. 21 TROUBLESHOOTING GUIDE ENGLISH ...
Service Manual
Page 6
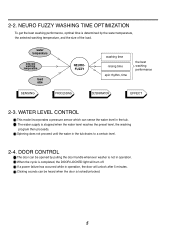
.... The water supply is completed, the DOOR LOCKED light will unlock after 5 minutes. Spinning does not proceed until the water in operation, the door will turn off. 2-2. When the cycle is stopped when the water level reaches the preset level, the washing program then proceeds. DOOR CONTROL The door can be...
.... The water supply is completed, the DOOR LOCKED light will unlock after 5 minutes. Spinning does not proceed until the water in operation, the door will turn off. 2-2. When the cycle is stopped when the water level reaches the preset level, the washing program then proceeds. DOOR CONTROL The door can be...
Service Manual
Page 7
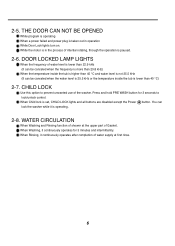
... more than 23.8 kHz) When the temperature inside the tub is lower than 40 °C) 2-7. When Washing, it is in operation While Door Lock lights turn on. CHILD LOCK Use this option to lock/unlock control. Press and hold PRE WASH button for 3 minutes and intermittently. 2-5. When Child lock is taken...
... more than 23.8 kHz) When the temperature inside the tub is lower than 40 °C) 2-7. When Washing, it is in operation While Door Lock lights turn on. CHILD LOCK Use this option to lock/unlock control. Press and hold PRE WASH button for 3 minutes and intermittently. 2-5. When Child lock is taken...
Service Manual
Page 9
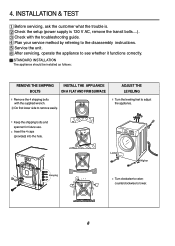
...method by referring to see whether it functions correctly. After servicing, operate the appliance to the disassembly instructions. ADJUST THE LEVELING Turn the leveling feet to lower. 8 counterclockwise to adjust the appliance. STANDARD INSTALLATION The appliance should be installed as follows: REMOVE...raise; 4. Check with the supplied wrench. Keep the shipping bolts and spanner for future use. Check the setup (power supply is . Turn clockwise to remove easily. INSTALLATION & TEST Before servicing, ask the customer what the trouble is 120 V AC, remove the transit bolts....)....
...method by referring to see whether it functions correctly. After servicing, operate the appliance to the disassembly instructions. ADJUST THE LEVELING Turn the leveling feet to lower. 8 counterclockwise to adjust the appliance. STANDARD INSTALLATION The appliance should be installed as follows: REMOVE...raise; 4. Check with the supplied wrench. Keep the shipping bolts and spanner for future use. Check the setup (power supply is . Turn clockwise to remove easily. INSTALLATION & TEST Before servicing, ask the customer what the trouble is 120 V AC, remove the transit bolts....)....
Service Manual
Page 13
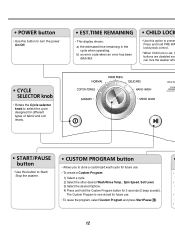
... whil • Rotate the Cycle selector knob to select the cycle designed for different types of fabric and soil levels. • Use this button to turn the power On/Off. • This display shows: a) the estimated time remaining in the cycle when operating. b 4) Press and hold PRE WA lock/unlock control...
... whil • Rotate the Cycle selector knob to select the cycle designed for different types of fabric and soil levels. • Use this button to turn the power On/Off. • This display shows: a) the estimated time remaining in the cycle when operating. b 4) Press and hold PRE WA lock/unlock control...
Service Manual
Page 18
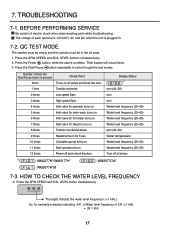
... cycle through the test modes. The digits indicate the water level frequency ( x.1 kHz ). So, for 3 sec. 10 times Circulation pump turns on. 11 times Drain pump turns on all lamps. 1) : WM2277H*/WM2177H* : WM2077CW : WM2677H*M 7-3. 7. BEFORE PERFORMING SERVICE Be careful of 241 x.1 kHz = 24.1 kHz 17 The washer must be empty and the controls...
... cycle through the test modes. The digits indicate the water level frequency ( x.1 kHz ). So, for 3 sec. 10 times Circulation pump turns on. 11 times Drain pump turns on all lamps. 1) : WM2277H*/WM2177H* : WM2077CW : WM2677H*M 7-3. 7. BEFORE PERFORMING SERVICE Be careful of 241 x.1 kHz = 24.1 kHz 17 The washer must be empty and the controls...
Service Manual
Page 19
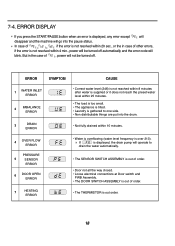
...; Laundry is displayed, the drain pump will go into the drum. • Not fully drained within 4 min., power will be turned off automatically and the error code will not be turned off . If is gathered to drain the water automatically. • The SENSOR SWITCH ASSEMBLY is out of order. • Door not...
...; Laundry is displayed, the drain pump will go into the drum. • Not fully drained within 4 min., power will be turned off automatically and the error code will not be turned off . If is gathered to drain the water automatically. • The SENSOR SWITCH ASSEMBLY is out of order. • Door not...


