
Owner's Manual
Page 3
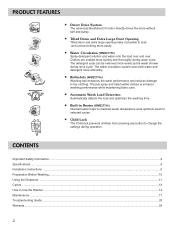
... Using the Dispenser ...11 Cycles ...13 How to enhance washing performance while maintaining fabric care. The jets spray and help tumble clothes to Use the Washer...14 Maintenance ...17 Troubleshooting Guide ...20 Warranty ...23 2 Built-in Heater (WM2277H*) Internal heater helps to the clothing. PRODUCT FEATURES Direct Drive System The advanced...
... Using the Dispenser ...11 Cycles ...13 How to enhance washing performance while maintaining fabric care. The jets spray and help tumble clothes to Use the Washer...14 Maintenance ...17 Troubleshooting Guide ...20 Warranty ...23 2 Built-in Heater (WM2277H*) Internal heater helps to the clothing. PRODUCT FEATURES Direct Drive System The advanced...
Owner's Manual
Page 4
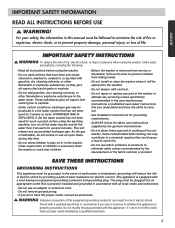
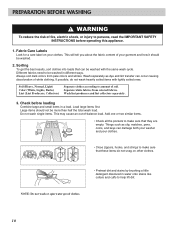
...reduce the risk of fire, electric shock, or injury to persons when using the washing machine, turn on or in your washer. WARNING: Improper connection of the equipment-grounding conductor can result in the user-maintenance instructions or published user-repair instructions that...Installation Instructions for 2 weeks or more. if it will release any servicing unless specifically recommended in risk of children is necessary when the washer is used for grounding requirements. • ALWAYS follow basic precautions, including the following: • Read all local codes and ordinances....
...reduce the risk of fire, electric shock, or injury to persons when using the washing machine, turn on or in your washer. WARNING: Improper connection of the equipment-grounding conductor can result in the user-maintenance instructions or published user-repair instructions that...Installation Instructions for 2 weeks or more. if it will release any servicing unless specifically recommended in risk of children is necessary when the washer is used for grounding requirements. • ALWAYS follow basic precautions, including the following: • Read all local codes and ordinances....
Owner's Manual
Page 5
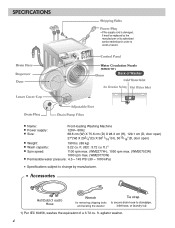
... kg) 3.22 cu. Accessories for removing shipping bolts and leveling the washer 1) Per IEC 60456, washes the equivalent of a 3.72 cu. ft. agitator washer. 4 ft. (IEC: 3.72 cu. ft.)1) Spin speed: 1100 rpm max. (WM2277H*), 1050 rpm max. (WM2075CW) 1000 rpm max. (WM2077CW) Permissible water pressure: 4.5 ~ 145 PSI (30 ~ 1000 kPa) Specifications subject...
... kg) 3.22 cu. Accessories for removing shipping bolts and leveling the washer 1) Per IEC 60456, washes the equivalent of a 3.72 cu. ft. agitator washer. 4 ft. (IEC: 3.72 cu. ft.)1) Spin speed: 1100 rpm max. (WM2277H*), 1050 rpm max. (WM2075CW) 1000 rpm max. (WM2077CW) Permissible water pressure: 4.5 ~ 145 PSI (30 ~ 1000 kPa) Specifications subject...
Owner's Manual
Page 6
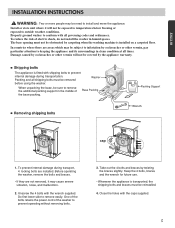
... the appliance and its surroundings in clean condition at all times. WARNING : Two or more people may be removed before using the washer. Properly ground washer to infestation by twisting the braces slightly. To reduce the risk of electric shock, do not install the... washer in the middle of the washer to remove easily. To prevent internal damage during transportation. Before operating the washer, remove the bolts and braces. • If they are installed. Shipping bolts The appliance is...
... the appliance and its surroundings in clean condition at all times. WARNING : Two or more people may be removed before using the washer. Properly ground washer to infestation by twisting the braces slightly. To reduce the risk of electric shock, do not install the... washer in the middle of the washer to remove easily. To prevent internal damage during transportation. Before operating the washer, remove the bolts and braces. • If they are installed. Shipping bolts The appliance is...
Owner's Manual
Page 7
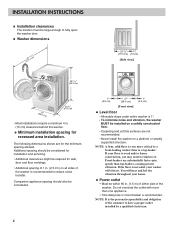
... view] 3811/16" (98.3 cm) (68.267c" m) 29 3/4" (75.6 cm) • Most installations require a minimum 4 in. (10 cm) clearance behind the washer. Minimum installation spacing for the minimum spacing allowed. Additional spacing should also be considered. 6 1" (2.5 cm) 27" (68.6 cm) [Front view] 1" (2.5 cm) Level ... • Additional spacing of 1 in. (2.5 cm) on a platform or weakly supported structure. NOTE: It is not solid, your washer will hear and feel the vibration throughout your floor is recommended to reinforce it. Do not overload the outlet with more critical to a...
... view] 3811/16" (98.3 cm) (68.267c" m) 29 3/4" (75.6 cm) • Most installations require a minimum 4 in. (10 cm) clearance behind the washer. Minimum installation spacing for the minimum spacing allowed. Additional spacing should also be considered. 6 1" (2.5 cm) 27" (68.6 cm) [Front view] 1" (2.5 cm) Level ... • Additional spacing of 1 in. (2.5 cm) on a platform or weakly supported structure. NOTE: It is not solid, your washer will hear and feel the vibration throughout your floor is recommended to reinforce it. Do not overload the outlet with more critical to a...
Owner's Manual
Page 8
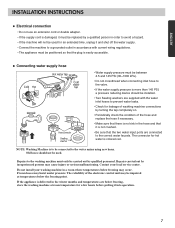
... local service center. Frozen hoses may cause injury or serious malfunctioning. NOTE: Washing Machine is easily accessible. Old hoses should be installed. • Two Sealing washers are supplied with current wiring regulations. • The appliance must be carried out by qualified personnel. If the appliance is delivered in the hose and...
... local service center. Frozen hoses may cause injury or serious malfunctioning. NOTE: Washing Machine is easily accessible. Old hoses should be installed. • Two Sealing washers are supplied with current wiring regulations. • The appliance must be carried out by qualified personnel. If the appliance is delivered in the hose and...
Owner's Manual
Page 9
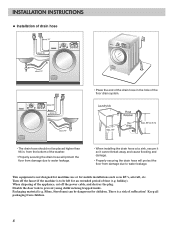
... maritime use or for children. Keep all packaging from damage due to be placed higher than 96 in. Packaging material (e.g. from the bottom of the washer. • Properly securing the drain hose will protect the floor from damage due to prevent young children being trapped inside.
... maritime use or for children. Keep all packaging from damage due to be placed higher than 96 in. Packaging material (e.g. from the bottom of the washer. • Properly securing the drain hose will protect the floor from damage due to prevent young children being trapped inside.
Owner's Manual
Page 10
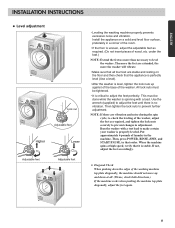
...the feet perfectly. Then tighten the lock nuts to prevent changes in that the appliance is perfectly level (Use a level). • After the washer is level, tighten the lock nuts up and down the edges of the washing machine top plate diagonally, the machine should not move up against... adjust the adjustable feet as required, and tighten the lock nuts securely to prevent further adjustment. Use the wrench (supplied) to level the washer. Run the washer with a load. The more the feet are extended, the more than necessary to adjust the feet until there is properly leveled. If not,...
...the feet perfectly. Then tighten the lock nuts to prevent changes in that the appliance is perfectly level (Use a level). • After the washer is level, tighten the lock nuts up and down the edges of the washing machine top plate diagonally, the machine should not move up against... adjust the adjustable feet as required, and tighten the lock nuts securely to prevent further adjustment. Use the wrench (supplied) to level the washer. Run the washer with a load. The more the feet are extended, the more than necessary to adjust the feet until there is properly leveled. If not,...
Owner's Manual
Page 11
... fire, electric shock, or injury to amount of -balance load. Sorting To get the best results, sort clothes into loads that can damage both your washer and your clothes. • Close zippers, hooks, and strings to make sure that they are empty. Large items should be more than half the total...
... fire, electric shock, or injury to amount of -balance load. Sorting To get the best results, sort clothes into loads that can damage both your washer and your clothes. • Close zippers, hooks, and strings to make sure that they are empty. Large items should be more than half the total...
Owner's Manual
Page 12
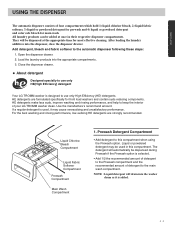
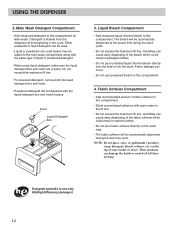
...detergent, bleach and fabric softener to this compartment. About detergent Designed specially to use only HE(High Efficiency) detergent Your LG TROMM washer is used in their respective dispenser compartments. Open the dispenser drawer. 2. If a regular detergent is designed to keep the interior of... your LG TROMM washer clean. The detergent will be dispensed during Prewash if the Prewash option is added. 11 They will automatically be dispensed at...
...detergent, bleach and fabric softener to this compartment. About detergent Designed specially to use only HE(High Efficiency) detergent Your LG TROMM washer is used in their respective dispenser compartments. Open the dispenser drawer. 2. If a regular detergent is designed to keep the interior of... your LG TROMM washer clean. The detergent will be dispensed during Prewash if the Prewash option is added. 11 They will automatically be dispensed at...
Owner's Manual
Page 13
... the last rinse cycle. Liquid Bleach Compartment • Add measured liquid chlorine bleach to the main wash compartment along with the same type of your washer or dryer. These products can be used. • Liquid or powdered color-safe bleach may be added to this compartment. • Dilute concentrated softeners with...
... the last rinse cycle. Liquid Bleach Compartment • Add measured liquid chlorine bleach to the main wash compartment along with the same type of your washer or dryer. These products can be used. • Liquid or powdered color-safe bleach may be added to this compartment. • Dilute concentrated softeners with...
Owner's Manual
Page 15
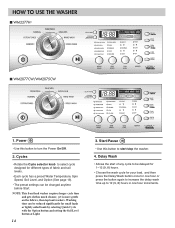
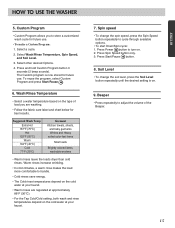
... to select cycle designed for different types of any cycle to turn the Power On/Off. 2. HOW TO USE THE WASHER I WM2277H* I WM2077CW/WM2075CW 1. Delay Wash • Allows the start /stop the washer. 4. Power • Use this button to start of fabric and soil levels. • Each cycle has a preset Water Temperature..., Spin Speed, Soil Level, and Option (See page 13). • The preset settings can be changed anytime before Start. NOTE: This front load washer requires longer cycle time and gets clothes much cleaner, yet is more gentle on the fabrics, than top load...
... to select cycle designed for different types of any cycle to turn the Power On/Off. 2. HOW TO USE THE WASHER I WM2277H* I WM2077CW/WM2075CW 1. Delay Wash • Allows the start /stop the washer. 4. Power • Use this button to start of fabric and soil levels. • Each cycle has a preset Water Temperature..., Spin Speed, Soil Level, and Option (See page 13). • The preset settings can be changed anytime before Start. NOTE: This front load washer requires longer cycle time and gets clothes much cleaner, yet is more gentle on the fabrics, than top load...
Owner's Manual
Page 16
... water at your faucet. • Warm rinses are washing. • Follow the fabric care label and chart below for future use . HOW TO USE THE WASHER 5. Select other desired Options. 4. Warm rinses increase wrinkling. • In cold climates, a warm rinse makes the load more comfortable to adjust the volume of load...
... water at your faucet. • Warm rinses are washing. • Follow the fabric care label and chart below for future use . HOW TO USE THE WASHER 5. Select other desired Options. 4. Warm rinses increase wrinkling. • In cold climates, a warm rinse makes the load more comfortable to adjust the volume of load...
Owner's Manual
Page 17
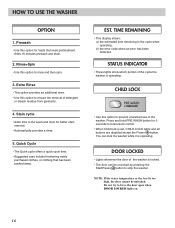
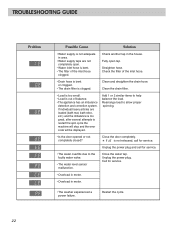
... in the cycle when operating, b) the error code when an error has been detected. STATUS INDICATOR • These lights show which portion of the washer is operating. Prewash • Use this option to lock/unlock control. • When Child lock is operating. CHILD LOCK • Use this option... seconds to prevent unwanted use of detergent or bleach residue from garments. 4. DOOR LOCKED • Lights whenever the door of the cycle the washer is set, CHILD LOCK lights and all buttons are disabled except the Power button. EST. Rinse+Spin • Use this option to stop the...
... in the cycle when operating, b) the error code when an error has been detected. STATUS INDICATOR • These lights show which portion of the washer is operating. Prewash • Use this option to lock/unlock control. • When Child lock is operating. CHILD LOCK • Use this option... seconds to prevent unwanted use of detergent or bleach residue from garments. 4. DOOR LOCKED • Lights whenever the door of the cycle the washer is set, CHILD LOCK lights and all buttons are disabled except the Power button. EST. Rinse+Spin • Use this option to stop the...
Owner's Manual
Page 18
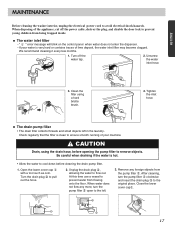
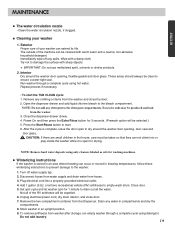
... the door lock to the original place. Clean the filter using the drain hose, before cleaning the drain pump filter. 1. ENGLISH MAINTENANCE Before cleaning the washer interior, unplug the electrical power cord to pull out the hose. 2. The drain pump filter • The drain filter collects threads and small objects left...
... the door lock to the original place. Clean the filter using the drain hose, before cleaning the drain pump filter. 1. ENGLISH MAINTENANCE Before cleaning the washer interior, unplug the electrical power cord to pull out the hose. 2. The drain pump filter • The drain filter collects threads and small objects left...
Owner's Manual
Page 19
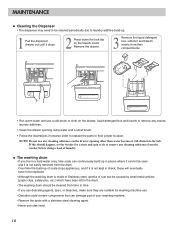
...the drawer opening other than water because it will eventually have been left in the drum. • The washing drum should happen, set the washer for washing machine use. • Descaler could contain components that can continuously build up . 1 Pull the dispenser drawer out until it is ...• Follow the illustrations in reverse order to replace the parts to their proper location. NOTE: Do not use any cleaning substance from the washer before doing a load of laundry. MAINTENANCE Cleaning the Dispenser • The dispenser may need to be cleaned from time to time. • ...
...the drawer opening other than water because it will eventually have been left in the drum. • The washing drum should happen, set the washer for washing machine use. • Descaler could contain components that can continuously build up . 1 Pull the dispenser drawer out until it is ...• Follow the illustrations in reverse order to replace the parts to their proper location. NOTE: Do not use any cleaning substance from the washer before doing a load of laundry. MAINTENANCE Cleaning the Dispenser • The dispenser may need to be cleaned from time to time. • ...
Owner's Manual
Page 20
.... 19 Close the dispenser drawer slowly. 4. Close door. 5. Disconnect hoses from water supply and drain water from the washer. 3. The outside of your washer 1. These areas should always be cleaned with warm water and a neutral, non-abrasive household detergent. After the cycle is..., and close the door. 2. Press the Start/Pause button to ensure a water-tight seal. Wipe with sharp objects. Store washer in freezing temperatures, follow these winterizing instructions to prevent damage to the detergent compartments. ENGLISH MAINTENANCE The water circulation nozzle • ...
.... 19 Close the dispenser drawer slowly. 4. Close door. 5. Disconnect hoses from water supply and drain water from the washer. 3. The outside of your washer 1. These areas should always be cleaned with warm water and a neutral, non-abrasive household detergent. After the cycle is..., and close the door. 2. Press the Start/Pause button to ensure a water-tight seal. Wipe with sharp objects. Store washer in freezing temperatures, follow these winterizing instructions to prevent damage to the detergent compartments. ENGLISH MAINTENANCE The water circulation nozzle • ...
Owner's Manual
Page 21
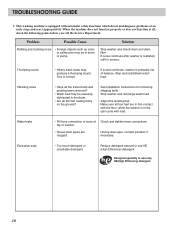
... be in the spin cycle with load. Stop and redistribute wash load. Contact plumber if necessary. Stop washer and rearrange wash load. If sound continues, washer is restarted, call the Service Department. See Installation Instructions for service. Reduce detergent amount or use only ...HE(High Efficiency) detergent 20 Designed specially to use HE (High Efficiency) detergent. Solution Stop washer and check drum and drain filter. Vibrating noise • Have all the feet resting firmly on the ground? Water leaks •...
... be in the spin cycle with load. Stop and redistribute wash load. Contact plumber if necessary. Stop washer and rearrange wash load. If sound continues, washer is restarted, call the Service Department. See Installation Instructions for service. Reduce detergent amount or use only ...HE(High Efficiency) detergent 20 Designed specially to use HE (High Efficiency) detergent. Solution Stop washer and check drum and drain filter. Vibrating noise • Have all the feet resting firmly on the ground? Water leaks •...
Owner's Manual
Page 22
.... Solution Check another tap in wall outlet. Check the filter of the inlet hose. The door must lock before the clothes washer begins to spin. Washer does not start • Electrical power cord may not be achieved. If problem is a circuit overload, have it corrected by...8226; House fuse is blown, circuit breaker tripped, or a power outage has occurred. TROUBLESHOOTING GUIDE ENGLISH Problem Possible Cause Water does not enter washer or it may take a few moments before spin can be plugged in or connection may vary by a qualified electrician. • Water supply tap...
.... Solution Check another tap in wall outlet. Check the filter of the inlet hose. The door must lock before the clothes washer begins to spin. Washer does not start • Electrical power cord may not be achieved. If problem is a circuit overload, have it corrected by...8226; House fuse is blown, circuit breaker tripped, or a power outage has occurred. TROUBLESHOOTING GUIDE ENGLISH Problem Possible Cause Water does not enter washer or it may take a few moments before spin can be plugged in or connection may vary by a qualified electrician. • Water supply tap...
Owner's Manual
Page 23
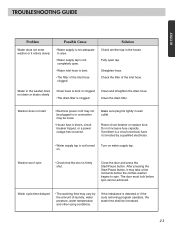
... and the error code will be displayed. Unplug the power plug and call for service. • Overload in motor. • Overload in motor. • The washer experienced a power failure. Clean the drain filter. • Load is too small. • Load is out of the inlet hose. • Drain hose is bent...
... and the error code will be displayed. Unplug the power plug and call for service. • Overload in motor. • Overload in motor. • The washer experienced a power failure. Clean the drain filter. • Load is too small. • Load is out of the inlet hose. • Drain hose is bent...


