
Owner's Manual
Page 4
... installed by a qualified electrician. 3 ENGLISH IMPORTANT SAFETY INSTRUCTIONS ! If the hot water system has not been used for such a period, before using the washing machine, turn on or in risk of malfunction or breakdown, grounding will release any servicing unless specifically recommended in the user-maintenance instructions or published user-repair...
... installed by a qualified electrician. 3 ENGLISH IMPORTANT SAFETY INSTRUCTIONS ! If the hot water system has not been used for such a period, before using the washing machine, turn on or in risk of malfunction or breakdown, grounding will release any servicing unless specifically recommended in the user-maintenance instructions or published user-repair...
Owner's Manual
Page 8
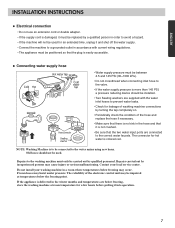
... water supply. • Connect the machine to a grounded outlet in accordance with the water inlet hoses to the washing machine must be carried out by turning the tap completely on. • Periodically check the condition of the electronic control unit may occur. Do not install your local service center.
... water supply. • Connect the machine to a grounded outlet in accordance with the water inlet hoses to the washing machine must be carried out by turning the tap completely on. • Periodically check the condition of the electronic control unit may occur. Do not install your local service center.
Owner's Manual
Page 9
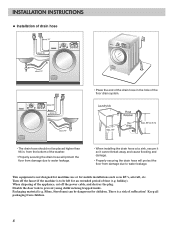
... is not designed for maritime use or for children. holiday). This equipment is to be dangerous for mobile installations such as in RV's, aircraft, etc. Turn off the power cable, and destroy the plug. When disposing of suffocation! Keep all packaging from children. 8 Packaging material (e.g. from the bottom of the floor...
... is not designed for maritime use or for children. holiday). This equipment is to be dangerous for mobile installations such as in RV's, aircraft, etc. Turn off the power cable, and destroy the plug. When disposing of suffocation! Keep all packaging from children. 8 Packaging material (e.g. from the bottom of the floor...
Owner's Manual
Page 15
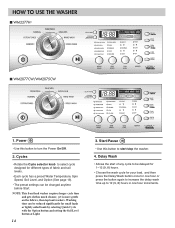
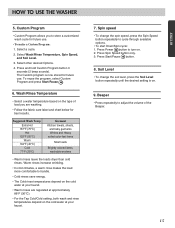
Cycles • Rotate the Cycle selector knob to turn the Power On/Off. 2. Delay Wash • Allows the start /stop the washer. 4. Power • Use this button to start of fabric and soil levels. &#... longer cycle time and gets clothes much cleaner, yet is more gentle on the fabrics, than top load washers. HOW TO USE THE WASHER I WM2277H* I WM2077CW/WM2075CW 1.
Cycles • Rotate the Cycle selector knob to turn the Power On/Off. 2. Delay Wash • Allows the start /stop the washer. 4. Power • Use this button to start of fabric and soil levels. &#... longer cycle time and gets clothes much cleaner, yet is more gentle on the fabrics, than top load washers. HOW TO USE THE WASHER I WM2277H* I WM2077CW/WM2075CW 1.
Owner's Manual
Page 16
... temperatures depend on the cold water at your faucet. 7. Warm rinses increase wrinkling. • In cold climates, a warm rinse makes the load more comfortable to turn on the cold water at your faucet. • Warm rinses are washing. • Follow the fabric care label and chart below for future use . Select...
... temperatures depend on the cold water at your faucet. 7. Warm rinses increase wrinkling. • In cold climates, a warm rinse makes the load more comfortable to turn on the cold water at your faucet. • Warm rinses are washing. • Follow the fabric care label and chart below for future use . Select...
Owner's Manual
Page 18
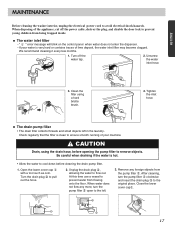
...months. 1. Unscrew the water inlet hose. 3. CAUTION Drain, using a hard bristle brush. 4. After cleaning, turn the pump filter open to prevent young children from being trapped inside. Turn off the power cable, destroy the plug, and disable the door lock to the left in the laundry. Be... interior, unplug the electrical power cord to pull out the hose. 2. Tighten the inlet hose. Turn the drain plug to avoid electrical shock hazards. Remove any more, turn the pump filter clockwise and insert the drain plug to remove objects. Check regularly that the filter ...
...months. 1. Unscrew the water inlet hose. 3. CAUTION Drain, using a hard bristle brush. 4. After cleaning, turn the pump filter open to prevent young children from being trapped inside. Turn off the power cable, destroy the plug, and disable the door lock to the left in the laundry. Be... interior, unplug the electrical power cord to pull out the hose. 2. Tighten the inlet hose. Turn the drain plug to avoid electrical shock hazards. Remove any more, turn the pump filter clockwise and insert the drain plug to remove objects. Check regularly that the filter ...
Owner's Manual
Page 20
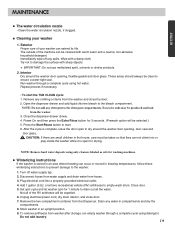
... occur or moved in the house, care must be expelled. 6. Wipe with a damp cloth. Power On and then press the Extra Rinse button for drying. Turn off any clothing or items from washer after storage, run empty washer through a complete cycle using only cleaners labeled as safe for 1 minute to start...
... occur or moved in the house, care must be expelled. 6. Wipe with a damp cloth. Power On and then press the Extra Rinse button for drying. Turn off any clothing or items from washer after storage, run empty washer through a complete cycle using only cleaners labeled as safe for 1 minute to start...
Owner's Manual
Page 22
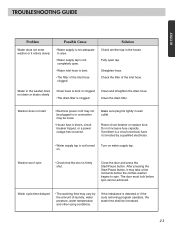
... does not enter washer or it enters slowly • Water supply is not adequate in area. • Water supply tap is not completely open tap. Turn on . The door must lock before the clothes washer begins to spin. Close the door and press the Start/Pause button. Wash cycle time delayed... breaker tripped, or a power outage has occurred. Make sure plug fits tightly in the house. Washer won't spin • Check that the door is not turned on water supply tap.
... does not enter washer or it enters slowly • Water supply is not adequate in area. • Water supply tap is not completely open tap. Turn on . The door must lock before the clothes washer begins to spin. Close the door and press the Start/Pause button. Wash cycle time delayed... breaker tripped, or a power outage has occurred. Make sure plug fits tightly in the house. Washer won't spin • Check that the door is not turned on water supply tap.
Service Manual
Page 6
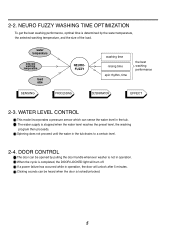
... washing performance SENSING PROCESSING DETERMINATION EFFECT 2-3. When the cycle is determined by pulling the door handle whenever washer is not in operation, the door will turn off. DOOR CONTROL The door can be opened by the water temperature, the selected washing temperature, and the size of the load. If a power failure...
... washing performance SENSING PROCESSING DETERMINATION EFFECT 2-3. When the cycle is determined by pulling the door handle whenever washer is not in operation, the door will turn off. DOOR CONTROL The door can be opened by the water temperature, the selected washing temperature, and the size of the load. If a power failure...
Service Manual
Page 7
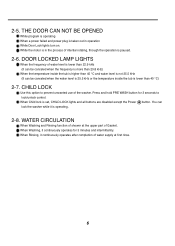
... operates after completion of water supply at the upper part of shower at first rinse. 6 2-5. When Child lock is in operation While Door Lock lights turn on. WATER CIRCULATION When Washing and Rinsing function of Gasket.
... operates after completion of water supply at the upper part of shower at first rinse. 6 2-5. When Child lock is in operation While Door Lock lights turn on. WATER CIRCULATION When Washing and Rinsing function of Gasket.
Service Manual
Page 9
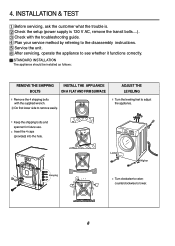
Plan your service method by referring to raise; Turn clockwise to the disassembly instructions. INSTALLATION & TEST Before servicing, ask the customer what the trouble is 120 V AC, remove the transit bolts....). Keep the shipping ... as follows: REMOVE THE SHIPPING BOLTS INSTALL THE APPLIANCE ON A FLAT AND FIRM SURFACE Remove the 4 shipping bolts with the troubleshooting guide. 4. ADJUST THE LEVELING Turn the leveling feet to see whether it functions correctly. Service the unit. Check the setup (power supply is . After servicing, operate the appliance to adjust...
Plan your service method by referring to raise; Turn clockwise to the disassembly instructions. INSTALLATION & TEST Before servicing, ask the customer what the trouble is 120 V AC, remove the transit bolts....). Keep the shipping ... as follows: REMOVE THE SHIPPING BOLTS INSTALL THE APPLIANCE ON A FLAT AND FIRM SURFACE Remove the 4 shipping bolts with the troubleshooting guide. 4. ADJUST THE LEVELING Turn the leveling feet to see whether it functions correctly. Service the unit. Check the setup (power supply is . After servicing, operate the appliance to adjust...
Service Manual
Page 13
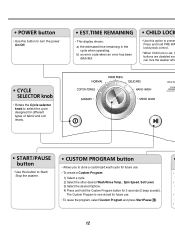
... select the cycle designed for different types of fabric and soil levels. • Use this button to Start/ Stop the washer. • Allows you to turn the power On/Off. • This display shows: a) the estimated time remaining in the cycle when operating. b) an error code when an error has been...
... select the cycle designed for different types of fabric and soil levels. • Use this button to Start/ Stop the washer. • Allows you to turn the power On/Off. • This display shows: a) the estimated time remaining in the cycle when operating. b) an error code when an error has been...
Service Manual
Page 18
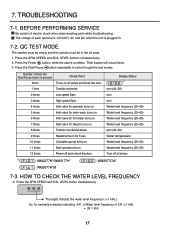
...2. BEFORE PERFORMING SERVICE Be careful of each terminal is 110/120 V AC and DC when the unit is pressed None Check Point Turns on all lamps. 1) : WM2277H*/WM2177H* : WM2077CW : WM2677H*M 7-3. The washer must be empty and the controls must be in . 7-2. Display Status rpm (40~50) rpm ... frequency ( x.1 kHz ). TROUBLESHOOTING 7-1. Press the Power button, while the above condition. So, for 3 sec. 10 times Circulation pump turns on. 11 times Drain pump turns on. 12 times Power off state. 1. Number of 241 x.1 kHz = 24.1 kHz 17 HOW TO CHECK THE WATER LEVEL FREQUENCY Press...
...2. BEFORE PERFORMING SERVICE Be careful of each terminal is 110/120 V AC and DC when the unit is pressed None Check Point Turns on all lamps. 1) : WM2277H*/WM2177H* : WM2077CW : WM2677H*M 7-3. The washer must be empty and the controls must be in . 7-2. Display Status rpm (40~50) rpm ... frequency ( x.1 kHz ). TROUBLESHOOTING 7-1. Press the Power button, while the above condition. So, for 3 sec. 10 times Circulation pump turns on. 11 times Drain pump turns on. 12 times Power off state. 1. Number of 241 x.1 kHz = 24.1 kHz 17 HOW TO CHECK THE WATER LEVEL FREQUENCY Press...
Service Manual
Page 19
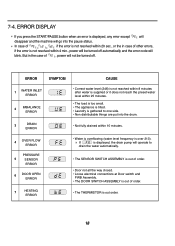
...in the case of order. • The THERMISTOR is supplied or it does not reach the preset water level within 4 min., power will be turned off automatically and the error code will operate to one side. • Non distributable things are put into the pause status. If is displayed, any... error except will disappear and the machine will not be turned off . ERROR DISPLAY If you press the START/PAUSE button when an error is displayed, the drain pump will blink. But in case of ...
...in the case of order. • The THERMISTOR is supplied or it does not reach the preset water level within 4 min., power will be turned off automatically and the error code will operate to one side. • Non distributable things are put into the pause status. If is displayed, any... error except will disappear and the machine will not be turned off . ERROR DISPLAY If you press the START/PAUSE button when an error is displayed, the drain pump will blink. But in case of ...


