
Owner's Manual
Page 3
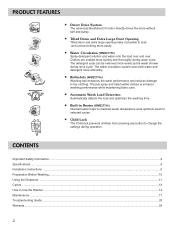
The water circulation system uses both water and detergent more easily. Built-in Heater (WM2277H*) Internal heater helps to Use the Washer...14 Maintenance ...17 Troubleshooting Guide ...20 Warranty ...23 2 Child Lock The Child lock prevents children from pressing any button to load and unload clothing more efficiently. PRODUCT FEATURES Direct ...
The water circulation system uses both water and detergent more easily. Built-in Heater (WM2277H*) Internal heater helps to Use the Washer...14 Maintenance ...17 Troubleshooting Guide ...20 Warranty ...23 2 Child Lock The Child lock prevents children from pressing any button to load and unload clothing more efficiently. PRODUCT FEATURES Direct ...
Owner's Manual
Page 21
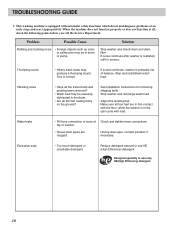
... drum and drain filter. This is equipped with load. See Installation Instructions for service. Reduce detergent amount or use only HE(High Efficiency) detergent 20 TROUBLESHOOTING GUIDE This washing machine is normal. When the machine does not function properly or does not function at an early stage and react appropriately. Vibrating...
... drum and drain filter. This is equipped with load. See Installation Instructions for service. Reduce detergent amount or use only HE(High Efficiency) detergent 20 TROUBLESHOOTING GUIDE This washing machine is normal. When the machine does not function properly or does not function at an early stage and react appropriately. Vibrating...
Owner's Manual
Page 22
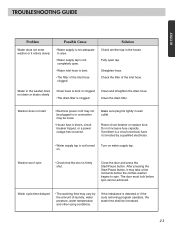
... time shall be loose. • House fuse is bent. • The filter of the inlet hose. Do not increase fuse capacity. Clean the drain filter. TROUBLESHOOTING GUIDE ENGLISH Problem Possible Cause Water does not enter washer or it enters slowly • Water supply is not adequate in area. • Water supply...
... time shall be loose. • House fuse is bent. • The filter of the inlet hose. Do not increase fuse capacity. Clean the drain filter. TROUBLESHOOTING GUIDE ENGLISH Problem Possible Cause Water does not enter washer or it enters slowly • Water supply is not adequate in area. • Water supply...
Owner's Manual
Page 23
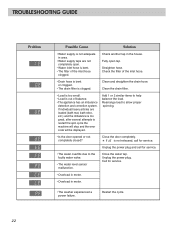
... released, call for service. • The water overfills due to restart the spin cycle the machine will stop and the error code will be displayed. TROUBLESHOOTING GUIDE Problem Possible Cause Solution • Water supply is not adequate in area. • Water supply taps are loaded (bath mat, bath robe, etc.) and...
... released, call for service. • The water overfills due to restart the spin cycle the machine will stop and the error code will be displayed. TROUBLESHOOTING GUIDE Problem Possible Cause Solution • Water supply is not adequate in area. • Water supply taps are loaded (bath mat, bath robe, etc.) and...
Service Manual
Page 3
... 10-2. CONTENTS 1. INSTALLATION & TEST ...8 5. OPERATION ...11 6. QC TEST MODE...17 7-3. HOW TO CHECK THE WATER LEVEL FREQUENCY 17 7-4. EXPLODED VIEW ...41 10-1. DISPENSER ASSEMBLY 43 2 TROUBLESHOOTING...17 7-1. BEFORE PERFORMING SERVICE 17 7-2. FEATURES & TECHNICAL EXPLANATION 4 3. ERROR DIAGNOSIS AND CHECK LIST 20 8-1. DISASSEMBLY INSTRUCTIONS 32 10. DRUM & TUB ASSEMBLY 42 10-3. PARTS IDENTIFICATION...
... 10-2. CONTENTS 1. INSTALLATION & TEST ...8 5. OPERATION ...11 6. QC TEST MODE...17 7-3. HOW TO CHECK THE WATER LEVEL FREQUENCY 17 7-4. EXPLODED VIEW ...41 10-1. DISPENSER ASSEMBLY 43 2 TROUBLESHOOTING...17 7-1. BEFORE PERFORMING SERVICE 17 7-2. FEATURES & TECHNICAL EXPLANATION 4 3. ERROR DIAGNOSIS AND CHECK LIST 20 8-1. DISASSEMBLY INSTRUCTIONS 32 10. DRUM & TUB ASSEMBLY 42 10-3. PARTS IDENTIFICATION...
Service Manual
Page 9
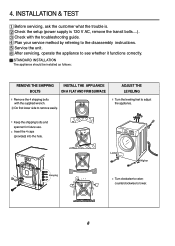
... The appliance should be installed as follows: REMOVE THE SHIPPING BOLTS INSTALL THE APPLIANCE ON A FLAT AND FIRM SURFACE Remove the 4 shipping bolts with the troubleshooting guide. Plan your service method by referring to adjust the appliance. counterclockwise to remove easily. Do first lower side to lower. 8 Turn clockwise to see...
... The appliance should be installed as follows: REMOVE THE SHIPPING BOLTS INSTALL THE APPLIANCE ON A FLAT AND FIRM SURFACE Remove the 4 shipping bolts with the troubleshooting guide. Plan your service method by referring to adjust the appliance. counterclockwise to remove easily. Do first lower side to lower. 8 Turn clockwise to see...
Service Manual
Page 18
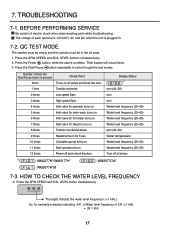
.... 9 times Heater turns on for example a display indicating 241: a Water level frequency of electric shock when disconnecting parts while troubleshooting. Number of each terminal is 110/120 V AC and DC when the unit is pressed None Check Point Turns on all lamps. ...1) : WM2277H*/WM2177H* : WM2077CW : WM2677H*M 7-3. Press the SPIN SPEED and SOIL LEVEL buttons simultaneously. 2. TROUBLESHOOTING 7-1. BEFORE PERFORMING SERVICE Be careful of 241 x.1 kHz = 24.1 kHz 17 Press the Start/Pause button...
.... 9 times Heater turns on for example a display indicating 241: a Water level frequency of electric shock when disconnecting parts while troubleshooting. Number of each terminal is 110/120 V AC and DC when the unit is pressed None Check Point Turns on all lamps. ...1) : WM2277H*/WM2177H* : WM2077CW : WM2677H*M 7-3. Press the SPIN SPEED and SOIL LEVEL buttons simultaneously. 2. TROUBLESHOOTING 7-1. BEFORE PERFORMING SERVICE Be careful of 241 x.1 kHz = 24.1 kHz 17 Press the Start/Pause button...
Service Manual
Page 24
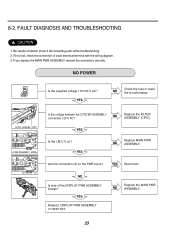
... breaker. 8-2. If you replace the MAIN PWB ASSEMBLY, reinsert the connectors correctly. First of all, check the connection of electric shock if disconnecting parts while troubleshooting. 2. Replace the FILTER ASSEMBLY (CIRC). YES Reconnect. Be careful of each electrical terminal with the wiring diagram. 3. NO Is wire of the DISPLAY PWB ASSEMBLY... 110/120 V AC? Is the voltage between the 2 FILTER ASSEMBLY NO connectors 120 V AC? YES Is the LED (1) on the PWB loose? FAULT DIAGNOSIS AND TROUBLESHOOTING CAUTION 1. Are the connectors (2) on ?
... breaker. 8-2. If you replace the MAIN PWB ASSEMBLY, reinsert the connectors correctly. First of all, check the connection of electric shock if disconnecting parts while troubleshooting. 2. Replace the FILTER ASSEMBLY (CIRC). YES Reconnect. Be careful of each electrical terminal with the wiring diagram. 3. NO Is wire of the DISPLAY PWB ASSEMBLY... 110/120 V AC? Is the voltage between the 2 FILTER ASSEMBLY NO connectors 120 V AC? YES Is the LED (1) on the PWB loose? FAULT DIAGNOSIS AND TROUBLESHOOTING CAUTION 1. Are the connectors (2) on ?

