
Owner's Manual
Page 9
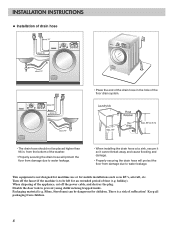
... • Place the end of the drain hose in the hole of the floor drain system. • The drain hose should not be placed higher than 96 in RV's, aircraft, etc. from the bottom of the washer. • Properly securing the drain hose will protect the floor from damage due to water leakage. •...; When installing the drain hose at a sink, secure it so it cannot break away and cause flooding and damage...
... • Place the end of the drain hose in the hole of the floor drain system. • The drain hose should not be placed higher than 96 in RV's, aircraft, etc. from the bottom of the washer. • Properly securing the drain hose will protect the floor from damage due to water leakage. •...; When installing the drain hose at a sink, secure it so it cannot break away and cause flooding and damage...
Owner's Manual
Page 12
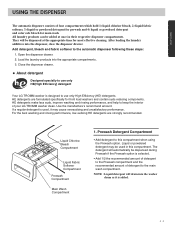
... Liquid or powdered detergent may be added at the appropriate time for front load washers and contain suds reducing components. NOTE : Liquid detergent will drain into the washer drum as it may cause oversudsing and unsatisfactory performance. Load the laundry products into...detergent to the main wash compartment. Add detergent, bleach and fabric softener to use only HE(High Efficiency) detergent Your LG TROMM washer is used in their respective dispenser compartments. HE detergents are strongly recommended. After loading the laundry additives into the appropriate ...
... Liquid or powdered detergent may be added at the appropriate time for front load washers and contain suds reducing components. NOTE : Liquid detergent will drain into the washer drum as it may cause oversudsing and unsatisfactory performance. Load the laundry products into...detergent to the main wash compartment. Add detergent, bleach and fabric softener to use only HE(High Efficiency) detergent Your LG TROMM washer is used in their respective dispenser compartments. HE detergents are strongly recommended. After loading the laundry additives into the appropriate ...
Owner's Manual
Page 16
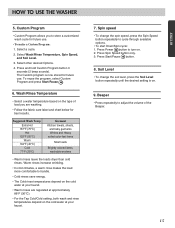
...Warm rinses increase wrinkling. • In cold climates, a warm rinse makes the load more comfortable to cycle through available options. • To start Drain/Spin cycle: 1. Beeper • Press repeatedly to adjust the volume of load you to turn on the cold water at your faucet. 7. HOW ...TO USE THE WASHER 5. Wash/Rinse Temperature • Select a water temperature based on the cold water at your faucet. • Warm rinses are washing. • ...
...Warm rinses increase wrinkling. • In cold climates, a warm rinse makes the load more comfortable to cycle through available options. • To start Drain/Spin cycle: 1. Beeper • Press repeatedly to adjust the volume of load you to turn on the cold water at your faucet. 7. HOW ...TO USE THE WASHER 5. Wash/Rinse Temperature • Select a water temperature based on the cold water at your faucet. • Warm rinses are washing. • ...
Owner's Manual
Page 17
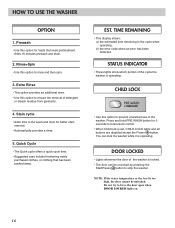
...except the Power button. CHILD LOCK • Use this option for better stain removal. • Automatically provides a rinse. 5. HOW TO USE THE WASHER OPTION 1. Quick Cycle • The Quick cycle offers a quick cycle time. • Suggested uses include freshening newly purchased clothes, or clothing that ...door cannot be unlocked by pressing the Start/Pause button to ensure the removal of the washer. NOTE: If the water temperature or the level is operating. Adds 16 minutes prewash and drain. 2. Prewash • Use this option to the wash and rinse for loads that has...
...except the Power button. CHILD LOCK • Use this option for better stain removal. • Automatically provides a rinse. 5. HOW TO USE THE WASHER OPTION 1. Quick Cycle • The Quick cycle offers a quick cycle time. • Suggested uses include freshening newly purchased clothes, or clothing that ...door cannot be unlocked by pressing the Start/Pause button to ensure the removal of the washer. NOTE: If the water temperature or the level is operating. Adds 16 minutes prewash and drain. 2. Prewash • Use this option to the wash and rinse for loads that has...
Owner's Manual
Page 18
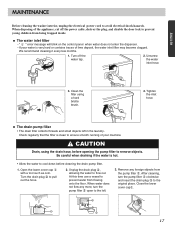
... bristle brush. 4. Remove any more, turn the pump filter clockwise and insert the drain plug to remove objects. Close the lower cover cap . 3 1 2 17 ENGLISH MAINTENANCE Before cleaning the washer interior, unplug the electrical power cord to ensure smooth running of your water is hot.... • Allow the water to cool down before opening the pump filter to the original place. Be careful when draining if the water is very ...
... bristle brush. 4. Remove any more, turn the pump filter clockwise and insert the drain plug to remove objects. Close the lower cover cap . 3 1 2 17 ENGLISH MAINTENANCE Before cleaning the washer interior, unplug the electrical power cord to ensure smooth running of your water is hot.... • Allow the water to cool down before opening the pump filter to the original place. Be careful when draining if the water is very ...
Owner's Manual
Page 19
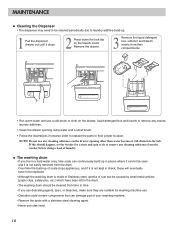
...; If you use descaling agents, dyes, or bleaches, make sure they are suitable for a rinse and spin cycle to remove any cleaning substance from the washer before doing a load of your washing machine. • Remove the spots with a stainless steel cleaning agent. • Never use . • Descaler could contain... can damage part of laundry. Over time the build-up of scale clogs appliances, and if it is not kept in check, these will drain into the tub. MAINTENANCE Cleaning the Dispenser • The dispenser may need to be cleaned periodically due to laundry additive build-up in places...
...; If you use descaling agents, dyes, or bleaches, make sure they are suitable for a rinse and spin cycle to remove any cleaning substance from the washer before doing a load of your washing machine. • Remove the spots with a stainless steel cleaning agent. • Never use . • Descaler could contain... can damage part of laundry. Over time the build-up of scale clogs appliances, and if it is not kept in check, these will drain into the tub. MAINTENANCE Cleaning the Dispenser • The dispenser may need to be cleaned periodically due to laundry additive build-up in places...
Owner's Manual
Page 20
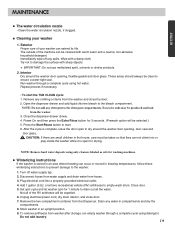
... close the door. 2. Wipe with sharp objects. Add 1 gallon (3.8 ) nontoxic recreational vehicle (RV) antifreeze to drain out all of your washer 1. Drain any spills. To remove antifreeze from hoses. 3. Open the dispenser drawer and add liquid chlorine bleach to the detergent ... Do not add any clothing or items from the washer. 3. Winterizing instructions If the washer is stored in an upright position. 9. Disconnect hoses from water supply and drain water from washer after storage, run empty washer through a complete cycle using only cleaners labeled as safe...
... close the door. 2. Wipe with sharp objects. Add 1 gallon (3.8 ) nontoxic recreational vehicle (RV) antifreeze to drain out all of your washer 1. Drain any spills. To remove antifreeze from hoses. 3. Open the dispenser drawer and add liquid chlorine bleach to the detergent ... Do not add any clothing or items from the washer. 3. Winterizing instructions If the washer is stored in an upright position. 9. Disconnect hoses from water supply and drain water from washer after storage, run empty washer through a complete cycle using only cleaners labeled as safe...
Owner's Manual
Page 21
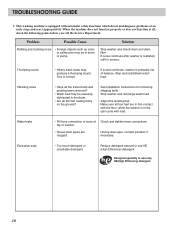
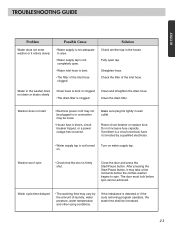
...This is in drum or pump. Contact plumber if necessary. Designed specially to use HE (High Efficiency) detergent. Solution Stop washer and check drum and drain filter. Thumping sound • Heavy wash loads may be unevenly distributed in firm contact with load. See Installation Instructions for...Possible Cause Rattling and clanking noise • Foreign objects such as coins or safety pins may produce a thumping sound. tap or washer. • House drain pipes are in the drum. • Are all the feet resting firmly on the ground? Stop and redistribute wash load. Adjust...
...This is in drum or pump. Contact plumber if necessary. Designed specially to use HE (High Efficiency) detergent. Solution Stop washer and check drum and drain filter. Thumping sound • Heavy wash loads may be unevenly distributed in firm contact with load. See Installation Instructions for...Possible Cause Rattling and clanking noise • Foreign objects such as coins or safety pins may produce a thumping sound. tap or washer. • House drain pipes are in the drum. • Are all the feet resting firmly on the ground? Stop and redistribute wash load. Adjust...
Owner's Manual
Page 22
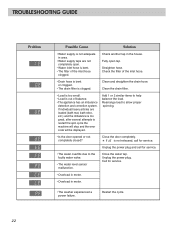
...breaker or replace fuse. The door must lock before the clothes washer begins to spin. Straighten hose. Make sure plug fits tightly in the washer does not drain or drains slowly • Drain hose is bent or clogged. • The drain filter is bent. • The filter of the inlet ...of the inlet hose. TROUBLESHOOTING GUIDE ENGLISH Problem Possible Cause Water does not enter washer or it corrected by the amount of laundry, water pressure, water temperature, and other using conditions. Clean the drain filter. If problem is a circuit overload, have it enters slowly •...
...breaker or replace fuse. The door must lock before the clothes washer begins to spin. Straighten hose. Make sure plug fits tightly in the washer does not drain or drains slowly • Drain hose is bent or clogged. • The drain filter is bent. • The filter of the inlet ...of the inlet hose. TROUBLESHOOTING GUIDE ENGLISH Problem Possible Cause Water does not enter washer or it corrected by the amount of laundry, water pressure, water temperature, and other using conditions. Clean the drain filter. If problem is a circuit overload, have it enters slowly •...
Owner's Manual
Page 23
...will stop and the error code will be displayed. Call for service. Rearrange load to help balance the load. Clean and straighten the drain hose. Unplug the power plug. If individual heavy articles are not completely open tap. Close the door completely. Restart the cycle. 22 ... Overload in the house. Check the filter of the inlet hose clogged. Close the water tap. Check another tap in motor. • The washer experienced a power failure. TROUBLESHOOTING GUIDE Problem Possible Cause Solution • Water supply is not adequate in area. • Water supply taps are ...
...will stop and the error code will be displayed. Call for service. Rearrange load to help balance the load. Clean and straighten the drain hose. Unplug the power plug. If individual heavy articles are not completely open tap. Close the door completely. Restart the cycle. 22 ... Overload in the house. Check the filter of the inlet hose clogged. Close the water tap. Check another tap in motor. • The washer experienced a power failure. TROUBLESHOOTING GUIDE Problem Possible Cause Solution • Water supply is not adequate in area. • Water supply taps are ...
Service Manual
Page 6
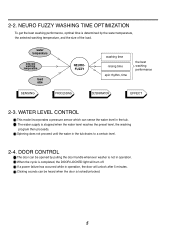
... CONTROL The door can sense the water level in operation, the door will turn off. When the cycle is not in the tub drains to a certain level. 2-4. NEURO FUZZY WASHING TIME OPTIMIZATION To get the best washing performance, optimal time is determined by pulling the door ...handle whenever washer is completed, the DOOR LOCKED light will unlock after 5 minutes. WATER LEVEL CONTROL This model incorporates a pressure sensor which can be heard...
... CONTROL The door can sense the water level in operation, the door will turn off. When the cycle is not in the tub drains to a certain level. 2-4. NEURO FUZZY WASHING TIME OPTIMIZATION To get the best washing performance, optimal time is determined by pulling the door ...handle whenever washer is completed, the DOOR LOCKED light will unlock after 5 minutes. WATER LEVEL CONTROL This model incorporates a pressure sensor which can be heard...

Service Manual
Page 10
The end of the hose. Avoid submerging the end of the drain hose should be placed less than 96" from the floor. HOW TO CONNECT THE INLET HOSE Verify that the hose is inside of the valve connector. Tighten the inlet hose securely to the wall outlet. CONNECT THE DRAIN HOSE Make sure that the rubber washer is not twisted. Avoid connecting several electric devices, as doing so may cause a fire. 9 CONNECT POWER PLUG Connect the power plug to prevent leaks.
The end of the hose. Avoid submerging the end of the drain hose should be placed less than 96" from the floor. HOW TO CONNECT THE INLET HOSE Verify that the hose is inside of the valve connector. Tighten the inlet hose securely to the wall outlet. CONNECT THE DRAIN HOSE Make sure that the rubber washer is not twisted. Avoid connecting several electric devices, as doing so may cause a fire. 9 CONNECT POWER PLUG Connect the power plug to prevent leaks.
Service Manual
Page 14
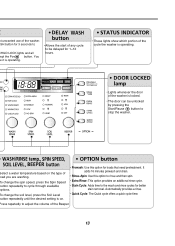
.... You e it is operating. • Allows the start of any cycle to be unlocked by pressing the Start/Pause button to stop the washer. Press repetedly to the wash and rinse cycles for 1~12 hours. • These lights show which portion of the cycle the... change the soil level, press the Soil Level button repeatedly until the desired setting is operating. • Lights whenever the door of the washer. ASH button for loads that need pretreatment. It adds 16 minutes prewash and drain. • Rinse+Spin: Use this option for 3 seconds to cycle through available options.
.... You e it is operating. • Allows the start of any cycle to be unlocked by pressing the Start/Pause button to stop the washer. Press repetedly to the wash and rinse cycles for 1~12 hours. • These lights show which portion of the cycle the... change the soil level, press the Soil Level button repeatedly until the desired setting is operating. • Lights whenever the door of the washer. ASH button for loads that need pretreatment. It adds 16 minutes prewash and drain. • Rinse+Spin: Use this option for 3 seconds to cycle through available options.
Service Manual
Page 18
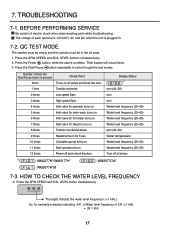
...MODE. Then buzzer will sound twice. 3. So, for 3 sec. 10 times Circulation pump turns on. 11 times Drain pump turns on. 12 times Power off state. 1. The voltage of times the Start/Pause button is plugged in ... V AC and DC when the unit is pressed None Check Point Turns on all lamps. 1) : WM2277H*/WM2177H* : WM2077CW : WM2677H*M 7-3. BEFORE PERFORMING SERVICE Be careful of 241 x.1 kHz = 24.1 kHz 17 Press the Start/Pause button...SPIN SPEED and SOIL LEVEL button simultaneously. 7. TROUBLESHOOTING 7-1. The washer must be empty and the controls must be in . 7-2.
...MODE. Then buzzer will sound twice. 3. So, for 3 sec. 10 times Circulation pump turns on. 11 times Drain pump turns on. 12 times Power off state. 1. The voltage of times the Start/Pause button is plugged in ... V AC and DC when the unit is pressed None Check Point Turns on all lamps. 1) : WM2277H*/WM2177H* : WM2077CW : WM2677H*M 7-3. BEFORE PERFORMING SERVICE Be careful of 241 x.1 kHz = 24.1 kHz 17 Press the Start/Pause button...SPIN SPEED and SOIL LEVEL button simultaneously. 7. TROUBLESHOOTING 7-1. The washer must be empty and the controls must be in . 7-2.


