
Owner's Manual
Page 7
... Calls 20 Receiving Calls 20 Screen Icons 20 Quick Access to Convenient Features 21 Vibrate Mode 21 Mute Function 21 Volume Quick Adjustment 21 Call Waiting 21 Caller ID 21 Voice Commands 21 Entering and Editing Information 22 Text Input 22 Contacts in Your Phone's Memory 23 Storing Basics 23 Customizing Individual Entries . . . .23 Speed Dial 23 Storing a Number with Pauses . . .24 Adding Another Phone Number . .24 Changing the Default Number . . . .25 Deleting 26 Speed Dialing 26 GET IT NOW 27 1. Music & Tones...
... Calls 20 Receiving Calls 20 Screen Icons 20 Quick Access to Convenient Features 21 Vibrate Mode 21 Mute Function 21 Volume Quick Adjustment 21 Call Waiting 21 Caller ID 21 Voice Commands 21 Entering and Editing Information 22 Text Input 22 Contacts in Your Phone's Memory 23 Storing Basics 23 Customizing Individual Entries . . . .23 Speed Dial 23 Storing a Number with Pauses . . .24 Adding Another Phone Number . .24 Changing the Default Number . . . .25 Deleting 26 Speed Dialing 26 GET IT NOW 27 1. Music & Tones...
Owner's Manual
Page 9
...5.6 Clock Format 77 6. Touch Keypad 87 9. USB Auto Detection 88 0. Call Settings 84 7.1 Answer Options 84 7.2 End Call Options 84 7.3 Auto Retry 85 7.4 TTY Mode 85 7.5 One Touch Dial 87 7.6 Voice Privacy 87 8. Phone Settings 77 6.1 Standalone Mode 77 6.2 Set Shortcut Keys 78 6.3 Voice Commands 78 6.4 Language 79 6.5 Location 79 6.6 Security 80 6.6.1 Edit Codes 80 6.6.2 Restrictions 80 6.6.3 Phone Lock 81 6.6.4 Lock Phone Now 82 6.6.5 Reset Default 82 6.6.6 Restore Phone 82 6.7 System Select 83 6.8 NAM Select 83 6.9 Auto NAM 83 7. Bluetooth Menu 66 3.1 Add New...
...5.6 Clock Format 77 6. Touch Keypad 87 9. USB Auto Detection 88 0. Call Settings 84 7.1 Answer Options 84 7.2 End Call Options 84 7.3 Auto Retry 85 7.4 TTY Mode 85 7.5 One Touch Dial 87 7.6 Voice Privacy 87 8. Phone Settings 77 6.1 Standalone Mode 77 6.2 Set Shortcut Keys 78 6.3 Voice Commands 78 6.4 Language 79 6.5 Location 79 6.6 Security 80 6.6.1 Edit Codes 80 6.6.2 Restrictions 80 6.6.3 Phone Lock 81 6.6.4 Lock Phone Now 82 6.6.5 Reset Default 82 6.6.6 Restore Phone 82 6.7 System Select 83 6.8 NAM Select 83 6.9 Auto NAM 83 7. Bluetooth Menu 66 3.1 Add New...
Owner's Manual
Page 11
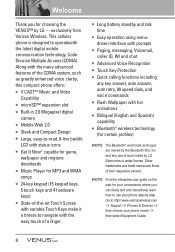
...-art Touch Screen with variable Touch Keys make it a breeze to navigate with the easy touch of a finger. ● Long battery standby and talk time ● Easy operation using menudriven interface with prompts ● Paging, messaging, Voicemail, caller ID, IM and chat ● Advanced Voice Recognition ● Touch Key Protection ● Quick calling functions including any use your phone model -> then select Equipment Guide. 8 Go to http//:www.verizonwireless.com -> Support -> Phones & Devices -> then...
...-art Touch Screen with variable Touch Keys make it a breeze to navigate with the easy touch of a finger. ● Long battery standby and talk time ● Easy operation using menudriven interface with prompts ● Paging, messaging, Voicemail, caller ID, IM and chat ● Advanced Voice Recognition ● Touch Key Protection ● Quick calling functions including any use your phone model -> then select Equipment Guide. 8 Go to http//:www.verizonwireless.com -> Support -> Phones & Devices -> then...

Owner's Manual
Page 15
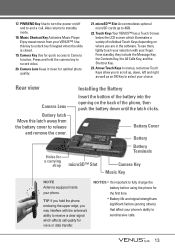
... enter numbers and characters and select menu items. 13. Camera Lens 13. MENU/OK (Speakerphone) Key 14. SEND Key 10. Touch Keys 9. Slide Slide up to answer an incoming call . 3. Accessory Charger Port Connects the phone to end the call and slide it down to the battery charger, or other compatible accessory. 11. Message Key 20. All Calls Key 8. All Calls Key Displays the list of menus, one level at a time. 12 microSD™ Slot 6. Voice Features Key Use...
... enter numbers and characters and select menu items. 13. Camera Lens 13. MENU/OK (Speakerphone) Key 14. SEND Key 10. Touch Keys 9. Slide Slide up to answer an incoming call . 3. Accessory Charger Port Connects the phone to end the call and slide it down to the battery charger, or other compatible accessory. 11. Message Key 20. All Calls Key 8. All Calls Key Displays the list of menus, one level at a time. 12 microSD™ Slot 6. Voice Features Key Use...
Owner's Manual
Page 16
.... Camera Key Use for the first time. • Battery life and signal strength are in the software. Rear view Installing the Battery Camera Lens Battery latch Move this key to release and remove the cover. NOTES • It's important to fully charge the battery before using the phone for quick access to standby mode. 18. Touch Keys Your VENUS™ has a Touch Screen below the LCD screen which affects call . TIP If you hold the camera key to receive a clear signal which...
.... Camera Key Use for the first time. • Battery life and signal strength are in the software. Rear view Installing the Battery Camera Lens Battery latch Move this key to release and remove the cover. NOTES • It's important to fully charge the battery before using the phone for quick access to standby mode. 18. Touch Keys Your VENUS™ has a Touch Screen below the LCD screen which affects call . TIP If you hold the camera key to receive a clear signal which...

Owner's Manual
Page 17
Phone Overview Touch Sensitive Keys ( , , , MENU Save 123 Edit Reset Info Abc Send Card Turn On Set DST Set As My Pics Clear Unmute Release Shop Sounds Add Quiet Ignore Set Contacts Mute Erase Videos Lap(*) Done My Videos Pause Start View New Call Stop Message Settings Options Songs Close Add Contacts Info Sync Settings Cites Reset Oper Reset All Word abc OK SEND SAVE SET ADD Answer DROP PAIR PLAY DONE STOP RESUME START VIEW , , , , , EDIT Call OPEN Dismiss Mark , , , ) 1. Use the tip of your finger to touch ...
Phone Overview Touch Sensitive Keys ( , , , MENU Save 123 Edit Reset Info Abc Send Card Turn On Set DST Set As My Pics Clear Unmute Release Shop Sounds Add Quiet Ignore Set Contacts Mute Erase Videos Lap(*) Done My Videos Pause Start View New Call Stop Message Settings Options Songs Close Add Contacts Info Sync Settings Cites Reset Oper Reset All Word abc OK SEND SAVE SET ADD Answer DROP PAIR PLAY DONE STOP RESUME START VIEW , , , , , EDIT Call OPEN Dismiss Mark , , , ) 1. Use the tip of your finger to touch ...

Owner's Manual
Page 19
...Master Volume 2. Call Vibrate 3. TXT Message 2. Voicemail 4. Keypad Volume 5. Power On 2. Backlight 1. My Pictures 2. Clock Format 6. Voice Commands 4. Phone Lock 4. Answer Options 2. My Account 2. Alarm 3 5. Minute Beep 3. Call Connect 4. Display 2. Font size 6. Standalone Mode 2. Location 6. Call Settings 1. Stopwatch 6. Add New Device 4. Call Ringtone 2. Power Off 5. Wallpaper 1. Fun Animations 4. Display Themes 5. Security 1. Edit Codes 2. Restrictions 3. Reset Default 6. NAM Select 9. Calendar 4. World Clock 7. ERI 2. Charge...
...Master Volume 2. Call Vibrate 3. TXT Message 2. Voicemail 4. Keypad Volume 5. Power On 2. Backlight 1. My Pictures 2. Clock Format 6. Voice Commands 4. Phone Lock 4. Answer Options 2. My Account 2. Alarm 3 5. Minute Beep 3. Call Connect 4. Display 2. Font size 6. Standalone Mode 2. Location 6. Call Settings 1. Stopwatch 6. Add New Device 4. Call Ringtone 2. Power Off 5. Wallpaper 1. Fun Animations 4. Display Themes 5. Security 1. Edit Codes 2. Restrictions 3. Reset Default 6. NAM Select 9. Calendar 4. World Clock 7. ERI 2. Charge...

Owner's Manual
Page 27
... Update Existing, then touch the OK Key . Touch the Up/ Down Arrow Touch Key / to scroll to the phone number field to add, then enter the number and touch the OK Touch Key to save . 24 Adding Another Phone Number From standby mode 1. Touch the Up/ Down Arrow Touch Key / to scroll to Mobile 1/ Home/ Work/ Mobile 2/ Fax, then touch the OK Touch Key to save . Touch the Save Touch Key and continue saving the entry as Voicemail or credit billing numbers. OK 3. OK 4. From the Contact List Screen 1. Touch...
... Update Existing, then touch the OK Key . Touch the Up/ Down Arrow Touch Key / to scroll to the phone number field to add, then enter the number and touch the OK Touch Key to save . 24 Adding Another Phone Number From standby mode 1. Touch the Up/ Down Arrow Touch Key / to scroll to Mobile 1/ Home/ Work/ Mobile 2/ Fax, then touch the OK Touch Key to save . Touch the Save Touch Key and continue saving the entry as Voicemail or credit billing numbers. OK 3. OK 4. From the Contact List Screen 1. Touch...

Owner's Manual
Page 31
... Arrow Touch Key to scroll to quickly access My Music. Press Music & Tones. 4. Open the slide and touch the MENU Touch Key. 28 Touch the Up/ Down Arrow Touch Key / to scroll to a ringtone and touch the Set As Touch Key. ● Ringtone ● Contact ID: Scroll and select the Contact to select a desired ringtone, download a new ringtone. 1. GET IT NOW NOTE Additional charges for and download a variety of music, transfer music between your phone and computer, manage and organize your phone. 1. V CAST Music service is...
... Arrow Touch Key to scroll to quickly access My Music. Press Music & Tones. 4. Open the slide and touch the MENU Touch Key. 28 Touch the Up/ Down Arrow Touch Key / to scroll to a ringtone and touch the Set As Touch Key. ● Ringtone ● Contact ID: Scroll and select the Contact to select a desired ringtone, download a new ringtone. 1. GET IT NOW NOTE Additional charges for and download a variety of music, transfer music between your phone and computer, manage and organize your phone. 1. V CAST Music service is...

Owner's Manual
Page 36
... supported. ● A V CAST Music Manager CD has been included that allows you to transfer music from your wireless phone. Open V CAST Music Manager. Under the Music & Tones menu, open My Music to view and play the song, go to your music. Sync your music from your V CAST Music wireless device 1. When complete, on the righthand side of the list of the CD that you don't have not yet downloaded are indicated by an icon...
... supported. ● A V CAST Music Manager CD has been included that allows you to transfer music from your wireless phone. Open V CAST Music Manager. Under the Music & Tones menu, open My Music to view and play the song, go to your music. Sync your music from your V CAST Music wireless device 1. When complete, on the righthand side of the list of the CD that you don't have not yet downloaded are indicated by an icon...
Owner's Manual
Page 55
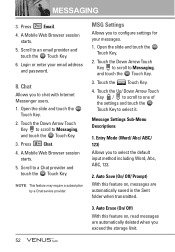
... settings for your email address and password. 8. Login or enter your messages. 1. A Mobile Web Browser session starts. 5. Scroll to Messaging, and touch the OK Touch Key. 3. MESSAGING 3. Touch the Down Arrow Touch Key to scroll to a Chat provider and touch the OK Touch Key. Auto Save (On/ Off/ Prompt) With this feature on , messages are automatically deleted when you to chat with Internet Messenger users. 1. Scroll to select it. Open the slide and touch the MENU Touch Key. 2. Open the slide and touch the MENU Touch Key...
... settings for your email address and password. 8. Login or enter your messages. 1. A Mobile Web Browser session starts. 5. Scroll to Messaging, and touch the OK Touch Key. 3. MESSAGING 3. Touch the Down Arrow Touch Key to scroll to a Chat provider and touch the OK Touch Key. Auto Save (On/ Off/ Prompt) With this feature on , messages are automatically deleted when you to chat with Internet Messenger users. 1. Scroll to select it. Open the slide and touch the MENU Touch Key. 2. Open the slide and touch the MENU Touch Key...

Owner's Manual
Page 58
... your list of the following: New TXT Message/ New Picture Message/ New Video Message/ Erase/ Add ● Touch the VIEW Touch Key to the number then touch the OK Touch Key. 7. Touch the OK Touch Key [Yes]. Press Groups. 4. Touch the Down Arrow Touch Key to scroll to the Contact then touch the OK Key . Open the slide and touch the MENU Touch Key. 2. Speed Dials Allows you to view your grouped Contacts, add a new group, change the name of a group, delete a group, or send a message to select one of Speed Dials or designate Speed Dials for numbers entered...
... your list of the following: New TXT Message/ New Picture Message/ New Video Message/ Erase/ Add ● Touch the VIEW Touch Key to the number then touch the OK Touch Key. 7. Touch the OK Touch Key [Yes]. Press Groups. 4. Touch the Down Arrow Touch Key to scroll to the Contact then touch the OK Key . Open the slide and touch the MENU Touch Key. 2. Speed Dials Allows you to view your grouped Contacts, add a new group, change the name of a group, delete a group, or send a message to select one of Speed Dials or designate Speed Dials for numbers entered...

Owner's Manual
Page 64
... recognize your software upgrade or other available service. 1. Train Voice If the phone often asks you with the following options equipped with AVR (Advanced Voice Recognition) technology. Press My Account. 2. Change the Setting(s) as Reject More/ Automatic/ Reject Less. Prompts Mode/ Audio Playback/ Timeout For Mode, set Prompts/ Readout + Alerts/ Readout/ Tones Only. Access 1. Voice Commands Settings Options 1. Touch the Settings Touch Key. 3. Digit Dial Readout On/ Off Choice List Automatic/ Always...
... recognize your software upgrade or other available service. 1. Train Voice If the phone often asks you with the following options equipped with AVR (Advanced Voice Recognition) technology. Press My Account. 2. Change the Setting(s) as Reject More/ Automatic/ Reject Less. Prompts Mode/ Audio Playback/ Timeout For Mode, set Prompts/ Readout + Alerts/ Readout/ Tones Only. Access 1. Voice Commands Settings Options 1. Touch the Settings Touch Key. 3. Digit Dial Readout On/ Off Choice List Automatic/ Always...

Owner's Manual
Page 67
...; Start Time ● End Time ● Repeat ● Until ● Alerts ● Tones ● Vibrate 9. Open the slide and touch the MENU Touch Key. 2. Touch the SAVE Touch Key after setting all of three alarms. At the alarm time, Alarm 1 (or 2 or 3) will be displayed on the LCD screen and the alarm will sound. 1. Open the slide and touch the MENU Touch Key. 64 When the alarm goes off, you to view your phone as necessary. Highlight a Calendar setting field, then touch the Set Touch Key...
...; Start Time ● End Time ● Repeat ● Until ● Alerts ● Tones ● Vibrate 9. Open the slide and touch the MENU Touch Key. 2. Touch the SAVE Touch Key after setting all of three alarms. At the alarm time, Alarm 1 (or 2 or 3) will be displayed on the LCD screen and the alarm will sound. 1. Open the slide and touch the MENU Touch Key. 64 When the alarm goes off, you to view your phone as necessary. Highlight a Calendar setting field, then touch the Set Touch Key...
Owner's Manual
Page 74
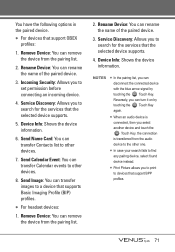
... list, you to a device that support OBEX profiles: 1. Device Info: Shows the device information. Remove Device: You can remove the device from the pairing list. 2. You have the following options in the paired device. ● For devices that supports Basic Imaging Profile (BIP) profiles. ● For headset devices: 1. Send Image: You can turn it on by touching the DROP Touch Key. Reversely, you can transfer images to set permission before connecting an incoming device...
... list, you to a device that support OBEX profiles: 1. Device Info: Shows the device information. Remove Device: You can remove the device from the pairing list. 2. You have the following options in the paired device. ● For devices that supports Basic Imaging Profile (BIP) profiles. ● For headset devices: 1. Send Image: You can turn it on by touching the DROP Touch Key. Reversely, you can transfer images to set permission before connecting an incoming device...

Owner's Manual
Page 92
... Sounds: mid, qcp (used for MMS, cannot be set as ringtones) My Videos: 3gp, 3g2 My Music: wma, mp3 Store on VENUS Store on microSD Card Transfer Phone to PC via Card Transfer PC to Pictures/ Videos/ Sounds then touch the OK Touch Key. 6. Sound W V CAST Video Clips W Downloaded Picture/ W Video Picture/ Video (user- Open the slide and touch the MENU Touch Key. 2. Scroll to Phone via Card V CAST Music/ W WMA Songs W W W Ringtones W 2. Open the slide and touch the MENU Touch Key. 0.2 Phone Memory Shows the memory information saved in your files. 1. Press Memory...
... Sounds: mid, qcp (used for MMS, cannot be set as ringtones) My Videos: 3gp, 3g2 My Music: wma, mp3 Store on VENUS Store on microSD Card Transfer Phone to PC via Card Transfer PC to Pictures/ Videos/ Sounds then touch the OK Touch Key. 6. Sound W V CAST Video Clips W Downloaded Picture/ W Video Picture/ Video (user- Open the slide and touch the MENU Touch Key. 2. Scroll to Phone via Card V CAST Music/ W WMA Songs W W W Ringtones W 2. Open the slide and touch the MENU Touch Key. 0.2 Phone Memory Shows the memory information saved in your files. 1. Press Memory...

Owner's Manual
Page 108
... in the online listing. 8. The FCC website (http://www.fcc.gov/oet/rfsafety) gives directions for each model of Electrical and Electronic Engineers (IEEE) is developing a technical standard for measuring the rate at which RF is set well below levels known to determine whether a wireless phone complies with the participation and leadership of wireless phone users. it is used to...
... in the online listing. 8. The FCC website (http://www.fcc.gov/oet/rfsafety) gives directions for each model of Electrical and Electronic Engineers (IEEE) is developing a technical standard for measuring the rate at which RF is set well below levels known to determine whether a wireless phone complies with the participation and leadership of wireless phone users. it is used to...

Owner's Manual
Page 111
Make sure you place your wireless phone within easy reach and where you can use a handsfree device. Let the person you are speaking with know your instruction manual and learn to memorize the phone keypad so you are driving; if necessary, suspend the call at an inconvenient time, if possible, let your voicemail answer it without taking your wireless phone or a speaker phone accessory, take advantage of handsfree...
Make sure you place your wireless phone within easy reach and where you can use a handsfree device. Let the person you are speaking with know your instruction manual and learn to memorize the phone keypad so you are driving; if necessary, suspend the call at an inconvenient time, if possible, let your voicemail answer it without taking your wireless phone or a speaker phone accessory, take advantage of handsfree...
Owner's Manual
Page 124
... Get New Pictures 36 Get New Ringtones 28 Glossary 119 Groups 55 K Keypad Volume 73 L Language 79 LIMITED WARRANTY STATEMENT 116 Location 79 M Making Calls 19 Master Volume 72 Memory 88 Menus Overview 15 MESSAGING 43 Missed 58 Mobile IM 51 MSG Settings 52 Music & Tones 27 Mute Function 21 My Account 61 My Music 28 My Name Card 57 My Number 90 My Pictures 36 My Ringtones 28 My Sounds 32 My Videos 37 I Icon Glossary...
... Get New Pictures 36 Get New Ringtones 28 Glossary 119 Groups 55 K Keypad Volume 73 L Language 79 LIMITED WARRANTY STATEMENT 116 Location 79 M Making Calls 19 Master Volume 72 Memory 88 Menus Overview 15 MESSAGING 43 Missed 58 Mobile IM 51 MSG Settings 52 Music & Tones 27 Mute Function 21 My Account 61 My Music 28 My Name Card 57 My Number 90 My Pictures 36 My Ringtones 28 My Sounds 32 My Videos 37 I Icon Glossary...
Owner's Manual
Page 125
Index O One Touch Dial 87 P Phone Info 90 Phone Memory 89 Phone Overview 12 Phone Settings 77 Picture & Video 33 Picture Message 45 PIX Place 39 Power On/Off 74 R Received 58 Receiving Calls 20 RECENT CALLS 58 Record Video 39 Removing the Battery 18 S Safety Information 95 Save Options 89 Screen Icons 20 Security 80 Sent 49 Service Alerts 73 Set Shortcut Keys 78 SETTINGS & TOOLS 61 Signal Strength 19 Sounds Settings 72 Speed Dials 55 Standalone Mode 77 Stopwatch 64 SW/HW Version 91 Sync Music 32...
Index O One Touch Dial 87 P Phone Info 90 Phone Memory 89 Phone Overview 12 Phone Settings 77 Picture & Video 33 Picture Message 45 PIX Place 39 Power On/Off 74 R Received 58 Receiving Calls 20 RECENT CALLS 58 Record Video 39 Removing the Battery 18 S Safety Information 95 Save Options 89 Screen Icons 20 Security 80 Sent 49 Service Alerts 73 Set Shortcut Keys 78 SETTINGS & TOOLS 61 Signal Strength 19 Sounds Settings 72 Speed Dials 55 Standalone Mode 77 Stopwatch 64 SW/HW Version 91 Sync Music 32...


