Owners Manual
Page 2
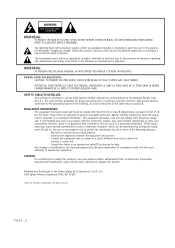
... experienced radio/TV technician for proper grounding and, in accordance with the instruction manual, may be determined by turning the equipment off and on a circuit different from LG Electronics Corporation. These limits are designed to operate the equipment. REFER TO QUALIFIED SERVICE PERSONNEL. WA R N I N G : TO REDUCE THE RISK OF ELECTRIC SHOCK DO NOT REMOVE COVER (OR BACK). POWER CORD POLARIZATION: CAUTION...
... experienced radio/TV technician for proper grounding and, in accordance with the instruction manual, may be determined by turning the equipment off and on a circuit different from LG Electronics Corporation. These limits are designed to operate the equipment. REFER TO QUALIFIED SERVICE PERSONNEL. WA R N I N G : TO REDUCE THE RISK OF ELECTRIC SHOCK DO NOT REMOVE COVER (OR BACK). POWER CORD POLARIZATION: CAUTION...
Owners Manual
Page 4
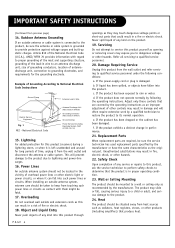
... the power-supply cord or plug is in the vicinity of antennadischarge unit, connection to rain or water. If the product exhibits a distinct change in wire to an antenna discharge unit, size of grounding conductors, location of overhead power lines or other products (including amplifiers) that the product is damaged. Outdoor Antenna Grounding If an outside antenna system should be located in proper operating...
... the power-supply cord or plug is in the vicinity of antennadischarge unit, connection to rain or water. If the product exhibits a distinct change in wire to an antenna discharge unit, size of grounding conductors, location of overhead power lines or other products (including amplifiers) that the product is damaged. Outdoor Antenna Grounding If an outside antenna system should be located in proper operating...
Owners Manual
Page 5
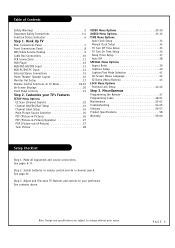
... to change without prior notice. PAGE 5 Install batteries in -Picture) Operation 27 POP (Picture-out-of Contents Safety Warnings 2 Important Safety Instructions 3-4 Function Status Indicators 6 Step 1. Step 2. Hook Up TV Rear Connections Panel 7 Front Connections Panel 8 ANT/Cable Service Hookup 9 Cable Box Connections 10 VCR Connections 11 DVD Player 12 RGB/DVI-HD/STB Input 13 RGB-PC/DVI-PC Input 14 External Stereo Connections 15 Home Theater: Speaker Layout 16 Monitor Out Setup 17 Remote Control Functions In TV Mode 18-19 On-Screen Displays...
... to change without prior notice. PAGE 5 Install batteries in -Picture) Operation 27 POP (Picture-out-of Contents Safety Warnings 2 Important Safety Instructions 3-4 Function Status Indicators 6 Step 1. Step 2. Hook Up TV Rear Connections Panel 7 Front Connections Panel 8 ANT/Cable Service Hookup 9 Cable Box Connections 10 VCR Connections 11 DVD Player 12 RGB/DVI-HD/STB Input 13 RGB-PC/DVI-PC Input 14 External Stereo Connections 15 Home Theater: Speaker Layout 16 Monitor Out Setup 17 Remote Control Functions In TV Mode 18-19 On-Screen Displays...
Owners Manual
Page 7
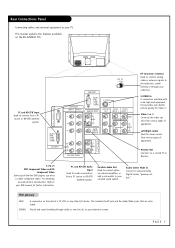
...) RGB/DVI INPUT (L) AUDIO (R) AUDIO CENTER MODE IN S-VIDEO MONITOR VIDEO VIDEO OUT INPUT 2 INPUT 1 VIDEO MONO (L) AUDIO (R) (L) AUDIO V A R I A A U D I O (R) B L E O U T RF Connector: Antenna Used to connect analog cable or antenna signals to the television, either an external amplifier, or add a sub-woofer to connect from a PC source or HD-STB Satellite system. Monitor Out Connects to external Dolby Digital Center "preamp output." Refer to your cable box. Picture and sound traveling through your television screen. Variable Audio Out Used to...
...) RGB/DVI INPUT (L) AUDIO (R) AUDIO CENTER MODE IN S-VIDEO MONITOR VIDEO VIDEO OUT INPUT 2 INPUT 1 VIDEO MONO (L) AUDIO (R) (L) AUDIO V A R I A A U D I O (R) B L E O U T RF Connector: Antenna Used to connect analog cable or antenna signals to the television, either an external amplifier, or add a sub-woofer to connect from a PC source or HD-STB Satellite system. Monitor Out Connects to external Dolby Digital Center "preamp output." Refer to your cable box. Picture and sound traveling through your television screen. Variable Audio Out Used to...
Owners Manual
Page 11
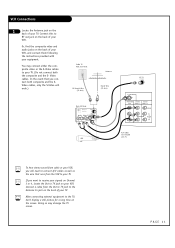
... want to receive your signals on Channel 3 or 4, locate the Out to your VCR. Or, find the composite video and audio jacks on the back of your VCR, and connect them following the instructions provided with TV VCR To hear stereo sound from the VCR to the TV, don't display a still picture for a long time on the screen. PAGE 11 Connect this to the Antenna In jack...
... want to receive your signals on Channel 3 or 4, locate the Out to your VCR. Or, find the composite video and audio jacks on the back of your VCR, and connect them following the instructions provided with TV VCR To hear stereo sound from the VCR to the TV, don't display a still picture for a long time on the screen. PAGE 11 Connect this to the Antenna In jack...
Owners Manual
Page 21
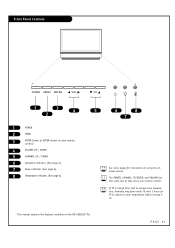
... remote control. The POWER, CHANNEL, TV/VIDEO, and VOLUME buttons work just as ENTER button on your remote control) 4 VOLUME UP / DOWN 5 CHANNEL UP / DOWN 6 Operation indicator. (See page 6). 7 Lamp indicator. (See page 6). 8 Temperature indicator. (See page 6). This manual explains the features available on . - If TV is moved from cold to normal room temperature, humidity may form inside TV, wait 3 hours for instructions on using the onscreen menus. CH 5 6 8 7 See menu pages for TV to adjust...
... remote control. The POWER, CHANNEL, TV/VIDEO, and VOLUME buttons work just as ENTER button on your remote control) 4 VOLUME UP / DOWN 5 CHANNEL UP / DOWN 6 Operation indicator. (See page 6). 7 Lamp indicator. (See page 6). 8 Temperature indicator. (See page 6). This manual explains the features available on . - If TV is moved from cold to normal room temperature, humidity may form inside TV, wait 3 hours for instructions on using the onscreen menus. CH 5 6 8 7 See menu pages for TV to adjust...
Owners Manual
Page 29
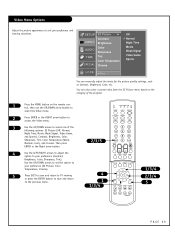
... the picture quality settings, such as Contrast, Brightness, Color, etc. SETUP EZ Picture G Contrast VIDEO Brightness Color AUDIO Sharpness TIME SPECIAL Tint Color Temperature Cinema LOCK F Prev. PIPCH+ SWAP RATIO CC FREEZE PIP INPUT MENU EXIT PLAY PAUSE STOP RECORD REW FF SKIP 1/3/4 2/3/4 5 PAGE 29 Then press ENTER or the Right arrow button. 4 Use the LEFT/RIGHT arrows to adjust the option to the previous menu. 2/3/5 4 1 1/3/4 TV VCR CABLE DVD SAT MODE LIGHT POWER TV/VIDEO FRONT DVI COMP1...
... the picture quality settings, such as Contrast, Brightness, Color, etc. SETUP EZ Picture G Contrast VIDEO Brightness Color AUDIO Sharpness TIME SPECIAL Tint Color Temperature Cinema LOCK F Prev. PIPCH+ SWAP RATIO CC FREEZE PIP INPUT MENU EXIT PLAY PAUSE STOP RECORD REW FF SKIP 1/3/4 2/3/4 5 PAGE 29 Then press ENTER or the Right arrow button. 4 Use the LEFT/RIGHT arrows to adjust the option to the previous menu. 2/3/5 4 1 1/3/4 TV VCR CABLE DVD SAT MODE LIGHT POWER TV/VIDEO FRONT DVI COMP1...
Owners Manual
Page 33
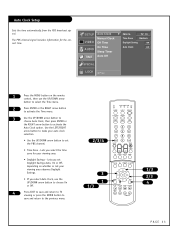
... RIGHT arrow button to activate the Time menu. 3 Use the UP/DOWN arrow button to choose Auto Clock, then press ENTER or the RIGHT arrow button to the previous menu. 2/3/4 3 1 1/3 TV VCR CABLE DVD SAT MODE LIGHT POWER TV/VIDEO FRONT DVI COMP1 COMP2 RGB 123 456 789 ENTER 0 MUTE FLASHBK SURF SAP VOL VIDEO CH PIP PIPCH- Auto Clock Setup Sets the time automatically from the PBS broadcast signal. The PBS channel signal includes information...
... RIGHT arrow button to activate the Time menu. 3 Use the UP/DOWN arrow button to choose Auto Clock, then press ENTER or the RIGHT arrow button to the previous menu. 2/3/4 3 1 1/3 TV VCR CABLE DVD SAT MODE LIGHT POWER TV/VIDEO FRONT DVI COMP1 COMP2 RGB 123 456 789 ENTER 0 MUTE FLASHBK SURF SAP VOL VIDEO CH PIP PIPCH- Auto Clock Setup Sets the time automatically from the PBS broadcast signal. The PBS channel signal includes information...

Owners Manual
Page 34
... : 44 TIME Auto Off SPECIAL LOCK F Prev. 1 Press the MENU button on the remote control, then use the UP/DOWN arrow button to select the Time menu. 2 Press ENTER or the RIGHT arrow button to activate the Time menu. 3 Use the UP/DOWN arrow button to choose Manual Clock, then press the RIGHT arrow to activate the Manual Clock menu. 4 Use the LEFT/RIGHT arrows button to the previous menu. 2/6 4 1 1/3/5 TV VCR CABLE DVD SAT MODE LIGHT POWER TV/VIDEO FRONT DVI...
... : 44 TIME Auto Off SPECIAL LOCK F Prev. 1 Press the MENU button on the remote control, then use the UP/DOWN arrow button to select the Time menu. 2 Press ENTER or the RIGHT arrow button to activate the Time menu. 3 Use the UP/DOWN arrow button to choose Manual Clock, then press the RIGHT arrow to activate the Manual Clock menu. 4 Use the LEFT/RIGHT arrows button to the previous menu. 2/6 4 1 1/3/5 TV VCR CABLE DVD SAT MODE LIGHT POWER TV/VIDEO FRONT DVI...

Owners Manual
Page 35
... Off Time then press the RIGHT arrow to select Off in step 4. 2/7 5 1 1/3/4/6 TV VCR CABLE DVD SAT MODE LIGHT POWER TV/VIDEO FRONT DVI COMP1 COMP2 RGB 123 456 789 ENTER 0 MUTE FLASHBK SURF SAP VOL VIDEO CH PIP PIPCH- PIPCH+ SWAP RATIO CC FREEZE PIP INPUT MENU EXIT PLAY PAUSE STOP RECORD REW FF SKIP 1/3/4/6 2/3/5 7 PAGE 35 SETUP Auto Clock Manual Clock VIDEO Off Time G On Time AUDIO Sleep Timer TIME Auto Off SPECIAL LOCK...
... Off Time then press the RIGHT arrow to select Off in step 4. 2/7 5 1 1/3/4/6 TV VCR CABLE DVD SAT MODE LIGHT POWER TV/VIDEO FRONT DVI COMP1 COMP2 RGB 123 456 789 ENTER 0 MUTE FLASHBK SURF SAP VOL VIDEO CH PIP PIPCH- PIPCH+ SWAP RATIO CC FREEZE PIP INPUT MENU EXIT PLAY PAUSE STOP RECORD REW FF SKIP 1/3/4/6 2/3/5 7 PAGE 35 SETUP Auto Clock Manual Clock VIDEO Off Time G On Time AUDIO Sleep Timer TIME Auto Off SPECIAL LOCK...
Owners Manual
Page 36
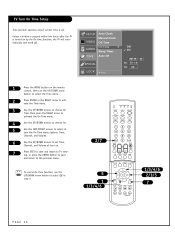
... select in step 4. 2/7 5 1 1/3/4/6 TV VCR CABLE DVD SAT MODE LIGHT POWER TV/VIDEO FRONT DVI COMP1 COMP2 RGB 123 456 789 ENTER 0 MUTE FLASHBK SURF SAP VOL VIDEO CH PIP PIPCH- SETUP VIDEO AUDIO TIME Auto Clock Manual Clock Off Time On Time G Sleep Timer Auto Off SPECIAL LOCK F Prev. TV Turn On Time Setup Time function operates only if current time is turned on the remote control, then use the UP/DOWN arrow button to set . PIPCH+ SWAP RATIO CC FREEZE PIP INPUT MENU EXIT PLAY PAUSE...
... select in step 4. 2/7 5 1 1/3/4/6 TV VCR CABLE DVD SAT MODE LIGHT POWER TV/VIDEO FRONT DVI COMP1 COMP2 RGB 123 456 789 ENTER 0 MUTE FLASHBK SURF SAP VOL VIDEO CH PIP PIPCH- SETUP VIDEO AUDIO TIME Auto Clock Manual Clock Off Time On Time G Sleep Timer Auto Off SPECIAL LOCK F Prev. TV Turn On Time Setup Time function operates only if current time is turned on the remote control, then use the UP/DOWN arrow button to set . PIPCH+ SWAP RATIO CC FREEZE PIP INPUT MENU EXIT PLAY PAUSE...

Owners Manual
Page 37
... the remote control, then use the UP/DOWN arrow button to select the Time menu. 2 Press ENTER or the RIGHT arrow button to activate the Time menu. 3 Use the UP/DOWN arrows to choose Sleep Timer then press the RIGHT arrow to access the Sleep Timer menu. 4 Use the UP/DOWN arrows to choose a preset turn your TV off automatically. Set it again if necessary. 2/5 TV VCR CABLE DVD SAT MODE LIGHT POWER TV/VIDEO FRONT DVI...
... the remote control, then use the UP/DOWN arrow button to select the Time menu. 2 Press ENTER or the RIGHT arrow button to activate the Time menu. 3 Use the UP/DOWN arrows to choose Sleep Timer then press the RIGHT arrow to access the Sleep Timer menu. 4 Use the UP/DOWN arrows to choose a preset turn your TV off automatically. Set it again if necessary. 2/5 TV VCR CABLE DVD SAT MODE LIGHT POWER TV/VIDEO FRONT DVI...
Owners Manual
Page 38
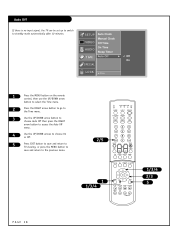
... RIGHT arrow button to access the Auto Off menu. 4 Use the UP/DOWN arrows to choose On or Off. 5 Press EXIT button to save and return to TV viewing, or press the MENU button to save and return to standby mode automatically after 10 minutes. Auto Off If there is no input signal, the TV can be set up to switch to the previous menu. 2/5 TV VCR CABLE DVD SAT MODE LIGHT POWER TV/VIDEO FRONT DVI COMP1...
... RIGHT arrow button to access the Auto Off menu. 4 Use the UP/DOWN arrows to choose On or Off. 5 Press EXIT button to save and return to TV viewing, or press the MENU button to save and return to standby mode automatically after 10 minutes. Auto Off If there is no input signal, the TV can be set up to switch to the previous menu. 2/5 TV VCR CABLE DVD SAT MODE LIGHT POWER TV/VIDEO FRONT DVI COMP1...
Owners Manual
Page 39
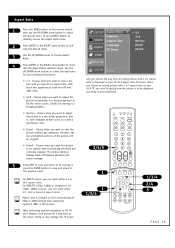
... TV, don't display a still picture for a long time on the remote control, then use the UP/DOWN arrow button to fill the entire screen. (Useful for your 16:9 TV, you need to specify how the picture is changed to view the picture without any alteration. When you receive an analog picture with a 4:3 aspect ratio is , more enlarged at both sides, to your TV 16:9 aspect ratio TV screen. Aspect Ratio 1 Press the MENU button on the screen...
... TV, don't display a still picture for a long time on the remote control, then use the UP/DOWN arrow button to fill the entire screen. (Useful for your 16:9 TV, you need to specify how the picture is changed to view the picture without any alteration. When you receive an analog picture with a 4:3 aspect ratio is , more enlarged at both sides, to your TV 16:9 aspect ratio TV screen. Aspect Ratio 1 Press the MENU button on the screen...
Owners Manual
Page 41
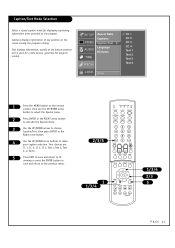
... arrow button. 4 Use the UP/DOWN arrow buttons to the previous menu. 2/3/5 TV VCR CABLE DVD SAT MODE LIGHT POWER TV/VIDEO FRONT DVI COMP1 COMP2 RGB 123 456 789 ENTER 0 MUTE FLASHBK SURF SAP VOL VIDEO CH PIP PIPCH- SETUP Aspect Ratio Captions VIDEO Caption/Text G Language AUDIO EZ Demo TIME SPECIAL LOCK F Prev. PIPCH+ SWAP RATIO CC FREEZE PIP INPUT 1 1/3/4 MENU EXIT PLAY PAUSE STOP RECORD REW FF SKIP 1/3/4 2/3 5 PAGE 41 Caption/Text Mode Selection Select a closed caption mode...
... arrow button. 4 Use the UP/DOWN arrow buttons to the previous menu. 2/3/5 TV VCR CABLE DVD SAT MODE LIGHT POWER TV/VIDEO FRONT DVI COMP1 COMP2 RGB 123 456 789 ENTER 0 MUTE FLASHBK SURF SAP VOL VIDEO CH PIP PIPCH- SETUP Aspect Ratio Captions VIDEO Caption/Text G Language AUDIO EZ Demo TIME SPECIAL LOCK F Prev. PIPCH+ SWAP RATIO CC FREEZE PIP INPUT 1 1/3/4 MENU EXIT PLAY PAUSE STOP RECORD REW FF SKIP 1/3/4 2/3 5 PAGE 41 Caption/Text Mode Selection Select a closed caption mode...

Owners Manual
Page 54
... picture that channel may cause image problems or distortion: Electrical appliances, powerful lights, cars, trucks; No picture and no sound. • Is the AC power cord plugged in? • Check that the shape of your AC power outlet works. (Test it in the Captions/Text menu. • Your program is properly connected. No color, but the sound is a rectangle. Picture has two horizontal black bars, one on your speakers are set to fixing problems yourself...
... picture that channel may cause image problems or distortion: Electrical appliances, powerful lights, cars, trucks; No picture and no sound. • Is the AC power cord plugged in? • Check that the shape of your AC power outlet works. (Test it in the Captions/Text menu. • Your program is properly connected. No color, but the sound is a rectangle. Picture has two horizontal black bars, one on your speakers are set to fixing problems yourself...
Owners Manual
Page 56
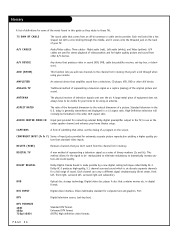
... channels to the vertical dimension of videocassettes and for connecting external Dolby digital preamplifier output to the TV, to dramatically increase picture and sound quality. Dolby AC-3 produces high-quality, 5.1 channel surround sound which is six discrete separate channels for stereo playback of a picture. Digital video disc player. AMPLIFIER An external device that produces video or sound (VCR, DVD, cable box,satellite receiver, set -top box). DIGITAL TV A new method of representing a television signal as a replica (analog) of the original picture and sound...
... channels to the vertical dimension of videocassettes and for connecting external Dolby digital preamplifier output to the TV, to dramatically increase picture and sound quality. Dolby AC-3 produces high-quality, 5.1 channel surround sound which is six discrete separate channels for stereo playback of a picture. Digital video disc player. AMPLIFIER An external device that produces video or sound (VCR, DVD, cable box,satellite receiver, set -top box). DIGITAL TV A new method of representing a television signal as a replica (analog) of the original picture and sound...
Owners Manual
Page 58
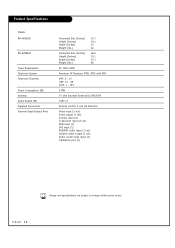
PAGE 58 Video input (3 set) Video output (1 set) S-Video input (2) Component input (2 set) RGB input (1) DVI input (1) RGB/DVI audio input (1 set) Variable audio output (1 set) Audio center mode input (1) Calibration port (1) Design and specifications are subject to change without prior notice. Product Specifications Models RU-44SZ61D RU-52SZ61D Power Requirement Television System Television Channels Power Consumption (W) Antenna Audio Output (W) Supplied Accessories External Input/Output Ports Horizontal Size (Inches) 41.7 Height (Inches) 30.1 Depth (Inches) 14 Weight (lbs.) 64 ...
PAGE 58 Video input (3 set) Video output (1 set) S-Video input (2) Component input (2 set) RGB input (1) DVI input (1) RGB/DVI audio input (1 set) Variable audio output (1 set) Audio center mode input (1) Calibration port (1) Design and specifications are subject to change without prior notice. Product Specifications Models RU-44SZ61D RU-52SZ61D Power Requirement Television System Television Channels Power Consumption (W) Antenna Audio Output (W) Supplied Accessories External Input/Output Ports Horizontal Size (Inches) 41.7 Height (Inches) 30.1 Depth (Inches) 14 Weight (lbs.) 64 ...
Owners Manual
Page 59
... with manufacturer's specifications, indicating that any product to the Factory Service Center. If a replacement unit is received, please use of original installation available. If you . Box 240007 201 James Record Road Huntsville, Alabama 35824 ATTN: CIC Telephone number: 1-800-243-0000 This number is a toll-free number Follow menu prompts when the call the LG®Brand Customer Interactive Service. LG®Brand DLP Rear Projection Televisions are marketed and...
... with manufacturer's specifications, indicating that any product to the Factory Service Center. If a replacement unit is received, please use of original installation available. If you . Box 240007 201 James Record Road Huntsville, Alabama 35824 ATTN: CIC Telephone number: 1-800-243-0000 This number is a toll-free number Follow menu prompts when the call the LG®Brand Customer Interactive Service. LG®Brand DLP Rear Projection Televisions are marketed and...

Owners Manual
Page 60
... gives you specific legal rights and you . G product where the original factory serial numbers have other rights that has been modified or incorporated into any way. P/N : 3828VA0220Y a (NB03JC) LG® Brand DLP Rear Projection Television U.S. Your unit will be defective in shipping or transit G service required as is, where is good only to schedule a service appointment. Replacement Units and Repair Parts are not...
... gives you specific legal rights and you . G product where the original factory serial numbers have other rights that has been modified or incorporated into any way. P/N : 3828VA0220Y a (NB03JC) LG® Brand DLP Rear Projection Television U.S. Your unit will be defective in shipping or transit G service required as is, where is good only to schedule a service appointment. Replacement Units and Repair Parts are not...


