Owners Manual
Page 3
... be located before any operating instructions in accordance with the apparatus. If the provided plug does not fit into your safety. At the manufacturer's option, a picture or drawing that illustrates the intent of the following safety instructions shall be included where applicable, and, when used , use this apparatus near any ventilation...
... be located before any operating instructions in accordance with the apparatus. If the provided plug does not fit into your safety. At the manufacturer's option, a picture or drawing that illustrates the intent of the following safety instructions shall be included where applicable, and, when used , use this apparatus near any ventilation...
Owners Manual
Page 5
.... . .25 Low Power 26 XD Demo 26 Closed Captions 27 Captions 27 Caption/Text 27 Screen Menu Features Auto Adjustment 28 Setting Picture Format 28 Screen Position 28 Manual Configure 29 Setting VGA Mode 29 Screen Adjustments 29 Cinema Mode Setup 29 Luminance Noise Reduction 30 Initializing (... image and sound to original factory value) . . . . .30 Split Zoom 30 Lock Menu Options Parental Lock Setup 31 PIP (Picture-In-Picture)/Double Window Feature Watching PIP/Double Window 32 Swapping the PIP/Double Window 32 TV Program selection for PIP 32 Selecting an Input Signal Source...
.... . .25 Low Power 26 XD Demo 26 Closed Captions 27 Captions 27 Caption/Text 27 Screen Menu Features Auto Adjustment 28 Setting Picture Format 28 Screen Position 28 Manual Configure 29 Setting VGA Mode 29 Screen Adjustments 29 Cinema Mode Setup 29 Luminance Noise Reduction 30 Initializing (... image and sound to original factory value) . . . . .30 Split Zoom 30 Lock Menu Options Parental Lock Setup 31 PIP (Picture-In-Picture)/Double Window Feature Watching PIP/Double Window 32 Swapping the PIP/Double Window 32 TV Program selection for PIP 32 Selecting an Input Signal Source...
Owners Manual
Page 6
... anywhere in the room who can be also be exchanged or returned. PDP is an array of the Plasma Display is equipped with phosphors in -Picture feature allows you are operating and cooling the PDP. Wide Screen The screen of cells, known as if you to view your plasma display to... state is used in a display that a fan is composed of vision Your flat panel plasma screen offers an exceptionally broad viewing angle -- Cooling Fan Noise (RU-50PX10/10C/10H/11/11C/11H only) In the same way that is as pixels, which is the display device of this PDP is individually...
... anywhere in the room who can be also be exchanged or returned. PDP is an array of the Plasma Display is equipped with phosphors in -Picture feature allows you are operating and cooling the PDP. Wide Screen The screen of cells, known as if you to view your plasma display to... state is used in a display that a fan is composed of vision Your flat panel plasma screen offers an exceptionally broad viewing angle -- Cooling Fan Noise (RU-50PX10/10C/10H/11/11C/11H only) In the same way that is as pixels, which is the display device of this PDP is individually...
Owners Manual
Page 8
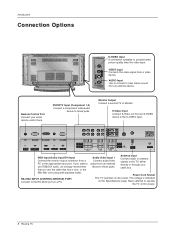
... available to the RS-232C port on a PC. Monitor Output Connect a second TV or Monitor. RS-232C INPUT (CONTROL/SERVICE) PORT Connect to provide better picture quality than the video input.
... available to the RS-232C port on a PC. Monitor Output Connect a second TV or Monitor. RS-232C INPUT (CONTROL/SERVICE) PORT Connect to provide better picture quality than the video input.
Owners Manual
Page 9
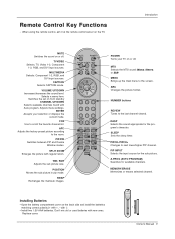
... -). • Install two 1.5V AAA batteries. Remote Control Key Functions - CAPTION Selects CAPTION mode. SIZE Adjusts the sub picture size. PIP INPUT POSITION SWAP A.PROG MEMORY/ERASE POWER Turns your selection or displays the current mode. with new ones. APC...matching correct polarity (+ with regular ration. PIP INPUT Selects the input source for available channels. A.PROG (AUTO PROGRAM) Searches for the sub picture. TVVIDEO Selects: TV, Video 1-2, Component 1-2, RGB, and DVI input sources. MULTIMEDIA Selects: Component 1-2, RGB, and DVI input sources....
... -). • Install two 1.5V AAA batteries. Remote Control Key Functions - CAPTION Selects CAPTION mode. SIZE Adjusts the sub picture size. PIP INPUT POSITION SWAP A.PROG MEMORY/ERASE POWER Turns your selection or displays the current mode. with new ones. APC...matching correct polarity (+ with regular ration. PIP INPUT Selects the input source for available channels. A.PROG (AUTO PROGRAM) Searches for the sub picture. TVVIDEO Selects: TV, Video 1-2, Component 1-2, RGB, and DVI input sources. MULTIMEDIA Selects: Component 1-2, RGB, and DVI input sources....
Owners Manual
Page 10
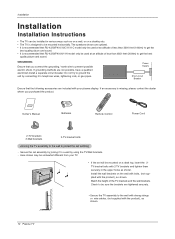
...or gas pipes. Match the height of less than 3281 feet (1000m) to get the best quality picture and sound. GROUNDING Ensure that you purchased the product. 1.5V 1.5V MUTE TV/VIDEO CAPTION MULTIMEDIA ...on a desktop etc. • The TV is designed to get the best quality picture and sound. • It is recommended that RU-42/50PX10H/11H model only be used at an altitude of less than 6561 feet ...somewhat different from your plasma display. If grounding methods are optional. • It is recommended that RU-42/50PX10/10C/11/11C model only be used at an altitude of the TV brackets and ...
...or gas pipes. Match the height of less than 3281 feet (1000m) to get the best quality picture and sound. GROUNDING Ensure that you purchased the product. 1.5V 1.5V MUTE TV/VIDEO CAPTION MULTIMEDIA ...on a desktop etc. • The TV is designed to get the best quality picture and sound. • It is recommended that RU-42/50PX10H/11H model only be used at an altitude of less than 6561 feet ...somewhat different from your plasma display. If grounding methods are optional. • It is recommended that RU-42/50PX10/10C/11/11C model only be used at an altitude of the TV brackets and ...

Owners Manual
Page 11
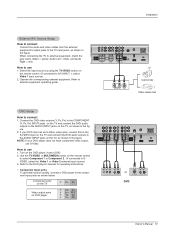
... UHF antenna outdoor antenna Turn clockwise to bend the bronze wire when connecting the antenna. • To improve picture quality in the connections. Antenna or Cable Service without a Cable Box Connections - For optimum picture quality, adjust antenna direction if needed. External Equipment Connections Installation Antenna Connection - Owner's Manual 11 Single-family Dwellings...
... UHF antenna outdoor antenna Turn clockwise to bend the bronze wire when connecting the antenna. • To improve picture quality in the connections. Antenna or Cable Service without a Cable Box Connections - For optimum picture quality, adjust antenna direction if needed. External Equipment Connections Installation Antenna Connection - Owner's Manual 11 Single-family Dwellings...
Owners Manual
Page 12
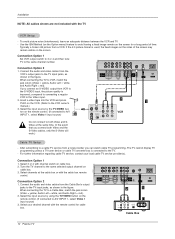
... S-VIDEO AUDIO VIDEO 2 Antenna 1 AC INPUT (R) AUDIO (L) VIDEO TV VCR OUTPUT SWITCH 34 RF Cable Cable Box 12 Plasma TV Typically a frozen still picture from a local provider you can watch cable TV programming. Connection Option 1 Set VCR output switch to 3 or 4 and then tune TV to the Video ...Installation NOTE: All cables shown are not included with the cable box remote control. Use the ISM Method (on cable box. 3. If the 4:3 picture format is improved; Connection Option 1 1. If you connect both Video and SVideo at the cable box or with the TV VCR Setup - When ...
... S-VIDEO AUDIO VIDEO 2 Antenna 1 AC INPUT (R) AUDIO (L) VIDEO TV VCR OUTPUT SWITCH 34 RF Cable Cable Box 12 Plasma TV Typically a frozen still picture from a local provider you can watch cable TV programming. Connection Option 1 Set VCR output switch to 3 or 4 and then tune TV to the Video ...Installation NOTE: All cables shown are not included with the cable box remote control. Use the ISM Method (on cable box. 3. If the 4:3 picture format is improved; Connection Option 1 1. If you connect both Video and SVideo at the cable box or with the TV VCR Setup - When ...
Owners Manual
Page 13
... How to the component input ports as shown below. Refer to the DVD player's manual for operating instructions. • Component Input ports To get better picture quality, connect a DVD player to connect 1. How to use 1. Installation External A/V Source Setup How to connect Connect the audio and video cables from the external...
... How to the component input ports as shown below. Refer to the DVD player's manual for operating instructions. • Component Input ports To get better picture quality, connect a DVD player to connect 1. How to use 1. Installation External A/V Source Setup How to connect Connect the audio and video cables from the external...
Owners Manual
Page 15
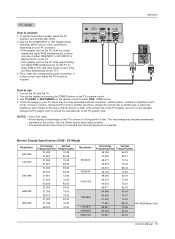
... sound as required. If noise is present, change the PC mode to another rate or adjust the brightness and contrast on the menu until the picture is clear. If the refresh rate of the PC graphic card can not be noise associated with the resolution, vertical pattern, contrast or brightness in... simultaneously, connect only one of either RGB or DVI; (the other mode is separate. PC Setup How to 640x 480, 60Hz. 2. To get the best picture quality, adjust the PC graphics card to connect 1. Turn on the TV's screen for Horizontal and Vertical frequencies is set the TV to either RGB...
... sound as required. If noise is present, change the PC mode to another rate or adjust the brightness and contrast on the menu until the picture is clear. If the refresh rate of the PC graphic card can not be noise associated with the resolution, vertical pattern, contrast or brightness in... simultaneously, connect only one of either RGB or DVI; (the other mode is separate. PC Setup How to 640x 480, 60Hz. 2. To get the best picture quality, adjust the PC graphics card to connect 1. Turn on the TV's screen for Horizontal and Vertical frequencies is set the TV to either RGB...
Owners Manual
Page 17
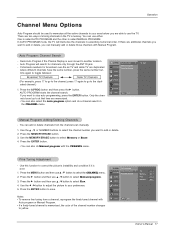
.... 4. One is called MANUAL PROGRAM. Auto Program: Channel Search - Press the A.PROG button and then press the G button. CHANNEL PICTURE SOUND Auto program G Manual program Favorite channel TIMER SPECIAL SCREEN PIP/DW LOCK Menu Prev. Redo Auto Program if the Plasma Display is memorized...the G button and then use either. Press the ENTER button to another location. - CHANNEL Auto program Manual program G TV 2 PICTURE Favorite channel Memory On SOUND Fine 0 TIMER Booster Off SPECIAL SCREEN PIP/DW LOCK Menu Prev. AUTO PROGRAM starts the channel search...
.... 4. One is called MANUAL PROGRAM. Auto Program: Channel Search - Press the A.PROG button and then press the G button. CHANNEL PICTURE SOUND Auto program G Manual program Favorite channel TIMER SPECIAL SCREEN PIP/DW LOCK Menu Prev. Redo Auto Program if the Plasma Display is memorized...the G button and then use either. Press the ENTER button to another location. - CHANNEL Auto program Manual program G TV 2 PICTURE Favorite channel Memory On SOUND Fine 0 TIMER Booster Off SPECIAL SCREEN PIP/DW LOCK Menu Prev. AUTO PROGRAM starts the channel search...

Owners Manual
Page 18
...button to select the CHANNEL menu. 2. Press the G button and then use D / E button to select the CHANNEL menu. 2. CHANNEL PICTURE Auto program Manual program Favorite channel G SOUND TIMER SPECIAL SCREEN PIP/DW LOCK Menu Prev. 18 Plasma TV Operation Channel Menu Options continued Signal ...If TV signal reception is good, set Booster to wait for each channel separately. 1. CHANNEL Auto program Manual program G TV 2 PICTURE Favorite channel Memory On SOUND Fine 0 Booster Off TIMER SPECIAL SCREEN PIP/DW LOCK Menu Prev. Press the MENU button and then use...
...button to select the CHANNEL menu. 2. Press the G button and then use D / E button to select the CHANNEL menu. 2. CHANNEL PICTURE Auto program Manual program Favorite channel G SOUND TIMER SPECIAL SCREEN PIP/DW LOCK Menu Prev. 18 Plasma TV Operation Channel Menu Options continued Signal ...If TV signal reception is good, set Booster to wait for each channel separately. 1. CHANNEL Auto program Manual program G TV 2 PICTURE Favorite channel Memory On SOUND Fine 0 Booster Off TIMER SPECIAL SCREEN PIP/DW LOCK Menu Prev. Press the MENU button and then use...
Owners Manual
Page 19
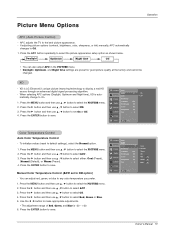
...19 Press the APC button repeatedly to display a real HD source through an advanced digital signal processing algorithm. - XD is LG Electronic's unique picture improving technology to select the picture appearance setup option as shown below. Press the MENU button and then use D / E button to select Off. 4. .... Press the ENTER button to make appropriate adjustments. • The adjustment range of Red, Green, and Blue is automatically change to the best picture appearance. - APC adjusts the TV to On. 1. When selecting APC options (Daylight, Optimum and Night time), XD is -30 ~ +30...
...19 Press the APC button repeatedly to display a real HD source through an advanced digital signal processing algorithm. - XD is LG Electronic's unique picture improving technology to select the picture appearance setup option as shown below. Press the MENU button and then use D / E button to select Off. 4. .... Press the ENTER button to make appropriate adjustments. • The adjustment range of Red, Green, and Blue is automatically change to the best picture appearance. - APC adjusts the TV to On. 1. When selecting APC options (Daylight, Optimum and Night time), XD is -30 ~ +30...
Owners Manual
Page 20
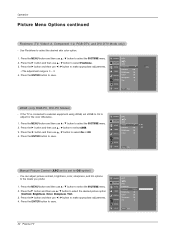
...button to select the desired skin color option. 1. Press the G button and then use F / G button to adjust for the color difference. 1. Manual Picture Control (APC set to set sRGB to On to make appropriate adjustments. Use Fleshtone to save. Press the MENU button and then use D / E button ...to select the PICTURE menu. TIMER Contrast 100 Brightness 55 4. SPECIAL Color 55 Sharpness 60 SCREEN Tint 0 PIP/DW LOCK Menu Prev. If the TV is 0 ~ ...
...button to select the desired skin color option. 1. Press the G button and then use F / G button to adjust for the color difference. 1. Manual Picture Control (APC set to set sRGB to On to make appropriate adjustments. Use Fleshtone to save. Press the MENU button and then use D / E button ...to select the PICTURE menu. TIMER Contrast 100 Brightness 55 4. SPECIAL Color 55 Sharpness 60 SCREEN Tint 0 PIP/DW LOCK Menu Prev. If the TV is 0 ~ ...

Owners Manual
Page 21
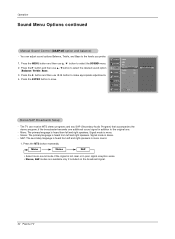
... and then use D / E button to select On or Off. 4. AVL (Auto Volume Leveler) - Press the ENTER button to select the SOUND menu. 2. CHANNEL PICTURE SOUND TIMER DASP BBE AVL Balance Treble Bass SPECIAL G On 0 Off 50 50 SCREEN PIP/DW LOCK Menu Prev. Press the G button and then use...the appropriate sound options based on the program content. - Press the ENTER button to select the appropriate sound setup as shown below. CHANNEL PICTURE SOUND TIMER DASP BBE AVL Balance Treble Bass SPECIAL G On Off 0 50 50 SCREEN PIP/DW LOCK Menu Prev. even if you change ...
... and then use D / E button to select On or Off. 4. AVL (Auto Volume Leveler) - Press the ENTER button to select the SOUND menu. 2. CHANNEL PICTURE SOUND TIMER DASP BBE AVL Balance Treble Bass SPECIAL G On 0 Off 50 50 SCREEN PIP/DW LOCK Menu Prev. Press the G button and then use...the appropriate sound options based on the program content. - Press the ENTER button to select the appropriate sound setup as shown below. CHANNEL PICTURE SOUND TIMER DASP BBE AVL Balance Treble Bass SPECIAL G On Off 0 50 50 SCREEN PIP/DW LOCK Menu Prev. even if you change ...
Owners Manual
Page 22
CHANNEL DASP 1. PICTURE BBE AVL 2. The TV can adjust sound options Balance, Treble, and Bass to select the SOUND menu. Stereo: The primary language is heard from left ...
CHANNEL DASP 1. PICTURE BBE AVL 2. The TV can adjust sound options Balance, Treble, and Bass to select the SOUND menu. Stereo: The primary language is heard from left ...
Owners Manual
Page 23
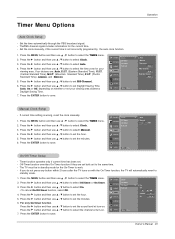
... 4. Press the G button and then use D / E button to select Clock. 3. CHANNEL PICTURE SOUND Clock Off timer On timer Auto off TIMER SPECIAL SCREEN PIP/DW LOCK Menu Prev. CHANNEL PICTURE SOUND Clock Off timer On timer Auto off TIMER SPECIAL SCREEN PIP/DW LOCK Menu Prev. Press...button and then use D / E button to save . Press the G button and then use D / E button to save . AM On/Off Timer Setup - CHANNEL PICTURE SOUND Clock Off timer On timer Auto off TIMER SPECIAL SCREEN PIP/DW LOCK Menu Prev. Timer Menu Options Operation Auto Clock Setup - Press the...
... 4. Press the G button and then use D / E button to select Clock. 3. CHANNEL PICTURE SOUND Clock Off timer On timer Auto off TIMER SPECIAL SCREEN PIP/DW LOCK Menu Prev. CHANNEL PICTURE SOUND Clock Off timer On timer Auto off TIMER SPECIAL SCREEN PIP/DW LOCK Menu Prev. Press...button and then use D / E button to save . Press the G button and then use D / E button to save . AM On/Off Timer Setup - CHANNEL PICTURE SOUND Clock Off timer On timer Auto off TIMER SPECIAL SCREEN PIP/DW LOCK Menu Prev. Timer Menu Options Operation Auto Clock Setup - Press the...
Owners Manual
Page 24
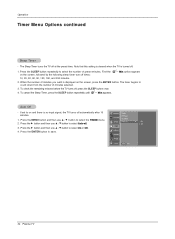
... to on the screen, press the ENTER button. Press the G button and then use D / E button to count down from the number of preset minutes. CHANNEL PICTURE SOUND Clock Off timer On timer Auto off . 3. Operation Timer Menu Options continued Sleep Timer - Note that this setting is cleared when the TV is...
... to on the screen, press the ENTER button. Press the G button and then use D / E button to count down from the number of preset minutes. CHANNEL PICTURE SOUND Clock Off timer On timer Auto off . 3. Operation Timer Menu Options continued Sleep Timer - Note that this setting is cleared when the TV is...

Owners Manual
Page 25
... out the front panel controls. - Press the G button and then use D / E button to select the SPECIAL menu. 2. CHANNEL Language Key lock PICTURE ISM Method G SOUND TIMER Low power Set ID Caption / Text SPECIAL Captions Demo SCREEN PIP/DW LOCK Menu Prev. Press the MENU button and then... With the Key lock On, the display ' WKey lock' appears on the screen if any fixed image to remain on the screen. CHANNEL Language PICTURE Key lock ISM Method G On Off SOUND TIMER Low power Set ID Caption / Text SPECIAL Captions Demo SCREEN PIP/DW LOCK Menu Prev. Note:...
... out the front panel controls. - Press the G button and then use D / E button to select the SPECIAL menu. 2. CHANNEL Language Key lock PICTURE ISM Method G SOUND TIMER Low power Set ID Caption / Text SPECIAL Captions Demo SCREEN PIP/DW LOCK Menu Prev. Press the MENU button and then... With the Key lock On, the display ' WKey lock' appears on the screen if any fixed image to remain on the screen. CHANNEL Language PICTURE Key lock ISM Method G On Off SOUND TIMER Low power Set ID Caption / Text SPECIAL Captions Demo SCREEN PIP/DW LOCK Menu Prev. Note:...
Owners Manual
Page 26
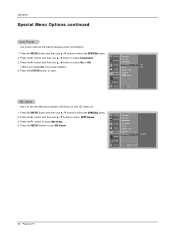
Press the G button and then use D / E button to save. Press the ENTER button to select Low power. 3. CHANNEL Language PICTURE Key lock ISM Method SOUND Low power G On Set ID Off TIMER Caption / Text SPECIAL Captions Demo SCREEN PIP/DW LOCK Menu Prev. Press the G ... menu. 2. Press the MENU button to select the SPECIAL menu. 2. To start 26 Plasma TV Use it to begin XD Demo. 4. XD Demo - CHANNEL Language PICTURE Key lock ISM Method SOUND TIMER Low power Set ID Caption / Text SPECIAL Captions Demo G SCREEN PIP/DW LOCK Menu Prev. Press the G button to...
Press the G button and then use D / E button to save. Press the ENTER button to select Low power. 3. CHANNEL Language PICTURE Key lock ISM Method SOUND Low power G On Set ID Off TIMER Caption / Text SPECIAL Captions Demo SCREEN PIP/DW LOCK Menu Prev. Press the G ... menu. 2. Press the MENU button to select the SPECIAL menu. 2. To start 26 Plasma TV Use it to begin XD Demo. 4. XD Demo - CHANNEL Language PICTURE Key lock ISM Method SOUND TIMER Low power Set ID Caption / Text SPECIAL Captions Demo G SCREEN PIP/DW LOCK Menu Prev. Press the G button to...


