Owner's Manual (English)
Page 3
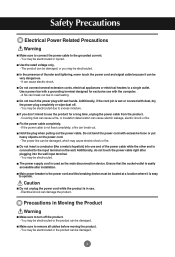
... to a single outlet. Do not touch the power plug with the computer. - The power supply cord is easily accessible after plugging into one end of thunder and lightning, never touch the power cord and signal cable because it is connected to the input terminal on the power cord. - Caution Do not unplug the power cord while the product is not fixed completely, a fire can break out. You may...
... to a single outlet. Do not touch the power plug with the computer. - The power supply cord is easily accessible after plugging into one end of thunder and lightning, never touch the power cord and signal cable because it is connected to the input terminal on the power cord. - Caution Do not unplug the power cord while the product is not fixed completely, a fire can break out. You may...
Owner's Manual (English)
Page 5
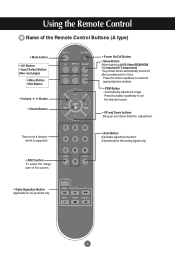
... the Remote Control Buttons (A type) • Mute button • AV Button • Input Select Button (See next page) • Menu Button • Exit Button • Volume Button • Check Button There is not a function which is supported • Power On/Off Button • Sleep Button When watching AV/S-Video/RGB/HDMI • Component1/ Component2 The product will be automatically turned off after a certain period of the screen. • Video Operation Button Applicable for the analog signal only) • ARC button...
... the Remote Control Buttons (A type) • Mute button • AV Button • Input Select Button (See next page) • Menu Button • Exit Button • Volume Button • Check Button There is not a function which is supported • Power On/Off Button • Sleep Button When watching AV/S-Video/RGB/HDMI • Component1/ Component2 The product will be automatically turned off after a certain period of the screen. • Video Operation Button Applicable for the analog signal only) • ARC button...
Owner's Manual (English)
Page 7
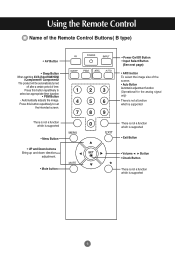
...; ARC button To select the image size of time. Press this button repetitively to set the intended screen. Press this button repetitively to select an appropriate time duration • PSM Button - Using the Remote Control Name of the Remote Control Buttons( B type) • AV Button • Sleep Button When watching AV/S-Video/RGB/HDMI /Component1/ Component2 The product will be automatically turned off after a certain period of the screen. • Auto Button Automatic adjustment function (Operational for the analog signal...
...; ARC button To select the image size of time. Press this button repetitively to set the intended screen. Press this button repetitively to select an appropriate time duration • PSM Button - Using the Remote Control Name of the Remote Control Buttons( B type) • AV Button • Sleep Button When watching AV/S-Video/RGB/HDMI /Component1/ Component2 The product will be automatically turned off after a certain period of the screen. • Auto Button Automatic adjustment function (Operational for the analog signal...
Owner's Manual (English)
Page 11
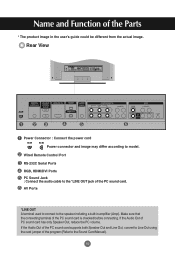
... PC sound card supports both Speaker Out and Line Out, convert to the Sound Card Manual). 10 Rear View REMOTE CONTROL IN RS-232C (CONTROL& SERVICE) OUT HDMI/DVI IN IN RGB IN RGB OUT AUDIO (RGB/DVI) COMPONENT IN VIDEO Y P B P R L-AUDIO-R 1 2 VIDEO AV IN L-AUDIO-R AV OUT S-VIDEO REMOTE CONTROL IN RS-232C (CONTROL& SERVICE) OUT HDMI/DVI IN IN RGB IN RGB OUT AUDIO (RGB/DVI) COMPONENT IN VIDEO Y P B P R L-AUDIO-R 1 2 VIDEO AV IN L-AUDIO-R AV OUT S-VIDEO Power Connector : Connect the power cord Power...
... PC sound card supports both Speaker Out and Line Out, convert to the Sound Card Manual). 10 Rear View REMOTE CONTROL IN RS-232C (CONTROL& SERVICE) OUT HDMI/DVI IN IN RGB IN RGB OUT AUDIO (RGB/DVI) COMPONENT IN VIDEO Y P B P R L-AUDIO-R 1 2 VIDEO AV IN L-AUDIO-R AV OUT S-VIDEO REMOTE CONTROL IN RS-232C (CONTROL& SERVICE) OUT HDMI/DVI IN IN RGB IN RGB OUT AUDIO (RGB/DVI) COMPONENT IN VIDEO Y P B P R L-AUDIO-R 1 2 VIDEO AV IN L-AUDIO-R AV OUT S-VIDEO Power Connector : Connect the power cord Power...
Owner's Manual (English)
Page 12
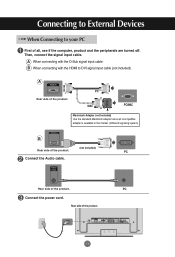
... peripherals are turned off. Connecting to External Devices When Connecting to DVI signal input cable (not included). AUDIO (RGB/DVI) Rear side of the product. REMOTE CONTROL IN RS-232C (CONTROL& SERVICE) OUT HDMI/DVI IN IN RGB IN RGB OUT AUDIO (RGB/DVI) COMPONENT IN VIDEO Y P B P R L-AUDIO-R 1 2 VIDEO AV IN L-AUDIO-R AV OUT S-VIDEO 11 PC MAC PC/MAC Macintosh Adapter (not included) Use the standard Macintosh adapter since an incompatible adapter is available...
... peripherals are turned off. Connecting to External Devices When Connecting to DVI signal input cable (not included). AUDIO (RGB/DVI) Rear side of the product. REMOTE CONTROL IN RS-232C (CONTROL& SERVICE) OUT HDMI/DVI IN IN RGB IN RGB OUT AUDIO (RGB/DVI) COMPONENT IN VIDEO Y P B P R L-AUDIO-R 1 2 VIDEO AV IN L-AUDIO-R AV OUT S-VIDEO 11 PC MAC PC/MAC Macintosh Adapter (not included) Use the standard Macintosh adapter since an incompatible adapter is available...
Owner's Manual (English)
Page 13
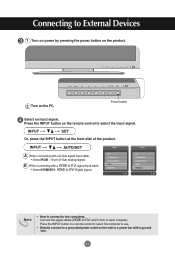
... the input signal. Press the INPUT button on the remote control to two computers. INPUT AUTO/SET Input Input A When connecting with a D-Sub signal input cable. • Select RGB : 15-pin D-Sub analog signal. Press the INPUT button in a remote control to select the computer to use. • Directly connect to External Devices 1 Turn on power by pressing the power button on the product. 2 Turn on the PC. Connecting to a grounded power outlet on the wall or a power bar with a ground wire. 12 Power button...
... the input signal. Press the INPUT button on the remote control to two computers. INPUT AUTO/SET Input Input A When connecting with a D-Sub signal input cable. • Select RGB : 15-pin D-Sub analog signal. Press the INPUT button in a remote control to select the computer to use. • Directly connect to External Devices 1 Turn on power by pressing the power button on the product. 2 Turn on the PC. Connecting to a grounded power outlet on the wall or a power bar with a ground wire. 12 Power button...
Owner's Manual (English)
Page 15
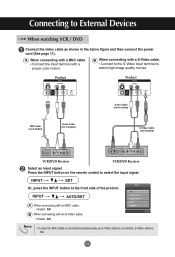
...AV. INPUT AUTO/SET A When connecting with a S-Video cable. • Connect to the S-Video input terminal to watch high image quality movies. Product AV IN VIDEO L-AUDIO-R AV OUT S-VIDEO Product AV IN VIDEO L-AUDIO-R AV OUT S-VIDEO Audio Cable (not included) BNC Cable (not included) Audio Cable (not included) S-Video Cable (not included) W R VCR/DVD Receiver VCR/DVD Receiver Select an input signal. Connecting to select the input signal. Press the INPUT button on the remote control to External Devices When watching VCR / DVD Connect the video cable as S-Video cable...
...AV. INPUT AUTO/SET A When connecting with a S-Video cable. • Connect to the S-Video input terminal to watch high image quality movies. Product AV IN VIDEO L-AUDIO-R AV OUT S-VIDEO Product AV IN VIDEO L-AUDIO-R AV OUT S-VIDEO Audio Cable (not included) BNC Cable (not included) Audio Cable (not included) S-Video Cable (not included) W R VCR/DVD Receiver VCR/DVD Receiver Select an input signal. Connecting to select the input signal. Press the INPUT button on the remote control to External Devices When watching VCR / DVD Connect the video cable as S-Video cable...
Owner's Manual (English)
Page 16
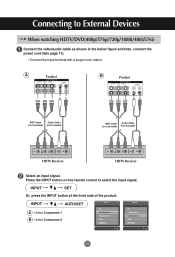
... remote control to External Devices When watching HDTV/DVD(480p/576p/720p/1080i/480i/576i) Connect the video/audio cable as shown in the below figure and then, connect the power cord (See page 11). • Connect the input terminal with a proper color match. INPUT SET Or, press the INPUT button at the front side of the product. INPUT AUTO/SET Input Input A • Select Component 1 B • Select Component 2 15 Connecting to select the input signal. A Product COMPONENT IN VIDEO Y P B P R L-AUDIO-R 1 2 B Product COMPONENT...
... remote control to External Devices When watching HDTV/DVD(480p/576p/720p/1080i/480i/576i) Connect the video/audio cable as shown in the below figure and then, connect the power cord (See page 11). • Connect the input terminal with a proper color match. INPUT SET Or, press the INPUT button at the front side of the product. INPUT AUTO/SET Input Input A • Select Component 1 B • Select Component 2 15 Connecting to select the input signal. A Product COMPONENT IN VIDEO Y P B P R L-AUDIO-R 1 2 B Product COMPONENT...

Owner's Manual (English)
Page 17
... the input signal. INPUT AUTO/SET Input Input A When connecting with a D-Sub signal input cable. • Select RGB 16 Press the INPUT button on the remote control to DVI Signal Cable RCA-PC (not included) Audio Cable HDMI Signal Cable (not included) D-Sub Signal Cable RCA-PC Audio Cable VCR/DVD/Set-top Box VCR/DVD/Set-top Box VCR/DVD/Set-top Box Select an input signal. INPUT SET Or, press the INPUT button at the front side of the product. When connecting with a HDMI signal input cable. • Select HDMI/DVI B When connecting with a HDMI to External Devices...
... the input signal. INPUT AUTO/SET Input Input A When connecting with a D-Sub signal input cable. • Select RGB 16 Press the INPUT button on the remote control to DVI Signal Cable RCA-PC (not included) Audio Cable HDMI Signal Cable (not included) D-Sub Signal Cable RCA-PC Audio Cable VCR/DVD/Set-top Box VCR/DVD/Set-top Box VCR/DVD/Set-top Box Select an input signal. INPUT SET Or, press the INPUT button at the front side of the product. When connecting with a HDMI signal input cable. • Select HDMI/DVI B When connecting with a HDMI to External Devices...
Owner's Manual (English)
Page 20
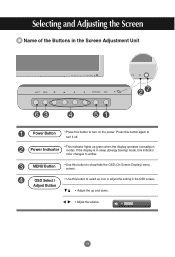
... lights up and down. • Adjust the volume. 19 If the display is in sleep (Energy Saving) mode, this indicator color changes to show/hide the OSD (On Screen Display) menu screen. MENU Button • Use this button to amber. OSD Select / Adjust Button • Use this button to select an icon or adjust the setting in the OSD screen. • Adjust the up green when the display operates normally(on the power. Press this button again to turn on mode...
... lights up and down. • Adjust the volume. 19 If the display is in sleep (Energy Saving) mode, this indicator color changes to show/hide the OSD (On Screen Display) menu screen. MENU Button • Use this button to amber. OSD Select / Adjust Button • Use this button to select an icon or adjust the setting in the OSD screen. • Adjust the up green when the display operates normally(on the power. Press this button again to turn on mode...
Owner's Manual (English)
Page 21
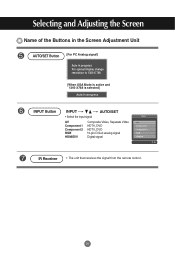
Selecting and Adjusting the Screen Name of the Buttons in the Screen Adjustment Unit AUTO/SET Button [For PC Analog signal] Auto in progress For opimal display change resolution to 1360 X 768 [When XGA Mode is active and 1360 X768 is selected] INPUT Button INPUT AUTO/SET • Select the input signal Input AV Component 1 Component 2 RGB HDMI/DVI Composite Video, Separate Video HDTV, DVD HDTV, DVD 15-pin D-Sub analog signal Digital signal IR Receiver • The unit that receives the signal from the remote control. 20
Selecting and Adjusting the Screen Name of the Buttons in the Screen Adjustment Unit AUTO/SET Button [For PC Analog signal] Auto in progress For opimal display change resolution to 1360 X 768 [When XGA Mode is active and 1360 X768 is selected] INPUT Button INPUT AUTO/SET • Select the input signal Input AV Component 1 Component 2 RGB HDMI/DVI Composite Video, Separate Video HDTV, DVD HDTV, DVD 15-pin D-Sub analog signal Digital signal IR Receiver • The unit that receives the signal from the remote control. 20
Owner's Manual (English)
Page 23
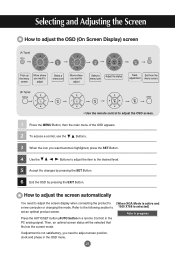
... SET Button. 6 Exit the OSD by pressing the EXIT Button. If adjustment is not satisfactory, you want to adjust Select a Adjust the status menu icon Save Exit from the adjustment menu screen. (B Type) • Use the remote control to adjust the OSD screen. 1 Press the MENU Button, then the main menu of the OSD appears. 2 To access a control, use the Buttons. 3 When the icon you need to adjust the screen display when connecting the product to [When XGA Mode...
... SET Button. 6 Exit the OSD by pressing the EXIT Button. If adjustment is not satisfactory, you want to adjust Select a Adjust the status menu icon Save Exit from the adjustment menu screen. (B Type) • Use the remote control to adjust the OSD screen. 1 Press the MENU Button, then the main menu of the OSD appears. 2 To access a control, use the Buttons. 3 When the icon you need to adjust the screen display when connecting the product to [When XGA Mode...
Owner's Manual (English)
Page 26
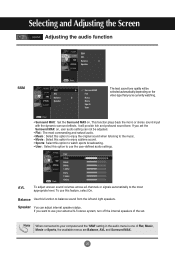
... 3KHz 7.5KHz 12KHz To adjust uneven sound volumes across all channels or signals automatically to your external hi-fi stereo system, turn off the internal speakers of Flat, Music, Movie or Sports, the available menus are Balance, AVL and Surround MAX . 25 To use the user-defined audio settings. If you set . This function plays back the mono or stereo sound input with the dynamic surround effects...
... 3KHz 7.5KHz 12KHz To adjust uneven sound volumes across all channels or signals automatically to your external hi-fi stereo system, turn off the internal speakers of Flat, Music, Movie or Sports, the available menus are Balance, AVL and Surround MAX . 25 To use the user-defined audio settings. If you set . This function plays back the mono or stereo sound input with the dynamic surround effects...
Owner's Manual (English)
Page 28
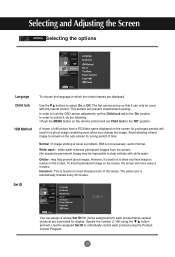
... the panel color of time. Orbiter : may be used with white wash. In order to lock the OSD screen adjustment, set to unlock it, do the following : • Push the MENU button on the screen. In order to Normal. Avoid allowing a fixed image to each product using the button and exit. Set ID Language Child lock ISM Method Set ID 1 Tile Mode Power Indicator Logo light Demo You can be set Child lock to individually control...
... the panel color of time. Orbiter : may be used with white wash. In order to lock the OSD screen adjustment, set to unlock it, do the following : • Push the MENU button on the screen. In order to Normal. Avoid allowing a fixed image to each product using the button and exit. Set ID Language Child lock ISM Method Set ID 1 Tile Mode Power Indicator Logo light Demo You can be set Child lock to individually control...
Owner's Manual (English)
Page 29
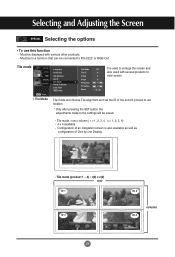
... to view screen. • Tile Mode Tile mode and choose Tile alignment and set the ID of One by one Display. - Selecting and Adjusting the Screen Selecting the options • To use this function - Must be in a function that can be connected to RS-232C or RGB Out Tile mode Language Child lock ISM Method Set ID Tile Mode Power Indicator Logo light Demo Tile Mode Tile ID H-Size V-Size...
... to view screen. • Tile Mode Tile mode and choose Tile alignment and set the ID of One by one Display. - Selecting and Adjusting the Screen Selecting the options • To use this function - Must be in a function that can be connected to RS-232C or RGB Out Tile mode Language Child lock ISM Method Set ID Tile Mode Power Indicator Logo light Demo Tile Mode Tile ID H-Size V-Size...
Owner's Manual (English)
Page 31
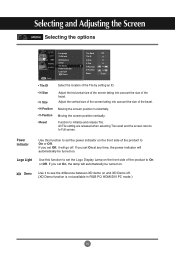
... be turned on. Adjust the vertical size of the screen taking into account the size of the bezel. All Tile setting are released when selecting Tile recall and the screen returns to initialize and release Tile. If you set On, the lamp will go off . (XD Demo function is not available in RGB PC/ HDMI/DVI PC mode.) 30 Power Indicator Logo Light Use this...
... be turned on. Adjust the vertical size of the screen taking into account the size of the bezel. All Tile setting are released when selecting Tile recall and the screen returns to initialize and release Tile. If you set On, the lamp will go off . (XD Demo function is not available in RGB PC/ HDMI/DVI PC mode.) 30 Power Indicator Logo Light Use this...
Owner's Manual (English)
Page 34
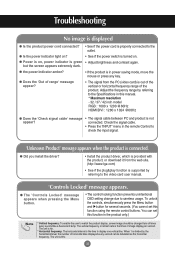
... the times of the product. Check the signal cable. • Press the 'INPUT' menu in power saving mode, move the mouse or press any key. Troubleshooting No image is displayed G Is the product power cord connected? • See if the power cord is connected. G Did you install the driver? • Install the product driver, which is provided with the product, or download it from the PC (video card) is green • Adjust brightness...
... the times of the product. Check the signal cable. • Press the 'INPUT' menu in power saving mode, move the mouse or press any key. Troubleshooting No image is displayed G Is the product power cord connected? • See if the power cord is connected. G Did you install the driver? • Install the product driver, which is provided with the product, or download it from the PC (video card) is green • Adjust brightness...
Owner's Manual (English)
Page 35
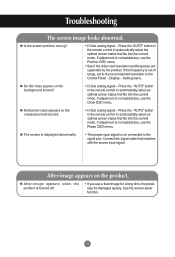
... the "AUTO" button in the remote control to the signal port. If adjustment is not satisfactory, use a fixed image for a long time, the pixels may be damaged quickly. G The screen is displayed abnormally. • The proper input signal is turned off. • If you use the Clock OSD menu. G After-image appears when the product is not connected to automatically select an optimal screen status that fits into the current mode. Setting menu. Display...
... the "AUTO" button in the remote control to the signal port. If adjustment is not satisfactory, use a fixed image for a long time, the pixels may be damaged quickly. G The screen is displayed abnormally. • The proper input signal is turned off. • If you use the Clock OSD menu. G After-image appears when the product is not connected to automatically select an optimal screen status that fits into the current mode. Setting menu. Display...
Owner's Manual (English)
Page 36
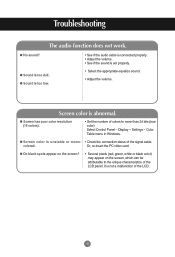
G Screen has poor color resolution (16 colors). • Set the number of colors to the unique characteristics of the LCD panel. Color Table menu in Windows. G Screen color is too low. • Select the appropriate equalize sound. • Adjust the volume. Or, re-insert the PC video card. G Sound is unstable or mono- • Check the connection status of the LCD. 35 Display - colored. G Do black spots appear on the screen? • Several pixels (red, green, white or black color) may...
G Screen has poor color resolution (16 colors). • Set the number of colors to the unique characteristics of the LCD panel. Color Table menu in Windows. G Screen color is too low. • Select the appropriate equalize sound. • Adjust the volume. Or, re-insert the PC video card. G Sound is unstable or mono- • Check the connection status of the LCD. 35 Display - colored. G Do black spots appear on the screen? • Several pixels (red, green, white or black color) may...
Owner's Manual (English)
Page 37
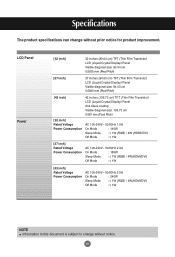
... (Thin Film Transistor) LCD (Liquid Crystal Display) Panel Anti-Glare coating Visible diagonal size: 106.73 cm 0.681 mm (Pixel Pitch) [32 inch] Rated Voltage Power Consumption AC 100-240V~ 50/60Hz 1.5A On Mode : 145W Sleep Mode : ≤ 1W (RGB) / 4W (HDMI/DVI) Off Mode : ≤ 1W [37 inch] Rated Voltage Power Consumption AC 100-240V~ 50/60Hz 2.0A On Mode : 180W Sleep Mode : ≤ 1W...
... (Thin Film Transistor) LCD (Liquid Crystal Display) Panel Anti-Glare coating Visible diagonal size: 106.73 cm 0.681 mm (Pixel Pitch) [32 inch] Rated Voltage Power Consumption AC 100-240V~ 50/60Hz 1.5A On Mode : 145W Sleep Mode : ≤ 1W (RGB) / 4W (HDMI/DVI) Off Mode : ≤ 1W [37 inch] Rated Voltage Power Consumption AC 100-240V~ 50/60Hz 2.0A On Mode : 180W Sleep Mode : ≤ 1W...


