
Owner's Manual (English)
Page 1
...) from the VCR/DVD/Set-top Box Watching AV Outputs A11 A11 A13 A14 A15 A16 A17 A18 Input Selecting and Adjusting the Screen A19 Selection How to adjust the OSD (On Screen Display) Screen A22 Adjusting Screen Color A23 and Tracking Adjusting the audio function A24 Selecting the Options A25 Adjusting Screen CLOCK/PHASE and Position A29 Adjusting PIP/POP/PBP Mode (Multiple Screen) Functions A30 Miscellaneous Troubleshooting A32 Specifications A35 is incorporated...
...) from the VCR/DVD/Set-top Box Watching AV Outputs A11 A11 A13 A14 A15 A16 A17 A18 Input Selecting and Adjusting the Screen A19 Selection How to adjust the OSD (On Screen Display) Screen A22 Adjusting Screen Color A23 and Tracking Adjusting the audio function A24 Selecting the Options A25 Adjusting Screen CLOCK/PHASE and Position A29 Adjusting PIP/POP/PBP Mode (Multiple Screen) Functions A30 Miscellaneous Troubleshooting A32 Specifications A35 is incorporated...

Owner's Manual (English)
Page 3
...Hold the plug when pulling out the power cable. The power supply cord is in Moving the Product Warning Make sure to the grounded current. - Ensure that the socket-outlet is easily accessible after plugging into one end of the power cable while the other end is connected to use . -..., or you don't intend to the input terminal on the power cord. - Precautions in use the product for exclusive use with excessive force or put heavy objects on the wall. ENGLISH Electrical Power Related Precautions Warning Make sure to connect the power cable to turn off . - Do not insert a ...
...Hold the plug when pulling out the power cable. The power supply cord is in Moving the Product Warning Make sure to the grounded current. - Ensure that the socket-outlet is easily accessible after plugging into one end of the power cable while the other end is connected to use . -..., or you don't intend to the input terminal on the power cord. - Precautions in use the product for exclusive use with excessive force or put heavy objects on the wall. ENGLISH Electrical Power Related Precautions Warning Make sure to connect the power cable to turn off . - Do not insert a ...
Owner's Manual (English)
Page 4
... not clean with a product for a long time. Take a rest from time to time to the User's Manual. - Take a regular break when working with an inflammable substance (thinner or benzene). Product can be deformed. Do not press strongly upon the panel with a hand or sharp object such as nail... box. Use authorized detergent only when cleaning the product. (Do not use benzene, thinner or alcohol.) - If you drop the product, the damaged product can be electrocuted or the product can cause electric shock or fire. Contact the service center for repair. Set the appropriate resolution ...
... not clean with a product for a long time. Take a rest from time to time to the User's Manual. - Take a regular break when working with an inflammable substance (thinner or benzene). Product can be deformed. Do not press strongly upon the panel with a hand or sharp object such as nail... box. Use authorized detergent only when cleaning the product. (Do not use benzene, thinner or alcohol.) - If you drop the product, the damaged product can be electrocuted or the product can cause electric shock or fire. Contact the service center for repair. Set the appropriate resolution ...
Owner's Manual (English)
Page 5
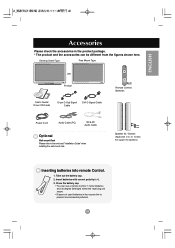
Speaker kit / Screws (Applicable only for models that support the speakers) Inserting batteries into remote Control. 1. A4 Close the battery cap. • You can be different from the figures shown here. Insert batteries with correct polarity (+/-). 3. Desktop Stand Type Free Mount Type OR Product User's Guide/ Driver CD/Cards 15-pin D-Sub Signal Cable DVI-D Signal Cable Remote Control/ Batteries Power Cord Audio Cable (PC) RCA-PC Audio Cable Optional Wall-mount Rack Please refer to prevent environmental pollution. Take out...
Speaker kit / Screws (Applicable only for models that support the speakers) Inserting batteries into remote Control. 1. A4 Close the battery cap. • You can be different from the figures shown here. Insert batteries with correct polarity (+/-). 3. Desktop Stand Type Free Mount Type OR Product User's Guide/ Driver CD/Cards 15-pin D-Sub Signal Cable DVI-D Signal Cable Remote Control/ Batteries Power Cord Audio Cable (PC) RCA-PC Audio Cable Optional Wall-mount Rack Please refer to prevent environmental pollution. Take out...
Owner's Manual (English)
Page 6
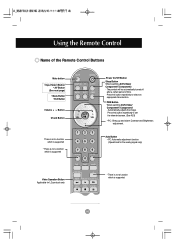
... button repetitively to set the intended screen. (See A23) • PC : Bring up and down Contrast and Brightness adjustment. Auto Button • PC: Automatic adjustment function (Operational for the analog signal only) Video Operation Button Applicable for LG products only * There is not a function which is supported A5 Using the Remote Control Name of time. The product will be automatically turned off after a certain period of the Remote Control Buttons Mute button • Input Select Button...
... button repetitively to set the intended screen. (See A23) • PC : Bring up and down Contrast and Brightness adjustment. Auto Button • PC: Automatic adjustment function (Operational for the analog signal only) Video Operation Button Applicable for LG products only * There is not a function which is supported A5 Using the Remote Control Name of time. The product will be automatically turned off after a certain period of the Remote Control Buttons Mute button • Input Select Button...
Owner's Manual (English)
Page 11
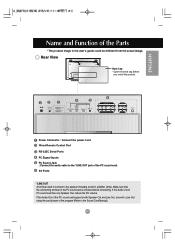
Power Connector : Connect the power cord Wired Remote Control Port RS-232C Serial Ports PC Signal Inputs PC Sound Jack : Connect the audio cable to the Sound Card Manual). If the Audio Out of PC sound card has only Speaker Out, reduce the PC volume. A10 If the Audio Out of the PC sound card supports both Speaker Out and Line Out, convert to Line Out using the card jumper of the program (Refer to the *LINE OUT...
Power Connector : Connect the power cord Wired Remote Control Port RS-232C Serial Ports PC Signal Inputs PC Sound Jack : Connect the audio cable to the Sound Card Manual). If the Audio Out of PC sound card has only Speaker Out, reduce the PC volume. A10 If the Audio Out of the PC sound card supports both Speaker Out and Line Out, convert to Line Out using the card jumper of the program (Refer to the *LINE OUT...
Owner's Manual (English)
Page 12
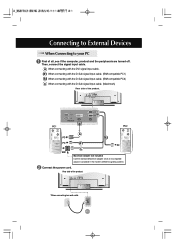
.... (Different signaling system) Connect the power cord. Rear side of all, see if the computer, product and the peripherals are turned off. B1 When connecting with the D-Sub signal input cable. (IBM compatible PC1) B2 When connecting with the D-Sub signal input cable. (IBM compatible PC2) C When connecting with the DVI signal input cable. A11 A When connecting with the D-Sub signal input cable. (Macintosh) Rear side of the product. Then, connect the signal input cable. Connecting to External Devices When Connecting to...
.... (Different signaling system) Connect the power cord. Rear side of all, see if the computer, product and the peripherals are turned off. B1 When connecting with the D-Sub signal input cable. (IBM compatible PC1) B2 When connecting with the D-Sub signal input cable. (IBM compatible PC2) C When connecting with the DVI signal input cable. A11 A When connecting with the D-Sub signal input cable. (Macintosh) Rear side of the product. Then, connect the signal input cable. Connecting to External Devices When Connecting to...
Owner's Manual (English)
Page 13
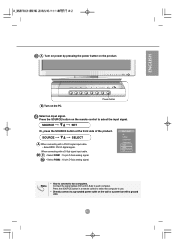
... to use. • Directly connect to two computers. SOURCE SELECT A When connecting with a ground wire. B2 • Select RGB2 : 15-pin D-Sub analog signal. Press the SOURCE button on the wall or a power bar with a DVI-D signal input cable. • Select DVI : DVI-D digital signal. When connecting with a D-Sub signal input cable. Note • How to connect to a grounded power outlet on the remote control to each computer. ENGLISH A Turn on power by pressing the power button...
... to use. • Directly connect to two computers. SOURCE SELECT A When connecting with a ground wire. B2 • Select RGB2 : 15-pin D-Sub analog signal. Press the SOURCE button on the wall or a power bar with a DVI-D signal input cable. • Select DVI : DVI-D digital signal. When connecting with a D-Sub signal input cable. Note • How to connect to a grounded power outlet on the remote control to each computer. ENGLISH A Turn on power by pressing the power button...

Owner's Manual (English)
Page 14
Connecting to External Devices Watching RGB Outputs Use this function when displaying ANALOG RGB inputs of a PC to the other product. • To use different products connected to each other Connect one end of the signal input cable(15-pin D-Sub Signal Cable) to the RGB INPUT connector of the RGB2. Product 1 PC PC 15-pin D-Sub Signal Cable Product 2 Product 3 Product 4 A13 Change SOURCE to RGB1 when desiring to see input signal of the RGB1, and select RGB2 when desiring to input signal of other end to the RGB OUT connector of product 1 and connect the other products. -
Connecting to External Devices Watching RGB Outputs Use this function when displaying ANALOG RGB inputs of a PC to the other product. • To use different products connected to each other Connect one end of the signal input cable(15-pin D-Sub Signal Cable) to the RGB INPUT connector of the RGB2. Product 1 PC PC 15-pin D-Sub Signal Cable Product 2 Product 3 Product 4 A13 Change SOURCE to RGB1 when desiring to see input signal of the RGB1, and select RGB2 when desiring to input signal of other end to the RGB OUT connector of product 1 and connect the other products. -
Owner's Manual (English)
Page 15
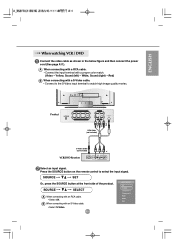
Product Red White Yellow RCA Cable (not included) R W Y S-Video Cable (not included) VCR/DVD Receiver Select an input signal. SOURCE SELECT A When connecting with a S-Video cable. • Connect to the S-Video input terminal to select the input signal. Red) B When connecting with an RCA cable. • Select AV. ENGLISH When watching VCR / DVD Connect the video cable as shown in the below figure and then connect the power cord (See page A11). SOURCE SET Or, press the SOURCE button at the front side...
Product Red White Yellow RCA Cable (not included) R W Y S-Video Cable (not included) VCR/DVD Receiver Select an input signal. SOURCE SELECT A When connecting with a S-Video cable. • Connect to the S-Video input terminal to select the input signal. Red) B When connecting with an RCA cable. • Select AV. ENGLISH When watching VCR / DVD Connect the video cable as shown in the below figure and then connect the power cord (See page A11). SOURCE SET Or, press the SOURCE button at the front side...
Owner's Manual (English)
Page 16
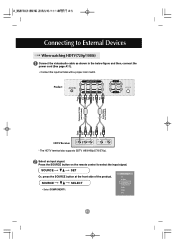
... SOURCE button on the remote control to External Devices When watching HDTV(720p/1080i) Connect the video/audio cable as shown in the below figure and then, connect the power cord (See page A11). • Connect the input terminal with a proper color match. A15 Select an input signal. SOURCE SET Or, press the SOURCE button at the front side of the product. SOURCE SELECT • Select COMPONENT 1. Product Green Blue Red White Red Component Cable (not included) Audio Cable (not included) Green Blue Red White Red HDTV Receiver...
... SOURCE button on the remote control to External Devices When watching HDTV(720p/1080i) Connect the video/audio cable as shown in the below figure and then, connect the power cord (See page A11). • Connect the input terminal with a proper color match. A15 Select an input signal. SOURCE SET Or, press the SOURCE button at the front side of the product. SOURCE SELECT • Select COMPONENT 1. Product Green Blue Red White Red Component Cable (not included) Audio Cable (not included) Green Blue Red White Red HDTV Receiver...
Owner's Manual (English)
Page 17
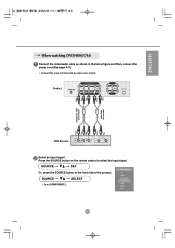
SOURCE SELECT • Select COMPONENT 2. ENGLISH When watching DVD(480i/576i) Connect the video/audio cable as shown in the below figure and then, connect the power cord (See page A11). • Connect the input terminal with a proper color match. Product White Red Green Blue Red Audio Cable (not included) Component Cable (not included) White Red Green Blue Red DVD Receiver Select an input signal. A16 Press the SOURCE button on the remote control to select the input signal. SOURCE SET Or, press the SOURCE button at the front side of the product.
SOURCE SELECT • Select COMPONENT 2. ENGLISH When watching DVD(480i/576i) Connect the video/audio cable as shown in the below figure and then, connect the power cord (See page A11). • Connect the input terminal with a proper color match. Product White Red Green Blue Red Audio Cable (not included) Component Cable (not included) White Red Green Blue Red DVD Receiver Select an input signal. A16 Press the SOURCE button on the remote control to select the input signal. SOURCE SET Or, press the SOURCE button at the front side of the product.

Owner's Manual (English)
Page 19
Product Video/TV/Product A18 R W Y ENGLISH Red White Yellow (not included) RCA Cable Watching AV Outputs Connect to the external device if you record the broadcasting. • When you set the input signal of the main screen as 'AV (CVBS)', you can transmit the signal that you're watching to the AV output terminal.
Product Video/TV/Product A18 R W Y ENGLISH Red White Yellow (not included) RCA Cable Watching AV Outputs Connect to the external device if you record the broadcasting. • When you set the input signal of the main screen as 'AV (CVBS)', you can transmit the signal that you're watching to the AV output terminal.
Owner's Manual (English)
Page 20
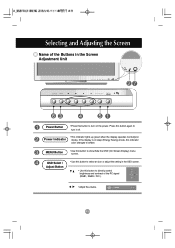
... Screen Adjustment Unit Power Button • Press this button to directly control brightness and contrast of the PC signal (RGB1, RGB2 / DVI ). • Adjust the volume. If the display is in sleep (Energy Saving) mode, this indicator color changes to turn on mode). Press this button to show/hide the OSD (On Screen Display) menu screen. MENU Button • Use this button again to amber. Power Indicator • This Indicator lights up green when the display operates normally(on the power...
... Screen Adjustment Unit Power Button • Press this button to directly control brightness and contrast of the PC signal (RGB1, RGB2 / DVI ). • Adjust the volume. If the display is in sleep (Energy Saving) mode, this indicator color changes to turn on mode). Press this button to show/hide the OSD (On Screen Display) menu screen. MENU Button • Use this button again to amber. Power Indicator • This Indicator lights up green when the display operates normally(on the power...
Owner's Manual (English)
Page 23
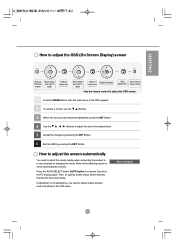
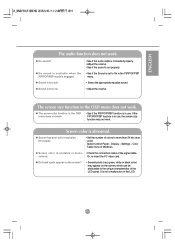
... the SET Button. 4 Use the Buttons to adjust the item to adjust screen position, clock and phase in the PC analog signal. Refer to the following section to a new computer or changing the mode. Then, an optimal screen status will be selected that fits into the current mode. A22 Press the AUTO/SELECT button (AUTO button in a remote Control) in the OSD menu. ENGLISH How to adjust the OSD (On Screen Display) screen Pops...
... the SET Button. 4 Use the Buttons to adjust the item to adjust screen position, clock and phase in the PC analog signal. Refer to the following section to a new computer or changing the mode. Then, an optimal screen status will be selected that fits into the current mode. A22 Press the AUTO/SELECT button (AUTO button in a remote Control) in the OSD menu. ENGLISH How to adjust the OSD (On Screen Display) screen Pops...
Owner's Manual (English)
Page 29
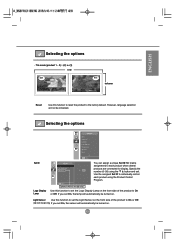
... options - Tile mode (product 1 ~ 2) : r(2) x c(1) row ID 1 ID 2 column Reset Use this function to set the Light Sensor on the front side of the product to individually control each product when several products are connected for display. Use the assigned Set ID to On or Off. Selecting the options Set ID You can assign a unique Set ID NO (name assignment) to the factory default. Light Sensor Use this function...
... options - Tile mode (product 1 ~ 2) : r(2) x c(1) row ID 1 ID 2 column Reset Use this function to set the Light Sensor on the front side of the product to individually control each product when several products are connected for display. Use the assigned Set ID to On or Off. Selecting the options Set ID You can assign a unique Set ID NO (name assignment) to the factory default. Light Sensor Use this function...

Owner's Manual (English)
Page 33
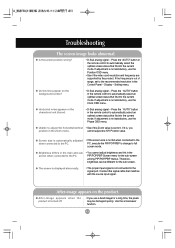
.... (http://www.lge.com) • See if the plug&play function is supported by referring to careless usage. Adjust the frequency range by the horizontal interval, the number of image display per second. q Power is on . Check the signal cable. • Press the 'SOURCE' menu in the remote Control to the Specifications in this user's guide. * Maximum resolution - 32 / 37 / 42 inch model RGB1 / RGB2 : 1600 x 1200 @60Hz DVI : 1360...
.... (http://www.lge.com) • See if the plug&play function is supported by referring to careless usage. Adjust the frequency range by the horizontal interval, the number of image display per second. q Power is on . Check the signal cable. • Press the 'SOURCE' menu in the remote Control to the Specifications in this user's guide. * Maximum resolution - 32 / 37 / 42 inch model RGB1 / RGB2 : 1600 x 1200 @60Hz DVI : 1360...
Owner's Manual (English)
Page 34
... remote control to full screen mode. A33 q Is the screen position wrong? • D-Sub analog signal - If the frequency is not satisfactory, use the Phase OSD menu. q Do thin lines appear on the product. Press the "AUTO" button in the PIP/POP/PBP Screen menu for the sub-screen. Connect the signal cable that fits into the current mode. Setting menu. If adjustment is out of range, set to the PC. If adjustment is turned...
... remote control to full screen mode. A33 q Is the screen position wrong? • D-Sub analog signal - If the frequency is not satisfactory, use the Phase OSD menu. q Do thin lines appear on the product. Press the "AUTO" button in the PIP/POP/PBP Screen menu for the sub-screen. Connect the signal cable that fits into the current mode. Setting menu. If adjustment is out of range, set to the PC. If adjustment is turned...
Owner's Manual (English)
Page 35
... (true color) Select Control Panel - q Screen has poor color resolution (16 colors). • Set the number of the signal cable. q Sound is abnormal. The screen size function in the OSD menu does not work . Display - Settings - colored. q The screen size function in the OSD menu does not work . Or, re-insert the PC video card. q Screen color is in use . q Do black spots appear on the screen? • Several pixels (red, green, white or black color) may not work . • See if the PIP/POP/PBP...
... (true color) Select Control Panel - q Screen has poor color resolution (16 colors). • Set the number of the signal cable. q Sound is abnormal. The screen size function in the OSD menu does not work . Display - Settings - colored. q The screen size function in the OSD menu does not work . Or, re-insert the PC video card. q Screen color is in use . q Do black spots appear on the screen? • Several pixels (red, green, white or black color) may not work . • See if the PIP/POP/PBP...
Owner's Manual (English)
Page 36
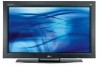
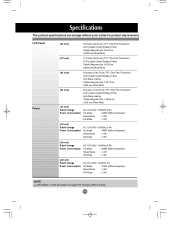
...) LCD (Liquid Crystal Display) Panel Anti-Glare coating Visible diagonal size: 116.84 cm 0.531 mm (Pixel Pitch) [32 inch] Rated Voltage Power Consumption AC 100-240V~ 50/60Hz 2.0A On Mode : 145W (Without Speaker) Sleep Mode : ≤ 4W Off Mode : ≤ 2W [37 inch] Rated Voltage Power Consumption AC 100-240V~ 50/60Hz 2.4A On Mode : 185W (Without Speaker) Sleep Mode : ≤ 4W Off Mode : ≤ 3W [42 inch...
...) LCD (Liquid Crystal Display) Panel Anti-Glare coating Visible diagonal size: 116.84 cm 0.531 mm (Pixel Pitch) [32 inch] Rated Voltage Power Consumption AC 100-240V~ 50/60Hz 2.0A On Mode : 145W (Without Speaker) Sleep Mode : ≤ 4W Off Mode : ≤ 2W [37 inch] Rated Voltage Power Consumption AC 100-240V~ 50/60Hz 2.4A On Mode : 185W (Without Speaker) Sleep Mode : ≤ 4W Off Mode : ≤ 3W [42 inch...


