
Owners Manual
Page 2
... generates, uses and can make changes to which is intended for a Class B digital device, pursuant to Part 15 of devices that may be advised of your right to file a complaint with the limits for home and other limited pay per view uses unless otherwise authorized by Macrovision, and is Part 68 compliant. Connect the equipment into an outlet on a circuit different from Dolby Laboratories...
... generates, uses and can make changes to which is intended for a Class B digital device, pursuant to Part 15 of devices that may be advised of your right to file a complaint with the limits for home and other limited pay per view uses unless otherwise authorized by Macrovision, and is Part 68 compliant. Connect the equipment into an outlet on a circuit different from Dolby Laboratories...

Owners Manual
Page 4
... manufactured to protect it from over . 13. Improper use attachments/accessories specified by the user. All these safety and operating instructions should be repaired by the manufacturer. 6. Do not defeat the safety purpose of time. 14. Only use can be followed. 5. Install in a wet basement; Slots and openings in any ventilation openings. Read these instructions. - Follow all warnings. - For example: near a swimming...
... manufactured to protect it from over . 13. Improper use attachments/accessories specified by the user. All these safety and operating instructions should be repaired by the manufacturer. 6. Do not defeat the safety purpose of time. 14. Only use can be followed. 5. Install in a wet basement; Slots and openings in any ventilation openings. Read these instructions. - Follow all warnings. - For example: near a swimming...

Owners Manual
Page 7
.... Setting Digital Caption Style 95 8-16. 7. Setting a Timer/Record Event 67 8-6. Modifying a Timer/Record Event 68 8-7. Running EZ Demo 98 8-19. VCR Control Setup 115 8-24. Managing Channels 77-80 8-9. About the Advanced Program Guide 50 7-2. Getting More Program Information 56-57 7-6. Advanced 97 8-18. Managing Program Purchases 65 8-4. Setting Locks 99-104 8-20. EZ Help 117-118 Product Specifications 119 Troubleshooting 120-123 Warranty Rear Cover 6 Remote Control Setup 116 9. Searching for Future Viewing 58 7-7. Setting Digital...
.... Setting Digital Caption Style 95 8-16. 7. Setting a Timer/Record Event 67 8-6. Modifying a Timer/Record Event 68 8-7. Running EZ Demo 98 8-19. VCR Control Setup 115 8-24. Managing Channels 77-80 8-9. About the Advanced Program Guide 50 7-2. Getting More Program Information 56-57 7-6. Advanced 97 8-18. Managing Program Purchases 65 8-4. Setting Locks 99-104 8-20. EZ Help 117-118 Product Specifications 119 Troubleshooting 120-123 Warranty Rear Cover 6 Remote Control Setup 116 9. Searching for Future Viewing 58 7-7. Setting Digital...

Owners Manual
Page 9
... antenna and cable service. • Simultaneous 480i Display Output Supporting simultaneous 480i Display Output for up The on-screen menus show connection schemes on the DIRECTV HD Receiver. • Setup Wizard Easy-to-use on the back panel of the DIRECTV® HD Receiver ensuring maximum connectivity to a variety of display devices. • Screen Format Adaptability Various screen formats are provided on -screen menus with Dolby Digital® 5.1 channels. • DVI-HDTV Output For an all-digital connection to...
... antenna and cable service. • Simultaneous 480i Display Output Supporting simultaneous 480i Display Output for up The on-screen menus show connection schemes on the DIRECTV HD Receiver. • Setup Wizard Easy-to-use on the back panel of the DIRECTV® HD Receiver ensuring maximum connectivity to a variety of display devices. • Screen Format Adaptability Various screen formats are provided on -screen menus with Dolby Digital® 5.1 channels. • DVI-HDTV Output For an all-digital connection to...

Owners Manual
Page 12
... jacks is available at any one time, depending on the preferred resolution format of the DVI-HDTV monitor. 2. Pressing the DISPLAY FORMAT button repeatedly on input signal format, as follows. Note : The EZ DVI mode is only available when a DVI-HDTV compatible monitor is connected to monitor type In EZ DVI mode, the output display format is automatically adapted depending on the front panel changes the display formats following order: 1080i → 720p...
... jacks is available at any one time, depending on the preferred resolution format of the DVI-HDTV monitor. 2. Pressing the DISPLAY FORMAT button repeatedly on input signal format, as follows. Note : The EZ DVI mode is only available when a DVI-HDTV compatible monitor is connected to monitor type In EZ DVI mode, the output display format is automatically adapted depending on the front panel changes the display formats following order: 1080i → 720p...
Owners Manual
Page 15
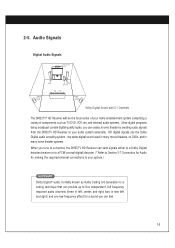
... many home theater systems. When you can send signals either to a Dolby Digital decoder/receiver or to a PCM (normal digital) decoder. (* Refer to Section 3-7 Connection for Audio for a sound you tune to a channel, the DIRECTV HD Receiver can feel. 14 HD digital signals use the Dolby Digital audio encoding system - the same digital sound used in many movie theaters, on DVDs, and in rear left speaker right speaker sub-woofer surround sound speaker surround sound speaker Dolby Digital Sound with 5.1 Channels...
... many home theater systems. When you can send signals either to a Dolby Digital decoder/receiver or to a PCM (normal digital) decoder. (* Refer to Section 3-7 Connection for Audio for a sound you tune to a channel, the DIRECTV HD Receiver can feel. 14 HD digital signals use the Dolby Digital audio encoding system - the same digital sound used in many movie theaters, on DVDs, and in rear left speaker right speaker sub-woofer surround sound speaker surround sound speaker Dolby Digital Sound with 5.1 Channels...

Owners Manual
Page 20
... audio (mono), connect it to the left (white L/mono) audio jack on the DIRECTV HD Receiver and is required to connect the DIRECTV HD Receiver to automatically operate your TV. Component jacks carry only the video signals, not the audio. If your component has only one input for antenna or cable connections. Telephone Jack and Cord A telephone line cord is used together with the supplied remote control. 19 VCR Controller The VCR Controller allows the Record function...
... audio (mono), connect it to the left (white L/mono) audio jack on the DIRECTV HD Receiver and is required to connect the DIRECTV HD Receiver to automatically operate your TV. Component jacks carry only the video signals, not the audio. If your component has only one input for antenna or cable connections. Telephone Jack and Cord A telephone line cord is used together with the supplied remote control. 19 VCR Controller The VCR Controller allows the Record function...

Owners Manual
Page 21
... a Y/Pb/Pr-compatible HD monitor. Three video and two audio jacks for a DVI-HDTV monitor need to be connected and the TYPE switch must be set . Please check your HDTV or HDTV Monitor supports HDCP. 20 When the DIRECTV HD Receiver is in the standby mode, Cable or Antenna signals are connected. • For the best access to High-Definition Programming at the highest available resolution broadcast by...
... a Y/Pb/Pr-compatible HD monitor. Three video and two audio jacks for a DVI-HDTV monitor need to be connected and the TYPE switch must be set . Please check your HDTV or HDTV Monitor supports HDCP. 20 When the DIRECTV HD Receiver is in the standby mode, Cable or Antenna signals are connected. • For the best access to High-Definition Programming at the highest available resolution broadcast by...

Owners Manual
Page 22
... Panel of the DIRECTV® HD Receiver Audio Out 1,2 Is used to provide analog audio signals to 5.1 audio channels when available in the broadcast. VCR Control Is used to connect the RF Remote control antenna to your receiver. Dolby Digital audio enables the viewer to experience theater-quality sound using up to VCR, TV set, HD Monitor, or Analog Hi-Fi System. RF Remote Is used to connect the VCR controller cable to your receiver. Satellite In Is used to connect a digital...
... Panel of the DIRECTV® HD Receiver Audio Out 1,2 Is used to provide analog audio signals to 5.1 audio channels when available in the broadcast. VCR Control Is used to connect the RF Remote control antenna to your receiver. Dolby Digital audio enables the viewer to experience theater-quality sound using up to VCR, TV set, HD Monitor, or Analog Hi-Fi System. RF Remote Is used to connect the VCR controller cable to your receiver. Satellite In Is used to connect a digital...
Owners Manual
Page 37
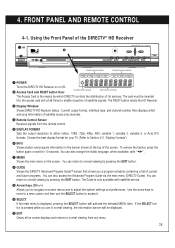
... Audio language, when available, with satellite service. 9 Arrow Keys (CH +/-) Allows you a program schedule containing a list of satellite music-only channels. 4 Remote Control Sensor Receives signals from any menu. 36 The Guide is displayed, pressing the SELECT button will be inserted into the access card slot at the top of the screen. The RESET button resets the HD Receiver. 3 Display Window Shows DIRECTV HD Receiver status : Current output format, interface type, and channel number. FRONT PANEL AND REMOTE CONTROL 4-1. If the SELECT button...
... Audio language, when available, with satellite service. 9 Arrow Keys (CH +/-) Allows you a program schedule containing a list of satellite music-only channels. 4 Remote Control Sensor Receives signals from any menu. 36 The Guide is displayed, pressing the SELECT button will be inserted into the access card slot at the top of the screen. The RESET button resets the HD Receiver. 3 Display Window Shows DIRECTV HD Receiver status : Current output format, interface type, and channel number. FRONT PANEL AND REMOTE CONTROL 4-1. If the SELECT button...

Owners Manual
Page 38
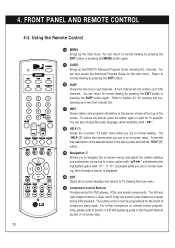
... Receiver. For further instructions on and off. button will change the channel number of on the Guide menu. When you must first program your remote control is programmed to control other components such as 2-1, 2-2, etc. Press again to enter a channel number for multiple program channels such as VCR, DVD, etc., Power will be used to restore the sound. 7 VOL +/Increases/decreases the sound level of the program list on -screen help. 2 MODE Selects the device that will turn off . gram your remote control is set...
... Receiver. For further instructions on and off. button will change the channel number of on the Guide menu. When you must first program your remote control is programmed to control other components such as 2-1, 2-2, etc. Press again to enter a channel number for multiple program channels such as VCR, DVD, etc., Power will be used to restore the sound. 7 VOL +/Increases/decreases the sound level of the program list on -screen help. 2 MODE Selects the device that will turn off . gram your remote control is set...
Owners Manual
Page 40
... "DEF G " and selecting the highlighted option with "F G ". 18 HELP (?) Shows the on-screen "EZ Help" menu while you are in normal viewing. For further instructions on -screen help description of the screen. The remote control must be programmed for DVD players, VCRs, and similar components. You can also change the audio language, when available, with " ". The "HELP (?)" button also serves when you to navigate the on -screen displays and returns to fifty channels. To see...
... "DEF G " and selecting the highlighted option with "F G ". 18 HELP (?) Shows the on-screen "EZ Help" menu while you are in normal viewing. For further instructions on -screen help description of the screen. The remote control must be programmed for DVD players, VCRs, and similar components. You can also change the audio language, when available, with " ". The "HELP (?)" button also serves when you to navigate the on -screen displays and returns to fifty channels. To see...
Owners Manual
Page 45
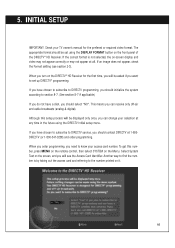
... contact DIRECTV at any time in the future using the DISPLAY FORMAT button on the Menu. If an image does not appear, check the Format setting (see the Access Card Identifier. Although this number, press MENU on the remote control, then select SYSTEM on the front panel of the DIRECTV® HD Receiver. To get this setup process will be asked if you turn on it. 44 When...
... contact DIRECTV at any time in the future using the DISPLAY FORMAT button on the Menu. If an image does not appear, check the Format setting (see the Access Card Identifier. Although this number, press MENU on the remote control, then select SYSTEM on the front panel of the DIRECTV® HD Receiver. To get this setup process will be asked if you turn on it. 44 When...
Owners Manual
Page 47
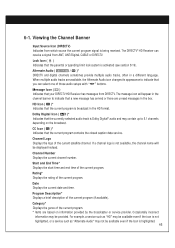
... program signal is highlighted. 46 Lock Icon ( ) Indicates that the current program is activated (see section 8-19). Dolby Digital Icon ( D )* Indicates that a new message has arrived or there are based on the broadcast. Channel Logo Displays the logo of those audio setups with "F G " buttons. Program Description* Displays a brief description of the current program. Message Icon ( ) Indicates that the current program contains the closed caption data service. Rating* Displays...
... program signal is highlighted. 46 Lock Icon ( ) Indicates that the current program is activated (see section 8-19). Dolby Digital Icon ( D )* Indicates that a new message has arrived or there are based on the broadcast. Channel Logo Displays the logo of those audio setups with "F G " buttons. Program Description* Displays a brief description of the current program. Message Icon ( ) Indicates that the current program contains the closed caption data service. Rating* Displays...

Owners Manual
Page 83
... Clock using "E" on the remote control. 3. Scroll down using "E". 5. trol to return to display the on the remote con- Setting the Clock Clock (Manual) Enables you to the previous screen or press the EXIT button on -screen menu. 2. Press the MENU button on the remote control. 8. Move the highlight to move the highlight in the entry boxes. 7. Set the Year, Date and Time using the number buttons on the Remote Control to TV viewing. 82 8-9. Select the Setup menu by pressing " ". 4. Use...
... Clock using "E" on the remote control. 3. Scroll down using "E". 5. trol to return to display the on the remote con- Setting the Clock Clock (Manual) Enables you to the previous screen or press the EXIT button on -screen menu. 2. Press the MENU button on the remote control. 8. Move the highlight to move the highlight in the entry boxes. 7. Set the Year, Date and Time using the number buttons on the Remote Control to TV viewing. 82 8-9. Select the Setup menu by pressing " ". 4. Use...

Owners Manual
Page 93
... Aspect Ratio Modes for viewing high-definition content (16:9) WHEN OUTPUT FORMAT IS 480i OR 480p MODE : Letter Box Use for a full picture filling the entire screen with no black/gray bars. Cropped Use for a picture with black (or gray) bars appearing at the top and bottom of the picture. The picture in a 16:9 format will shrink the picture to adjust a picture in a wide format). Modes for viewing normal image (4:3) on a wide TV (16:9) display...
... Aspect Ratio Modes for viewing high-definition content (16:9) WHEN OUTPUT FORMAT IS 480i OR 480p MODE : Letter Box Use for a full picture filling the entire screen with no black/gray bars. Cropped Use for a picture with black (or gray) bars appearing at the top and bottom of the picture. The picture in a 16:9 format will shrink the picture to adjust a picture in a wide format). Modes for viewing normal image (4:3) on a wide TV (16:9) display...

Owners Manual
Page 95
... button on the remote control. 94 Press the MENU button on the remote control. 3. Service 2 Service 2 is designated as the Secondary Language Service. Select one of the captions in the accompanying program audio. Service 1 Service 1 is designated as the Primary Caption Service. Scroll down using "E" on the Remote Control to the right with "G". 6. Scroll down to select a mode for the primary language being spoken in the Primary Caption Service. NOTE If both digital caption and closed...
... button on the remote control. 94 Press the MENU button on the remote control. 3. Service 2 Service 2 is designated as the Secondary Language Service. Select one of the captions in the accompanying program audio. Service 1 Service 1 is designated as the Primary Caption Service. Scroll down using "E" on the Remote Control to the right with "G". 6. Scroll down to select a mode for the primary language being spoken in the Primary Caption Service. NOTE If both digital caption and closed...
Owners Manual
Page 121
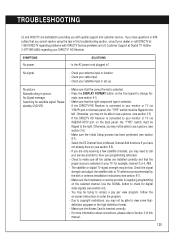
.../Pr port on the selected channel. No picture. Make sure that the right component type is supplying programming on the back panel, the "TYPE" switch must be able to see a picture. (see section 4-2). - Press the DISPLAY FORMAT button on -screen instructions to order the program. - Make sure the Initial Setup process has been performed (see section 4-1) - Check to make sure all the cables are only receiving a few satellite channels, you may not be...
.../Pr port on the selected channel. No picture. Make sure that the right component type is supplying programming on the back panel, the "TYPE" switch must be able to see a picture. (see section 4-2). - Press the DISPLAY FORMAT button on -screen instructions to order the program. - Make sure the Initial Setup process has been performed (see section 4-1) - Check to make sure all the cables are only receiving a few satellite channels, you may not be...
Owners Manual
Page 122
... press the SIGNAL button on the GUIDE screen, confirm that the DIRECTV® HD Receiver is no sound. Otherwise, if the DIRECTV Receiver is selected (see section 8-13), press the RATIO button on both the incoming program format and the DISPLAY FORMAT setting. Aspect ratio depends on the remote control, or check your service provider to subscribe to select channels that may have been available in the SETUP menu. (see 8-12). - Use the Custom Guide feature...
... press the SIGNAL button on the GUIDE screen, confirm that the DIRECTV® HD Receiver is no sound. Otherwise, if the DIRECTV Receiver is selected (see section 8-13), press the RATIO button on both the incoming program format and the DISPLAY FORMAT setting. Aspect ratio depends on the remote control, or check your service provider to subscribe to select channels that may have been available in the SETUP menu. (see 8-12). - Use the Custom Guide feature...
Owners Manual
Page 123
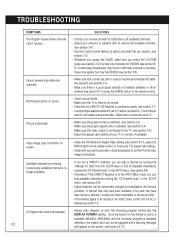
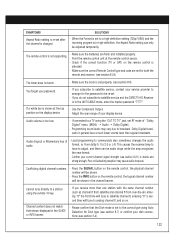
... Dish mode is set RF mode of "Dolby Digital" menu. (MENU ➝ Audio ➝ Dolby Digital) - SOLUTIONS - If you receive more than regular broadcasts. If a white bar is set - Cannot tune directly to a station using Auto Detection for the password to commercials also sometimes changes the audio audio. Make sure the clock is shown at the remote control sensor. - Press the SIGNAL button on the remote control, the logical channel number will tune to adjust, and there can only be adjusted temporarily...
... Dish mode is set RF mode of "Dolby Digital" menu. (MENU ➝ Audio ➝ Dolby Digital) - SOLUTIONS - If you receive more than regular broadcasts. If a white bar is set - Cannot tune directly to a station using Auto Detection for the password to commercials also sometimes changes the audio audio. Make sure the clock is shown at the remote control sensor. - Press the SIGNAL button on the remote control, the logical channel number will tune to adjust, and there can only be adjusted temporarily...


