User Guide
Page 3
All rights reserved. All other trademarks are registered trademarks of their respective owners. t Some of the contents of this document is subject to your phone depending on the actual phone. LG 441G User Guide t Screen displays and illustrations may not apply to change without notice. All information in this manual may differ from those you see on your phone's software or your service provider. t Copyright ©2015 LG Electronics, Inc. LG and the LG logo are the property of LG Group and its related entities.
All rights reserved. All other trademarks are registered trademarks of their respective owners. t Some of the contents of this document is subject to your phone depending on the actual phone. LG 441G User Guide t Screen displays and illustrations may not apply to change without notice. All information in this manual may differ from those you see on your phone's software or your service provider. t Copyright ©2015 LG Electronics, Inc. LG and the LG logo are the property of LG Group and its related entities.
User Guide
Page 4
... 5 Rear view 7 Getting Started 8 Installing the SIM card and battery 8 Charging your phone 10 On-Screen Icons 11 General Functions 12 Before you begin 12 Making a Call 12 Making a Call with the Send Key 12 Making International Calls ... Incoming Call 16 Rejecting an Incoming Call 16 Muting the Microphone 16 Using the Speakerphone 17 Prepaid 18 Add airtime 18 Buy airtime 18 My phone number 18 My airtime (balance) info 18 Airtime display 18 Serial number 19 SIM number 19 Contacts 20 Contact list 20 New contact 20 Groups...
... 5 Rear view 7 Getting Started 8 Installing the SIM card and battery 8 Charging your phone 10 On-Screen Icons 11 General Functions 12 Before you begin 12 Making a Call 12 Making a Call with the Send Key 12 Making International Calls ... Incoming Call 16 Rejecting an Incoming Call 16 Muting the Microphone 16 Using the Speakerphone 17 Prepaid 18 Add airtime 18 Buy airtime 18 My phone number 18 My airtime (balance) info 18 Airtime display 18 Serial number 19 SIM number 19 Contacts 20 Contact list 20 New contact 20 Groups...
User Guide
Page 5
... Browser 40 Using the Browser 40 Menus for the Browser 41 Using the Navigation Keys 41 Music 42 Playing Music 42 Adding Music To Your Phone 43 Camera 44 Take photo 44 Record video 45 Camera album 46 3
... Browser 40 Using the Browser 40 Menus for the Browser 41 Using the Navigation Keys 41 Music 42 Playing Music 42 Adding Music To Your Phone 43 Camera 44 Take photo 44 Record video 45 Camera album 46 3
User Guide
Page 6
Contents Settings 47 Audio & ringtones 47 Ringtone 47 Message tone 47 Alert tone 47 Keypad tone 48 Multimedia 48 Call 48 Phone settings 48 Languages 48 Set hotkeys 48 Airplane mode 48 Security 49 Reset settings 49 Display 50 Wallpapers 50 Fonts 50 Clocks & calendar 50 Brightness ... on/off 53 Search new device 53 My devices 53 My bluetooth info 53 Memory 54 Used space 54 Applications 54 Messages 54 Browser 54 Phone information 56 Accessories 57 For Your Safety 58 Safety Guidelines 64
Contents Settings 47 Audio & ringtones 47 Ringtone 47 Message tone 47 Alert tone 47 Keypad tone 48 Multimedia 48 Call 48 Phone settings 48 Languages 48 Set hotkeys 48 Airplane mode 48 Security 49 Reset settings 49 Display 50 Wallpapers 50 Fonts 50 Clocks & calendar 50 Brightness ... on/off 53 Search new device 53 My devices 53 My bluetooth info 53 Memory 54 Used space 54 Applications 54 Messages 54 Browser 54 Phone information 56 Accessories 57 For Your Safety 58 Safety Guidelines 64

User Guide
Page 7
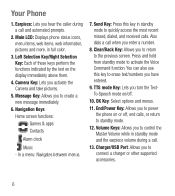
Your Phone Phone Components 1 2 12 3 4 5 6 8 9 13 10 11 7 Press and hold to activate/deactivate Vibration Mode. 5
Your Phone Phone Components 1 2 12 3 4 5 6 8 9 13 10 11 7 Press and hold to activate/deactivate Vibration Mode. 5
User Guide
Page 8
...or other supported accessories. 6 Clear/Back Key: Allows you to create a new message immediately. 6. TTS mode Key: Lets you to power the phone on or off . 10. Message Key: Allows you turn the TextTo-Speech mode on the display immediately above them. 4. Volume Keys: Allows ...you hear the caller during a call and automated prompts. 2. Your Phone 1. Earpiece: Lets you to standby mode. 12. Camera Key: Lets you enter a number. 8. Main LCD: Displays phone status icons, menu items, web items, web information, pictures and more, in standby mode to...
...or other supported accessories. 6 Clear/Back Key: Allows you to create a new message immediately. 6. TTS mode Key: Lets you to power the phone on or off . 10. Message Key: Allows you turn the TextTo-Speech mode on the display immediately above them. 4. Volume Keys: Allows ...you hear the caller during a call and automated prompts. 2. Your Phone 1. Earpiece: Lets you to standby mode. 12. Camera Key: Lets you enter a number. 8. Main LCD: Displays phone status icons, menu items, web items, web information, pictures and more, in standby mode to...
User Guide
Page 10
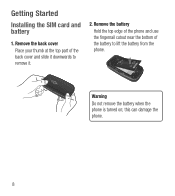
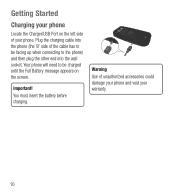
Warning Do not remove the battery when the phone is turned on; this can damage the phone. 8 Getting Started Installing the SIM card and battery 1. Remove the battery Hold the top edge of the phone and use the fingernail cutout near the bottom of the back cover and slide it . 2. Remove the back cover Place your thumb at the top part of the battery to remove it downwards to lift the battery from the phone.
Warning Do not remove the battery when the phone is turned on; this can damage the phone. 8 Getting Started Installing the SIM card and battery 1. Remove the battery Hold the top edge of the phone and use the fingernail cutout near the bottom of the back cover and slide it . 2. Remove the back cover Place your thumb at the top part of the battery to remove it downwards to lift the battery from the phone.
User Guide
Page 11
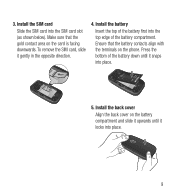
... back cover on the battery compartment and slide it upwards until it gently in the opposite direction. 4. Ensure that the gold contact area on the phone. Install the SIM card Slide the SIM card into place. 5. Make sure that the battery contacts align with the terminals on the card is facing...
... back cover on the battery compartment and slide it upwards until it gently in the opposite direction. 4. Ensure that the gold contact area on the phone. Install the SIM card Slide the SIM card into place. 5. Make sure that the battery contacts align with the terminals on the card is facing...
User Guide
Page 12
Important! Warning Use of your warranty. 10 Your phone will need to the phone) and then plug the other end into the wall socket. You must insert the battery before charging. Getting Started Charging your phone Locate the Charger/USB Port on the screen. Plug the charging cable into the phone (the 'B' side of the cable has to be facing up when connecting to be charged until the Full Battery message appears on the left side of unauthorized accessories could damage your phone and void your phone.
Important! Warning Use of your warranty. 10 Your phone will need to the phone) and then plug the other end into the wall socket. You must insert the battery before charging. Getting Started Charging your phone Locate the Charger/USB Port on the screen. Plug the charging cable into the phone (the 'B' side of the cable has to be facing up when connecting to be charged until the Full Battery message appears on the left side of unauthorized accessories could damage your phone and void your phone.
User Guide
Page 13
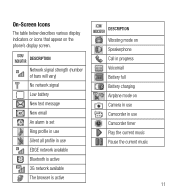
... profile in use EDGE network available ICON/ INDICATOR DESCRIPTION Vibrating mode on Speakerphone Call in progress Voicemail Battery full Battery charging Airplane mode on the phone's display screen. ICON/ INDICATOR DESCRIPTION Network signal strength (number of bars will vary) No network signal Low battery New text message New email An alarm...
... profile in use EDGE network available ICON/ INDICATOR DESCRIPTION Vibrating mode on Speakerphone Call in progress Voicemail Battery full Battery charging Airplane mode on the phone's display screen. ICON/ INDICATOR DESCRIPTION Network signal strength (number of bars will vary) No network signal Low battery New text message New email An alarm...
User Guide
Page 14
Making a Call 1 Make sure your phone is powered on the display screen, simply press the Clear/Back Key to erase one digit at a time. Ź Press and hold the key and ... Key 1 Press the Send Key to display the most recent missed, dialed and received calls will appear. 2 Enter the country code, area code, and the phone number. 3 Press the Send Key number. To edit a number on . 2 Enter...
Making a Call 1 Make sure your phone is powered on the display screen, simply press the Clear/Back Key to erase one digit at a time. Ź Press and hold the key and ... Key 1 Press the Send Key to display the most recent missed, dialed and received calls will appear. 2 Enter the country code, area code, and the phone number. 3 Press the Send Key number. To edit a number on . 2 Enter...
User Guide
Page 15
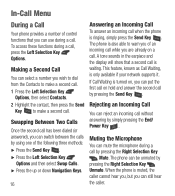
... Press the Send Key or the Left Selection Key Accept to answer an incoming call. Vibrating Mode (Quick) Vibrating Mode can be identified, the caller's phone number (or name, if stored in the Contacts List and pressing the Send Key . 1 Press the Down Navigation Key to access the Contact List. ...2 Highlight the Contact and press the Send Key . If the Answer Mode has been set as in standby mode, you receive a call, the phone displays a notification on the screen and rings and/ or vibrates. Adjusting the Volume Answering a Call When you can adjust the Master Volume using other functions...
... Press the Send Key or the Left Selection Key Accept to answer an incoming call. Vibrating Mode (Quick) Vibrating Mode can be identified, the caller's phone number (or name, if stored in the Contacts List and pressing the Send Key . 1 Press the Down Navigation Key to access the Contact List. ...2 Highlight the Contact and press the Send Key . If the Answer Mode has been set as in standby mode, you receive a call, the phone displays a notification on the screen and rings and/ or vibrates. Adjusting the Volume Answering a Call When you can adjust the Master Volume using other functions...
User Guide
Page 16
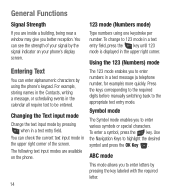
...the upper right corner. ABC mode This mode allows you to be entered. Type numbers using the phone's keypad. The 123 mode enables you to enter numbers in the upper right corner of your phone's display screen. Symbol mode The Symbol mode enables you to enter various symbols or special characters. ...) If you are available on your signal by using one keystroke per number. You can enter alphanumeric characters by the signal indicator on the phone. You can check the current text input mode in a text message (a telephone number, for example) more quickly.
...the upper right corner. ABC mode This mode allows you to be entered. Type numbers using the phone's keypad. The 123 mode enables you to enter numbers in the upper right corner of your phone's display screen. Symbol mode The Symbol mode enables you to enter various symbols or special characters. ...) If you are available on your signal by using one keystroke per number. You can enter alphanumeric characters by the signal indicator on the phone. You can check the current text input mode in a text message (a telephone number, for example) more quickly.
User Guide
Page 18
..., then press the Send Key to warn you of an incoming call while you can be unmuted by pressing the Right Selection Key Mute. The phone can switch between the calls by using one of the following three methods: Ź Press the Send Key . Ź Press the Left Selection Key Options... are already on a call without answering by pressing the Send Key . If Call Waiting is turned on hold and answer the second call when the phone is waiting. Muting the Microphone You can reject an incoming call . To access these functions during a call , press the Left Selection Key Options. A tone sounds...
..., then press the Send Key to warn you of an incoming call while you can be unmuted by pressing the Right Selection Key Mute. The phone can switch between the calls by using one of the following three methods: Ź Press the Send Key . Ź Press the Left Selection Key Options... are already on a call without answering by pressing the Send Key . If Call Waiting is turned on hold and answer the second call when the phone is waiting. Muting the Microphone You can reject an incoming call . To access these functions during a call , press the Left Selection Key Options. A tone sounds...

User Guide
Page 19
Warning Due to increased volume levels, do not place the phone near your ear while the speakerphone is automatically deactivated when you end the call by pressing the OK Key Spk. The loudspeaker is enabled. 17 Using the Speakerphone You can use the integrated Speakerphone during a call . on.
Warning Due to increased volume levels, do not place the phone near your ear while the speakerphone is automatically deactivated when you end the call by pressing the OK Key Spk. The loudspeaker is enabled. 17 Using the Speakerphone You can use the integrated Speakerphone during a call . on.
User Guide
Page 20
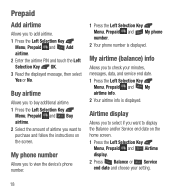
Airtime display Allows you to select if you to view the device's phone number. 1 Press the Left Selection Key Menu, Prepaid and My phone number. 2 Your phone number is displayed. My phone number Allows you want to purchase and follow the instructions on the home screen. 1 Press the Left Selection Key Menu, Prepaid and Airtime...
Airtime display Allows you to select if you to view the device's phone number. 1 Press the Left Selection Key Menu, Prepaid and My phone number. 2 Your phone number is displayed. My phone number Allows you want to purchase and follow the instructions on the home screen. 1 Press the Left Selection Key Menu, Prepaid and Airtime...
User Guide
Page 21
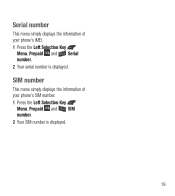
SIM number This menu simply displays the information of your phone's SIM number. 1 Press the Left Selection Key Menu, Prepaid and SIM number. 2 Your SIM number is displayed. Serial number This menu simply displays the information of your phone's IMEI. 1 Press the Left Selection Key Menu, Prepaid and Serial number. 2 Your serial number is displayed. 19
SIM number This menu simply displays the information of your phone's SIM number. 1 Press the Left Selection Key Menu, Prepaid and SIM number. 2 Your SIM number is displayed. Serial number This menu simply displays the information of your phone's IMEI. 1 Press the Left Selection Key Menu, Prepaid and Serial number. 2 Your serial number is displayed. 19
User Guide
Page 22
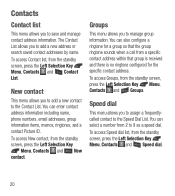
... contact address. To access Groups, from 2 to add a new address or search saved contact addresses by name. You can enter contact address information including name, phone numbers, email addresses, group information items, memos, ringtones, and a contact Picture ID.
... contact address. To access Groups, from 2 to add a new address or search saved contact addresses by name. You can enter contact address information including name, phone numbers, email addresses, group information items, memos, ringtones, and a contact Picture ID.
User Guide
Page 23
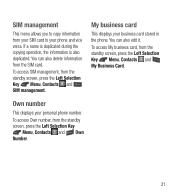
...21 If a name is duplicated during the copying operation, the information is also duplicated. Own number This displays your business card stored in the phone. To access Own number, from the standby screen, press the Left Selection Key Menu, Contacts and My Business Card. SIM management This menu allows... you to your phone and vice versa. To access SIM management, from your SIM card to copy information from the standby screen, press the Left Selection Key Menu...
...21 If a name is duplicated during the copying operation, the information is also duplicated. Own number This displays your business card stored in the phone. To access Own number, from the standby screen, press the Left Selection Key Menu, Contacts and My Business Card. SIM management This menu allows... you to your phone and vice versa. To access SIM management, from your SIM card to copy information from the standby screen, press the Left Selection Key Menu...
User Guide
Page 26
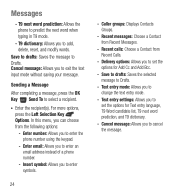
...: Allows you to enter symbols. 24 - T9 dictionary: Allows you to change the text entry mode. - Insert symbol: Allows you to enter the phone number using the keypad. - Caller groups: Displays Contacts Groups. - For more options, press the Left Selection Key Options. Recent calls: Choose a Contact... you to add, delete, reset, and modify words. s Enter the recipient(s). Enter number: Allows you to enter an email address instead of a phone number. - Cancel message: Allows you to cancel the message. Enter email: Allows you to set the options for Add Cc and Add Bcc. -...
...: Allows you to enter symbols. 24 - T9 dictionary: Allows you to change the text entry mode. - Insert symbol: Allows you to enter the phone number using the keypad. - Caller groups: Displays Contacts Groups. - For more options, press the Left Selection Key Options. Recent calls: Choose a Contact... you to add, delete, reset, and modify words. s Enter the recipient(s). Enter number: Allows you to enter an email address instead of a phone number. - Cancel message: Allows you to cancel the message. Enter email: Allows you to set the options for Add Cc and Add Bcc. -...


