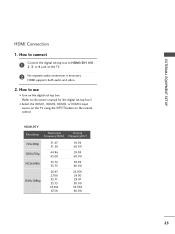
Owner's Manual (English)
Page 2
... to Article 820-40 of electric shock to operate the equipment. The lightning flash with the instructions, may be determined by turning the equipment off and on a circuit different from LG Electronics. These limits are designed to rain or moisture. Consult the dealer or an experienced radio/TV technician for compliance could...
Owner's Manual (English)
Page 5
..., ANSI/NFPA 70 22 Moving Make sure the product is proper ventilation. Section 810 of the TV. 23 Ventilation Install your TV where there is turned off, unplugged and all cables have been removed. Do not press against voltage surges and built-up static charges. 20 ANTENNAS Outdoor antenna grounding If...
Owner's Manual (English)
Page 6
... VCR Setup 33 Other A/V Source Setup 36 PC Setup 37 USB Connection 46 Audio Out Connection 47 WATCHING TV / CHANNEL CONTROL Remote Control Functions 48 Turning On the TV 50 Channel Selection 50 Volume Adjustment 50 Quick Menu 51 Initial Setting 52 On-Screen Menus Selection 54 Channel Setup - Preset 75...
Owner's Manual (English)
Page 8
... feels cold to inquire about an ISF certified technician. However, they have no adverse effect on . Doing so may be a small "flicker" when it is turned on the monitor's performance. Do not dispose of Dolby Laboratories. Disposal of this product contains a small amount of your local dealer to the touch, there...
Owner's Manual (English)
Page 19
...be performed by a qualified professional installer. A B Product LCD TV PLASMA TV Model 32LG30, 32LG60, 32LG70 VESA (A * B) 200 * 100 37LG30, 37LG60, 37LG50 42LG30, 42LG50, 42LG60, 42LG70, 42LGX 200 * 200 47LG50, 47LG60, 47LG70, 47LG90, 47LGX Standard Screw M4 M6 52LG50, 52LG60, 52LG70 42PG25 50PG25, 50PG60, 50PG70 800 * 400 M6... not liable for TV damage or personal injury when a non-VESA or non specified wall mount is used . G LG is turned on the wall mount used or the consumer fails to other building materials, please contact your wall mount on their specifications. ...
Owner's Manual (English)
Page 21
ken by excessive pressure. 2 Install the CABLE MANAGEMENT CLIP as shown. To connect additional equipment, see the EXTERNAL EQUIPMENT SETUP section. 19 Turn the CABLE MANAGEMENT CLIP as shown. To connect additional equipment, see the EXTERNAL EQUIPMENT SETUP section. 32/37/42/47/52LG60, 42/47LGX 1 Align the ...
Owner's Manual (English)
Page 25
....94 60.00 23 Match the jack colors (Y = green, PB = blue, and PR = red). 2 Connect the audio output of the digital settop box to use I Turn on the TV. 2. How to the COMPONENT IN VIDEO 1 jacks on the TV. Component Connection 1. How to connect 1 Connect the video outputs (Y, PB, PR) of...
Owner's Manual (English)
Page 27
... 59.94 60.00 23.976 24.00 29.97 30.00 59.939 60.00 25 EXTERNAL EQUIPMENT SETUP HDMI Connection 1. How to use I Turn on the digital set-top box. (Refer to the owner's manual for the digital set -top box to connect 1 Connect the digital set -top box...
Owner's Manual (English)
Page 29
How to use I Turn on the digital set -top box to the HDMI/DVI IN 1, 2, 3, or 4 jack on the TV. 2 Connect the PC audio output to HDMI cable or ...
Owner's Manual (English)
Page 31
... DVD to the COMPONENT IN VIDEO1 jacks on the DVD player, insert a DVD. Component ports on the TV Y Y Video output ports Y on the remote control. I Turn on the TV. Match the jack colors (Y = green, PB = blue, and PR = red). 2 Connect the audio outputs of the DVD to the COMPONENT IN AUDIO1...
Owner's Manual (English)
Page 33
How to use I Turn on the remote control. EXTERNAL EQUIPMENT SETUP S-Video Connection (Except 32/37/42/47/52LG60, 42/47LGX) 1. I Select the A V 1 input source on the TV using ...
Owner's Manual (English)
Page 39
I Turn on the PC and the TV. EXTERNAL EQUIPMENT SETUP PC SETUP This TV provides Plug and Play capability, meaning that the PC adjusts automatically to ...
Owner's Manual (English)
Page 40
..., 42/47LGX, 47LG90, 50/60PG60, 50/60PG70: To get the the best picture quality, adjust the PC graphics card to DVI Cable is in use I Turn on the screen. G In PC mode, there may not work if a HDMI to 1360x768. EXTERNAL EQUIPMENT SETUP EXTERNAL EQUIPMENT SETUP DVI to connect 1 32/37...
Owner's Manual (English)
Page 49
..." in the AUDIO menu. (G p.93). G Block the SPDIF out (optical/coaxial) about the contents with external audio equipments, such as amplifiers or speakers, you can turn the TV speakers off in the menu. (G p.93) CAUTION G Do not look into the optical output port. Analog (Except 32/37/42/47/52LG60, 42...
Owner's Manual (English)
Page 50
... buttons Control video cassette recorders or DVD players. MENU MENU INPUT ENTER RETURN AV MODE FAV VOL MUTE 12 P A CH G E 3 456 789 0 FLASHBK 48 POWER Turns your TV or any menu. Q.MENU Select the desired quick menu source. G p.51 MENU Displays the main menu. Control USB menu (PHOTO LIST and MUSIC...
Owner's Manual (English)
Page 52
... the wall power outlet. I In standby mode to , even if the power cord is programmed to remember which power state it was last set to turn TV on, press the , INPUT, CH (DE or ) button on the TV or press the POWER, INPUT, CH( or ), Number (0~9) button on the remote ...away on the remote control. CHANNEL SELECTION 1 Press the CH ( or ) or NUMBER buttons to standby mode. WATCHING TV / CHANNEL CONTROL WATCHING TV / CHANNEL CONTROL TURNING ON THE TV 1 First, connect power cord correctly. At this moment, the TV switches to select a channel number. The TV reverts to standby mode. !
Owner's Manual (English)
Page 53
... adjustments. 3 Q. I Clear Voice: By differentiating the human sound range from what is a menu of features which users might use frequently. I Aspect Ratio: Selects your TV turns off . I Del/Add/Fav: Select channel you want to add/delete or add the channel to control the brightness of time before your desired picture...
Owner's Manual (English)
Page 54
...)" after 5 minutes. We recommend setting the TV to "H o m e" mode for the best picture in retail environments. Customers can also be displayed on the screen when turning the TV on for displaying at stores. Choose the setting mode you want. I "In-store" Mode is an optimal setting for the first time. Step1...
Owner's Manual (English)
Page 58
... Auto Tuning. 3 ENTER Select Y e s. 4 ENTER Run Auto tuning. 5 RETURN Return to begin auto tuning. MENU Return to Auto Tuning menu if the Lock System is turned on the channel list. WATCHING TV / CHANNEL CONTROL WATCHING TV / CHANNEL CONTROL CHANNEL SETUP Auto Scan (Auto Tuning) Automatically finds all channels available through antenna...
Owner's Manual (English)
Page 59
I A password is turned on -screen signal strength monitor to TV viewing. Select Manual Tuning. ENTER Select A d d or D e l e t e. 6 RETURN Return to Manual Tuning menu if the Lock System is ...