
User Guide
Page 2
...and Tracking Selecting and Adjustment the Screen Name of the Buttons in the Screen Adjustment Unit OSD Menu How to adjust the OSD (On Screen Display) screen When Connected to your PC Adjusting Screen Color Adjusting Screen CLOCK/PHASE and Position Adjusting the audio function Selecting the Options Adjusting PIP/POP... Specifications A40 is incorporated under license from SRS Labs,Inc. i technology is a trademark of Contents Installation Safety Precautions A1 and Accessories A4 Using the Remote Control A5 Connection Connecting the Speakers - ENGLISH Table of SRS Labs,Inc.
...and Tracking Selecting and Adjustment the Screen Name of the Buttons in the Screen Adjustment Unit OSD Menu How to adjust the OSD (On Screen Display) screen When Connected to your PC Adjusting Screen Color Adjusting Screen CLOCK/PHASE and Position Adjusting the audio function Selecting the Options Adjusting PIP/POP... Specifications A40 is incorporated under license from SRS Labs,Inc. i technology is a trademark of Contents Installation Safety Precautions A1 and Accessories A4 Using the Remote Control A5 Connection Connecting the Speakers - ENGLISH Table of SRS Labs,Inc.
User Guide
Page 6
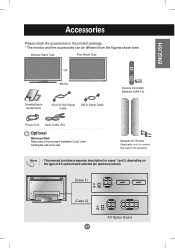
... 2] A4 Video AV Option Board Desktop Stand Type Free Mount Type OR Monitor Diskette/User's Guide/Cards 15-pin D-Sub Signal Cable DVI-D Signal Cable Remote Controller/ Batteries (AAA x 2) Power Cord Audio Cable (PC) Optional Wall-mount Rack Please refer to the enclosed "Installation Guide" when installing the wall-mount rack...
... 2] A4 Video AV Option Board Desktop Stand Type Free Mount Type OR Monitor Diskette/User's Guide/Cards 15-pin D-Sub Signal Cable DVI-D Signal Cable Remote Controller/ Batteries (AAA x 2) Power Cord Audio Cable (PC) Optional Wall-mount Rack Please refer to the enclosed "Installation Guide" when installing the wall-mount rack...
User Guide
Page 7
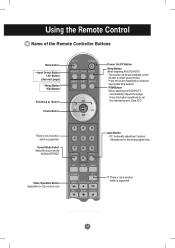
...(See A27) There is not a function which is supported Sound Mode Select Select the sound mode : MONO/STEREO Video Operation Button Applicable for LG products only Auto Button PC: Automatic adjustment function (Operational for the analog signal only) * * There is not a function which is supported A5... The monitor will be automatically turned off after a certain period of the Remote Controller Buttons Mute button • Input Select Button • AV Button (See next page) • Menu Button • Exit Button Volume Button...
...(See A27) There is not a function which is supported Sound Mode Select Select the sound mode : MONO/STEREO Video Operation Button Applicable for LG products only Auto Button PC: Automatic adjustment function (Operational for the analog signal only) * * There is not a function which is supported A5... The monitor will be automatically turned off after a certain period of the Remote Controller Buttons Mute button • Input Select Button • AV Button (See next page) • Menu Button • Exit Button Volume Button...
User Guide
Page 9
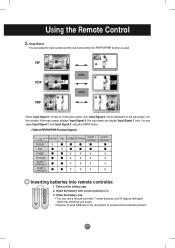
... 7 meter distance and 30 degree (left/right) within the receiving unit scope. • Dispose of used . A7 Using the Remote Control 3. You can display 'Input Signal 1' only. PIP POP PBP SWAP SWAP When 'Input Signal 1' comes on the sub-screen. CVBS S-Video SCART ... 2 COMPONENT 2 CVBS S-Video SCART 1 COMPONENT 1 SCART 2 COMPONENT 2 Inserting batteries into remote controller. 1. Insert the battery with correct polarity (+/-). 3. Close the battery cap. • You can be displayed on in the recycle bin to prevent environmental pollution. On the contrary, if the main screen...
... 7 meter distance and 30 degree (left/right) within the receiving unit scope. • Dispose of used . A7 Using the Remote Control 3. You can display 'Input Signal 1' only. PIP POP PBP SWAP SWAP When 'Input Signal 1' comes on the sub-screen. CVBS S-Video SCART ... 2 COMPONENT 2 CVBS S-Video SCART 1 COMPONENT 1 SCART 2 COMPONENT 2 Inserting batteries into remote controller. 1. Insert the battery with correct polarity (+/-). 3. Close the battery cap. • You can be displayed on in the recycle bin to prevent environmental pollution. On the contrary, if the main screen...
User Guide
Page 14
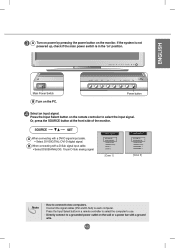
If the system is not powered up, check if the main power switch is in a remote controller to select the computer to use. Or, press the SOURCE button at the front side of the monitor. Connect the signal cables (DVI and D-... connecting with a ground wire. Press the Input Select button on the PC. Directly connect to select the input signal. Main Power Switch B Turn on the remote controller to a grounded power outlet on the wall or a power bar with a DVI-D signal input cable. • Select DVI DIGITAL: DVI-D digital signal. Power button...
If the system is not powered up, check if the main power switch is in a remote controller to select the computer to use. Or, press the SOURCE button at the front side of the monitor. Connect the signal cables (DVI and D-... connecting with a ground wire. Press the Input Select button on the PC. Directly connect to select the input signal. Main Power Switch B Turn on the remote controller to a grounded power outlet on the wall or a power bar with a DVI-D signal input cable. • Select DVI DIGITAL: DVI-D digital signal. Power button...

User Guide
Page 16
Press the Input Select button on the remote controller to the SCART1 terminal if the component (RGB) function is supported by the DVD player. A14 A When connecting with an RCA cable. • Select ...
Press the Input Select button on the remote controller to the SCART1 terminal if the component (RGB) function is supported by the DVD player. A14 A When connecting with an RCA cable. • Select ...
User Guide
Page 17
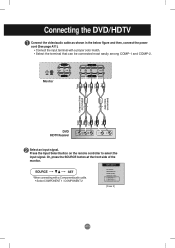
.../audio cable. • Select COMPONENT 1 / COMPONENT 2 DVI DIGITAL DSUB ANALOG VIDEO1(CVBS) VIDEO2(S-Video) COMPONENT 1 COMPONENT 2 [Case 2] A15 Press the Input Select button on the remote controller to select the input signal. When connecting with a proper color match. • Select the terminal that can be connected most easily among COMP-1 and...
.../audio cable. • Select COMPONENT 1 / COMPONENT 2 DVI DIGITAL DSUB ANALOG VIDEO1(CVBS) VIDEO2(S-Video) COMPONENT 1 COMPONENT 2 [Case 2] A15 Press the Input Select button on the remote controller to select the input signal. When connecting with a proper color match. • Select the terminal that can be connected most easily among COMP-1 and...
User Guide
Page 20
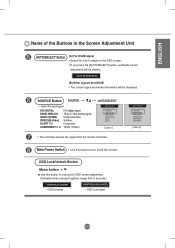
... the OSD screen. • If you press the [AUTO/SELECT] button, automatic screen adjustment will be started. [B] Other signals that receives the signal from the remote controller. ENGLISH Name of the Buttons in the Screen Adjustment Unit AUTO/SELECT Button [A] For DSUB signal • Select the icon to adjust on /off...) DVI DIGITAL DSUB ANALOG VIDEO1(CVBS) VIDEO2(S-Video) SCART 1 SCART 2 [Case 1] • The unit that DSUB • The current signal and mode information will be displayed.
... the OSD screen. • If you press the [AUTO/SELECT] button, automatic screen adjustment will be started. [B] Other signals that receives the signal from the remote controller. ENGLISH Name of the Buttons in the Screen Adjustment Unit AUTO/SELECT Button [A] For DSUB signal • Select the icon to adjust on /off...) DVI DIGITAL DSUB ANALOG VIDEO1(CVBS) VIDEO2(S-Video) SCART 1 SCART 2 [Case 1] • The unit that DSUB • The current signal and mode information will be displayed.
User Guide
Page 22
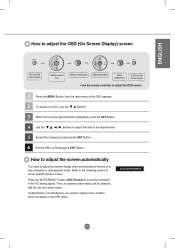
...will be selected that fits into the current mode. Press the AUTO/SELECT button (AUTO button in a remote controller) in the OSD menu. A20 ENGLISH How to adjust the OSD (On Screen Display) screen Pops up the menu screen Select a menu icon Select a menu icon Adjust the status Save ...adjustment Exit from the menu screen. • Use the remote controller to adjust the OSD screen. 1 Press the MENU Button, then...
...will be selected that fits into the current mode. Press the AUTO/SELECT button (AUTO button in a remote controller) in the OSD menu. A20 ENGLISH How to adjust the OSD (On Screen Display) screen Pops up the menu screen Select a menu icon Select a menu icon Adjust the status Save ...adjustment Exit from the menu screen. • Use the remote controller to adjust the OSD screen. 1 Press the MENU Button, then...
User Guide
Page 39
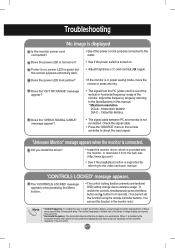
... function in power saving mode, move the mouse or press any key. A37 Check the signal cable. • Press the 'SOURCE' menu in the remote controller to the Specifications in this manual. * Maximum resolution D-Sub : 1600x1200 @60Hz DVI-D : 1360x768 @60Hz Does the 'CHECK SIGNAL CABLE' message ... the monitor driver, which is provided with the monitor, or download it from the PC (video card) is kHz. Troubleshooting No image is displayed Is the monitor power cord connected? • See if the power cord is properly connected to the video card user manual. 'CONTROLS LOCKED'...
... function in power saving mode, move the mouse or press any key. A37 Check the signal cable. • Press the 'SOURCE' menu in the remote controller to the Specifications in this manual. * Maximum resolution D-Sub : 1600x1200 @60Hz DVI-D : 1360x768 @60Hz Does the 'CHECK SIGNAL CABLE' message ... the monitor driver, which is provided with the monitor, or download it from the PC (video card) is kHz. Troubleshooting No image is displayed Is the monitor power cord connected? • See if the power cord is properly connected to the video card user manual. 'CONTROLS LOCKED'...
User Guide
Page 40
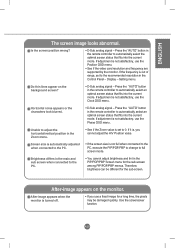
...status that fits into the current mode. Use the screensaver function. After-image appears on the background screen? • D-Sub analog signal - Display - Screen size is automatically adjusted when connected to the PC. • If the screen size is turned off. • If you ... the PC. • You cannot adjust brightness and tint in the Control Panel - Therefore, brightness can be damaged quickly. Setting menu. Unable to adjust the horizontal/vertical position in the remote controller to automatically select an optimal screen status that fits into the current mode...
...status that fits into the current mode. Use the screensaver function. After-image appears on the background screen? • D-Sub analog signal - Display - Screen size is automatically adjusted when connected to the PC. • If the screen size is turned off. • If you ... the PC. • You cannot adjust brightness and tint in the Control Panel - Therefore, brightness can be damaged quickly. Setting menu. Unable to adjust the horizontal/vertical position in the remote controller to automatically select an optimal screen status that fits into the current mode...


