
User Guide
Page 2
... Connection Connecting the Speakers - ENGLISH Table of SRS Labs,Inc. i Optional A8 Name and Function of the Parts A9 Connecting the Monitor A10 Connecting the VCR/DVD A13 Connecting the DVD/HDTV A15 Connecting AV Outputs A16 Input Selection and Tracking Selecting and Adjustment the Screen Name of the Buttons in the Screen Adjustment Unit OSD Menu How to adjust the OSD (On Screen Display) screen When Connected to your PC Adjusting Screen Color Adjusting Screen CLOCK/PHASE and Position Adjusting the audio...
... Connection Connecting the Speakers - ENGLISH Table of SRS Labs,Inc. i Optional A8 Name and Function of the Parts A9 Connecting the Monitor A10 Connecting the VCR/DVD A13 Connecting the DVD/HDTV A15 Connecting AV Outputs A16 Input Selection and Tracking Selecting and Adjustment the Screen Name of the Buttons in the Screen Adjustment Unit OSD Menu How to adjust the OSD (On Screen Display) screen When Connected to your PC Adjusting Screen Color Adjusting Screen CLOCK/PHASE and Position Adjusting the audio...

User Guide
Page 4
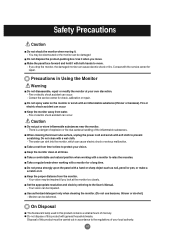
... heavy objects on the wall. Fix the power cable completely. - Do not bend the power cord with wet hands. Precautions in use the monitor for exclusive use with dust, dry the power plug completely or wipe dust off the monitor. - ENGLISH Electrical Power Related Precautions Warning Make sure to connect the power cable to overheating. During a thunder or lightning storm, unplug the power cable or signal cable. - Use the rated voltage...
... heavy objects on the wall. Fix the power cable completely. - Do not bend the power cord with wet hands. Precautions in use the monitor for exclusive use with dust, dry the power plug completely or wipe dust off the monitor. - ENGLISH Electrical Power Related Precautions Warning Make sure to connect the power cable to overheating. During a thunder or lightning storm, unplug the power cable or signal cable. - Use the rated voltage...
User Guide
Page 5
... handling of this product with soft cloth to the regulations of mercury. Use it . - Set the appropriate resolution and clock by referring to protect your local authority. Do not dispose of this product must be damaged Do not dispose the product-packing box. Take a rest from time to time to the User's Manual. - Disposal of the inflammable substances.
... handling of this product with soft cloth to the regulations of mercury. Use it . - Set the appropriate resolution and clock by referring to protect your local authority. Do not dispose of this product must be damaged Do not dispose the product-packing box. Take a rest from time to time to the User's Manual. - Disposal of the inflammable substances.
User Guide
Page 6
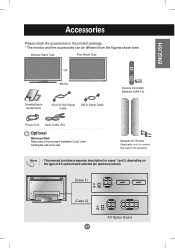
... / Screws (Applicable only for models that support the speakers) Note This manual provides a separate description for cases 1 and 2, depending on the type of AV option board selected (an optional product). [Case 1] Video [Case 2] A4 Video AV Option Board Desktop Stand Type Free Mount Type OR Monitor Diskette/User's Guide/Cards 15-pin D-Sub Signal Cable DVI-D Signal Cable Remote Controller/ Batteries (AAA x 2) Power Cord Audio Cable (PC) Optional Wall-mount Rack Please refer to the enclosed "Installation Guide" when installing the wall-mount...
... / Screws (Applicable only for models that support the speakers) Note This manual provides a separate description for cases 1 and 2, depending on the type of AV option board selected (an optional product). [Case 1] Video [Case 2] A4 Video AV Option Board Desktop Stand Type Free Mount Type OR Monitor Diskette/User's Guide/Cards 15-pin D-Sub Signal Cable DVI-D Signal Cable Remote Controller/ Batteries (AAA x 2) Power Cord Audio Cable (PC) Optional Wall-mount Rack Please refer to the enclosed "Installation Guide" when installing the wall-mount...
User Guide
Page 7
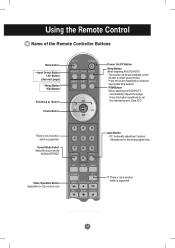
... supported Sound Mode Select Select the sound mode : MONO/STEREO Video Operation Button Applicable for LG products only Auto Button PC: Automatic adjustment function (Operational for the analog signal only) * * There is not a function which is supported A5 The monitor will be automatically turned off after a certain period of the Remote Controller Buttons Mute button • Input Select Button • AV Button (See next page) • Menu Button • Exit Button Volume Button Check Button BRT.W Power On/Off Button Sleep Button When watching AV/DVD/HDTV...
... supported Sound Mode Select Select the sound mode : MONO/STEREO Video Operation Button Applicable for LG products only Auto Button PC: Automatic adjustment function (Operational for the analog signal only) * * There is not a function which is supported A5 The monitor will be automatically turned off after a certain period of the Remote Controller Buttons Mute button • Input Select Button • AV Button (See next page) • Menu Button • Exit Button Volume Button Check Button BRT.W Power On/Off Button Sleep Button When watching AV/DVD/HDTV...

User Guide
Page 11
... Input ports Connect the power cord *LINE OUT A terminal used to connect to the *LINE OUT jack of the Parts Rear View Back Cap - If the Audio Out of the program (Refer to Line Out using the card jumper of PC sound card has only Speaker Out, reduce the PC volume. A9 Make sure that the connecting terminal of the PC sound card is checked before you install the monitor...
... Input ports Connect the power cord *LINE OUT A terminal used to connect to the *LINE OUT jack of the Parts Rear View Back Cap - If the Audio Out of the program (Refer to Line Out using the card jumper of PC sound card has only Speaker Out, reduce the PC volume. A9 Make sure that the connecting terminal of the PC sound card is checked before you install the monitor...

User Guide
Page 13
... adapter since an incompatible adaptor is available in the market. (Different signaling system) Rear side of the monitor. B When connecting with the DSub signal input cable. (IBM compatible PC) C When connecting with the DVI signal input cable. OUT IN * When connecting to a wall outlet. A11 OUT IN OUT IN PC PC MAC Connect the power cord. Connecting the Monitor First of all, see if the computer, monitor and the peripherals are turned...
... adapter since an incompatible adaptor is available in the market. (Different signaling system) Rear side of the monitor. B When connecting with the DSub signal input cable. (IBM compatible PC) C When connecting with the DVI signal input cable. OUT IN * When connecting to a wall outlet. A11 OUT IN OUT IN PC PC MAC Connect the power cord. Connecting the Monitor First of all, see if the computer, monitor and the peripherals are turned...
User Guide
Page 17
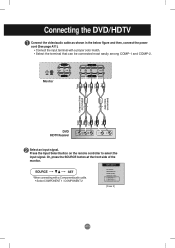
...) Audio Cable (not included) Green Blue Red White Red DVD HDTV Receiver Select an input signal. Press the Input Select button on the remote controller to select the input signal. Or, press the SOURCE button at the front side of the monitor. When connecting with a proper color match. • Select the terminal that can be connected most easily among COMP-1 and COMP-2. Connecting the DVD/HDTV Connect the video/audio cable as shown in the below figure and then, connect the power cord...
...) Audio Cable (not included) Green Blue Red White Red DVD HDTV Receiver Select an input signal. Press the Input Select button on the remote controller to select the input signal. Or, press the SOURCE button at the front side of the monitor. When connecting with a proper color match. • Select the terminal that can be connected most easily among COMP-1 and COMP-2. Connecting the DVD/HDTV Connect the video/audio cable as shown in the below figure and then, connect the power cord...
User Guide
Page 19
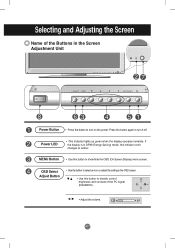
... (On Screen Display) menu screen. If the display is in the Screen Adjustment Unit Power Button • Press the button to turn it off. OSD Select Adjust Button • Use the button to select an icon or adjust the setting in the OSD screen. • Use this indicator color changes to directly control brightness and contrast of the Buttons in DPM (Energy Saving) mode, this button to amber. Power LED • This Indicator lights up green when the display operates normally...
... (On Screen Display) menu screen. If the display is in the Screen Adjustment Unit Power Button • Press the button to turn it off. OSD Select Adjust Button • Use the button to select an icon or adjust the setting in the OSD screen. • Use this indicator color changes to directly control brightness and contrast of the Buttons in DPM (Energy Saving) mode, this button to amber. Power LED • This Indicator lights up green when the display operates normally...
User Guide
Page 21
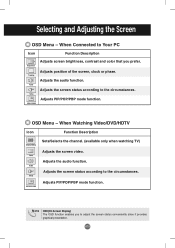
... Screen Display) The OSD function enables you prefer. When Connected to Your PC Icon Function Description Adjusts screen brightness, contrast and color that you to adjust the screen status conveniently since it provides graphical presentation. Adjusts the audio function. Adjusts PIP/POP/PBP mode function. When Watching Video/DVD/HDTV Icon Function Description Channel Setup Video Audio Setup PIP/POP/PBP Sets/Selects the channel. (available only when watching TV) Adjusts the screen video. Adjustment Tracking Audio Setup PIP/POP/PBP Adjusts...
... Screen Display) The OSD function enables you prefer. When Connected to Your PC Icon Function Description Adjusts screen brightness, contrast and color that you to adjust the screen status conveniently since it provides graphical presentation. Adjusts the audio function. Adjusts PIP/POP/PBP mode function. When Watching Video/DVD/HDTV Icon Function Description Channel Setup Video Audio Setup PIP/POP/PBP Sets/Selects the channel. (available only when watching TV) Adjusts the screen video. Adjustment Tracking Audio Setup PIP/POP/PBP Adjusts...
User Guide
Page 22
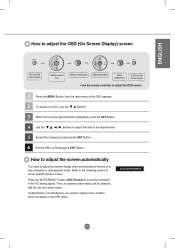
... menu screen. • Use the remote controller to adjust the OSD screen. 1 Press the MENU Button, then the main menu of the OSD appears. 2 To access a control, use the Buttons. 3 When the icon you need to adjust the screen display when connecting the monitor to a new computer or changing the mode. How to adjust the screen automatically You need to set an optimal monitor screen. Refer to the following section to adjust screen position, clock and phase in the PC analog signal...
... menu screen. • Use the remote controller to adjust the OSD screen. 1 Press the MENU Button, then the main menu of the OSD appears. 2 To access a control, use the Buttons. 3 When the icon you need to adjust the screen display when connecting the monitor to a new computer or changing the mode. How to adjust the screen automatically You need to set an optimal monitor screen. Refer to the following section to adjust screen position, clock and phase in the PC analog signal...
User Guide
Page 23
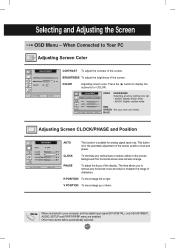
USER 9300K/6500K Selecting a factory setting color set. • 9300K: Slightly bluish white. • 6500K: Slightly reddish white. RED GREEN Set your computer and the digital input signal (DVI-DIGITAL), only ADJUSTMENT, AUDIO, SETUP and PIP/POP/PBP menu are enabled. This item allows you to your own color levels. Note When connected to remove any vertical bars or stripes visible on the screen background.The horizontal screen size will be automatically adjusted. Selecting and Adjusting the Screen OSD...
USER 9300K/6500K Selecting a factory setting color set. • 9300K: Slightly bluish white. • 6500K: Slightly reddish white. RED GREEN Set your computer and the digital input signal (DVI-DIGITAL), only ADJUSTMENT, AUDIO, SETUP and PIP/POP/PBP menu are enabled. This item allows you to your own color levels. Note When connected to remove any vertical bars or stripes visible on the screen background.The horizontal screen size will be automatically adjusted. Selecting and Adjusting the Screen OSD...
User Guide
Page 24
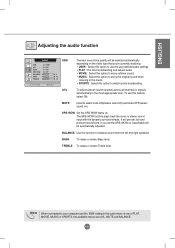
... of FLAT, MOVIE, MUSIC or SPORTS, the available menus are AVL, MUTE and BALANCE. The SRS WOW function plays back the mono or stereo sound input with the dynamic surround effects. ENGLISH Adjusting the audio function SSM The best sound tone quality will be automatically adjusted. Note When connected to watch sports broadcasting. SRS WOW Set the SRS WOW menu on the video type...
... of FLAT, MOVIE, MUSIC or SPORTS, the available menus are AVL, MUTE and BALANCE. The SRS WOW function plays back the mono or stereo sound input with the dynamic surround effects. ENGLISH Adjusting the audio function SSM The best sound tone quality will be automatically adjusted. Note When connected to watch sports broadcasting. SRS WOW Set the SRS WOW menu on the video type...

User Guide
Page 31
... the factory default. Left Right Moving the OSD screen position horizontally. However, language selection will be adjusted. Specify the number (1 ~ 99) using the Monitor Control Program. When you turn the monitor off and on the screen. RESET SET ID Use this function to individually control each monitor when several monitors are displayed. You can assign a unique SET ID NO (name assignment) to '0', vertical and horizontal positioning cannot be disabled when the screen size...
... the factory default. Left Right Moving the OSD screen position horizontally. However, language selection will be adjusted. Specify the number (1 ~ 99) using the Monitor Control Program. When you turn the monitor off and on the screen. RESET SET ID Use this function to individually control each monitor when several monitors are displayed. You can assign a unique SET ID NO (name assignment) to '0', vertical and horizontal positioning cannot be disabled when the screen size...

User Guide
Page 35
... turn the monitor on/off, select an input source or adjust the OSD menu from your PC. OUT RS-232C Cable (not included) PC OUT IN Monitor OUT IN OUT IN Communication Parameter Baud Rate : 115200bps Data Length : 8bits Parity Bit : NONE Stop Bit : 1bit Flow Control : NONE A33 You can control several monitors to a single PC. Connecting the cable Connect the RS-232C cable...
... turn the monitor on/off, select an input source or adjust the OSD menu from your PC. OUT RS-232C Cable (not included) PC OUT IN Monitor OUT IN OUT IN Communication Parameter Baud Rate : 115200bps Data Length : 8bits Parity Bit : NONE Stop Bit : 1bit Flow Control : NONE A33 You can control several monitors to a single PC. Connecting the cable Connect the RS-232C cable...

User Guide
Page 36
... Flag Address Command Value Checksum 6h 50h xxh F2h 00h * Monitors assigned with User Control Auto Assign Address 1. Reset (1) Send Command 0 1 2 3 4 5 Length Flag Address Command Value Checksum 06h 6Eh 00h F0h 00h * Set the checksum value to a single PC. ENGLISH You can control several monitors at a time by connecting them to "00h" when adding all message contents. * Wait about 50ms...
... Flag Address Command Value Checksum 6h 50h xxh F2h 00h * Monitors assigned with User Control Auto Assign Address 1. Reset (1) Send Command 0 1 2 3 4 5 Length Flag Address Command Value Checksum 06h 6Eh 00h F0h 00h * Set the checksum value to a single PC. ENGLISH You can control several monitors at a time by connecting them to "00h" when adding all message contents. * Wait about 50ms...
User Guide
Page 39
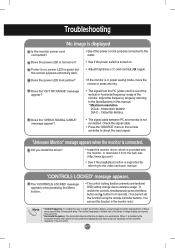
... Menu button. • The control locking function prevents unintentional OSD setting change due to display one vertical line. Did you install the driver? • Install the monitor driver, which is provided with the monitor, or download it from the PC (video card) is the time to careless usage. Does the power LED is turned on . The unit is properly connected to the video card user manual. 'CONTROLS LOCKED' message appears. Troubleshooting No image is displayed Is the monitor power cord connected...
... Menu button. • The control locking function prevents unintentional OSD setting change due to display one vertical line. Did you install the driver? • Install the monitor driver, which is provided with the monitor, or download it from the PC (video card) is the time to careless usage. Does the power LED is turned on . The unit is properly connected to the video card user manual. 'CONTROLS LOCKED' message appears. Troubleshooting No image is displayed Is the monitor power cord connected...
User Guide
Page 40
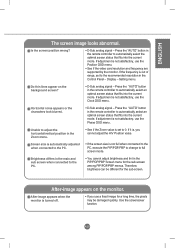
... remote controller to full screen mode. Therefore, brightness can be damaged quickly. If the frequency is not satisfactory, use a fixed image for a long time, the pixels may be different for the sub-screen among PIP/POP/PBP menus. Press the "AUTO" button in the PIP/POP/PBP Screen menu for the sub-screen. Screen size is automatically adjusted when connected to the PC. • If the screen size is set to the recommended resolution...
... remote controller to full screen mode. Therefore, brightness can be damaged quickly. If the frequency is not satisfactory, use a fixed image for a long time, the pixels may be different for the sub-screen among PIP/POP/PBP menus. Press the "AUTO" button in the PIP/POP/PBP Screen menu for the sub-screen. Screen size is automatically adjusted when connected to the PC. • If the screen size is set to the recommended resolution...

User Guide
Page 41
... appropriate treble sound. • Select the appropriate bass sound. Screen has poor color resolution (16 colors). • Set the number of the signal cable. Sound is abnormal. Do black spots appear on the screen? • Several pixels (red, green, white or black color) may not work. Display - Or, re-insert the PC video card. The screen size function in Windows. Settings - No sound is available when the PIP/POP/PBP mode is not a malfunction of the LCD panel. It...
... appropriate treble sound. • Select the appropriate bass sound. Screen has poor color resolution (16 colors). • Set the number of the signal cable. Sound is abnormal. Do black spots appear on the screen? • Several pixels (red, green, white or black color) may not work. Display - Or, re-insert the PC video card. The screen size function in Windows. Settings - No sound is available when the PIP/POP/PBP mode is not a malfunction of the LCD panel. It...
User Guide
Page 42
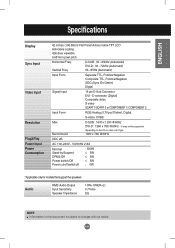
... only for models that support the speakers Audio RMS Audio Output Input Sensitivity Speaker Impedance 10W+10W(R+L) 0.7Vrms 8Ω NOTE Information in this document is subject to change without notice. ENGLISH Specifications Display Sync Input Video Input Resolution Plug&Play Power Input Power Consumption 42 inches (106.68cm) Flat Panel Active matrix-TFT LCD Anti-Glare coating 42inches viewable 0.681mm pixel pitch Horizontal Freq. D connector (Digital) Composite video S video SCART 1/SCART 2 or COMPONENT 1/ COMPONENT 2 Input Form RGB Analog (0.7Vp-p/75ohm), Digital, S-video, CVBS...
... only for models that support the speakers Audio RMS Audio Output Input Sensitivity Speaker Impedance 10W+10W(R+L) 0.7Vrms 8Ω NOTE Information in this document is subject to change without notice. ENGLISH Specifications Display Sync Input Video Input Resolution Plug&Play Power Input Power Consumption 42 inches (106.68cm) Flat Panel Active matrix-TFT LCD Anti-Glare coating 42inches viewable 0.681mm pixel pitch Horizontal Freq. D connector (Digital) Composite video S video SCART 1/SCART 2 or COMPONENT 1/ COMPONENT 2 Input Form RGB Analog (0.7Vp-p/75ohm), Digital, S-video, CVBS...


