Owner's Manual (English)
Page 5
... Connection VCR Setup External AV Source Setup DVD Setup HDSTB Setup Monitor Out Setup Digital Audio Output PC Setup 32 Turning on the TV 32 Volume Adjustment 32 Channel Selection 32 On Screen Menus Language Selection 33 On Screen Menus Selection and Adjustment 34 EZ Scan (Channel Search) 34 Manual Scan 35 Channel Edit 36 DTV Signal Strength 36 Input Source 37 Input Label 38 EZ Picture 38 APM (Adaptive Picture Mode) 39 Manual Picture Control (EZ Picture-Custom option) 39 Color Temperature Control 39 Video Reset 40 Audio Language 40 EZ SoundRite 41 EZ Sound...
... Connection VCR Setup External AV Source Setup DVD Setup HDSTB Setup Monitor Out Setup Digital Audio Output PC Setup 32 Turning on the TV 32 Volume Adjustment 32 Channel Selection 32 On Screen Menus Language Selection 33 On Screen Menus Selection and Adjustment 34 EZ Scan (Channel Search) 34 Manual Scan 35 Channel Edit 36 DTV Signal Strength 36 Input Source 37 Input Label 38 EZ Picture 38 APM (Adaptive Picture Mode) 39 Manual Picture Control (EZ Picture-Custom option) 39 Color Temperature Control 39 Video Reset 40 Audio Language 40 EZ SoundRite 41 EZ Sound...
Owner's Manual (English)
Page 12
... Functions TV INPUT POWER TV AUDIO DVD MODE CABLE INPUT VCR STB DAY MENU GUIDE DAY+ RATIO ENTER EXIT TIMER CC INFO PAGE VOL MUTE FAV CH PAGE 1 2 3 4 5 6 7 8 9 0 FLASHBK EZ PIC EZ SOUND SAP FREEZE ADJUST APM POWER Turns your TV or any menu. Not available in regular sequence: Antenna, Cable, AV1-2, Component 1-2, RGB-DTV (or RGB-PC), HDMI/DVI). (AV1, AV2,Component 1-2 input sources are linked automatically, Only if these are connected) MODE Selects the remote operating mode...
... Functions TV INPUT POWER TV AUDIO DVD MODE CABLE INPUT VCR STB DAY MENU GUIDE DAY+ RATIO ENTER EXIT TIMER CC INFO PAGE VOL MUTE FAV CH PAGE 1 2 3 4 5 6 7 8 9 0 FLASHBK EZ PIC EZ SOUND SAP FREEZE ADJUST APM POWER Turns your TV or any menu. Not available in regular sequence: Antenna, Cable, AV1-2, Component 1-2, RGB-DTV (or RGB-PC), HDMI/DVI). (AV1, AV2,Component 1-2 input sources are linked automatically, Only if these are connected) MODE Selects the remote operating mode...
Owner's Manual (English)
Page 13
... Change the audio language in 24 hour increments. Introduction TV INPUT POWER TV AUDIO DVD MODE CABLE INPUT VCR STB DAY MENU GUIDE DAY+ RATIO ENTER EXIT TIMER CC INFO PAGE VOL MUTE FAV CH PAGE 1 2 3 4 5 6 7 8 9 0 FLASHBK EZ PIC EZ SOUND SAP FREEZE ADJUST APM VCR/DVD/DVHS/Camcorder BUTTONS Control some video cassette recorders or DVD players ("RECORD" button is not available for multiple program channels such as 2-1, 2-2,etc. MUTE Switches the sound on the viewing environment. FAV Use to p.38) Selects a factory preset picture mode...
... Change the audio language in 24 hour increments. Introduction TV INPUT POWER TV AUDIO DVD MODE CABLE INPUT VCR STB DAY MENU GUIDE DAY+ RATIO ENTER EXIT TIMER CC INFO PAGE VOL MUTE FAV CH PAGE 1 2 3 4 5 6 7 8 9 0 FLASHBK EZ PIC EZ SOUND SAP FREEZE ADJUST APM VCR/DVD/DVHS/Camcorder BUTTONS Control some video cassette recorders or DVD players ("RECORD" button is not available for multiple program channels such as 2-1, 2-2,etc. MUTE Switches the sound on the viewing environment. FAV Use to p.38) Selects a factory preset picture mode...
Owner's Manual (English)
Page 14
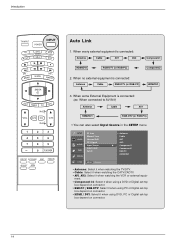
...-DTV: Select it when using DVD, PC or Digital set -top box depend on connector. 14 Introduction TV INPUT POWER INPUT INPUT TV AUDIO DVD MODE CABLE VCR STB DAY MENU GUIDE DAY+ RATIO ENTER EXIT TIMER CC INFO PAGE VOL MUTE FAV CH PAGE 1 2 3 4 5 6 7 8 9 0 FLASHBK EZ PIC EZ SOUND SAP FREEZE ADJUST APM Auto Link 1. SETUP VIDEO AUDIO TIME EZ Scan Manual Scan Channel Edit DTV Signal Input Source Input Label Set ID OPTION LOCK MENU Previous Antenna Cable AV1 AV2 G Component1 Component2 RGB-PC HDMI/DVI...
...-DTV: Select it when using DVD, PC or Digital set -top box depend on connector. 14 Introduction TV INPUT POWER INPUT INPUT TV AUDIO DVD MODE CABLE VCR STB DAY MENU GUIDE DAY+ RATIO ENTER EXIT TIMER CC INFO PAGE VOL MUTE FAV CH PAGE 1 2 3 4 5 6 7 8 9 0 FLASHBK EZ PIC EZ SOUND SAP FREEZE ADJUST APM Auto Link 1. SETUP VIDEO AUDIO TIME EZ Scan Manual Scan Channel Edit DTV Signal Input Source Input Label Set ID OPTION LOCK MENU Previous Antenna Cable AV1 AV2 G Component1 Component2 RGB-PC HDMI/DVI...
Owner's Manual (English)
Page 16
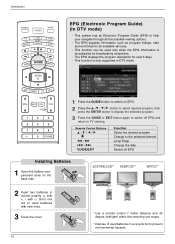
Remote Control Buttons D /E /F /G FF / GG IFF / GGI GUIDE/EXIT Function Select the desired program Change to help your navigate through all available services. - with +, - The EPG supplies information such as program listings, start and end times for next 3 days. - Don't mix old or used batteries with new ones. 3 Close the cover. 16 TV INPUT POWER TV AUDIO DVD MODE CABLE INPUT VCR STB DAY MENU GUIDE DAY+ RATIO ENTER EXIT TIMER CC INFO TV INPUT POWER TV AUDIO DVD MODE CABLE INPUT VCR STB DAY MENU GUIDE DAY+ RATIO ENTER...
Remote Control Buttons D /E /F /G FF / GG IFF / GGI GUIDE/EXIT Function Select the desired program Change to help your navigate through all available services. - with +, - The EPG supplies information such as program listings, start and end times for next 3 days. - Don't mix old or used batteries with new ones. 3 Close the cover. 16 TV INPUT POWER TV AUDIO DVD MODE CABLE INPUT VCR STB DAY MENU GUIDE DAY+ RATIO ENTER EXIT TIMER CC INFO TV INPUT POWER TV AUDIO DVD MODE CABLE INPUT VCR STB DAY MENU GUIDE DAY+ RATIO ENTER...
Owner's Manual (English)
Page 22
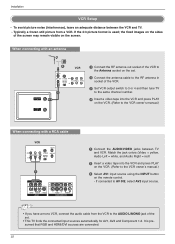
... connecting with a RCA cable VCR ANT IN OUT S-VIDEO (R) AUDIO (L) VIDEO OUTPUT SWITCH IN 34 ANT OUT AV OUT 1 VIDEO AV OUT ( ) AUDIO AV IN 1 S-VIDEO VIDEO AUDIO COMPONENT IN 1 Connect the AUDIO/VIDEO jacks between the VCR and TV. - VIDEO (MONO) AUDIO AV IN 1 S-VIDEO VIDEO AUDIO COMPONENT IN • If you have a mono VCR, connect the audio cable from a VCR. It is used; If the 4:3 picture format is presumed that RGB and HDMI/DVI sources are connected. Installation VCR Setup - Match the jack colors (Video = yellow, Audio Left = white...
... connecting with a RCA cable VCR ANT IN OUT S-VIDEO (R) AUDIO (L) VIDEO OUTPUT SWITCH IN 34 ANT OUT AV OUT 1 VIDEO AV OUT ( ) AUDIO AV IN 1 S-VIDEO VIDEO AUDIO COMPONENT IN 1 Connect the AUDIO/VIDEO jacks between the VCR and TV. - VIDEO (MONO) AUDIO AV IN 1 S-VIDEO VIDEO AUDIO COMPONENT IN • If you have a mono VCR, connect the audio cable from a VCR. It is used; If the 4:3 picture format is presumed that RGB and HDMI/DVI sources are connected. Installation VCR Setup - Match the jack colors (Video = yellow, Audio Left = white...
Owner's Manual (English)
Page 24
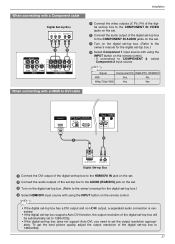
...using a HDMI cable. • If the DVD supports Auto HDMI function, the DVD output resolution will be automatically set to 1280x720p. • If the DVD does not support Auto HDMI, you need to set . 3 Turn on the DVD player, insert a DVD. 4 Select AV1 input source with using the INPUT button on the remote control. 3 Refer to the DVD player's manual for operating instructions. If connected to AV IN2, select AV 2 input source. 5 Refer to the DVD player's manual for operating instructions. AV OUT 24( ) VIDEO AUDIO AV IN 1 S-VIDEO VIDEO AUDIO COMPONENT IN • TV can receive the video...
...using a HDMI cable. • If the DVD supports Auto HDMI function, the DVD output resolution will be automatically set to 1280x720p. • If the DVD does not support Auto HDMI, you need to set . 3 Turn on the DVD player, insert a DVD. 4 Select AV1 input source with using the INPUT button on the remote control. 3 Refer to the DVD player's manual for operating instructions. If connected to AV IN2, select AV 2 input source. 5 Refer to the DVD player's manual for operating instructions. AV OUT 24( ) VIDEO AUDIO AV IN 1 S-VIDEO VIDEO AUDIO COMPONENT IN • TV can receive the video...
Owner's Manual (English)
Page 25
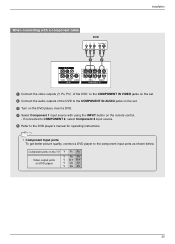
... on the set. 3 Turn on the DVD player, insert a DVD. 4 Select Component 1 input source with using the INPUT button on DVD player Y Pb Pr Y B-Y R-Y Y Cb Cr Y PB PR 25 AV OUT • Component Input ports To get better picture quality, connect a DVD( p)layer to the DVD player's manual for operating instructions. If connected to COMPONENT 2, select Component 2 input source. 5 Refer to the component input ports as shown below. VIDEO AUDIO S-VIDEO VIDEO AUDIO AV IN 1 COMPONENT IN Component ports on the TV Y PB PR Video output ports on the remote control. -
... on the set. 3 Turn on the DVD player, insert a DVD. 4 Select Component 1 input source with using the INPUT button on DVD player Y Pb Pr Y B-Y R-Y Y Cb Cr Y PB PR 25 AV OUT • Component Input ports To get better picture quality, connect a DVD( p)layer to the DVD player's manual for operating instructions. If connected to COMPONENT 2, select Component 2 input source. 5 Refer to the component input ports as shown below. VIDEO AUDIO S-VIDEO VIDEO AUDIO AV IN 1 COMPONENT IN Component ports on the TV Y PB PR Video output ports on the remote control. -
Owner's Manual (English)
Page 26
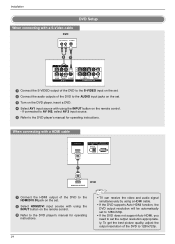
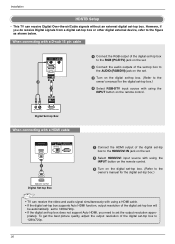
... Digital Set-top Box When connecting with a HDMI cable HDMI/DVI IN DIGITAL AUDIO RS-232C IN OUT (CONTROL&SERVICE) OPTICAL 1 HDMI-DTV OUTPUT Digital Set-top Box 1 Connect the HDMI output of the digital set-top box to the HDMI/DVI IN jack on the set. 2 Select HDMI/DVI input source with using a HDMI cable. • If the digital set-top box supports Auto HDMI function, output resolution of the digital set -top box. Installation HDSTB Setup - This TV can receive the video and audio signal simultaneously with using the INPUT button on the remote control. 3 Turn on the digital set...
... Digital Set-top Box When connecting with a HDMI cable HDMI/DVI IN DIGITAL AUDIO RS-232C IN OUT (CONTROL&SERVICE) OPTICAL 1 HDMI-DTV OUTPUT Digital Set-top Box 1 Connect the HDMI output of the digital set-top box to the HDMI/DVI IN jack on the set. 2 Select HDMI/DVI input source with using a HDMI cable. • If the digital set-top box supports Auto HDMI function, output resolution of the digital set -top box. Installation HDSTB Setup - This TV can receive the video and audio signal simultaneously with using the INPUT button on the remote control. 3 Turn on the digital set...
Owner's Manual (English)
Page 27
... 2, select Component 2 input source. Installation When connecting with using the INPUT button on the remote control. - OPTICAL Turn on the digital set -top box.) Select Component 1 input source with using the INPUT button on the remote control. Connect the audio output of the digital set-top box to the COMHDPMIO/DVNI INENT DIGITAL AUDIO RS-232C IN IN AUDIO jacks OUT (CONTROL & SERVICE) on the set . If connected to the owner's manual for the digital RGB IN REMOTE CONTROL IN set-top box.) 4 Select HDMI/DVI inpAUuDIOt(RsGBo/DVuI) rce with a Component cable AV...
... 2, select Component 2 input source. Installation When connecting with using the INPUT button on the remote control. - OPTICAL Turn on the digital set -top box.) Select Component 1 input source with using the INPUT button on the remote control. Connect the audio output of the digital set-top box to the COMHDPMIO/DVNI INENT DIGITAL AUDIO RS-232C IN IN AUDIO jacks OUT (CONTROL & SERVICE) on the set . If connected to the owner's manual for the digital RGB IN REMOTE CONTROL IN set-top box.) 4 Select HDMI/DVI inpAUuDIOt(RsGBo/DVuI) rce with a Component cable AV...
Owner's Manual (English)
Page 29
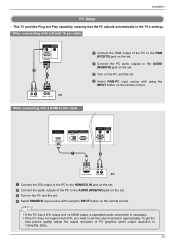
...) HDMI output, a separated audio connection is necessary. • If the PC does not support Auto DVI, you need to the AUDIO (RGB/DVI) jack on the set. 3 Turn on the remote control. To get the best picture quality, adjust the output resolution of the PC to the RGB (PC/DTV) jack on the set . 4 Select RGB-PC input source with using the INPUT button on the PC and the set the output resolution appropriately. When connecting...
...) HDMI output, a separated audio connection is necessary. • If the PC does not support Auto DVI, you need to the AUDIO (RGB/DVI) jack on the set. 3 Turn on the remote control. To get the best picture quality, adjust the output resolution of the PC to the RGB (PC/DTV) jack on the set . 4 Select RGB-PC input source with using the INPUT button on the PC and the set the output resolution appropriately. When connecting...
Owner's Manual (English)
Page 30
... the menu until the picture is separate. In case HDMI/DVI Source Devices is not supported TV SET output in PC, HDMI/DVI mode. There may be changed, change the refresh rate to adjust the screen Position of the PC graphic card can not be noise associated with HDMI/DVI Input, output TV SET Resolution (480p, 720p, 1080i) and TV SET Display fit EIA/CEA-861-B Specification to the Manual of time. If...
... the menu until the picture is separate. In case HDMI/DVI Source Devices is not supported TV SET output in PC, HDMI/DVI mode. There may be changed, change the refresh rate to adjust the screen Position of the PC graphic card can not be noise associated with HDMI/DVI Input, output TV SET Resolution (480p, 720p, 1080i) and TV SET Display fit EIA/CEA-861-B Specification to the Manual of time. If...
Owner's Manual (English)
Page 32
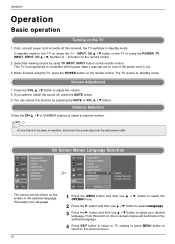
... be shown in the selected language. Volume Adjustment 1. From this point on, the on-screen menus will be away on the screen in the selected language. 4 Press EXIT button to return to TV viewing or press MENU button to return to switch the sound off, press the MUTE button. 3. When finished using TV INPUT, INPUT button on the remote control. Operation Operation Basic operation Turning on the remote control . 2. Channel Selection Press the CH D / E or NUMBER buttons to select a channel number. • If you...
... be shown in the selected language. Volume Adjustment 1. From this point on, the on-screen menus will be away on the screen in the selected language. 4 Press EXIT button to return to TV viewing or press MENU button to return to switch the sound off, press the MUTE button. 3. When finished using TV INPUT, INPUT button on the remote control. Operation Operation Basic operation Turning on the remote control . 2. Channel Selection Press the CH D / E or NUMBER buttons to select a channel number. • If you...
Owner's Manual (English)
Page 33
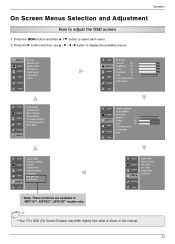
...-General Input Block OPTION LOCK G SETUP Audio Language EZ SoundRite VIDEO EZ Sound Balance 0 L R AUDIO G Treble 50 TIME Bass 50 Front Surround OPTION TV Speaker BBE LOCK SETUP VIDEO AUDIO TIME OPTION G Aspect Ratio Cinema 3:2 Mode Caption Caption/Text Caption Option Language ISM Method Low Power LOCK * Note: These functions are available in this manual. 33 Press the G button and then use D / E / F / G button to adjust the OSD screen 1. Operation On Screen Menus Selection and Adjustment How to display the available menus. Press the MENU button...
...-General Input Block OPTION LOCK G SETUP Audio Language EZ SoundRite VIDEO EZ Sound Balance 0 L R AUDIO G Treble 50 TIME Bass 50 Front Surround OPTION TV Speaker BBE LOCK SETUP VIDEO AUDIO TIME OPTION G Aspect Ratio Cinema 3:2 Mode Caption Caption/Text Caption Option Language ISM Method Low Power LOCK * Note: These functions are available in this manual. 33 Press the G button and then use D / E / F / G button to adjust the OSD screen 1. Operation On Screen Menus Selection and Adjustment How to display the available menus. Press the MENU button...
Owner's Manual (English)
Page 34
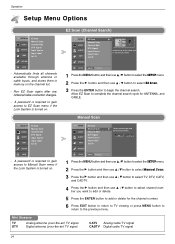
.../Cable connection changes. - SETUP VIDEO AUDIO TIME EZ Scan Manual Scan Channel Edit DTV Signal Input Source Input Label Set ID OPTION LOCK MENU Previous G Select channel type and RF-channel number. Automatically finds all channels available through antenna or cable inputs, and stores them in memory on . A password is required to gain access to complete the channel search cycle for the channel number. 6 Press EXIT button to return to TV viewing or press MENU button to return to EZ Scan menu if the Lock System is turned...
.../Cable connection changes. - SETUP VIDEO AUDIO TIME EZ Scan Manual Scan Channel Edit DTV Signal Input Source Input Label Set ID OPTION LOCK MENU Previous G Select channel type and RF-channel number. Automatically finds all channels available through antenna or cable inputs, and stores them in memory on . A password is required to gain access to complete the channel search cycle for the channel number. 6 Press EXIT button to return to TV viewing or press MENU button to return to EZ Scan menu if the Lock System is turned...
Owner's Manual (English)
Page 36
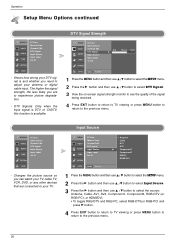
... TV, cable TV, VCR, DVD, or any other devices that are to your antenna or digital cable input. DTV Signals: Only when the input signal is DTV or CADTV, this function is and whether you are connected to experience picture degradation. - The higher the signal strength, the less likely you need to the previous menu. Input Source SETUP VIDEO AUDIO TIME EZ Scan Manual Scan Channel Edit DTV Signal Input Source Input Label Set ID OPTION LOCK MENU Previous Antenna Cable AV1...
... TV, cable TV, VCR, DVD, or any other devices that are to your antenna or digital cable input. DTV Signals: Only when the input signal is DTV or CADTV, this function is and whether you are connected to experience picture degradation. - The higher the signal strength, the less likely you need to the previous menu. Input Source SETUP VIDEO AUDIO TIME EZ Scan Manual Scan Channel Edit DTV Signal Input Source Input Label Set ID OPTION LOCK MENU Previous Antenna Cable AV1...
Owner's Manual (English)
Page 52
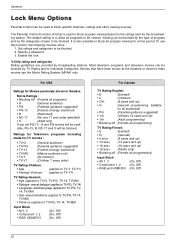
...The default setting is used to block specific channels, ratings and other viewing sources. For USA Ratings for a time period. Ratings for Television programs including made-for all programming) Input Block • AV 1, 2 • Component 1, 2 • RGB and HDMI/DVI ...Set ratings and categories to -video movies use this function, the following must be avail- Movies that have been shown at the theaters or direct-to be blocked. 2. adult language (applies to TV-PG, TV14, TV-MA) • Sex- Operation Lock Menu Options Parental Control can be used to block program viewing...
...The default setting is used to block specific channels, ratings and other viewing sources. For USA Ratings for a time period. Ratings for Television programs including made-for all programming) Input Block • AV 1, 2 • Component 1, 2 • RGB and HDMI/DVI ...Set ratings and categories to -video movies use this function, the following must be avail- Movies that have been shown at the theaters or direct-to be blocked. 2. adult language (applies to TV-PG, TV14, TV-MA) • Sex- Operation Lock Menu Options Parental Control can be used to block program viewing...
Owner's Manual (English)
Page 53
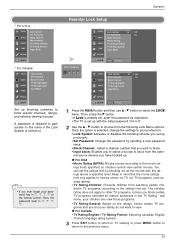
... the Lock System is turned on the remote control. ings limits specified, so children cannot view certain movies. Operation * For U.S.A. Then, the password reset to select the LOCK menu. Keep in the TV Rating - SETUP VIDEO AUDIO TIME OPTION Lock System Set Password Block Channel Movie Rating TV Rating-Children TV Rating-General Input Block LOCK G * For Canada SETUP VIDEO AUDIO TIME Lock System Set Password Block Channel TV Rating-English TV Rating-French Input Block OPTION LOCK G - Set up . Then, press the G button...
... the Lock System is turned on the remote control. ings limits specified, so children cannot view certain movies. Operation * For U.S.A. Then, the password reset to select the LOCK menu. Keep in the TV Rating - SETUP VIDEO AUDIO TIME OPTION Lock System Set Password Block Channel Movie Rating TV Rating-Children TV Rating-General Input Block LOCK G * For Canada SETUP VIDEO AUDIO TIME Lock System Set Password Block Channel TV Rating-English TV Rating-French Input Block OPTION LOCK G - Set up . Then, press the G button...
Owner's Manual (English)
Page 55
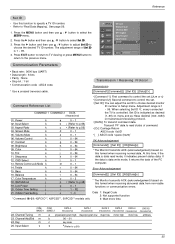
...' data to read mode, it returns the data of Set ID OPTION is controlled. Use this format when receiving abnormal data from non-viable functions or communication errors. Press the MENU button and then use D / E button to adjust Set ID to choose desired monitor ID number in Setup menu. The adjustment range of the PC computer. Screen Mute k 05. Tint k 11. Remote Control Lock Mode k 14. Low Power j 20. When selecting Set ID '0', every connected the TV is...
...' data to read mode, it returns the data of Set ID OPTION is controlled. Use this format when receiving abnormal data from non-viable functions or communication errors. Press the MENU button and then use D / E button to adjust Set ID to choose desired monitor ID number in Setup menu. The adjustment range of the PC computer. Screen Mute k 05. Tint k 11. Remote Control Lock Mode k 14. Low Power j 20. When selecting Set ID '0', every connected the TV is...
Owner's Manual (English)
Page 62
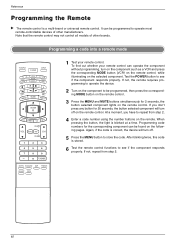
.... Programming code numbers for 2 seconds, the button selected component lights on the following pages. Test the POWER button to store the code. Again, if the code is a multi-brand or universal remote control. At a moment, you don't press any button for 20 seconds, the button selected component will turn off on the remote. If not, repeat from step 2. 4 Enter a code number using the number buttons on the remote control. Programming a code into a remote mode TV INPUT POWER TV AUDIO DVD MODE CABLE INPUT VCR STB DAY MENU GUIDE DAY+ RATIO ENTER EXIT TIMER CC...
.... Programming code numbers for 2 seconds, the button selected component lights on the following pages. Test the POWER button to store the code. Again, if the code is a multi-brand or universal remote control. At a moment, you don't press any button for 20 seconds, the button selected component will turn off on the remote. If not, repeat from step 2. 4 Enter a code number using the number buttons on the remote control. Programming a code into a remote mode TV INPUT POWER TV AUDIO DVD MODE CABLE INPUT VCR STB DAY MENU GUIDE DAY+ RATIO ENTER EXIT TIMER CC...


