
Owner's Manual (English)
Page 1
... when you require service. As an ENERGY STAR Partner LGE U. See the label attached on the back cover and quote this product meets the ENERGY STAR guidelines for future reference. S. A.,Inc. has determined that this information to your set . LCD TV MODELS: 32LC2D 32LC2DU 37LC2D 42LC2D PLASMA TV MODELS: 42PC3D 42PC3DC 42PC3DV 50PC3D 60PC1D 60PC1DC OWNER'S MANUAL Internet Home Page : http...
... when you require service. As an ENERGY STAR Partner LGE U. See the label attached on the back cover and quote this product meets the ENERGY STAR guidelines for future reference. S. A.,Inc. has determined that this information to your set . LCD TV MODELS: 32LC2D 32LC2DU 37LC2D 42LC2D PLASMA TV MODELS: 42PC3D 42PC3DC 42PC3DV 50PC3D 60PC1D 60PC1DC OWNER'S MANUAL Internet Home Page : http...
Owner's Manual (English)
Page 4
... placed upon . Protect the power cord from tip-over. 14. Servicing is used in any way, such as tiny red, green, or blue spots. The fluorescent lamp used , use of time. Safety Instructions 12. Refer all servicing to plugs, wall outlets, and the point where the cord exits the appliance. Any of time. 15. Pay particular attention to qualified service personnel. Unplug this owner's manual to be carried out...
... placed upon . Protect the power cord from tip-over. 14. Servicing is used in any way, such as tiny red, green, or blue spots. The fluorescent lamp used , use of time. Safety Instructions 12. Refer all servicing to plugs, wall outlets, and the point where the cord exits the appliance. Any of time. 15. Pay particular attention to qualified service personnel. Unplug this owner's manual to be carried out...

Owner's Manual (English)
Page 5
... Setup Digital Audio Output PC Setup 29 29 29 29 30 31 31 32 33 33 34 35 35~36 37 38 39 40 41 41~42 43 43 Turning on the TV Volume Adjustment Channel Selection On Screen Menus Language Selection On Screen Menus Selection and Adjustment EZ Scan (Channel Search) Manual Scan Channel Edit DTV Signal Strength Input Source Input Label Auto Picture Control(EZ Picture) Color Temperature Control XD Advanced-Cinema 3:2 Mode / Black Level Video Reset Audio Language Auto Sound Control(EZ Sound) Manual Sound Control (EZ Sound-User...
... Setup Digital Audio Output PC Setup 29 29 29 29 30 31 31 32 33 33 34 35 35~36 37 38 39 40 41 41~42 43 43 Turning on the TV Volume Adjustment Channel Selection On Screen Menus Language Selection On Screen Menus Selection and Adjustment EZ Scan (Channel Search) Manual Scan Channel Edit DTV Signal Strength Input Source Input Label Auto Picture Control(EZ Picture) Color Temperature Control XD Advanced-Cinema 3:2 Mode / Black Level Video Reset Audio Language Auto Sound Control(EZ Sound) Manual Sound Control (EZ Sound-User...
Owner's Manual (English)
Page 11
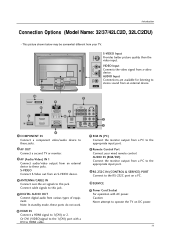
S-VIDEO Input Provides better picture quality than the video input. Connect cable signals to the appropriate input port. 2 AV OUT Connect a second TV or monitor. 3 AV (Audio/Video) IN 1 Connect audio/video output from various types of equipment. AUDIO Input Connections are available for listening to AC IN stereo sound from an external device. 11 10 1 SERVICE 7 COMPONENT IN 6 RGB IN (PC) VIDEO AUDIO 5 AV OUT AV IN 1 COMPONENT IN 4 HDMI IN 2 8 VIDEO AUDIO 2 ANTENNA/ 1(DVI) OPTICAL CABLE IN RS-232C IN (CONTROL & SERVICE) DIGITAL AUDIO OUT S-VIDEO VIDEO (MONO) AUDIO ...
S-VIDEO Input Provides better picture quality than the video input. Connect cable signals to the appropriate input port. 2 AV OUT Connect a second TV or monitor. 3 AV (Audio/Video) IN 1 Connect audio/video output from various types of equipment. AUDIO Input Connections are available for listening to AC IN stereo sound from an external device. 11 10 1 SERVICE 7 COMPONENT IN 6 RGB IN (PC) VIDEO AUDIO 5 AV OUT AV IN 1 COMPONENT IN 4 HDMI IN 2 8 VIDEO AUDIO 2 ANTENNA/ 1(DVI) OPTICAL CABLE IN RS-232C IN (CONTROL & SERVICE) DIGITAL AUDIO OUT S-VIDEO VIDEO (MONO) AUDIO ...
Owner's Manual (English)
Page 19
... VCR owner's manual.) 3 Select AV1 input source using the INPUT button on the set . Typically a frozen still picture from the VCR to the AUDIO L/MONO jack of the set . 2 Connect the antenna cable to the RF antenna in socket of the VCR. 3 Set VCR output switch to 3 or 4 and then tune TV to the same channel number. 4 Insert a video tape into the VCR and press PLAY on the screen. If the 4:3 picture format is used; the fixed images on...
... VCR owner's manual.) 3 Select AV1 input source using the INPUT button on the set . Typically a frozen still picture from the VCR to the AUDIO L/MONO jack of the set . 2 Connect the antenna cable to the RF antenna in socket of the VCR. 3 Set VCR output switch to 3 or 4 and then tune TV to the same channel number. 4 Insert a video tape into the VCR and press PLAY on the screen. If the 4:3 picture format is used; the fixed images on...

Owner's Manual (English)
Page 20
...VCR owner's manual.) 4 Select AV1 input source with using the INPUT button on the remote control. - External AV Source Setup Camcorder Video Game Set 1 L AUDIO R VIDEO 1 Connect the AUDIO/VIDEO jacks between TV and external equipment. The picture quality is improved; Do not connect to both Video and the S-Video cables, only the S-Video will work. Match the jack colors (Video = yellow, Audio Left = white, and Audio Right = red). 2 Select AV2 input source with using the INPUT button on the remote control. - Installation COMPONENT IN AV OUT AV IN 1 VIDEO AUDIO OPTICAL DIGITAL AUDIO...
...VCR owner's manual.) 4 Select AV1 input source with using the INPUT button on the remote control. - External AV Source Setup Camcorder Video Game Set 1 L AUDIO R VIDEO 1 Connect the AUDIO/VIDEO jacks between TV and external equipment. The picture quality is improved; Do not connect to both Video and the S-Video cables, only the S-Video will work. Match the jack colors (Video = yellow, Audio Left = white, and Audio Right = red). 2 Select AV2 input source with using the INPUT button on the remote control. - Installation COMPONENT IN AV OUT AV IN 1 VIDEO AUDIO OPTICAL DIGITAL AUDIO...
Owner's Manual (English)
Page 21
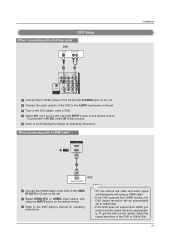
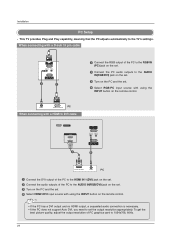
..., adjust the output resolution of the DVD to the HDMI IN 1(DVI) or 2 jack on the set the output resolution appropriately. VIDEO AUDIO COMPONENT IN AV OUT AV IN 1 OPTICAL DIGITAL AUDIO OUT S-VIDEO VIDEO ( ) AUDIO • TV can receive the video and audio signal simultaneously with using the INPUT button on the remote control. 3 Refer to the DVD player's manual for operating instructions. If connected to AV IN2, select AV 2 input source. 5 Refer to the DVD player's manual for operating instructions. VIDEO AUDIO DVD Setup When connecting with a S-Video cable DVD S-VIDEO...
..., adjust the output resolution of the DVD to the HDMI IN 1(DVI) or 2 jack on the set the output resolution appropriately. VIDEO AUDIO COMPONENT IN AV OUT AV IN 1 OPTICAL DIGITAL AUDIO OUT S-VIDEO VIDEO ( ) AUDIO • TV can receive the video and audio signal simultaneously with using the INPUT button on the remote control. 3 Refer to the DVD player's manual for operating instructions. If connected to AV IN2, select AV 2 input source. 5 Refer to the DVD player's manual for operating instructions. VIDEO AUDIO DVD Setup When connecting with a S-Video cable DVD S-VIDEO...
Owner's Manual (English)
Page 22
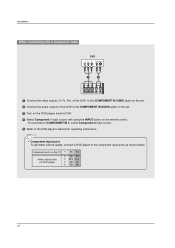
... the set. 3 Turn on the DVD player, insert a DVD. 4 Select Component 1 input source with using the INPUT button on the remote control. - Installation When connecting with a component cable DVD B R (R) AUDIO (L) 1 2 VIDEO AUDIO ANTENNA/ CABLE IN HDMI / DVI IN COMPONENT IN 1 Connect the video outputs (Y, PB, PR) of the DVD to the COMPONENT IN VIDEO jacks on the set. 2 Connect the audio outputs of the DVD to the DVD player's manual for operating instructions. COMPONENT IN AV OUT AV IN 1 • Component Input ports VIDEO AUDIO To get better picture quality, connect a DVD player...
... the set. 3 Turn on the DVD player, insert a DVD. 4 Select Component 1 input source with using the INPUT button on the remote control. - Installation When connecting with a component cable DVD B R (R) AUDIO (L) 1 2 VIDEO AUDIO ANTENNA/ CABLE IN HDMI / DVI IN COMPONENT IN 1 Connect the video outputs (Y, PB, PR) of the DVD to the COMPONENT IN VIDEO jacks on the set. 2 Connect the audio outputs of the DVD to the DVD player's manual for operating instructions. COMPONENT IN AV OUT AV IN 1 • Component Input ports VIDEO AUDIO To get better picture quality, connect a DVD player...

Owner's Manual (English)
Page 23
... box. HDMI / DVI IN 3 Turn on the digital set-top box. (Refer to 1280x720p. To get the best picture quality, adjust the output resolution of the digital set-top box to the HDMI IN 1(DVI) or 2 jack on the set. 2 Select HDMI1/DVI or HDMI2 input source with using the INPUT button on the remote control. 3 Turn on the digital set -top box to the owner's manual for the digita(ClONTsROLe&StER-VtICoE) p box.) 4 Select Component 1 input source with a Component cable RS-232C IN (CONTROL & SERVICE) Digital Set-top Box B R (R) AUDIO (L) 1 2 VIDEO AUDIO 1 Connect the video outputs...
... box. HDMI / DVI IN 3 Turn on the digital set-top box. (Refer to 1280x720p. To get the best picture quality, adjust the output resolution of the digital set-top box to the HDMI IN 1(DVI) or 2 jack on the set. 2 Select HDMI1/DVI or HDMI2 input source with using the INPUT button on the remote control. 3 Turn on the digital set -top box to the owner's manual for the digita(ClONTsROLe&StER-VtICoE) p box.) 4 Select Component 1 input source with a Component cable RS-232C IN (CONTROL & SERVICE) Digital Set-top Box B R (R) AUDIO (L) 1 2 VIDEO AUDIO 1 Connect the video outputs...

Owner's Manual (English)
Page 24
... connecting with using the INPUT button on the set. RS-232C IN (CONTROL & SERVICE) • If the digital set-top box has a DVI output and no HDMI output, a separated audio connection is necessary. • If the digital set-top box supports Auto DVI function, the output resolution of the set-top box to 1280x720p. 24 RGB IN 3 Turn on the digital set-top box. (Refer to the owner's manual for the d(PCi)gital set-top box.) REMORTEGBAIUNDIO IN CONTROL IN (RGB/DVI) 4 Select HDMI1/DVI input source with a HDMI to DVI cable SERVICE HDMI...
... connecting with using the INPUT button on the set. RS-232C IN (CONTROL & SERVICE) • If the digital set-top box has a DVI output and no HDMI output, a separated audio connection is necessary. • If the digital set-top box supports Auto DVI function, the output resolution of the set-top box to 1280x720p. 24 RGB IN 3 Turn on the digital set-top box. (Refer to the owner's manual for the d(PCi)gital set-top box.) REMORTEGBAIUNDIO IN CONTROL IN (RGB/DVI) 4 Select HDMI1/DVI input source with a HDMI to DVI cable SERVICE HDMI...
Owner's Manual (English)
Page 25
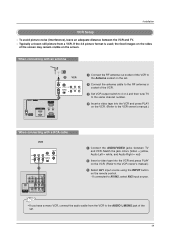
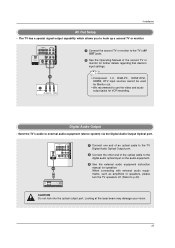
... turn the TV speakers off. (Refer to external audio equipment (stereo system) via the Digital Audio Output Optical port. Looking at the laser beam may damage your vision. 25 Installation AV Out Setup - Digital Audio Output - COMPONENT IN AV OUT AV IN 1 VIDEO AUDIO OPTICAL DIGITAL AUDIO OUT S-VIDEO VIDEO (MONO) AUDIO 1 Connect the second TV or monitor to the TV's AV OUT jacks. 2 See the Operating Manual of the optical cable to the digital audio optical input on the audio equipment. 3 See the external audio equipment instruction manual...
... turn the TV speakers off. (Refer to external audio equipment (stereo system) via the Digital Audio Output Optical port. Looking at the laser beam may damage your vision. 25 Installation AV Out Setup - Digital Audio Output - COMPONENT IN AV OUT AV IN 1 VIDEO AUDIO OPTICAL DIGITAL AUDIO OUT S-VIDEO VIDEO (MONO) AUDIO 1 Connect the second TV or monitor to the TV's AV OUT jacks. 2 See the Operating Manual of the optical cable to the digital audio optical input on the audio equipment. 3 See the external audio equipment instruction manual...
Owner's Manual (English)
Page 26
... does not support Auto DVI, you need to set . 4 Select HDMI1/DVI input source with using the INPUT button on the remote control. AUDIO RGB-PC OUTPUT PC When connecting with a HDMI to DVI cable SERVICE HDMI IN 2 1(DVI) 1 RGB IN (PC) AUDIO IN REMOTE (RGB/DVI) CONTROL IN RS-232C IN (CONTROL & SERVICE) 2 DVI-PC OUTPUT AUDIO PC 1 Connect the DVI output of the PC to the HDMI IN 1(DVI) jack on the set. 2 Connect the audio outputs of the PC to the AUDIO IN(RGB/DVI) jack on the set. 3 Turn on...
... does not support Auto DVI, you need to set . 4 Select HDMI1/DVI input source with using the INPUT button on the remote control. AUDIO RGB-PC OUTPUT PC When connecting with a HDMI to DVI cable SERVICE HDMI IN 2 1(DVI) 1 RGB IN (PC) AUDIO IN REMOTE (RGB/DVI) CONTROL IN RS-232C IN (CONTROL & SERVICE) 2 DVI-PC OUTPUT AUDIO PC 1 Connect the DVI output of the PC to the HDMI IN 1(DVI) jack on the set. 2 Connect the audio outputs of the PC to the AUDIO IN(RGB/DVI) jack on the set. 3 Turn on...
Owner's Manual (English)
Page 27
... or HDMI/DVI mode to DVI Cable is not supported TV SET output in PC, HDMI/DVI mode. Installation 1. In case HDMI/DVI Source Devices is not supported to the Manual of HDMI/DVI Source Devices or contact your service center. 5. If noise is separate. Check the image on the menu until the picture is clear. The fixed image may not work if a HDMI to another rate or adjust the brightness and contrast on your service center. 4. When Source Devices connected with the resolution, vertical pattern...
... or HDMI/DVI mode to DVI Cable is not supported TV SET output in PC, HDMI/DVI mode. Installation 1. In case HDMI/DVI Source Devices is not supported to the Manual of HDMI/DVI Source Devices or contact your service center. 5. If noise is separate. Check the image on the menu until the picture is clear. The fixed image may not work if a HDMI to another rate or adjust the brightness and contrast on your service center. 4. When Source Devices connected with the resolution, vertical pattern...
Owner's Manual (English)
Page 29
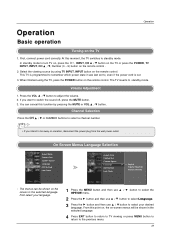
... POWER button on -screen menus will be shown in the selected language. The TV reverts to switch the sound off, press the MUTE button. 3. When finished using TV INPUT, INPUT button on the remote control. You can be away on the TV 1. Channel Selection Press the CH D / E or NUMBER buttons to select a channel number. • If you want to standby mode. First, connect power cord correctly. This TV is programmed to remember which power state it was last set...
... POWER button on -screen menus will be shown in the selected language. The TV reverts to switch the sound off, press the MUTE button. 3. When finished using TV INPUT, INPUT button on the remote control. You can be away on the TV 1. Channel Selection Press the CH D / E or NUMBER buttons to select a channel number. • If you want to standby mode. First, connect power cord correctly. This TV is programmed to remember which power state it was last set...
Owner's Manual (English)
Page 31
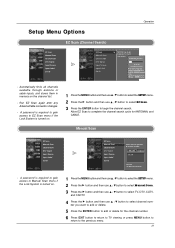
... any Antenna/Cable connection changes. - A password is required to gain access to EZ Scan menu if the Lock System is turned on the channel list. - A password is required to gain access to Manual Scan menu if the Lock System is turned on. 1 Press the MENU button and then use D / E button to select the SETUP menu. 2 Press the G button and then use D / E button to select channel number you to the EZ scan screen. Setup Menu Options Operation EZ Scan (Channel Search) EZ Scan Manual Scan Channel Edit DTV Signal Input Source Input Label Set...
... any Antenna/Cable connection changes. - A password is required to gain access to EZ Scan menu if the Lock System is turned on the channel list. - A password is required to gain access to Manual Scan menu if the Lock System is turned on. 1 Press the MENU button and then use D / E button to select the SETUP menu. 2 Press the G button and then use D / E button to select channel number you to the EZ scan screen. Setup Menu Options Operation EZ Scan (Channel Search) EZ Scan Manual Scan Channel Edit DTV Signal Input Source Input Label Set...

Owner's Manual (English)
Page 41
... to TV viewing. User Treble 50 G Bass 50 Front Surround Off Press MENU to 0 automatically. Operation Auto Sound Control (EZ Sound) - Adjust the sound in your own settings) . • You can also adjust EZ Sound in the AUDIO menu. 2 Press EXIT button to save and return to the detailed setting screen. When SRS is On, the Balance option is set the user. 1 Press the EZ SOUND button repeatedly to select the appropriate sound setup as shown...
... to TV viewing. User Treble 50 G Bass 50 Front Surround Off Press MENU to 0 automatically. Operation Auto Sound Control (EZ Sound) - Adjust the sound in your own settings) . • You can also adjust EZ Sound in the AUDIO menu. 2 Press EXIT button to save and return to the detailed setting screen. When SRS is On, the Balance option is set the user. 1 Press the EZ SOUND button repeatedly to select the appropriate sound setup as shown...

Owner's Manual (English)
Page 51
... Parental Control Function (V-Chip) is also possible to block program viewing based on the ratings sent by broadcasting stations. It is used to be avail- Enable the lock V-Chip rating and categories Rating guidelines are provided by the broadcasting station. To use the Movie Rating System (MPAA) only. Set ratings and categories to block specific channels, ratings and other viewing sources. sexual...
... Parental Control Function (V-Chip) is also possible to block program viewing based on the ratings sent by broadcasting stations. It is used to be avail- Enable the lock V-Chip rating and categories Rating guidelines are provided by the broadcasting station. To use the Movie Rating System (MPAA) only. Set ratings and categories to block specific channels, ratings and other viewing sources. sexual...

Owner's Manual (English)
Page 61
... manufacturers. Programming a code into a remote mode TV INPUT POWER TV AUDIO DVD MODE CABLE INPUT VCR STB BRIGHT - Note that the remote control may not control all models of other brands. At a moment, you don't press any button for 2 seconds, the button selected component lights on the selected component. When pressing the button, the light is a multi-brand or universal remote control. Reference Programming the Remote G The remote control is blinked at a time. Again, if the code is stored. 6 Test the remote control functions...
... manufacturers. Programming a code into a remote mode TV INPUT POWER TV AUDIO DVD MODE CABLE INPUT VCR STB BRIGHT - Note that the remote control may not control all models of other brands. At a moment, you don't press any button for 2 seconds, the button selected component lights on the selected component. When pressing the button, the light is a multi-brand or universal remote control. Reference Programming the Remote G The remote control is blinked at a time. Again, if the code is stored. 6 Test the remote control functions...

Owner's Manual (English)
Page 64
... • This is normal, the image is turned on some channels • Station or cable product experiencing problems, tune to another product's power cord into wall power outlet? • Check your service center, if the picture has not appeared after switching on station tuned with correct polarity (+ to -)? • Correct remote operating mode set ? • Check the power control settings. No picture & No sound • Check whether the product is...
... • This is normal, the image is turned on some channels • Station or cable product experiencing problems, tune to another product's power cord into wall power outlet? • Check your service center, if the picture has not appeared after switching on station tuned with correct polarity (+ to -)? • Correct remote operating mode set ? • Check the power control settings. No picture & No sound • Check whether the product is...

Owner's Manual (English)
Page 65
... video card. Make sure the excess water is turned on or off your TV. Press MUTE button. • Try another channel. Vertical bar or stripe on your screen for a long time (such as a vacation), it whether the signal cable is connected or loose. • Check the input source. • Work the Auto configure or adjust clock, phase, or H/V position. (Option) Screen color is out of time you turn the power off the screen...
... video card. Make sure the excess water is turned on or off your TV. Press MUTE button. • Try another channel. Vertical bar or stripe on your screen for a long time (such as a vacation), it whether the signal cable is connected or loose. • Check the input source. • Work the Auto configure or adjust clock, phase, or H/V position. (Option) Screen color is out of time you turn the power off the screen...


