
Owners Manual
Page 1
rel_e service. P S MANUAL MODELS • MU-60PZ95V _fore operating the Monffor.
rel_e service. P S MANUAL MODELS • MU-60PZ95V _fore operating the Monffor.

Owners Manual
Page 3
... the they exit from the apparatus. A po_arlzed grounding plug has two b_ades with the _nufactu_r's _natruct|ons. 8. This product Association_ compiies with all warnings. 4. OwneFs Manual 3 Ct i 0 n s f Important safeguards for you get many years of enjey_nt and safe oparation that are provided type plug has two blades if the provided and...
... the they exit from the apparatus. A po_arlzed grounding plug has two b_ades with the _nufactu_r's _natruct|ons. 8. This product Association_ compiies with all warnings. 4. OwneFs Manual 3 Ct i 0 n s f Important safeguards for you get many years of enjey_nt and safe oparation that are provided type plug has two blades if the provided and...

Owners Manual
Page 5
...Checklist ... Clock Setup ...OrdOff Tier Setup ...Auto Off/Sleep Timer ...Speciat Menu Options Key Lock ...ISM (Image Sticking Minimization) Warranty ... 39~40 Owner's Manual 5 Cable TV Setup ...External A!V Sou roe Setup ...DVD Setup ...DTV Setup / Monitor Out Setup PC Setup Operation Turning on the Monitor ...Menu Language Selection...XD ...Color Temperature Control Fleshtone ...sRGB ...Manua_ Picture Control(APC Sound Menu Options DASP (Digital Auto Sound BBE ...AVL (Auto Votume Leveler) Manual Sound Control(DASP Timer Menu Options ... 27 27 ,27 27 27 27 28~33 34~35 36 37 :38 16 16 17 17...
...Checklist ... Clock Setup ...OrdOff Tier Setup ...Auto Off/Sleep Timer ...Speciat Menu Options Key Lock ...ISM (Image Sticking Minimization) Warranty ... 39~40 Owner's Manual 5 Cable TV Setup ...External A!V Sou roe Setup ...DVD Setup ...DTV Setup / Monitor Out Setup PC Setup Operation Turning on the Monitor ...Menu Language Selection...XD ...Color Temperature Control Fleshtone ...sRGB ...Manua_ Picture Control(APC Sound Menu Options DASP (Digital Auto Sound BBE ...AVL (Auto Votume Leveler) Manual Sound Control(DASP Timer Menu Options ... 27 27 ,27 27 27 27 28~33 34~35 36 37 :38 16 16 17 17...

Owners Manual
Page 7
VOLUME ( I_luminates green when the Monitor is a simplified reptesen_tion The Front Panet Co.rots shown of a typicaJ front panel here may be somewhat different from your monitor: Main Power Button INPUT SELECT Button Sub Power Button Power Standby Indicator Muminates red in standby mode. Introduction - This is turned on.
VOLUME ( I_luminates green when the Monitor is a simplified reptesen_tion The Front Panet Co.rots shown of a typicaJ front panel here may be somewhat different from your monitor: Main Power Button INPUT SELECT Button Sub Power Button Power Standby Indicator Muminates red in standby mode. Introduction - This is turned on.

Owners Manual
Page 9
... that you purchased accessories ate included with your deaJer, see the optiona} Wall MountJng Bracket [ns_[ation and Setup Guide. Alkaline Owner's Manual Batteries Remote Control DVPD CabJe Power Cord D-sub 15 pin Cable I ns ta I Ia t io n I ns t r uc ... The Monitor can be m_unted horizontally or vertically. For proper vent#ation, atlow a clearance of 4" on a desktop etc. • The plasma display is missing, p_ease contact the dea_er the product. GROUNDING Ensure that the following where you connect electdc shock, ff grounding electrician the grounding methods...
... that you purchased accessories ate included with your deaJer, see the optiona} Wall MountJng Bracket [ns_[ation and Setup Guide. Alkaline Owner's Manual Batteries Remote Control DVPD CabJe Power Cord D-sub 15 pin Cable I ns ta I Ia t io n I ns t r uc ... The Monitor can be m_unted horizontally or vertically. For proper vent#ation, atlow a clearance of 4" on a desktop etc. • The plasma display is missing, p_ease contact the dea_er the product. GROUNDING Ensure that the following where you connect electdc shock, ff grounding electrician the grounding methods...

Owners Manual
Page 11
... sour_ w_h using the iNPUT SELECT button on the VCR. (Refer to the Vi_o input. 2. compared to connecting a regumar VCR to the VCR owner's manuaL) 3. Select 3 or 4 with using the iNPUT SELECT button on cable box 3, Select channels at the san to the _me channeMnumber, Connection I, Connect...Monitor to a Cable Box, match the jack corers (Video = ye[[ow_ Audio Left = white, and Audio Right = red). 2. Cabre Box Owner's Manual 11 images on the screen for cable box. After subscribing to a cable TV service The TV _nnot display TV programming }=or further information regarding from...
... sour_ w_h using the iNPUT SELECT button on the VCR. (Refer to the Vi_o input. 2. compared to connecting a regumar VCR to the VCR owner's manuaL) 3. Select 3 or 4 with using the iNPUT SELECT button on cable box 3, Select channels at the san to the _me channeMnumber, Connection I, Connect...Monitor to a Cable Box, match the jack corers (Video = ye[[ow_ Audio Left = white, and Audio Right = red). 2. Cabre Box Owner's Manual 11 images on the screen for cable box. After subscribing to a cable TV service The TV _nnot display TV programming }=or further information regarding from...

Owners Manual
Page 13
S!gna! 480i manual for Monitor out. To watch digitally broadcast programs, purchase and connect a digita_ set -top, box,) 2, Use INPUT SELECT on your set4op box connector. No Yes ... audio connec_ons. See the Operating Manuai of the second Monitor ther details regarding that _vice_s input settings NOTE . DVFPC/DVFDTV or monitor input sources Owner's Manual 13 for _pending on the remote control to select Component 2_ RGS, or OVl source, Component The Monitor has a special signal to the Monitor's MONFOR...
S!gna! 480i manual for Monitor out. To watch digitally broadcast programs, purchase and connect a digita_ set -top, box,) 2, Use INPUT SELECT on your set4op box connector. No Yes ... audio connec_ons. See the Operating Manuai of the second Monitor ther details regarding that _vice_s input settings NOTE . DVFPC/DVFDTV or monitor input sources Owner's Manual 13 for _pending on the remote control to select Component 2_ RGS, or OVl source, Component The Monitor has a special signal to the Monitor's MONFOR...

Owners Manual
Page 15
...85.00 75.06 59.99 74.93 84.88 60.02 60.02 60.00 Vertical Frequency(Hz) 70.09 Resolution Horizontal Frequency(KHz) 31.500 Vertical Frequency(Hz) 60.00 • DVI Input PC (DVI-D) Resolution Horizontal....00 60.31 72.18 1280x960 1280x1024 1280x768 1024x768 48.363 56.476 60.023 47.693 60.091 68.504 60.023 63.981 60.00 70.06 75.02 59.99 74.93 84.88 60.02 60.02 ...85.08 70.08 852x480 Vertical Frequency(Hz) 70.09 Resolution Horizontal Frequency(KHz) 31.500 37.799 39.375 Ve_ical Frequency(Hz) 60.00 70.00 75.00 Owner'_ Manual...
...85.00 75.06 59.99 74.93 84.88 60.02 60.02 60.00 Vertical Frequency(Hz) 70.09 Resolution Horizontal Frequency(KHz) 31.500 Vertical Frequency(Hz) 60.00 • DVI Input PC (DVI-D) Resolution Horizontal....00 60.31 72.18 1280x960 1280x1024 1280x768 1024x768 48.363 56.476 60.023 47.693 60.091 68.504 60.023 63.981 60.00 70.06 75.02 59.99 74.93 84.88 60.02 60.02 ...85.08 70.08 852x480 Vertical Frequency(Hz) 70.09 Resolution Horizontal Frequency(KHz) 31.500 37.799 39.375 Ve_ical Frequency(Hz) 60.00 70.00 75.00 Owner'_ Manual...

Owners Manual
Page 17
... and then use &/V the PICTUPJ_ 2. se_ngs are preset for good picture qua[i#y at the factory and cannot be and - XD is LG Ele_ronic_s unique source through an advanced When selecting APC o_ions change to On button picture improving technology to Off option) you prefer. _nu. Press...o_ temperature 1. Press the II_ b_ton 3 Press the I1_ button 4. and Blue is automatically 1. repeatedly to select the picture appearance or tint) manually, APC automatically 1 Press the APC button setup option as shown below. • You can _ust the MENU or b_ue to select XD. ...
... and then use &/V the PICTUPJ_ 2. se_ngs are preset for good picture qua[i#y at the factory and cannot be and - XD is LG Ele_ronic_s unique source through an advanced When selecting APC o_ions change to On button picture improving technology to Off option) you prefer. _nu. Press...o_ temperature 1. Press the II_ b_ton 3 Press the I1_ button 4. and Blue is automatically 1. repeatedly to select the picture appearance or tint) manually, APC automatically 1 Press the APC button setup option as shown below. • You can _ust the MENU or b_ue to select XD. ...

Owners Manual
Page 19
... orOff. Press the MENU 2. button to Off, 1. AVL main_ins an equal button sound level; button and then use A JV button Owner's Manual 19 If you adiust sound options (Treble and Bass) manually, DASP automatically changes to select AVL. Press the _ button clarity and presence for better speech and then use A / V button button...
... orOff. Press the MENU 2. button to Off, 1. AVL main_ins an equal button sound level; button and then use A JV button Owner's Manual 19 If you adiust sound options (Treble and Bass) manually, DASP automatically changes to select AVL. Press the _ button clarity and presence for better speech and then use A / V button button...

Owners Manual
Page 21
... Press the I_ button and then use & j V button to set the hour. The Sleep Timer turns the Monitor off at turn off _mes: 20, 30, 60, 90, 120, 180, and 240 minutes. When the number of minutes selected. 3 To check _ remaining minutes before 1he TV turns off, p_ss tf'_ SLEEP... z_ button once -_- _ appears, Owner's Manual 21 4, To cancei the Sleep Timer, press the SLEEP button repea1_ad_'yuntil !_ Press the I_ button 6. on the screen, press the OK, button, The timer...
... Press the I_ button and then use & j V button to set the hour. The Sleep Timer turns the Monitor off at turn off _mes: 20, 30, 60, 90, 120, 180, and 240 minutes. When the number of minutes selected. 3 To check _ remaining minutes before 1he TV turns off, p_ss tf'_ SLEEP... z_ button once -_- _ appears, Owner's Manual 21 4, To cancei the Sleep Timer, press the SLEEP button repea1_ad_'yuntil !_ Press the I_ button 6. on the screen, press the OK, button, The timer...

Owners Manual
Page 23
... instalt_ verti_lly, if the monitor 4. Press the MENU button 1, Press the MENU button and then use &/V to select Low power. button to step _ Demo. Owner's Manual 23 Operation Special Menu Options continued - Press the I_ button 4. Press the MENU button and then use A/V and then use &/V 2. Low power reduces the p{asma...
... instalt_ verti_lly, if the monitor 4. Press the MENU button 1, Press the MENU button and then use &/V to select Low power. button to step _ Demo. Owner's Manual 23 Operation Special Menu Options continued - Press the I_ button 4. Press the MENU button and then use A/V and then use &/V 2. Low power reduces the p{asma...
Owners Manual
Page 25
... select the _N 2 Press the I_ button 3, Press the 1_ button and then use & i Y button and then use & ,,V button to seJect CLne_, to save , Owner's Manual 25 The Phase • The Clock adjustment adjustment range is 0 _ 30, range is-127 _ +128. 5, Press the OK button to save Use this function tape...
... select the _N 2 Press the I_ button 3, Press the 1_ button and then use & i Y button and then use & ,,V button to seJect CLne_, to save , Owner's Manual 25 The Phase • The Clock adjustment adjustment range is 0 _ 30, range is-127 _ +128. 5, Press the OK button to save Use this function tape...

Owners Manual
Page 26
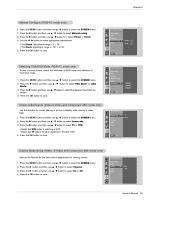
..., You can move the image up or down tf an image is unique to reduce 1. Operation Screen Menu Options continued Use YNR to each function: Manual config, Position, Split zoom, PIP position and sub picture size for double v,dndow, - Press the I_ button and then use A / V button to select On or...
..., You can move the image up or down tf an image is unique to reduce 1. Operation Screen Menu Options continued Use YNR to each function: Manual config, Position, Split zoom, PIP position and sub picture size for double v,dndow, - Press the I_ button and then use A / V button to select On or...

Owners Manual
Page 27
and then use 4 / I_ button to _ shown on your Monitor screen at the same time. the sub picture size with Winkle in • You can aJso change the WIN.SIZE the sub picture button size. to se{ect the input source for the sub picture, Each press of P_P changes the PIP options be_ow. Operation PIP (Picture-ln-Picture)!Double Window PIP lets you view 2 different inputs pictures (sources) on the Monitor screen at the same time. DoubEe Win_w mode splits the screen into 2, allowing 2 picture sources to • Using the Win.size function in PIP mode, is ...
and then use 4 / I_ button to _ shown on your Monitor screen at the same time. the sub picture size with Winkle in • You can aJso change the WIN.SIZE the sub picture button size. to se{ect the input source for the sub picture, Each press of P_P changes the PIP options be_ow. Operation PIP (Picture-ln-Picture)!Double Window PIP lets you view 2 different inputs pictures (sources) on the Monitor screen at the same time. DoubEe Win_w mode splits the screen into 2, allowing 2 picture sources to • Using the Win.size function in PIP mode, is ...

Owners Manual
Page 29
... 0 -. 64 0 -. 64 0 ~ 64 0-- 3 0 _ 3C 0 _ 3C 0 _ 3C 1 _6 0 _a 0 _3 O~ 1[ 1 -, FE 1 ~9 0-20 1 Key_ * The Monitor transmits ACK (acknowledgement) based on non-viable 21. Send: IR _ Owner's Manual 29 The adjustment range of Set _ is 1 _ 99, 4 Press the OK button to read mode, it returns the data of command, * [Cr]: Carriage Return ASCIi...
... 0 -. 64 0 -. 64 0 ~ 64 0-- 3 0 _ 3C 0 _ 3C 0 _ 3C 1 _6 0 _a 0 _3 O~ 1[ 1 -, FE 1 ~9 0-20 1 Key_ * The Monitor transmits ACK (acknowledgement) based on non-viable 21. Send: IR _ Owner's Manual 29 The adjustment range of Set _ is 1 _ 99, 4 Press the OK button to read mode, it returns the data of command, * [Cr]: Carriage Return ASCIi...

Owners Manual
Page 31
...Command2:k) • To adjust the screen sharpness. Transmission [[k][I To control the PIP (Picture In picture)/DW (Double Window). and the front panel 17. the split I_ To adjust the screen tint. Transmission [[kl[j][ Data ][Set ID][ ][Data][Cr] J Transmission [[k][p][ Data 1'....picture position using the remote Acknowledqement [[r][ ][Set ID][ ][OK][Data][x] J Owner's Manual 31 on /off Transmission [[k][r][ ][Set ID][ ][Data][Cr] J Acknowledqement [[m][ ][Set ID][ ][OK][Data][x] control ] and front panel main power controls Data Min: 0 - Color (Command2:i) • To adjust the...
...Command2:k) • To adjust the screen sharpness. Transmission [[k][I To control the PIP (Picture In picture)/DW (Double Window). and the front panel 17. the split I_ To adjust the screen tint. Transmission [[kl[j][ Data ][Set ID][ ][Data][Cr] J Transmission [[k][p][ Data 1'....picture position using the remote Acknowledqement [[r][ ][Set ID][ ][OK][Data][x] J Owner's Manual 31 on /off Transmission [[k][r][ ][Set ID][ ][Data][Cr] J Acknowledqement [[m][ ][Set ID][ ][OK][Data][x] control ] and front panel main power controls Data Min: 0 - Color (Command2:i) • To adjust the...

Owners Manual
Page 33
... [[j][r][ Data ][Set ID][ ][Data][Cr] I - Auto Configure (Command2:u) I_ To adjust picture position and minimize image shaking automatically. Max:9 Acknowledgement [[s][ ][Set Ig][ ][OK][gata][x] I Owner'_ Manual 33 Acknowledgement [[t][ ][Set ID][ ][OK][Data][x] I 30. To control the low power function on/off 1 : Low power on screen, Transmission [[j][p][ Data ][Set ID][ ][Data][Cr...
... [[j][r][ Data ][Set ID][ ][Data][Cr] I - Auto Configure (Command2:u) I_ To adjust picture position and minimize image shaking automatically. Max:9 Acknowledgement [[s][ ][Set Ig][ ][OK][gata][x] I Owner'_ Manual 33 Acknowledgement [[t][ ][Set ID][ ][OK][Data][x] I 30. To control the low power function on/off 1 : Low power on screen, Transmission [[j][p][ Data ][Set ID][ ][Data][Cr...

Owners Manual
Page 35
Owner's Manual 35 tRCodes Code O0 01 02 (Hexa) Function UP (A) DOWN _T) VOL (1_) R/C St,_on " RiC Button R!C Sutton Note " ...03 ...y£L (_) ...R/C ...08 P£WER ...R/C Sutton (...
Owner's Manual 35 tRCodes Code O0 01 02 (Hexa) Function UP (A) DOWN _T) VOL (1_) R/C St,_on " RiC Button R!C Sutton Note " ...03 ...y£L (_) ...R/C ...08 P£WER ...R/C Sutton (...

Owners Manual
Page 37
... on your Monitor. To remove dirt or dust, wipe the cabinet Please _ sure not to protect against po_ible damage from lightning or power surges, Owner's Manual 37 Careful and regular cleaning c_an extend the amount of lukewarm water and a Iit_e fabdc softener or dish washing detergent Wring the cloth un_l ifs...
... on your Monitor. To remove dirt or dust, wipe the cabinet Please _ sure not to protect against po_ible damage from lightning or power surges, Owner's Manual 37 Careful and regular cleaning c_an extend the amount of lukewarm water and a Iit_e fabdc softener or dish washing detergent Wring the cloth un_l ifs...

