Owner's Manual
Page 4
... to ground the unit by connecting it , discontinue use a damaged or loose power cord. Do not try to install the TV by the hanging power and signal cables on the wall, make the TV with a three-prong grounded AC plug must remain readily operable. 19 "As long as this apparatus or antenna during a thunder or lighting storm. The plug must be certain. Do not...
... to ground the unit by connecting it , discontinue use a damaged or loose power cord. Do not try to install the TV by the hanging power and signal cables on the wall, make the TV with a three-prong grounded AC plug must remain readily operable. 19 "As long as this apparatus or antenna during a thunder or lighting storm. The plug must be certain. Do not...
Owner's Manual
Page 6
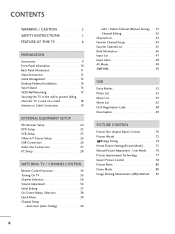
... Panel Information 11 Stand Instruction 13 Cable Management 15 Desktop Pedestal Installation 16 Swivel Stand 16 VESA Wall Mounting 17 Securing the TV to the wall to prevent falling when the TV is used on a stand 18 Antenna or Cable Connection 19 EXTERNAL EQUIPMENT SETUP HD Receiver Setup 20 DVD Setup 23 VCR Setup 25 Other A/V Source Setup 26 USB Connection 26 Audio Out Connection 27 PC Setup 28 WATCHING TV / CHANNEL CONTROL Remote Control Functions 34 Turning On TV 36 Channel Selection 36 Volume Adjustment 36 Initial Setting...
... Panel Information 11 Stand Instruction 13 Cable Management 15 Desktop Pedestal Installation 16 Swivel Stand 16 VESA Wall Mounting 17 Securing the TV to the wall to prevent falling when the TV is used on a stand 18 Antenna or Cable Connection 19 EXTERNAL EQUIPMENT SETUP HD Receiver Setup 20 DVD Setup 23 VCR Setup 25 Other A/V Source Setup 26 USB Connection 26 Audio Out Connection 27 PC Setup 28 WATCHING TV / CHANNEL CONTROL Remote Control Functions 34 Turning On TV 36 Channel Selection 36 Volume Adjustment 36 Initial Setting...
Owner's Manual
Page 8
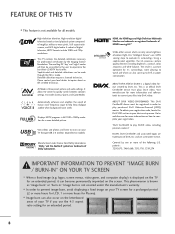
... amplifies the sound of human voice frequency range to play DivX® video, including premium content" DivX®, DivX Certified® and associated logos are trademarks of DivX, Inc. Using a sophisticated algorithm, the LG processes picture quality elements including brightness, contrast, color, sharpness and white balance. logos, screen menus, video game, and computer display) is displayed on your device setup menu. High-resolution digital television broadcast and...
... amplifies the sound of human voice frequency range to play DivX® video, including premium content" DivX®, DivX Certified® and associated logos are trademarks of DivX, Inc. Using a sophisticated algorithm, the LG processes picture quality elements including brightness, contrast, color, sharpness and white balance. logos, screen menus, video game, and computer display) is displayed on your device setup menu. High-resolution digital television broadcast and...
Owner's Manual
Page 12
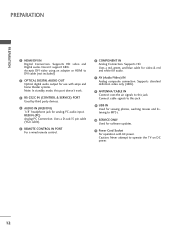
... DIGITAL AUDIO OUT Optical digital audio output for use with AC power. Connect cable signals to MP3s. 10 SERVICE ONLY Used for software updates. 11 Power Cord Socket For operation with amps and home theater systems. Note: In standby mode, this port doesn't work. 3 RS-232C IN (CONTROL & SERVICE) PORT Used by third party devices. 4 AUDIO IN (RGB/DVI) 1/8" headphone jack for audio. 7 AV (Audio/Video) IN Analog composite connection. Doesn't support 480i. Supports standard definition video only (480i). 8 ANTENNA/CABLE IN Connect over-the air signals to this jack. 9 USB IN Used for viewing...
... DIGITAL AUDIO OUT Optical digital audio output for use with AC power. Connect cable signals to MP3s. 10 SERVICE ONLY Used for software updates. 11 Power Cord Socket For operation with amps and home theater systems. Note: In standby mode, this port doesn't work. 3 RS-232C IN (CONTROL & SERVICE) PORT Used by third party devices. 4 AUDIO IN (RGB/DVI) 1/8" headphone jack for audio. 7 AV (Audio/Video) IN Analog composite connection. Doesn't support 480i. Supports standard definition video only (480i). 8 ANTENNA/CABLE IN Connect over-the air signals to this jack. 9 USB IN Used for viewing...
Owner's Manual
Page 20
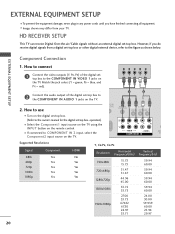
... video outputs (Y, PB, PR) of the digital set -top box. How to use s Turn on the TV. operation) s Select the Component1 input source on the TV using the INPUT button on the remote control. EXTERNAL EQUIPMENT SETUP s To prevent the equipment damage, never plug in any power cords until you do receive digital signals from your TV. Match the jack colors (Y = green, PB = blue, and PR = red). EXTERNAL EQUIPMENT SETUP Component Connection 1. However, if you have finished connecting all equipment. s Image...
... video outputs (Y, PB, PR) of the digital set -top box. How to use s Turn on the TV. operation) s Select the Component1 input source on the TV using the INPUT button on the remote control. EXTERNAL EQUIPMENT SETUP s To prevent the equipment damage, never plug in any power cords until you do receive digital signals from your TV. Match the jack colors (Y = green, PB = blue, and PR = red). EXTERNAL EQUIPMENT SETUP Component Connection 1. However, if you have finished connecting all equipment. s Image...
Owner's Manual
Page 21
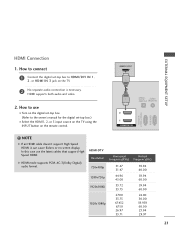
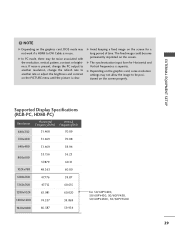
....94 60.00 24.00 30.00 59.939 60.00 23.94 29.97 21 NOTE G If an HDMI cable doesn't support High Speed HDMI, it can cause flickers or no screen display. How to connect 1 Connect the digital set-top box to the owner's manual for the digital set-top box.) I Turn on the digital set-top box. (Refer to HDMI/DVI IN 1, 2, or HDMI IN 3 jack on the remote control. G HDMI mode supports PCM, AC-3(Dolby Digital) audio format.
....94 60.00 24.00 30.00 59.939 60.00 23.94 29.97 21 NOTE G If an HDMI cable doesn't support High Speed HDMI, it can cause flickers or no screen display. How to connect 1 Connect the digital set-top box to the owner's manual for the digital set-top box.) I Turn on the digital set-top box. (Refer to HDMI/DVI IN 1, 2, or HDMI IN 3 jack on the remote control. G HDMI mode supports PCM, AC-3(Dolby Digital) audio format.
Owner's Manual
Page 22
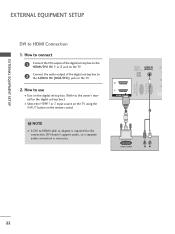
... the owner's manual for this connection. OPTICAL DIGITAL AUDIO OUT AUDIO IN (RGB/DVI) R CO RS-232C IN (CONTROL & SERVICE) RGB IN (PC) 2 2 1 1 HDMI/DVI IN 1 2 DVI-DTV OUTPUT R L 22 How to connect 1 Connect the DVI output of the digital set -top box.) I Select the HDMI1 or 2 input source on the TV using the INPUT button on the TV. 2. NOTE G A DVI to HDMI cable or adapter is necessary. DVI doesn't support audio, so a separate audio connection is required for the digital set -top box to HDMI Connection 1. EXTERNAL EQUIPMENT SETUP EXTERNAL EQUIPMENT SETUP DVI...
... the owner's manual for this connection. OPTICAL DIGITAL AUDIO OUT AUDIO IN (RGB/DVI) R CO RS-232C IN (CONTROL & SERVICE) RGB IN (PC) 2 2 1 1 HDMI/DVI IN 1 2 DVI-DTV OUTPUT R L 22 How to connect 1 Connect the DVI output of the digital set -top box.) I Select the HDMI1 or 2 input source on the TV using the INPUT button on the TV. 2. NOTE G A DVI to HDMI cable or adapter is necessary. DVI doesn't support audio, so a separate audio connection is required for the digital set -top box to HDMI Connection 1. EXTERNAL EQUIPMENT SETUP EXTERNAL EQUIPMENT SETUP DVI...
Owner's Manual
Page 29
..., change the PC output to another resolution, change the refresh rate to another rate or adjust the brightness and contrast on the graphics card, some resolution settings may not work if a HDMI to be noise associated with the resolution, vertical pattern, contrast or brightness. G The synchronization input form for a long period of time. The fixed image could become permanently imprinted on the screen properly. EXTERNAL EQUIPMENT SETUP...
..., change the PC output to another resolution, change the refresh rate to another rate or adjust the brightness and contrast on the graphics card, some resolution settings may not work if a HDMI to be noise associated with the resolution, vertical pattern, contrast or brightness. G The synchronization input form for a long period of time. The fixed image could become permanently imprinted on the screen properly. EXTERNAL EQUIPMENT SETUP...
Owner's Manual
Page 37
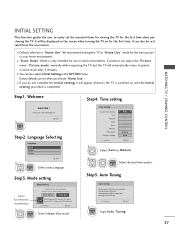
... channel information will be displayed on the screen when turning the TV on until the Initial setting procedure is switched on for use this TV at store, select [Store Demo]. INITIAL SETTING This Function guides the user to easily set when you choose "Home Use". I "Store Demo" Mode is "Home Use". Language Selecting Language English Español Français Next 1 ENTER Select menu Language. I Default selection is only intended for the first time. Time setting Time Setting Current Time Setting...
... channel information will be displayed on the screen when turning the TV on until the Initial setting procedure is switched on for use this TV at store, select [Store Demo]. INITIAL SETTING This Function guides the user to easily set when you choose "Home Use". I "Store Demo" Mode is "Home Use". Language Selecting Language English Español Français Next 1 ENTER Select menu Language. I Default selection is only intended for the first time. Time setting Time Setting Current Time Setting...
Owner's Manual
Page 38
...; Color 60 • Tint E 0R Enter G AUDIO Auto Volume Clear Voice II Balance Sound Mode TV Speaker Move Enter : Off : Off + 3 0L R : Standard • Infinte Surround: Off • Treble 50 • Bass 50 • Reset : On OPTION Language Input Label SIMPLINK Key Lock Caption Demo Mode ISM Method Set ID Initial Setting Move Enter : On : Off : Off : Off : Normal : 1 : Home Use CHANNEL PICTURE AUDIO TIME OPTION LOCK INPUT USB TIME Clock Off Time : Off On Time : Off Sleep Timer...
...; Color 60 • Tint E 0R Enter G AUDIO Auto Volume Clear Voice II Balance Sound Mode TV Speaker Move Enter : Off : Off + 3 0L R : Standard • Infinte Surround: Off • Treble 50 • Bass 50 • Reset : On OPTION Language Input Label SIMPLINK Key Lock Caption Demo Mode ISM Method Set ID Initial Setting Move Enter : On : Off : Off : Off : Normal : 1 : Home Use CHANNEL PICTURE AUDIO TIME OPTION LOCK INPUT USB TIME Clock Off Time : Off On Time : Off Sleep Timer...

Owner's Manual
Page 49
... events. Sound Mode" respectively. Off Game Cinema Sport WATCHING TV / CHANNEL CONTROL 1AV MODE Press the AV MODE button repeatedly to select the desired source. 2 ENTER s If you select "O f f" in AV mode, Cinema will be selected both for "PICTURE menu - Picture Mode" and "AUDIO menu - s Cinema: Optimizes video and audio for playing games. AV MODE AV Mode toggles through preset Video and Audio settings. s G a m e: Optimizes video and audio for watching movies. s Sport: Optimizes video and audio for playing games. 49 s O f f: Disables the AV MODE.
... events. Sound Mode" respectively. Off Game Cinema Sport WATCHING TV / CHANNEL CONTROL 1AV MODE Press the AV MODE button repeatedly to select the desired source. 2 ENTER s If you select "O f f" in AV mode, Cinema will be selected both for "PICTURE menu - Picture Mode" and "AUDIO menu - s Cinema: Optimizes video and audio for playing games. AV MODE AV Mode toggles through preset Video and Audio settings. s G a m e: Optimizes video and audio for watching movies. s Sport: Optimizes video and audio for playing games. 49 s O f f: Disables the AV MODE.
Owner's Manual
Page 58
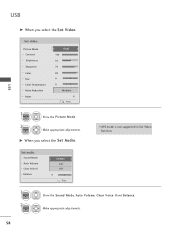
Make appropriate adjustments. Sound Mode Auto Volume Clear Voice ll Balance Cinema Off Off 0 L R Prev. 1 ENTER 2 ENTER Show the Sound Mode, Auto Volume, Clear Voice II and Balance. G When you select the Set Video. I APS mode is not supported in Set Video function. Set audio. Make appropriate adjustments. 58 Set video. USB USB G When you select the Set Audio. Picture Mode Contrast Brightness Sharpness Color Tint Color Temperature Noise Reduction Reset Vivid 100 50 70 80 0 W C 0 W C Medium Prev. 1 ENTER 2 ENTER Show the Picture Mode.
Make appropriate adjustments. Sound Mode Auto Volume Clear Voice ll Balance Cinema Off Off 0 L R Prev. 1 ENTER 2 ENTER Show the Sound Mode, Auto Volume, Clear Voice II and Balance. G When you select the Set Video. I APS mode is not supported in Set Video function. Set audio. Make appropriate adjustments. 58 Set video. USB USB G When you select the Set Audio. Picture Mode Contrast Brightness Sharpness Color Tint Color Temperature Noise Reduction Reset Vivid 100 50 70 80 0 W C 0 W C Medium Prev. 1 ENTER 2 ENTER Show the Picture Mode.

Owner's Manual
Page 61
... shown below) will not work. 61 G This TV can not play time. G Press ENTER, A, H o m e, Q.MENU, B A C K, E X I The play information box (as the play . NOTE G When music is playing, is no user input to stop the screen saver. Sound Mode Auto Volume Clear Voice ll Balance 1 Q.MENU Show the Sound Mode. 2 Make appropriate adjustments. Cinema Off Off 0 L R Exit I T, or ENERGY SAVING button to prevent a fixed image remaining on the screen for TV speaker, Set Audio features in choose options...
... shown below) will not work. 61 G This TV can not play time. G Press ENTER, A, H o m e, Q.MENU, B A C K, E X I The play information box (as the play . NOTE G When music is playing, is no user input to stop the screen saver. Sound Mode Auto Volume Clear Voice ll Balance 1 Q.MENU Show the Sound Mode. 2 Make appropriate adjustments. Cinema Off Off 0 L R Exit I T, or ENERGY SAVING button to prevent a fixed image remaining on the screen for TV speaker, Set Audio features in choose options...
Owner's Manual
Page 66
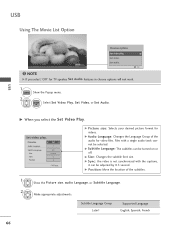
... . G Picture size: Selects your desired picture format for video files. Files with the captions, it can be turned on or off. Sync . G Audio Language: Changes the Language Group of the subtitles. 1 Show the Picture size, audio Language, or Subtitle Language. 2 Make appropriate adjustments. G Size: Changes the subtitle font size. G Sync: the video is not synchronized with a single audio track cannot be adjusted by 0.5 second. Set audio. USB G When you select "Off" for TV speaker, Set Audio features in choose options will not work. 1 Q.MENU...
... . G Picture size: Selects your desired picture format for video files. Files with the captions, it can be turned on or off. Sync . G Audio Language: Changes the Language Group of the subtitles. 1 Show the Picture size, audio Language, or Subtitle Language. 2 Make appropriate adjustments. G Size: Changes the subtitle font size. G Sync: the video is not synchronized with a single audio track cannot be adjusted by 0.5 second. Set audio. USB G When you select "Off" for TV speaker, Set Audio features in choose options will not work. 1 Q.MENU...
Owner's Manual
Page 67
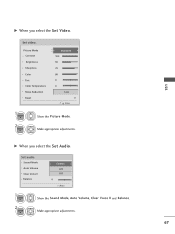
Picture Mode Contrast Brightness Sharpness Color Tint Color Temperature Noise Reduction Reset Standard 100 50 70 80 0 W C 0 W C Low Prev. 1 ENTER 2 ENTER Show the Picture Mode. Set audio. G When you select the Set Audio. Make appropriate adjustments. Sound Mode Auto Volume Clear Voice ll Balance Cinema Off Off 0 L R Prev. 1 ENTER Show the Sound Mode, Auto Volume, Clear Voice II and Balance. 2 ENTER Make appropriate adjustments. 67 USB G When you select the Set Video. Set video.
Picture Mode Contrast Brightness Sharpness Color Tint Color Temperature Noise Reduction Reset Standard 100 50 70 80 0 W C 0 W C Low Prev. 1 ENTER 2 ENTER Show the Picture Mode. Set audio. G When you select the Set Audio. Make appropriate adjustments. Sound Mode Auto Volume Clear Voice ll Balance Cinema Off Off 0 L R Prev. 1 ENTER Show the Sound Mode, Auto Volume, Clear Voice II and Balance. 2 ENTER Make appropriate adjustments. 67 USB G When you select the Set Video. Set video.
Owner's Manual
Page 100
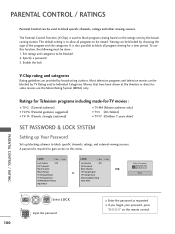
.... PARENTAL CONTROL / RATINGS Parental Control can be blocked. 2. The default setting is required to gain access to block program viewing based on the remote control. It is used to be done : 1. Most television programs and television movies can be blocked by broadcasting stations. LOCK Move Enter LOCK Move Enter Lock System : Off Set Password Block Channel Movie Rating TV Rating-Children TV Rating-General Downloadable Rating Input Block Lock System : Off Set Password Block Channel or TV Rating-English...
.... PARENTAL CONTROL / RATINGS Parental Control can be blocked. 2. The default setting is required to gain access to block program viewing based on the remote control. It is used to be done : 1. Most television programs and television movies can be blocked by broadcasting stations. LOCK Move Enter LOCK Move Enter Lock System : Off Set Password Block Channel Movie Rating TV Rating-Children TV Rating-General Downloadable Rating Input Block Lock System : Off Set Password Block Channel or TV Rating-English...
Owner's Manual
Page 112
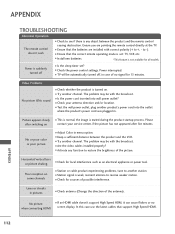
... connecting HDMI screen display. Please after five minutes. s TV will be with correct polarity (+ to another product's power cord into wall power outlet? Poor reception on . Lines or streaks in menu option. APPENDIX TROUBLESHOOTING Abnormal Operation The remote control doesn't work s Check to see if there is any function to restore the brightness of the picture. s Ensure that support High Speed HDMI. Power is turned on some channels s Station or cable...
... connecting HDMI screen display. Please after five minutes. s TV will be with correct polarity (+ to another product's power cord into wall power outlet? Poor reception on . Lines or streaks in menu option. APPENDIX TROUBLESHOOTING Abnormal Operation The remote control doesn't work s Check to see if there is any function to restore the brightness of the picture. s Ensure that support High Speed HDMI. Power is turned on some channels s Station or cable...

Owner's Manual
Page 113
... s Work the Auto configure or adjust clock, phase, or H/V position. (Option) Screen color is out of the speakers Unusual sound from one of range s Adjust resolution, horizontal frequency, or vertical frequency. s Check whether the bit rate is supported. s Check whether the video file and subtitle file are the same. s Sound muted? s Try another channel. s Adjust Balance in the same folder. PC Mode Problems The signal is unstable s Check the signal cable. Vertical...
... s Work the Auto configure or adjust clock, phase, or H/V position. (Option) Screen color is out of the speakers Unusual sound from one of range s Adjust resolution, horizontal frequency, or vertical frequency. s Check whether the bit rate is supported. s Check whether the video file and subtitle file are the same. s Sound muted? s Try another channel. s Adjust Balance in the same folder. PC Mode Problems The signal is unstable s Check the signal cable. Vertical...

Owner's Manual
Page 122
... mapping'. Treble (Command: k r) To adjust treble. The Physical number is the actual digital channel number, the Major is not required when sending a command. Remote Control Lock Mode (Command: k m) To lock the remote control and the front panel controls on the TV. Transmission [k][s][ ][Set ID][ ][Data][Cr] Data Min: 00 ~ Max: 64 (*transmit by Hexadecimal code) *Refer to , and the Minor is used. Acknowledgement [s][ ][Set ID][ ][OK/NG][Data...
... mapping'. Treble (Command: k r) To adjust treble. The Physical number is the actual digital channel number, the Major is not required when sending a command. Remote Control Lock Mode (Command: k m) To lock the remote control and the front panel controls on the TV. Transmission [k][s][ ][Set ID][ ][Data][Cr] Data Min: 00 ~ Max: 64 (*transmit by Hexadecimal code) *Refer to , and the Minor is used. Acknowledgement [s][ ][Set ID][ ][OK/NG][Data...
Specification
Page 2
... II (Voice Zoom) Auto Volume Leveler II Sound Mode SPECIAL FEATURES Picture Wizard II Smart Energy Saving 1080p Source Input A/V Input Navigation Input Labeling Screen Adjust Quick View (Flashback) Picture Freeze Parental Control w/V-Chip Rating (DTV) Closed Caption SIMPLINK™ CONVENIENCE FEATURES Language Auto Tuning/Programming Channel Add/Delete Favorite Channel Programming Auto/Manual Clock On/Off Timer Sleep Timer Auto Off/Auto Sleep AV INPUTS/OUTPUTS RF In (Antenna/Cable) AV In Component Video In (Y, Pb, Pr) + Audio Digital Audio Out (Optical) HDMI 1.4a/HDCP Input RGB In (D-Sub 15...
... II (Voice Zoom) Auto Volume Leveler II Sound Mode SPECIAL FEATURES Picture Wizard II Smart Energy Saving 1080p Source Input A/V Input Navigation Input Labeling Screen Adjust Quick View (Flashback) Picture Freeze Parental Control w/V-Chip Rating (DTV) Closed Caption SIMPLINK™ CONVENIENCE FEATURES Language Auto Tuning/Programming Channel Add/Delete Favorite Channel Programming Auto/Manual Clock On/Off Timer Sleep Timer Auto Off/Auto Sleep AV INPUTS/OUTPUTS RF In (Antenna/Cable) AV In Component Video In (Y, Pb, Pr) + Audio Digital Audio Out (Optical) HDMI 1.4a/HDCP Input RGB In (D-Sub 15...


