
Specification (English)
Page 2
...1 SIDE BACK REAR AUDIO/VIDEO INPUTS/OUTPUTS (CONTINUED) S-Video In 1 HD Component Video In (Y,Pb,Pr) + L/R Audio 2 Digital Audio Out 1 (Optical) HDMI/HDCP Input 2 (V.1.3 with Deep Color) RGB In (D-Sub 15pin) - RGB 60p A/V Input Navigation • Auto Navigation • Input Labeling • Quick View (Previous Channel) • Clear Voice (On/Off) • Quick Setup Guide • Parental Control w/V-Chip • Key Lock • Closed Caption • LG SimpLink™ (HDMI CEC) •...
...1 SIDE BACK REAR AUDIO/VIDEO INPUTS/OUTPUTS (CONTINUED) S-Video In 1 HD Component Video In (Y,Pb,Pr) + L/R Audio 2 Digital Audio Out 1 (Optical) HDMI/HDCP Input 2 (V.1.3 with Deep Color) RGB In (D-Sub 15pin) - RGB 60p A/V Input Navigation • Auto Navigation • Input Labeling • Quick View (Previous Channel) • Clear Voice (On/Off) • Quick Setup Guide • Parental Control w/V-Chip • Key Lock • Closed Caption • LG SimpLink™ (HDMI CEC) •...
Owner's Manual (English)
Page 4
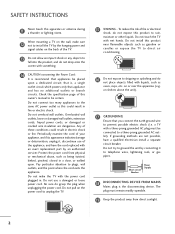
... INSTRUCTIONS 11 Never touch this owner's manual to be connected to dripping or splashing and do not drop onto the screen with the power cord plugged in fire or electric shock. Do not overload wall outlets. a TV with wet hands. When mounting a TV on or over the apparatus (e.g. that you connect the earth ground wire to install the TV by an authorized servicer...
... INSTRUCTIONS 11 Never touch this owner's manual to be connected to dripping or splashing and do not drop onto the screen with the power cord plugged in fire or electric shock. Do not overload wall outlets. a TV with wet hands. When mounting a TV on or over the apparatus (e.g. that you connect the earth ground wire to install the TV by an authorized servicer...
Owner's Manual (English)
Page 5
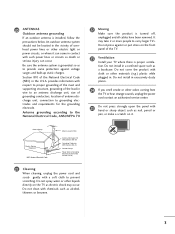
...Ground Clamps Power Service Grounding Electrode System (NEC Art 250, Part H) 21 Cleaning When cleaning, unplug the power cord and scrub gently with a soft cloth to the National Electrical Code, ANSI/NFPA 70 22 Moving Make sure the product is proper ventilation. Antenna grounding according...front panel of antenna discharge unit, connection to an antenna discharge unit, size of grounding conductors, location of the TV. 23 Ventilation Install your TV where there is turned off, unplugged and all cables have been removed. Section 810 of overhead power lines or other liquids directly on...
...Ground Clamps Power Service Grounding Electrode System (NEC Art 250, Part H) 21 Cleaning When cleaning, unplug the power cord and scrub gently with a soft cloth to the National Electrical Code, ANSI/NFPA 70 22 Moving Make sure the product is proper ventilation. Antenna grounding according...front panel of antenna discharge unit, connection to an antenna discharge unit, size of grounding conductors, location of the TV. 23 Ventilation Install your TV where there is turned off, unplugged and all cables have been removed. Section 810 of overhead power lines or other liquids directly on...
Owner's Manual (English)
Page 6
... VESA Wall Mounting 13 Securing the TV to the wall to prevent falling . . . . 14 Antenna or Cable Connection 15 EXTERNAL EQUIPMENT SETUP HD Receiver Setup 16 DVD Setup 19 VCR Setup 21 Other A/V Source Setup 23 Audio Out Connection 23 PC Setup 24 WATCHING TV / CHANNEL CONTROL Remote Control Functions 30 Turning On TV 32 Channel Selection 32 Volume Adjustment 32 Initial Setting 33 Quick Menu 34 On-Screen Menus Selection 35 Channel Setup - Picture Mode - Channel Editing 38 Input List 39 Input Label 40 AV Mode 41 SIMPLINK 42 PICTURE CONTROL Picture Size (Aspect Ratio...
... VESA Wall Mounting 13 Securing the TV to the wall to prevent falling . . . . 14 Antenna or Cable Connection 15 EXTERNAL EQUIPMENT SETUP HD Receiver Setup 16 DVD Setup 19 VCR Setup 21 Other A/V Source Setup 23 Audio Out Connection 23 PC Setup 24 WATCHING TV / CHANNEL CONTROL Remote Control Functions 30 Turning On TV 32 Channel Selection 32 Volume Adjustment 32 Initial Setting 33 Quick Menu 34 On-Screen Menus Selection 35 Channel Setup - Picture Mode - Channel Editing 38 Input List 39 Input Label 40 AV Mode 41 SIMPLINK 42 PICTURE CONTROL Picture Size (Aspect Ratio...

Owner's Manual (English)
Page 10
... attached, remove the tape. Illuminates blue when the TV is switched on . Illuminates blue when the TV is switched on . INPUT 8 INPUT MENU INPUT MENU ENTER VOL MENU ENTER INPUT Button ENTER VOL MENU Button VOL CH ENTER VOLUME Button (-, +) Buttons CH CH CHANNEL (E,D)Buttons INPUT MENU ENTER VOL INPUT MENU POWER Button ENTER INPUT Button VOL MENU Button CH ENTER Button VOLUME (-, +) Buttons CH CHANNEL (E,D)Buttons 42/50PG20/20C, 50/60PG30, 50/60PG30C Remote Control Sensor POWER Button Power/Standby Indicator Illuminates red in standby mode. I Image shown may...
... attached, remove the tape. Illuminates blue when the TV is switched on . Illuminates blue when the TV is switched on . INPUT 8 INPUT MENU INPUT MENU ENTER VOL MENU ENTER INPUT Button ENTER VOL MENU Button VOL CH ENTER VOLUME Button (-, +) Buttons CH CH CHANNEL (E,D)Buttons INPUT MENU ENTER VOL INPUT MENU POWER Button ENTER INPUT Button VOL MENU Button CH ENTER Button VOLUME (-, +) Buttons CH CHANNEL (E,D)Buttons 42/50PG20/20C, 50/60PG30, 50/60PG30C Remote Control Sensor POWER Button Power/Standby Indicator Illuminates red in standby mode. I Image shown may...

Owner's Manual (English)
Page 11
...standby mode, this port do not work. 3 RS-232C IN (CONTROL & SERVICE) PORT Connect over-the air signals to this jack. AUDIO (RGB/DVI) 1/8" headphone jack for use with AC power. R HDMI IN 3 SERVICE ONLY USB PREPARATION BACK PANEL INFORMATION I Image shown may differ from your TV. 9 7 10 1 R VIDEO L/MONO AUDIO R 3 RS-232C IN (CONTROL & SERVICE) 4 5 ANTENNA/ CABLE IN 6 RGB IN RGB(PC) AUDIO (RGB/DVI) 7 AV IN 2 2 1 AV IN 1 S-VIDEO DIGITAL AUDIO OUT REMOTE CONTROL IN OPTICAL 2 AUDIO 1 VIDEO (MONO) COMPONENT IN VIDEO AUDIO HDMI/DVI IN 2 1 8 ( ) 1 AV (Audio/Video...
...standby mode, this port do not work. 3 RS-232C IN (CONTROL & SERVICE) PORT Connect over-the air signals to this jack. AUDIO (RGB/DVI) 1/8" headphone jack for use with AC power. R HDMI IN 3 SERVICE ONLY USB PREPARATION BACK PANEL INFORMATION I Image shown may differ from your TV. 9 7 10 1 R VIDEO L/MONO AUDIO R 3 RS-232C IN (CONTROL & SERVICE) 4 5 ANTENNA/ CABLE IN 6 RGB IN RGB(PC) AUDIO (RGB/DVI) 7 AV IN 2 2 1 AV IN 1 S-VIDEO DIGITAL AUDIO OUT REMOTE CONTROL IN OPTICAL 2 AUDIO 1 VIDEO (MONO) COMPONENT IN VIDEO AUDIO HDMI/DVI IN 2 1 8 ( ) 1 AV (Audio/Video...
Owner's Manual (English)
Page 18
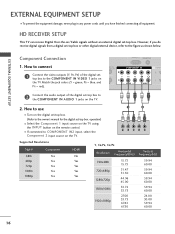
...(PC) (RGB/DVI) COMPONENT IN VIDEO AUDIO HDMI/ 2 1 2 Connect the audio output of the digital settop box to COMPONENT IN2 input, select the Component 2 input source on the TV. 2. operation) I Select the Component 1 input source on the TV using the INPUT button on 1 the TV. Match the jack colors (Y = green, PB = blue, and( ) PR = red). I If connected to the COMPONENT IN VIDEO 1 jacks on the remote control. HD RECEIVER SETUP This TV can receive Digital Over-the-air/Cable signals without an external digital set -top box to the...
...(PC) (RGB/DVI) COMPONENT IN VIDEO AUDIO HDMI/ 2 1 2 Connect the audio output of the digital settop box to COMPONENT IN2 input, select the Component 2 input source on the TV. 2. operation) I Select the Component 1 input source on the TV using the INPUT button on 1 the TV. Match the jack colors (Y = green, PB = blue, and( ) PR = red). I If connected to the COMPONENT IN VIDEO 1 jacks on the remote control. HD RECEIVER SETUP This TV can receive Digital Over-the-air/Cable signals without an external digital set -top box to the...
Owner's Manual (English)
Page 19
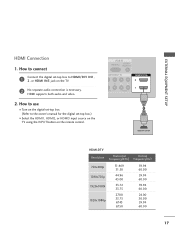
...connect 1 Connect the digital set-top box to the owner's manual for the digital set -top box. (Refer to HDMI/DVI IN1, 2, or HDMI IN3 jack on the remote control. How to use I Turn on the digital set -top box.) I Select the HDMI1, HDMI2, or HDMI3 input source on the TV using the INPUT button on the TV. 2 No separate audio connection is necessary. ( ) HDMI supports both audio and video. 2. RGB IN RGB(PC) AUDIO (RGB/DVI) OMPONENT IN B PR L R EO AUDIO HDMI/DVI IN 2 1 1 HDMI-DTV OUTPUT HDMI-DTV Resolution... 59.94 60.00 ( ) 17 EXTERNAL EQUIPMENT SETUP HDMI Connection 1.
...connect 1 Connect the digital set-top box to the owner's manual for the digital set -top box. (Refer to HDMI/DVI IN1, 2, or HDMI IN3 jack on the remote control. How to use I Turn on the digital set -top box.) I Select the HDMI1, HDMI2, or HDMI3 input source on the TV using the INPUT button on the TV. 2 No separate audio connection is necessary. ( ) HDMI supports both audio and video. 2. RGB IN RGB(PC) AUDIO (RGB/DVI) OMPONENT IN B PR L R EO AUDIO HDMI/DVI IN 2 1 1 HDMI-DTV OUTPUT HDMI-DTV Resolution... 59.94 60.00 ( ) 17 EXTERNAL EQUIPMENT SETUP HDMI Connection 1.
Owner's Manual (English)
Page 20
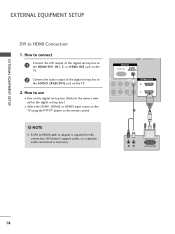
.../DVI) CABLE IN COMPONENT IN PB PR L R VIDEO AUDIO HDMI/DVI IN 2 1 2 1 ! NOTE G A DVI to HDMI Connection 1. DVI doesn't support audio, so a separate audio connection is required for the digital set -top box. (Refer to the AUDIO (RGB/DVI) jack on the remote control. R L DVI-DTV OUTPUT 18 EXTERNAL EQUIPMENT SETUP EXTERNAL EQUIPMENT SETUP DVI to HDMI cable or adapter is necessary. How to use ( ) I Turn on the digital set -top box.) I Select the HDMI1, HDMI2, or HDMI3 input source on the TV using the INPUT button on the TV. 2. How to connect 1 Connect...
.../DVI) CABLE IN COMPONENT IN PB PR L R VIDEO AUDIO HDMI/DVI IN 2 1 2 1 ! NOTE G A DVI to HDMI Connection 1. DVI doesn't support audio, so a separate audio connection is required for the digital set -top box. (Refer to the AUDIO (RGB/DVI) jack on the remote control. R L DVI-DTV OUTPUT 18 EXTERNAL EQUIPMENT SETUP EXTERNAL EQUIPMENT SETUP DVI to HDMI cable or adapter is necessary. How to use ( ) I Turn on the digital set -top box.) I Select the HDMI1, HDMI2, or HDMI3 input source on the TV using the INPUT button on the TV. 2. How to connect 1 Connect...

Owner's Manual (English)
Page 23
... to the same channel number. I Set VCR output switch to 3 or 4 and then tune TV to all TVs and is used; the fixed images on the sides of the screen may remain visible on the VCR. (Refer to use I Insert a video tape into the VCR and press PLAY on the screen. How to the VCR owner's manual.) ANTENNA/ CABLE IN IO DVI) 1 HDMI/DVI IN 2 R 1 ANT OUT S-VIDEO VIDEO L R ANT IN OUTPUT SWITCH Wall Jack 2 Antenna ( ) 21 EXTERNAL EQUIPMENT SETUP VCR SETUP I Use the ISM feature...
... to the same channel number. I Set VCR output switch to 3 or 4 and then tune TV to all TVs and is used; the fixed images on the sides of the screen may remain visible on the VCR. (Refer to use I Insert a video tape into the VCR and press PLAY on the screen. How to the VCR owner's manual.) ANTENNA/ CABLE IN IO DVI) 1 HDMI/DVI IN 2 R 1 ANT OUT S-VIDEO VIDEO L R ANT IN OUTPUT SWITCH Wall Jack 2 Antenna ( ) 21 EXTERNAL EQUIPMENT SETUP VCR SETUP I Use the ISM feature...

Owner's Manual (English)
Page 27
... or adjust the brightness and contrast on the screen properly. 25 G Depending on the graphics card, DOS mode may not allow the image to DVI Cable is separate. G The synchronization input form for a long period of time. If noise is present, change the PC output to another resolution, change the refresh rate to 1360x768. G Depending on the screen. EXTERNAL EQUIPMENT SETUP Supported Display Specifications (RGB-PC, HDMI-PC) Resolution 640x350...
... or adjust the brightness and contrast on the screen properly. 25 G Depending on the graphics card, DOS mode may not allow the image to DVI Cable is separate. G The synchronization input form for a long period of time. If noise is present, change the PC output to another resolution, change the refresh rate to 1360x768. G Depending on the screen. EXTERNAL EQUIPMENT SETUP Supported Display Specifications (RGB-PC, HDMI-PC) Resolution 640x350...
Owner's Manual (English)
Page 36
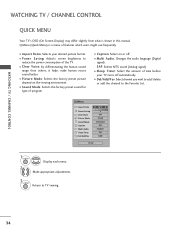
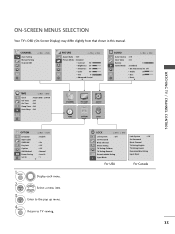
... desired picture format. I Multi Audio: Changes the audio language (Digital signal). SAP: Selects MTS sound (Analog signal). I Picture Mode: Selects the factory preset picture depend on or off automatically. I Caption: Select on the viewing environment. MENU Return to reduce the power consumption of program. I Del/Add/Fav: Select channel you want to add/delete or add the channel to the Favorite List. I Sleep Timer: Select the amount of features which users might use frequently. I P o w e r S a v i n g: Adjusts screen brightness to TV viewing. 34 Q.Menu (Quick Menu...
... desired picture format. I Multi Audio: Changes the audio language (Digital signal). SAP: Selects MTS sound (Analog signal). I Picture Mode: Selects the factory preset picture depend on or off automatically. I Caption: Select on the viewing environment. MENU Return to reduce the power consumption of program. I Del/Add/Fav: Select channel you want to add/delete or add the channel to the Favorite List. I Sleep Timer: Select the amount of features which users might use frequently. I P o w e r S a v i n g: Adjusts screen brightness to TV viewing. 34 Q.Menu (Quick Menu...
Owner's Manual (English)
Page 37
... Auto Volume : Off Clear Voice : On Balance 0L R Sound Mode : Standard • SRS TruSurround XT: Off • Treble 50 • Bass 50 • Reset E TIME Move Enter Clock : Feb/21/2008/ 2:10 AM Off Time : Off On Time : Off Sleep Timer : Off Auto Sleep : Off CHANNEL PICTURE AUDIO TIME OPTION LOCK OPTION Move Enter Language : English Input Label SIMPLINK : On Key Lock : Off Caption : Off ISM Method : Normal Power Saving : Level 0 Set ID : 1 E 1 MENU Display...
... Auto Volume : Off Clear Voice : On Balance 0L R Sound Mode : Standard • SRS TruSurround XT: Off • Treble 50 • Bass 50 • Reset E TIME Move Enter Clock : Feb/21/2008/ 2:10 AM Off Time : Off On Time : Off Sleep Timer : Off Auto Sleep : Off CHANNEL PICTURE AUDIO TIME OPTION LOCK OPTION Move Enter Language : English Input Label SIMPLINK : On Key Lock : Off Caption : Off ISM Method : Normal Power Saving : Level 0 Set ID : 1 E 1 MENU Display...

Owner's Manual (English)
Page 56
... the previous menu. I Normal: If image sticking is never a problem, ISM is best not to help prevent ghost images. I Inversion: Inversion will move every 2 minutes. set to remain on the screen, the image will automatically invert the plasma display panel color every 30 minutes. I W h i t e W a s h: White Wash removes ghost images from a PC/video game displayed on the screen for removing a ghost image. To return to normal viewing, press the any fixed image to Normal. PICTURE CONTROL IMAGE STICKING...
... the previous menu. I Normal: If image sticking is never a problem, ISM is best not to help prevent ghost images. I Inversion: Inversion will move every 2 minutes. set to remain on the screen, the image will automatically invert the plasma display panel color every 30 minutes. I W h i t e W a s h: White Wash removes ghost images from a PC/video game displayed on the screen for removing a ghost image. To return to normal viewing, press the any fixed image to Normal. PICTURE CONTROL IMAGE STICKING...
Owner's Manual (English)
Page 68
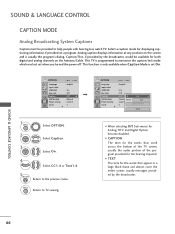
...-menus for Analog, DTV, and Digital Option become disabled. Analog caption displays information at any position on a program. OPTION Move Enter Language Input Label SIMPLINK Key Lock Caption ISM Method Power Saving Set ID E : English : On : Off : Off : Normal : Level 0 : 1 1 MENU Select OPTION. 2 ENTER 3 ENTER Select Caption. usually the audio portion of the TV screen; SOUND & LANGUAGE CONTROL CAPTION MODE Analog Broadcasting System Captions Caption must be available for both digital and analog channels on the Antenna/Cable. Select O n. 4 Select C C 1-4 or Text1...
...-menus for Analog, DTV, and Digital Option become disabled. Analog caption displays information at any position on a program. OPTION Move Enter Language Input Label SIMPLINK Key Lock Caption ISM Method Power Saving Set ID E : English : On : Off : Off : Normal : Level 0 : 1 1 MENU Select OPTION. 2 ENTER 3 ENTER Select Caption. usually the audio portion of the TV screen; SOUND & LANGUAGE CONTROL CAPTION MODE Analog Broadcasting System Captions Caption must be available for both digital and analog channels on the Antenna/Cable. Select O n. 4 Select C C 1-4 or Text1...

Owner's Manual (English)
Page 76
...Rating Input Block LOCK Move Enter Lock System : Off Set Password Block Channel TV Rating-English TV Rating-French Downloadable Rating Input Block Enter Password **** Close 1 MENU ENTER Select L O C K. 21 2 3 456 789 0 Input the password. 74 I TV-Y7 (Children 7 years older) PARENTAL CONTROL / RATING SET PASSWORD & LOCK SYSTEM Setting up Your Password Set up with the initial password "0-0-0-0". The default setting is set up blocking schemes to block specific channels, ratings, and external viewing sources. Ratings for Television programs including made-for a time...
...Rating Input Block LOCK Move Enter Lock System : Off Set Password Block Channel TV Rating-English TV Rating-French Downloadable Rating Input Block Enter Password **** Close 1 MENU ENTER Select L O C K. 21 2 3 456 789 0 Input the password. 74 I TV-Y7 (Children 7 years older) PARENTAL CONTROL / RATING SET PASSWORD & LOCK SYSTEM Setting up Your Password Set up with the initial password "0-0-0-0". The default setting is set up blocking schemes to block specific channels, ratings, and external viewing sources. Ratings for Television programs including made-for a time...
Owner's Manual (English)
Page 88
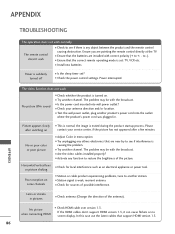
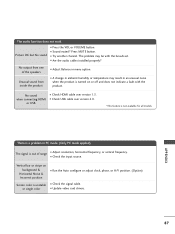
... the sleep timer set : TV, VCR etc. If the HDMI cables don't support HDMI version 1.3, it can cause flickers or no screen display. Please after a few minutes. I Check antenna (Change the direction of the picture. Lines or streaks in pictures I Activate any function to +, - No picture when connecting HDMI I Check the power control settings. I Check HDMI cable over version 1.3. The problem may be with the broadcast. I Try another station. In this case use the latest cables...
... the sleep timer set : TV, VCR etc. If the HDMI cables don't support HDMI version 1.3, it can cause flickers or no screen display. Please after a few minutes. I Check antenna (Change the direction of the picture. Lines or streaks in pictures I Activate any function to +, - No picture when connecting HDMI I Check the power control settings. I Check HDMI cable over version 1.3. The problem may be with the broadcast. I Try another station. In this case use the latest cables...
Owner's Manual (English)
Page 89
... USB cable over version 1.3. I Update video card drivers. 87 The problem may result in menu option. I A change in ambient humidity or temperature may be with the product. No sound when connecting HDMI or USB I Check the input source. I Check HDMI cable over version 2.0. *This feature is unstable or single color I Run the Auto configure or adjust clock, phase, or H/V position. (Option) I Check the signal cable. The audio function does not work. Picture OK...
... USB cable over version 1.3. I Update video card drivers. 87 The problem may result in menu option. I A change in ambient humidity or temperature may be with the product. No sound when connecting HDMI or USB I Check the input source. I Check HDMI cable over version 2.0. *This feature is unstable or single color I Run the Auto configure or adjust clock, phase, or H/V position. (Option) I Check the signal cable. The audio function does not work. Picture OK...
Owner's Manual (English)
Page 93
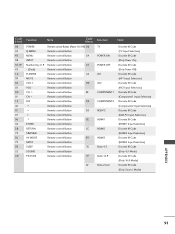
...CH Remote control Button FAV Remote control Button D4 Remote control Button Remote control Button D5 Remote control Button Remote control Button CE ENTER Remote control Button RETURN Remote control Button CC SIMPLINK Remote control Button AV MODE Remote control Button E9 RATIO Remote control Button SLEEP Remote control Button 76 SOUND Remote control Button PICTURE Remote control Button 77 AF Function Note TV POWER ON POWER OFF AV1 AV2 COMPONENT1 COMPONENT2 RGB-PC HDMI1 HDMI2 HDMI3 Ratio 4:3 Ratio 16:9 Ratio Zoom Discrete IR Code (TV Input Selection) Discrete...
...CH Remote control Button FAV Remote control Button D4 Remote control Button Remote control Button D5 Remote control Button Remote control Button CE ENTER Remote control Button RETURN Remote control Button CC SIMPLINK Remote control Button AV MODE Remote control Button E9 RATIO Remote control Button SLEEP Remote control Button 76 SOUND Remote control Button PICTURE Remote control Button 77 AF Function Note TV POWER ON POWER OFF AV1 AV2 COMPONENT1 COMPONENT2 RGB-PC HDMI1 HDMI2 HDMI3 Ratio 4:3 Ratio 16:9 Ratio Zoom Discrete IR Code (TV Input Selection) Discrete...

Owner's Manual (English)
Page 98
... adjust balance. ISM Method (Command: j p) To avoid having a fixed image remain on /off , remote control lock is the sub-channel. OSD Select (Command: k l) To select OSD (On Screen Display) on screen. The Physical number is the actual digital channel number, the Major is the number that the channel should be mapped to the Major number, the Physical number is used. Auto configuration only works in RGB-PC mode. Auto Configuration (Command: j u) To adjust picture position and minimize image...
... adjust balance. ISM Method (Command: j p) To avoid having a fixed image remain on /off , remote control lock is the sub-channel. OSD Select (Command: k l) To select OSD (On Screen Display) on screen. The Physical number is the actual digital channel number, the Major is the number that the channel should be mapped to the Major number, the Physical number is used. Auto configuration only works in RGB-PC mode. Auto Configuration (Command: j u) To adjust picture position and minimize image...


