
Owners Manual
Page 1
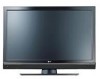
A.,Inc. Retain it for energy efficiency. S. 0 _J ENERGY STAR is a set . has determined that this manual carefully before operating your dealer when you require service. LCD TV PLASMA TV OWNER'S MANUAL LCD TV MODELS 37LBSD 42LBSD 47LBSD S2LBSD 47LC7DF PLASMA TV MODELS SOPY3D SOPY3DF 60PY3D 60PY3DF Please read this product meets the ENERGY STAR guidelines for future reference. Environmental...
A.,Inc. Retain it for energy efficiency. S. 0 _J ENERGY STAR is a set . has determined that this manual carefully before operating your dealer when you require service. LCD TV PLASMA TV OWNER'S MANUAL LCD TV MODELS 37LBSD 42LBSD 47LBSD S2LBSD 47LC7DF PLASMA TV MODELS SOPY3D SOPY3DF 60PY3D 60PY3DF Please read this product meets the ENERGY STAR guidelines for future reference. Environmental...
Owners Manual
Page 4
... cord or plug is , a single outlet circuit which powers only that you connect the earth ground wire to be placed upon . Any of this owner's manual to prevent possible electric shock. Do not overload wall outlets. that is damaged, liquid has been spilled or objects have the cord replaced with an...
... cord or plug is , a single outlet circuit which powers only that you connect the earth ground wire to be placed upon . Any of this owner's manual to prevent possible electric shock. Do not overload wall outlets. that is damaged, liquid has been spilled or objects have the cord replaced with an...
Owners Manual
Page 5
... Level 60 Picture Reset 61 Image Sticking Minimization (ISM) Method ....... 62 Low - CONTENTS WARNING / CAUTION 1 SAFETY INSTRUCTIONS 2 FEATURE OF THIS TV 6 Accessories 7 Front Panel Information 8 Back Panel Information 10 Stand Installation 12 Not using the desk-type stand 13 Swivel Stand 13 Back Cover ... List 51 Picture Size (Aspect Ratio) Control 53 Preset Picture Settings - Preset 54 - Add / Delete Channel (Manual Tuning) ...... 39 - Color Tone - Preset 55 Manual Picture Adjustment - Picture Mode - Analog Broadcasting System Captions ....... 74 - Picture Mode -
... Level 60 Picture Reset 61 Image Sticking Minimization (ISM) Method ....... 62 Low - CONTENTS WARNING / CAUTION 1 SAFETY INSTRUCTIONS 2 FEATURE OF THIS TV 6 Accessories 7 Front Panel Information 8 Back Panel Information 10 Stand Installation 12 Not using the desk-type stand 13 Swivel Stand 13 Back Cover ... List 51 Picture Size (Aspect Ratio) Control 53 Preset Picture Settings - Preset 54 - Add / Delete Channel (Manual Tuning) ...... 39 - Color Tone - Preset 55 Manual Picture Adjustment - Picture Mode - Analog Broadcasting System Captions ....... 74 - Picture Mode -

Owners Manual
Page 8
... can be cautions of the exterior. * Do not wipe roughly when removing stain. Please be different from the figures shown here. _o © z Owner's Manual CD Manual Remote Control, Batteries Power Cord 75ohm Round Cable Polishing Cloth * Slightly wipe stained spot on the exterior only with your product. PREPARATION ACCESSORIES Ensure that...
... can be cautions of the exterior. * Do not wipe roughly when removing stain. Please be different from the figures shown here. _o © z Owner's Manual CD Manual Remote Control, Batteries Power Cord 75ohm Round Cable Polishing Cloth * Slightly wipe stained spot on the exterior only with your product. PREPARATION ACCESSORIES Ensure that...
Owners Manual
Page 14
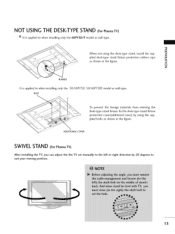
... wall-type. =O _o r_ When not using the supplied bolts as shown at the figure. ADDITIONAL COVER SWIVELSTAND (For Plasma TV) After installing the TV, you can adjust the the TV set manually to the left or right direction by using the desk-type stand, install the sup- plied desk-type stand fixture protection... the desk-type stand fixture protection cover(additional cover) by 20 degrees to suit your viewing position. 13 NOT USING THE DESK-TYPESTAND (For Plasma TV) It is applied to when installing only the 50/60PY3D, BOLT 50/60PY3DF model as wall-type.
... wall-type. =O _o r_ When not using the supplied bolts as shown at the figure. ADDITIONAL COVER SWIVELSTAND (For Plasma TV) After installing the TV, you can adjust the the TV set manually to the left or right direction by using the desk-type stand, install the sup- plied desk-type stand fixture protection... the desk-type stand fixture protection cover(additional cover) by 20 degrees to suit your viewing position. 13 NOT USING THE DESK-TYPESTAND (For Plasma TV) It is applied to when installing only the 50/60PY3D, BOLT 50/60PY3DF model as wall-type.
Owners Manual
Page 21
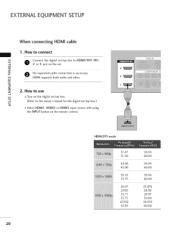
m (Refer to the owner's manual for the digital set-top box.) c "O 01S_elect HDMI1, HDMI2 or HDMI3 input source with using the INPUT button on the digital set-top box. m HDMI ...
m (Refer to the owner's manual for the digital set-top box.) c "O 01S_elect HDMI1, HDMI2 or HDMI3 input source with using the INPUT button on the digital set-top box. m HDMI ...
Owners Manual
Page 22
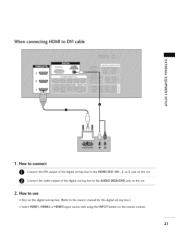
How to use 01T_urn on the digital set-top box. (Refer to the HDMI/DVI IN1,2 or 3 jack on the set. How to connect O Connect the DVI output of the digital set-top box to DVI cable m x .-I m z m XZ) c "0 m z .-I m -4 C "0 1. O Connect the audio output of the digital set-top box to the owner's manual for the digital set-top box.) 01S_elect HDMII, HDMI2 or HDMI3 input source with using the INPUT button on the remote control. 21 When connecting HDMI to the AUDIO (RGB/DVI) jack on the set. 2.
How to use 01T_urn on the digital set-top box. (Refer to the HDMI/DVI IN1,2 or 3 jack on the set. How to connect O Connect the DVI output of the digital set-top box to DVI cable m x .-I m z m XZ) c "0 m z .-I m -4 C "0 1. O Connect the audio output of the digital set-top box to the owner's manual for the digital set-top box.) 01S_elect HDMII, HDMI2 or HDMI3 input source with using the INPUT button on the remote control. 21 When connecting HDMI to the AUDIO (RGB/DVI) jack on the set. 2.
Owners Manual
Page 23
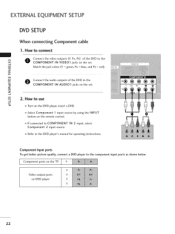
... cable 1. How to COMPONENT Component 2 input source. Component Input ports To get better picture quality, connect a DVD player to the DVD player's manual for operating instructions. Component ports on the TV Video output ports on the set . r_l z r_l 2. IN 2 input, select 01_Refer to the component input ports as shown below. How...
... cable 1. How to COMPONENT Component 2 input source. Component Input ports To get better picture quality, connect a DVD player to the DVD player's manual for operating instructions. Component ports on the TV Video output ports on the set . r_l z r_l 2. IN 2 input, select 01_Refer to the component input ports as shown below. How...

Owners Manual
Page 24
.... How to connect O onnect the HDMI output of the DVD to the AUDIO input jacks on the remote control. 0_Refer to the DVD player's manual for operating instructions. X:) c 2. c ,l_If connected to the HDMI/DVI IN 1,2, or 3 jack on the r_l remote control. "O 01_Refer to... use 01_Turn on the output set . HDMI supports both audio and video. 2. How to the DVD player's manual for operating instructions. 23 When connecting HDMI cable 1. How to use 01_Select HDMI1, HDMI2, or HDMI3 input source by using the INPUT button...
.... How to connect O onnect the HDMI output of the DVD to the AUDIO input jacks on the remote control. 0_Refer to the DVD player's manual for operating instructions. X:) c 2. c ,l_If connected to the HDMI/DVI IN 1,2, or 3 jack on the r_l remote control. "O 01_Refer to... use 01_Turn on the output set . HDMI supports both audio and video. 2. How to the DVD player's manual for operating instructions. 23 When connecting HDMI cable 1. How to use 01_Select HDMI1, HDMI2, or HDMI3 input source by using the INPUT button...
Owners Manual
Page 25
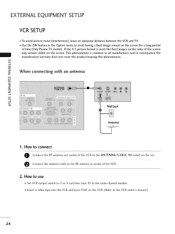
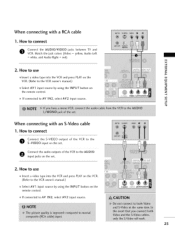
... z When connecting with an antenna r_l X_ c "0 r_l z L_ r_l c "0 Wall Jack Antenna 1. How to use 01S_et VCR output switch to 3 or 4 and then tune TV to the same channel number. 01_Insert a video tape into the VCR and press PLAY on the VCR. (Refer to avoid having a fixed image remain on... out socket of the VCR to the ANTENNA/CABLE e Connect the antenna cable to all manufactures and in the Option menu to the VCR owner's manual.) 24 Use the ISM feature in consequence the manufactures warranty does not cover the product bearing this phenomenon.
... z When connecting with an antenna r_l X_ c "0 r_l z L_ r_l c "0 Wall Jack Antenna 1. How to use 01S_et VCR output switch to 3 or 4 and then tune TV to the same channel number. 01_Insert a video tape into the VCR and press PLAY on the VCR. (Refer to avoid having a fixed image remain on... out socket of the VCR to the ANTENNA/CABLE e Connect the antenna cable to all manufactures and in the Option menu to the VCR owner's manual.) 24 Use the ISM feature in consequence the manufactures warranty does not cover the product bearing this phenomenon.
Owners Manual
Page 26
... with an S-Video cable 1. How to use 01_Insert a video tape into the VCR and press PLAY on the m VCR. (Refer to the VCR owner's manual.) £3 c "0 01S_elect AV1 input source by using the INPUT button on the remote control. 01_If connected to the VCR owner.... 25 Match the jack colors (Video = yellow, Audio Left = white, and Audio Right = red) r'_ x m 2. z 01_If connected to connect O Connect the AUDIO/VIDEO jacks between TV and VCR. How to use z 01I_nsert a video tape into the VCR and press PLAY on m the remote control. Connect the audio outputs of the VCR...
... with an S-Video cable 1. How to use 01_Insert a video tape into the VCR and press PLAY on the m VCR. (Refer to the VCR owner's manual.) £3 c "0 01S_elect AV1 input source by using the INPUT button on the remote control. 01_If connected to the VCR owner.... 25 Match the jack colors (Video = yellow, Audio Left = white, and Audio Right = red) r'_ x m 2. z 01_If connected to connect O Connect the AUDIO/VIDEO jacks between TV and VCR. How to use z 01I_nsert a video tape into the VCR and press PLAY on m the remote control. Connect the audio outputs of the VCR...
Owners Manual
Page 34
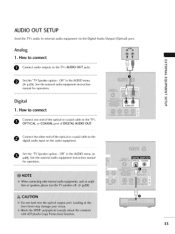
... COAXIAL port of the optical or coaxial cable to the digital audio input on the audio equipment. 0 Set the "TV Speaker option - See the external audio equipment instruction manual for operation. 33 O Set the "TV Speaker option - How to connect O Connect one end of DIGITAL AUDIO OUT. How to connect O Connect audio outputs...
... COAXIAL port of the optical or coaxial cable to the digital audio input on the audio equipment. 0 Set the "TV Speaker option - See the external audio equipment instruction manual for operation. 33 O Set the "TV Speaker option - How to connect O Connect one end of DIGITAL AUDIO OUT. How to connect O Connect audio outputs...
Owners Manual
Page 38
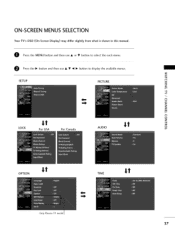
ON-SCREENMENUS SELECTION Your TV's OSD (On Screen Display) may differ slightly from what is shown in this manual. @ Press the MENU button and then use A or • button to select the each menu. @ Press the I_ button and then use A • _1 I_ button to display the available menus. z < N I > z z r_l N 0 It Z It _m LOCK For USA For Canada AUDIO 0 OPTION It It TIME Only Plasma TV model 37 SETUP PICTURE "1-
ON-SCREENMENUS SELECTION Your TV's OSD (On Screen Display) may differ slightly from what is shown in this manual. @ Press the MENU button and then use A or • button to select the each menu. @ Press the I_ button and then use A • _1 I_ button to display the available menus. z < N I > z z r_l N 0 It Z It _m LOCK For USA For Canada AUDIO 0 OPTION It It TIME Only Plasma TV model 37 SETUP PICTURE "1-
Owners Manual
Page 40
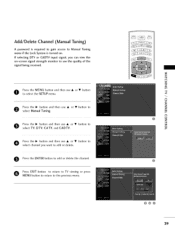
... • button Pserelescst thMeanI_ualbTututonninga_nd then use • or • button to select channel you can view the on . Press EXIT button to return to TV viewing or press MENU button to return to Manual Tuning menu if the Lock System is required to gain access to the previous menu. Add/Delete Channel... (Manual Tuning) A password is turned on -screen signal strength monitor to add or delete the channel. If selecting DTV or CADTV input signal, you want to O ...
... • button Pserelescst thMeanI_ualbTututonninga_nd then use • or • button to select channel you can view the on . Press EXIT button to return to TV viewing or press MENU button to return to Manual Tuning menu if the Lock System is required to gain access to the previous menu. Add/Delete Channel... (Manual Tuning) A password is turned on -screen signal strength monitor to add or delete the channel. If selecting DTV or CADTV input signal, you want to O ...
Owners Manual
Page 57
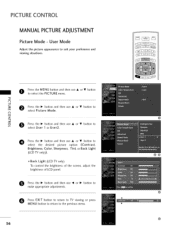
...I_ button and then use A or • button to suit your preference and viewing situations. O Press EXIT button to return to TV viewing or press MENU button to return to make appropriate adjustments. O ress the I_ button and then use _II or I_ button to.... 56 @@ PICTURE CONTROL MANUAL PICTUREADJUSTMENT Picture Mode - N O Z _o O O Pserelescst tUheseIr_ 1buotrtoUnsearn2d. User Mode Adjust the picture appearance to select the desired picture option (Contrast, Brightness, Color, Sharpness, Tint, or Back Light (LCD TV only)). 01B_ack Light (LCD TV only) To control the brightness...
...I_ button and then use A or • button to suit your preference and viewing situations. O Press EXIT button to return to TV viewing or press MENU button to return to make appropriate adjustments. O ress the I_ button and then use _II or I_ button to.... 56 @@ PICTURE CONTROL MANUAL PICTUREADJUSTMENT Picture Mode - N O Z _o O O Pserelescst tUheseIr_ 1buotrtoUnsearn2d. User Mode Adjust the picture appearance to select the desired picture option (Contrast, Brightness, Color, Sharpness, Tint, or Back Light (LCD TV only)). 01B_ack Light (LCD TV only) To control the brightness...
Owners Manual
Page 59
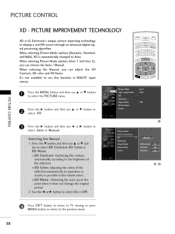
When selecting Picture Mode options (User I and User 2), you can choose the Auto / Manual. When selecting Picture Mode options (Dynamic, Standard, and Mild), XD is LG Electronic's unique picture improving technology to the previous menu. 58 C m Press the I_ button and then use A or • button to select ... to select the PICTURE menu. Press the MENU button and then use _ or I_ button to select Auto or Manual. 0O O Press EXIT button to return to TV viewing or press MENU button to return to display a real HD source through an advanced digital signal processing algorithm....
When selecting Picture Mode options (User I and User 2), you can choose the Auto / Manual. When selecting Picture Mode options (Dynamic, Standard, and Mild), XD is LG Electronic's unique picture improving technology to the previous menu. 58 C m Press the I_ button and then use A or • button to select ... to select the PICTURE menu. Press the MENU button and then use _ or I_ button to select Auto or Manual. 0O O Press EXIT button to return to TV viewing or press MENU button to return to display a real HD source through an advanced digital signal processing algorithm....
Owners Manual
Page 78
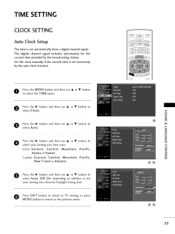
The digital channel signal includes information for the current time provided by the auto clock function. Set the clock manually if the current time is set incorrectly by the broadcasting station. TIME SETTING CLOCK SETTING Auto Clock Setup The time is set ...automatically from a digital channel signal. O Press EXIT button to return to TV viewing or press MENU button to return to select your viewing area observes Daylight Saving time. button and then use A or • button to...
The digital channel signal includes information for the current time provided by the auto clock function. Set the clock manually if the current time is set incorrectly by the broadcasting station. TIME SETTING CLOCK SETTING Auto Clock Setup The time is set ...automatically from a digital channel signal. O Press EXIT button to return to TV viewing or press MENU button to return to select your viewing area observes Daylight Saving time. button and then use A or • button to...
Owners Manual
Page 79
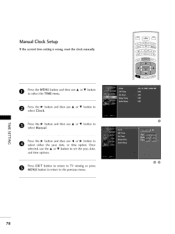
... to the previous menu. 78 O0 O Press EXIT button to return to TV viewing or press MENU button to return to set the year, date, and time options. Manual Clock Setup If the current time setting is wrong, reset the clock manually. button and then use A or • button to O Pserelescst tMheanIu_al.button...
... to the previous menu. 78 O0 O Press EXIT button to return to TV viewing or press MENU button to return to set the year, date, and time options. Manual Clock Setup If the current time setting is wrong, reset the clock manually. button and then use A or • button to O Pserelescst tMheanIu_al.button...
Owners Manual
Page 86
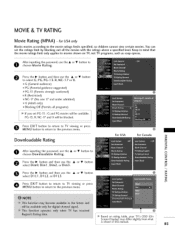
...or press For USA For Canada _D r_l z O z _D O _D z c_ Based on TV, not TV programs, such as soap operas. O PMrEeNssU EXbIuTttonbuttotonretutron rtoetutrhne ptoreviToVus vimeweinnug. for USA only Blocks movies ...according to choose Downloadable Rating. O PMrEeNssU EXbIuTttonbutttoonretutorn retoturtnhe topreTvViousviewmienngu. Press the I_ button and then use the A or • button select DimO, Dim l, Dim2, or Dim3. Keep in this manual...
...or press For USA For Canada _D r_l z O z _D O _D z c_ Based on TV, not TV programs, such as soap operas. O PMrEeNssU EXbIuTttonbuttotonretutron rtoetutrhne ptoreviToVus vimeweinnug. for USA only Blocks movies ...according to choose Downloadable Rating. O PMrEeNssU EXbIuTttonbutttoonretutorn retoturtnhe topreTvViousviewmienngu. Press the I_ button and then use the A or • button select DimO, Dim l, Dim2, or Dim3. Keep in this manual...


