Owners Manual
Page 1
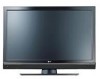
...-saving guidelines issued by the U.S. See the label attached on the back cover and quote this information to your set . LCD TV PLASMA TV OWNER'S MANUAL LCD TV MODELS 37LBSD 42LBSD 47LBSD S2LBSD 47LC7DF PLASMA TV MODELS SOPY3D SOPY3DF 60PY3D 60PY3DF Please read this product meets the ENERGY STAR guidelines for future reference. has determined that...
...-saving guidelines issued by the U.S. See the label attached on the back cover and quote this information to your set . LCD TV PLASMA TV OWNER'S MANUAL LCD TV MODELS 37LBSD 42LBSD 47LBSD S2LBSD 47LC7DF PLASMA TV MODELS SOPY3D SOPY3DF 60PY3D 60PY3DF Please read this product meets the ENERGY STAR guidelines for future reference. has determined that...

Owners Manual
Page 2
...SERVICEABLEPARTS INSIDE. DO NOT EXPOSE THIS PRODUCT TO RAIN OR MOISTURE. However, there is connected, -Consult the dealer or an experienced radio/TV technician for help, Any changes or modifications not expressly approved by the party responsible for a Class B digital device, pursuant to provide ...modification could void the user's authority to correct the interference by turning the equipment off and on a circuit different from LG Electronics. WARNING / CAUTION TO REDUCE THE RISK OF ELECTRIC SHOCK DO NOT REMOVE COVER (OR BACK). Connect the equipment to radio communications....
...SERVICEABLEPARTS INSIDE. DO NOT EXPOSE THIS PRODUCT TO RAIN OR MOISTURE. However, there is connected, -Consult the dealer or an experienced radio/TV technician for help, Any changes or modifications not expressly approved by the party responsible for a Class B digital device, pursuant to provide ...modification could void the user's authority to correct the interference by turning the equipment off and on a circuit different from LG Electronics. WARNING / CAUTION TO REDUCE THE RISK OF ELECTRIC SHOCK DO NOT REMOVE COVER (OR BACK). Connect the equipment to radio communications....
Owners Manual
Page 5
...22 VCR Setup 24 Other A/V Source Setup 26 PC Setup 27 USB In Setup 32 Audio Out Setup 33 Remote Control Functions 34 Turning On TV 36 Channel Selection 36 Volume Adjustment 36 On-Screen Menus Selection 37 Channel Setup - Add / Delete Channel (Manual Tuning) ...... 39 - ... Digital Broadcasting System Captions ........ 75 - Color Tone - Picture Improvement Technology 58 Advanced - User Mode 57 XD - User Mode 67 Balance 68 TV Speakers On/Off Setup 69 Stereo/SAP Broadcasts Setup 70 Audio Language 71 On-Screen Menus Language Selection 72 Caption Mode 73 - Picture Mode -...
...22 VCR Setup 24 Other A/V Source Setup 26 PC Setup 27 USB In Setup 32 Audio Out Setup 33 Remote Control Functions 34 Turning On TV 36 Channel Selection 36 Volume Adjustment 36 On-Screen Menus Selection 37 Channel Setup - Add / Delete Channel (Manual Tuning) ...... 39 - ... Digital Broadcasting System Captions ........ 75 - Color Tone - Picture Improvement Technology 58 Advanced - User Mode 57 XD - User Mode 67 Balance 68 TV Speakers On/Off Setup 69 Stereo/SAP Broadcasts Setup 70 Audio Language 71 On-Screen Menus Language Selection 72 Caption Mode 73 - Picture Mode -...

Owners Manual
Page 6
ManuaCl lockSetup 7.8... Auto On/Off Time Setting 79 Sleep Time Setting 80 Auto Shut-off Setting 81 Set Password & Lock System 82 Channel Blocking 84 External Input Blocking 84 Movie & TV Rating 85 Troubleshooting 88 Maintenance 90 Product Specifications 91 Programming the Remote Control 93 IR Codes 97 External Control Through RS-232C 99 Open Source License 106 S ClockSetting - AutoClockSetup 7..7... -
ManuaCl lockSetup 7.8... Auto On/Off Time Setting 79 Sleep Time Setting 80 Auto Shut-off Setting 81 Set Password & Lock System 82 Channel Blocking 84 External Input Blocking 84 Movie & TV Rating 85 Troubleshooting 88 Maintenance 90 Product Specifications 91 Programming the Remote Control 93 IR Codes 97 External Control Through RS-232C 99 Open Source License 106 S ClockSetting - AutoClockSetup 7..7... -
Owners Manual
Page 7
... out in this logo displays Full HD (high-definition) 1080p native resolution by Laboratories. FOR LCD TV If the TV feels cold to fit room atmosphere. ""_Avoid touching the LCD screenor holding your local authority. 6 b. Do not dispose of this logo works easily with ... and processing a Full HD 1080p signal. The fluorescent lamp used in accordance to the HDMI (high-definition multimedia interface), LG TV with this product with TV. under license from Dolby Laboratories. ""_Some minute dot defects may produce some temporary distortion effects on the monitor's performance....
... out in this logo displays Full HD (high-definition) 1080p native resolution by Laboratories. FOR LCD TV If the TV feels cold to fit room atmosphere. ""_Avoid touching the LCD screenor holding your local authority. 6 b. Do not dispose of this logo works easily with ... and processing a Full HD 1080p signal. The fluorescent lamp used in accordance to the HDMI (high-definition multimedia interface), LG TV with this product with TV. under license from Dolby Laboratories. ""_Some minute dot defects may produce some temporary distortion effects on the monitor's performance....
Owners Manual
Page 9
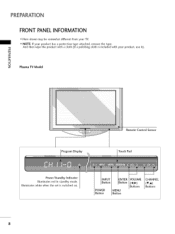
PREPARATION FRONT PANELINFORMATION ,,,IHere shown may be somewhat different from your product, use it). _o rrl _o © z Plasma TV Model Program Display Remote Control Sensor Touch Pad llluminates Power/Sta nd by Indicator llluminates red in standby mode. white when the set is included with a cloth (If a polishing cloth is switched on. POWER Button MENU Button VOLUME (_,_) Buttons CHANNEL (T,A) Buttons 8 ""_NOTE: If your product has a protection tape attached, remove the tape. -O And then wipe the product with your TV.
PREPARATION FRONT PANELINFORMATION ,,,IHere shown may be somewhat different from your product, use it). _o rrl _o © z Plasma TV Model Program Display Remote Control Sensor Touch Pad llluminates Power/Sta nd by Indicator llluminates red in standby mode. white when the set is included with a cloth (If a polishing cloth is switched on. POWER Button MENU Button VOLUME (_,_) Buttons CHANNEL (T,A) Buttons 8 ""_NOTE: If your product has a protection tape attached, remove the tape. -O And then wipe the product with your TV.
Owners Manual
Page 10
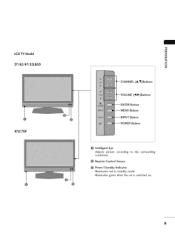
llluminates green when the set is switched on. 9 LCD TV Model 37/42/47/52LB5D 47LC7DF -O _o m _o © z (A,V)Buttons (_1,1_)Buttons --ENTER Bu_on Bu_on --INPUT --POWER Bu_on Bu_on Intelligent Eye Adjusts picture according to the surrounding conditions. Remote Control Sensor Power/Standby Indicator Illuminates red in standby mode.
llluminates green when the set is switched on. 9 LCD TV Model 37/42/47/52LB5D 47LC7DF -O _o m _o © z (A,V)Buttons (_1,1_)Buttons --ENTER Bu_on Bu_on --INPUT --POWER Bu_on Bu_on Intelligent Eye Adjusts picture according to the surrounding conditions. Remote Control Sensor Power/Standby Indicator Illuminates red in standby mode.
Owners Manual
Page 11
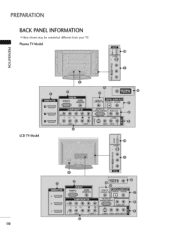
Plasma TV Model m i © z LCD TV Model 10 PREPARATION BACK PANELINFORMATION ,,,IHere shown may be somewhat different from your TV.
Plasma TV Model m i © z LCD TV Model 10 PREPARATION BACK PANELINFORMATION ,,,IHere shown may be somewhat different from your TV.

Owners Manual
Page 12
... IN (CONTROL & SERVICE) PORT Connect to this jack. Note: In standby mode, these @ USB INPUT Power Cord Socket For operation with a DVI to operate the TV on a PC. _D m _D © z O HDMI/DVI IN Connect a HDMI signal to this jack. COMPONENT IN Connect a component jacks. DIGITAL AUDIO OUT Connect digital audio...
... IN (CONTROL & SERVICE) PORT Connect to this jack. Note: In standby mode, these @ USB INPUT Power Cord Socket For operation with a DVI to operate the TV on a PC. _D m _D © z O HDMI/DVI IN Connect a HDMI signal to this jack. COMPONENT IN Connect a component jacks. DIGITAL AUDIO OUT Connect digital audio...

Owners Manual
Page 13
PREPARATION STAND INSTALLATION (Onl3y7LBSD) ""_Here shown may be somewhat different from your TV. 0 Carefully place the product screen side down on m a cushioned surface that will protect product and screen from damage. 0 z Assemble the product stand with the product as shown. 0 Securely install the 4 bolts provided. 12
PREPARATION STAND INSTALLATION (Onl3y7LBSD) ""_Here shown may be somewhat different from your TV. 0 Carefully place the product screen side down on m a cushioned surface that will protect product and screen from damage. 0 z Assemble the product stand with the product as shown. 0 Securely install the 4 bolts provided. 12
Owners Manual
Page 14
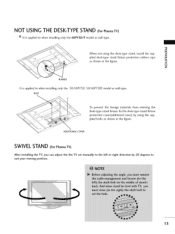
plied desk-type stand fixture protection rubber caps _o as shown at the figure. ADDITIONAL COVER SWIVELSTAND (For Plasma TV) After installing the TV, you can adjust the the TV set manually to the left or right direction by using the desk-type stand, install the sup- O z RUBBER It is applied to when installing... the desk-type stand fixture protection cover(additional cover) by 20 degrees to suit your viewing position. 13 NOT USING THE DESK-TYPESTAND (For Plasma TV) It is applied to when installing only the 50/60PY3D, BOLT 50/60PY3DF model as wall-type.
plied desk-type stand fixture protection rubber caps _o as shown at the figure. ADDITIONAL COVER SWIVELSTAND (For Plasma TV) After installing the TV, you can adjust the the TV set manually to the left or right direction by using the desk-type stand, install the sup- O z RUBBER It is applied to when installing... the desk-type stand fixture protection cover(additional cover) by 20 degrees to suit your viewing position. 13 NOT USING THE DESK-TYPESTAND (For Plasma TV) It is applied to when installing only the 50/60PY3D, BOLT 50/60PY3DF model as wall-type.
Owners Manual
Page 15
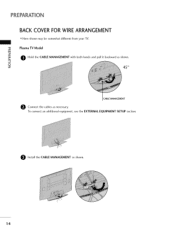
Plasma TV Model m 0 Hold the CABLE MANAGEMENT with both hands and pull it backward as shown. © z 45 ° CABLE MANAGEMENT e Connect the cables as shown. 14 Install the CABLE MANAGEMENT as necessary. To connect an additional equipment, see the EXTERNAL EQUIPMENT SETUP section. PREPARATION BACK COVER FOR WIRE ARRANGEMENT ,,,IHere shown may be somewhat different from your TV.
Plasma TV Model m 0 Hold the CABLE MANAGEMENT with both hands and pull it backward as shown. © z 45 ° CABLE MANAGEMENT e Connect the cables as shown. 14 Install the CABLE MANAGEMENT as necessary. To connect an additional equipment, see the EXTERNAL EQUIPMENT SETUP section. PREPARATION BACK COVER FOR WIRE ARRANGEMENT ,,,IHere shown may be somewhat different from your TV.
Owners Manual
Page 16
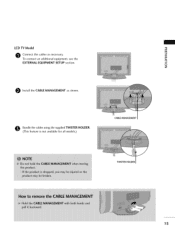
LCD TV Model "O _o m O onnect the cables as necessary. _o To connect an additional equipment, see the EXTERNAL EQUIPMENT SETUP section. © z 0 Install the CABLE MANAGEMENT as shown. O undle the cables using the supplied TWISTER HOLDER. (This feature is not available for all models.) CABLE MANAGEMENT TWISTER HOLDER 1S
LCD TV Model "O _o m O onnect the cables as necessary. _o To connect an additional equipment, see the EXTERNAL EQUIPMENT SETUP section. © z 0 Install the CABLE MANAGEMENT as shown. O undle the cables using the supplied TWISTER HOLDER. (This feature is not available for all models.) CABLE MANAGEMENT TWISTER HOLDER 1S
Owners Manual
Page 17
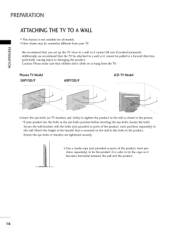
... ,,,IThis feature is safer to tie the rope so it becomes horizontal between the wall and the product. 16 z Plasma TV Model 50PY3D/F 60PY3D/F LCD TV Model ii_i!i_i¸!iI_!Ii|!i|iIi|!l!I!||||| i_i_i_i'_iiiiliiilii!_iii_i!i!i_iiii!iiii_|i]|_i_i_ili!i!¸_|i|l|iii / iiill il_!i_ii __i !_iii...! _ | _iii!iii!iiiii!_,iii Insert the eye-bolts (or TV brackets and bolts) to tighten the product to the wall ...
... ,,,IThis feature is safer to tie the rope so it becomes horizontal between the wall and the product. 16 z Plasma TV Model 50PY3D/F 60PY3D/F LCD TV Model ii_i!i_i¸!iI_!Ii|!i|iIi|!l!I!||||| i_i_i_i'_iiiiliiilii!_iii_i!i!i_iiii!iiii_|i]|_i_i_ili!i!¸_|i|l|iii / iiill il_!i_ii __i !_iii...! _ | _iii!iii!iiiii!_,iii Insert the eye-bolts (or TV brackets and bolts) to tighten the product to the wall ...
Owners Manual
Page 18
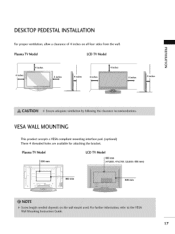
Plasma TV Model LCD TV Model 4 inches I4 inches 4 inches 4 inches 4 inches 4 inches 4 inches "0 _o m _o © z 4 inches VESA WALL MOUNTING This product accepts a VESA-compliant mounting interface pad. (optional) There 4 threaded holes are available for attaching the bracket. Plasma TV Model LCD TV Model 6(4070LBmSDm, 47LC7DF, S2LBSD: 800 mm) !iiii_ 400 mm 400 mm 17 DESKTOP PEDESTALINSTALLATION For proper ventilation, allow a clearance of 4 inches on all four sides from the wall.
Plasma TV Model LCD TV Model 4 inches I4 inches 4 inches 4 inches 4 inches 4 inches 4 inches "0 _o m _o © z 4 inches VESA WALL MOUNTING This product accepts a VESA-compliant mounting interface pad. (optional) There 4 threaded holes are available for attaching the bracket. Plasma TV Model LCD TV Model 6(4070LBmSDm, 47LC7DF, S2LBSD: 800 mm) !iiii_ 400 mm 400 mm 17 DESKTOP PEDESTALINSTALLATION For proper ventilation, allow a clearance of 4 inches on all four sides from the wall.

Owners Manual
Page 19
PREPARATION ANTENNA OR CABLE CONNECTION ""_Here shown may be split for two TV's, install a 2-Way Signal Splitter. 0_ If the antenna is not installed properly, contact your TV. 1. Cable Wall Jack ::_: Cable TV UHF Antenna _ VHF 01T_o improve the picture quality in a poor signal area, please purchase a signal amplifier and install properly. 0_ If...
PREPARATION ANTENNA OR CABLE CONNECTION ""_Here shown may be split for two TV's, install a 2-Way Signal Splitter. 0_ If the antenna is not installed properly, contact your TV. 1. Cable Wall Jack ::_: Cable TV UHF Antenna _ VHF 01T_o improve the picture quality in a poor signal area, please purchase a signal amplifier and install properly. 0_ If...
Owners Manual
Page 20
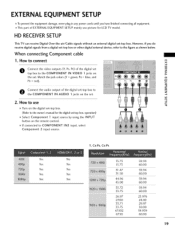
... power cords until you do receive digital signals from a digital set-top box or other digital external device, refer to use picture for LCD TV model. HD RECEIVERSETUP This TV can receive Digital Over-the-air/Cable signals without an external digital set . This part of the digital set-top box to z the...
... power cords until you do receive digital signals from a digital set-top box or other digital external device, refer to use picture for LCD TV model. HD RECEIVERSETUP This TV can receive Digital Over-the-air/Cable signals without an external digital set . This part of the digital set-top box to z the...
Owners Manual
Page 23
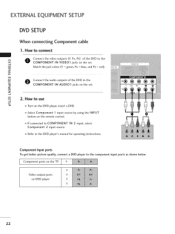
Component ports on the TV Video output ports on the remote control. !!!! | 01_If connected to use c "0 01_Turn on the DVD player, insert a DVD. 01_Select Component 1 input source by using the ...
Component ports on the TV Video output ports on the remote control. !!!! | 01_If connected to use c "0 01_Turn on the DVD player, insert a DVD. 01_Select Component 1 input source by using the ...
Owners Manual
Page 25
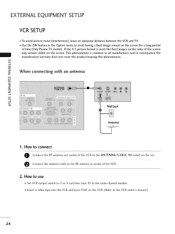
.../CABLE e Connect the antenna cable to avoid having a fixed image remain on the VCR. (Refer to all manufactures and in socket of time (Only Plasma TV model). tWl x r_l _o z When connecting with an antenna r_l X_ c "0 r_l z L_ r_l c "0 Wall Jack Antenna 1. If the 4:3 picture ... the VCR owner's manual.) 24 EXTERNALEQUIPMENT SETUP VCR SETUP To avoid picture noise (interference), leave an adequate distance between the VCR and TV. Use the ISM feature in the Option menu to the RF antenna in consequence the manufactures warranty does not cover the product bearing this...
.../CABLE e Connect the antenna cable to avoid having a fixed image remain on the VCR. (Refer to all manufactures and in socket of time (Only Plasma TV model). tWl x r_l _o z When connecting with an antenna r_l X_ c "0 r_l z L_ r_l c "0 Wall Jack Antenna 1. If the 4:3 picture ... the VCR owner's manual.) 24 EXTERNALEQUIPMENT SETUP VCR SETUP To avoid picture noise (interference), leave an adequate distance between the VCR and TV. Use the ISM feature in the Option menu to the RF antenna in consequence the manufactures warranty does not cover the product bearing this...
Owners Manual
Page 26
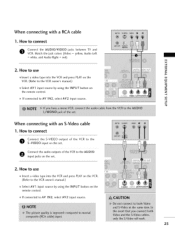
Match the jack colors (Video = yellow, Audio Left = white, and Audio Right = red) r'_ x m 2. z 01_If connected to connect O Connect the AUDIO/VIDEO jacks between TV and VCR. m c -0 When connecting with a RCA cable 1. How to use z 01I_nsert a video tape into the VCR and press PLAY on the VCR. (Refer to the S-...
Match the jack colors (Video = yellow, Audio Left = white, and Audio Right = red) r'_ x m 2. z 01_If connected to connect O Connect the AUDIO/VIDEO jacks between TV and VCR. m c -0 When connecting with a RCA cable 1. How to use z 01I_nsert a video tape into the VCR and press PLAY on the VCR. (Refer to the S-...


