
Owner's Manual (English)
Page 1
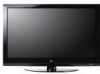
... exceed the limits necessary to qualify for ENERGY STAR in the "factory default (Home Use)" setting. PLASMA TV OWNER'S MANUAL 42PQ10 50PQ10 50PS11 60PS11 42PQ12 50PQ12 Please read this manual carefully before operating your set and retain it below should you ever need service. Record it for future reference. Model: ...1-888-865-3026 USA, Commercial User 1-888-542-2623 CANADA LG Customer Information Center P/NO : SAC33575902(0904-REV00) www.lgusa.com / www.lg.cwaw/ww.lgwuws.alg.comm/ ewrwciwa.l.lgco.cma The model and serial number of the TV is located on the back and one side of the...
... exceed the limits necessary to qualify for ENERGY STAR in the "factory default (Home Use)" setting. PLASMA TV OWNER'S MANUAL 42PQ10 50PQ10 50PS11 60PS11 42PQ12 50PQ12 Please read this manual carefully before operating your set and retain it below should you ever need service. Record it for future reference. Model: ...1-888-865-3026 USA, Commercial User 1-888-542-2623 CANADA LG Customer Information Center P/NO : SAC33575902(0904-REV00) www.lgusa.com / www.lg.cwaw/ww.lgwuws.alg.comm/ ewrwciwa.l.lgco.cma The model and serial number of the TV is located on the back and one side of the...
Owner's Manual (English)
Page 6
... List 45 Input Label 46 AV Mode 47 SIMPLINK 48 USB Entry Modes 50 Photo List 51 Music List 55 PICTURE CONTROL Picture Size (Aspect Ratio) Control 58 Energy Saving 60 Preset Picture Settings(Picture Mode 61 Manual Picture Adjustment - User Mode 62 Picture Improvement Technology ...Other A/V Source Setup 23 Audio Out Connection 23 USB Connection 24 PC Setup 25 WATCHING TV / CHANNEL CONTROL Remote Control Functions 30 Turning On TV 34 Channel Selection 34 Volume Adjustment 34 Initial Setting 35 On-Screen Menus Selection 36 Quick Menu 38 Channel Setup - Add / Delete Channel ...
... List 45 Input Label 46 AV Mode 47 SIMPLINK 48 USB Entry Modes 50 Photo List 51 Music List 55 PICTURE CONTROL Picture Size (Aspect Ratio) Control 58 Energy Saving 60 Preset Picture Settings(Picture Mode 61 Manual Picture Adjustment - User Mode 62 Picture Improvement Technology ...Other A/V Source Setup 23 Audio Out Connection 23 USB Connection 24 PC Setup 25 WATCHING TV / CHANNEL CONTROL Remote Control Functions 30 Turning On TV 34 Channel Selection 34 Volume Adjustment 34 Initial Setting 35 On-Screen Menus Selection 36 Quick Menu 38 Channel Setup - Add / Delete Channel ...
Owner's Manual (English)
Page 7
... - Analog Broadcasting System Captions 79 - Auto Clock Setup 82 Manual Clock Setup 83 Auto On/Off Time Setting 84 Sleep Timer Setting 85 PARENTAL CONTROL / RATINGS Set Password & Lock System 86 Channel Blocking 89 Movie & TV Rating 90 Downloadable Rating 95 External Input Blocking 96 Key lock 97 APPENDIX Troubleshooting 98 Maintenance 100 Product...
... - Analog Broadcasting System Captions 79 - Auto Clock Setup 82 Manual Clock Setup 83 Auto On/Off Time Setting 84 Sleep Timer Setting 85 PARENTAL CONTROL / RATINGS Set Password & Lock System 86 Channel Blocking 89 Movie & TV Rating 90 Downloadable Rating 95 External Input Blocking 96 Key lock 97 APPENDIX Troubleshooting 98 Maintenance 100 Product...
Owner's Manual (English)
Page 8
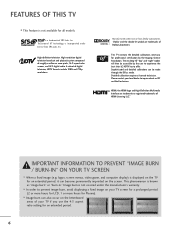
... professional certification by the user to experience the best their LG HDTV has to inquire about an ISF certified technician. High-resolution digital television broadcast and playback system composed of your TV if you use the 4:3 aspect ratio setting for Plasma). Please contact your TV screen for a prolonged period (2 or more hours for LCD, 1 or...
... professional certification by the user to experience the best their LG HDTV has to inquire about an ISF certified technician. High-resolution digital television broadcast and playback system composed of your TV if you use the 4:3 aspect ratio setting for Plasma). Please contact your TV screen for a prolonged period (2 or more hours for LCD, 1 or...
Owner's Manual (English)
Page 16
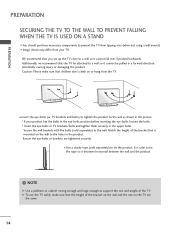
...eye-bolts position before inserting the eye-bolts, loosen the bolts. * Insert the eye-bolts or TV brackets/bolts and tighten them securely in the picture. * If your TV. We recommend that you set up the TV close to a wall so it cannot be attached to a wall so it cannot fall over ... the wall brackets with the bolts (sold separately) to tie the product. G To use the TV safely, make sure that the TV be pulled in the product. PREPARATION PREPARATION SECURING THE TV TO THE WALL TO PREVENT FALLING WHEN THE TV IS USED ON A STAND I You should purchase necessary components to prevent the...
...eye-bolts position before inserting the eye-bolts, loosen the bolts. * Insert the eye-bolts or TV brackets/bolts and tighten them securely in the picture. * If your TV. We recommend that you set up the TV close to a wall so it cannot be attached to a wall so it cannot fall over ... the wall brackets with the bolts (sold separately) to tie the product. G To use the TV safely, make sure that the TV be pulled in the product. PREPARATION PREPARATION SECURING THE TV TO THE WALL TO PREVENT FALLING WHEN THE TV IS USED ON A STAND I You should purchase necessary components to prevent the...
Owner's Manual (English)
Page 18
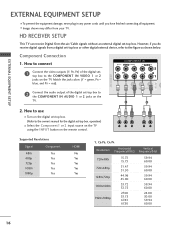
... 33.75 67.43 67.50 59.94 60.00 59.94 60.00 59.94 60.00 59.94 60.00 24.00 30.00 59.94 60.00 16 HD RECEIVER SETUP This TV can receive Digital Over-the-air/Cable signals without an external digital set -top box. How to... use I Turn on the digital set -top box to the COMPONENT IN VIDEO 1 or 2 jacks on the remote control. operation...
... 33.75 67.43 67.50 59.94 60.00 59.94 60.00 59.94 60.00 59.94 60.00 24.00 30.00 59.94 60.00 16 HD RECEIVER SETUP This TV can receive Digital Over-the-air/Cable signals without an external digital set -top box. How to... use I Turn on the digital set -top box to the COMPONENT IN VIDEO 1 or 2 jacks on the remote control. operation...
Owner's Manual (English)
Page 20
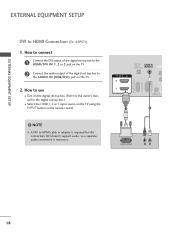
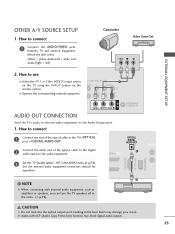
...audio connection is required for the digital set-top box.) I Turn on the TV. 2. How to connect 1 Connect the DVI output of the digital set-top box to HDMI cable or adapter is necessary. NOTE G A DVI to the AUDIO IN (RGB/DVI) jack on the digital set-top box. (Refer to HDMI Connection ...(For 60PS11) 1. How to use I Select the HDMI1, 2 or 3 input source on the TV using the INPUT button on the TV. 2 Connect the audio output of the digital set-top box to the HDMI/DVI IN 1, 2 or 3 jack on the remote control. ! OPTICAL DIGITAL AUDIO OUT AUDIO IN...
...audio connection is required for the digital set-top box.) I Turn on the TV. 2. How to connect 1 Connect the DVI output of the digital set-top box to HDMI cable or adapter is necessary. NOTE G A DVI to the AUDIO IN (RGB/DVI) jack on the digital set-top box. (Refer to HDMI Connection ...(For 60PS11) 1. How to use I Select the HDMI1, 2 or 3 input source on the TV using the INPUT button on the TV. 2 Connect the audio output of the digital set-top box to the HDMI/DVI IN 1, 2 or 3 jack on the remote control. ! OPTICAL DIGITAL AUDIO OUT AUDIO IN...
Owner's Manual (English)
Page 23
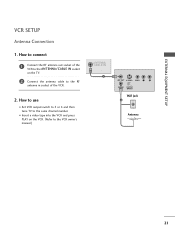
I Set VCR output switch to 3 or 4 and then tune TV to the same channel number. How to connect 1 Connect the RF antenna out socket of the VCR to the ANTENNA/CABLE IN socket on the VCR. (Refer to the RF antenna in socket of the VCR. 2. How to use I Insert a video tape into the VCR and press PLAY on the TV. 2 Connect the antenna cable to the VCR owner's manual.) ANTENNA/ CABLE IN 1 ANT OUT S-VIDEO VIDEO L R ANT IN OUTPUT SWITCH Wall Jack 2 Antenna 21 EXTERNAL EQUIPMENT SETUP VCR SETUP Antenna Connection 1.
I Set VCR output switch to 3 or 4 and then tune TV to the same channel number. How to connect 1 Connect the RF antenna out socket of the VCR to the ANTENNA/CABLE IN socket on the VCR. (Refer to the RF antenna in socket of the VCR. 2. How to use I Insert a video tape into the VCR and press PLAY on the TV. 2 Connect the antenna cable to the VCR owner's manual.) ANTENNA/ CABLE IN 1 ANT OUT S-VIDEO VIDEO L R ANT IN OUTPUT SWITCH Wall Jack 2 Antenna 21 EXTERNAL EQUIPMENT SETUP VCR SETUP Antenna Connection 1.
Owner's Manual (English)
Page 25
...Audio Left = white, and Audio Right = red) Camcorder Video Game Set VIDEO L R EXTERNAL EQUIPMENT SETUP AV IN 2. I Select the A V 1 or 2(For 60PS11) input source on the TV using the INPUT button on the audio equipment. IN 1 3 Set the "TV Speaker option - USB SERVICE ONLY RS-232C IN (SERVICE ONLY) ...2 ! G Audio with external audio equipment, such as amplifiers or speakers, you can turn the TV speakers off in the AUDIO menu...
...Audio Left = white, and Audio Right = red) Camcorder Video Game Set VIDEO L R EXTERNAL EQUIPMENT SETUP AV IN 2. I Select the A V 1 or 2(For 60PS11) input source on the TV using the INPUT button on the audio equipment. IN 1 3 Set the "TV Speaker option - USB SERVICE ONLY RS-232C IN (SERVICE ONLY) ...2 ! G Audio with external audio equipment, such as amplifiers or speakers, you can turn the TV speakers off in the AUDIO menu...

Owner's Manual (English)
Page 27
... the PC audio output to use I Select the HDMI1, 2 or 3 input source on the TV using the INPUT button on the TV. 1 REMOTE CONTROL IN S-VID 2 AV IN 1 2. I Turn on the TV. 2. RGB OUTPUT AUDIO DVI to the TV's settings. HDMI/DVI IN 2 1 RGB IN (PC) RS-232C IN (CONTROL & SERVICE) OPTICAL ...AUDIO IN DIGITAL AUDIO OUT (RGB/DVI) REMOT CONTROL 1 2 DVI-PC OUTPUT AUDIO 25 How to the AUDIO IN (RGB/DVI) jack on the PC and the TV. How to connect 1 Connect...
... the PC audio output to use I Select the HDMI1, 2 or 3 input source on the TV using the INPUT button on the TV. 1 REMOTE CONTROL IN S-VID 2 AV IN 1 2. I Turn on the TV. 2. RGB OUTPUT AUDIO DVI to the TV's settings. HDMI/DVI IN 2 1 RGB IN (PC) RS-232C IN (CONTROL & SERVICE) OPTICAL ...AUDIO IN DIGITAL AUDIO OUT (RGB/DVI) REMOT CONTROL 1 2 DVI-PC OUTPUT AUDIO 25 How to the AUDIO IN (RGB/DVI) jack on the PC and the TV. How to connect 1 Connect...
Owner's Manual (English)
Page 28
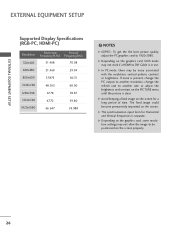
... not allow the image to 1920x1080. G Depending on the screen properly. 26 G In PC mode, there may be positioned on the graphics card, some resolution settings may not work if a HDMI to another resolution, change the refresh rate to DVI Cable is clear. G Avoid keeping a fixed image on the screen. EXTERNAL...
... not allow the image to 1920x1080. G Depending on the screen properly. 26 G In PC mode, there may be positioned on the graphics card, some resolution settings may not work if a HDMI to another resolution, change the refresh rate to DVI Cable is clear. G Avoid keeping a fixed image on the screen. EXTERNAL...
Owner's Manual (English)
Page 29
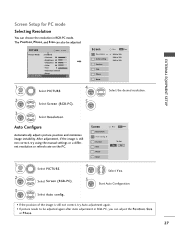
...Move Enter E Picture Mode : Standard • Contrast 90 • Brightness 50 • Sharpness 60 • Color 60 • Tint 0R G • Advanced Control • Reset Screen (RGB-PC) Screen Resolution G Auto config. To Set Yes No 1 MENU 2 ENTER 3 ENTER Select PICTURE. Select Auto config...the desired resolution. 3 ENTER Select Resolution. After adjustment, if the image is still not correct, try using the manual settings or a different resolution or refresh rate on the PC. Select Screen (RGB-PC). Auto Configure Automatically adjusts picture position ...
...Move Enter E Picture Mode : Standard • Contrast 90 • Brightness 50 • Sharpness 60 • Color 60 • Tint 0R G • Advanced Control • Reset Screen (RGB-PC) Screen Resolution G Auto config. To Set Yes No 1 MENU 2 ENTER 3 ENTER Select PICTURE. Select Auto config...the desired resolution. 3 ENTER Select Resolution. After adjustment, if the image is still not correct, try using the manual settings or a different resolution or refresh rate on the PC. Select Screen (RGB-PC). Auto Configure Automatically adjusts picture position ...
Owner's Manual (English)
Page 31
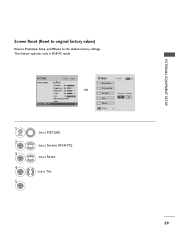
... E Picture Mode : Standard • Contrast 90 • Brightness 50 • Sharpness 60 • Color 60 • Tint 0R G • Advanced Control • Reset Screen (RGB-PC) 1 MENU 2 ENTER 3 ENTER 4 ENTER 5 ENTER Select PICTURE. Select Screen (RGB-PC). Auto config. Position Size Initialize Settings. Select Reset. Screen Resolution Move MENU Prev. EXTERNAL EQUIPMENT...
... E Picture Mode : Standard • Contrast 90 • Brightness 50 • Sharpness 60 • Color 60 • Tint 0R G • Advanced Control • Reset Screen (RGB-PC) 1 MENU 2 ENTER 3 ENTER 4 ENTER 5 ENTER Select PICTURE. Select Screen (RGB-PC). Auto config. Position Size Initialize Settings. Select Reset. Screen Resolution Move MENU Prev. EXTERNAL EQUIPMENT...

Owner's Manual (English)
Page 32
...p.47 For 50PS11 POWER Turns the TV on or off to the next UP/DOWN one. G p.58 ENTER FAV Scroll through inputs. INPUT Rotates through the programmed Favorite channels. G p.34 CHANNEL Changes the channel. G p.38 FREEZE Freezes the current frame. UP/DOWN PAGE Moves from one full set of screen .../DOWN MUTE Switch the sound on from standby. G p.43 MENU RETURN Q.MENU FREEZE RATIO FAV 30 Also switches the TV on the TV. 42/50PQ10, 42/50PQ12, 50PS11 INFO Displays channel information at the remote control sensor on from standby or off . INFO AV MODE POWER INPUT ENERGY SAVING...
...p.47 For 50PS11 POWER Turns the TV on or off to the next UP/DOWN one. G p.58 ENTER FAV Scroll through inputs. INPUT Rotates through the programmed Favorite channels. G p.34 CHANNEL Changes the channel. G p.38 FREEZE Freezes the current frame. UP/DOWN PAGE Moves from one full set of screen .../DOWN MUTE Switch the sound on from standby. G p.43 MENU RETURN Q.MENU FREEZE RATIO FAV 30 Also switches the TV on the TV. 42/50PQ10, 42/50PQ12, 50PS11 INFO Displays channel information at the remote control sensor on from standby or off . INFO AV MODE POWER INPUT ENERGY SAVING...

Owner's Manual (English)
Page 33
THUMBSTICK (Up/Down/Left Navigates the on-screen menus and adjusts the system settings to the last channel viewed. Installing Batteries I Install two 1.5V AAA batteries. I Open the battery compartment cover on -screen displays and returns to move return ... old or used batteries with new ones. FLASHBK Tunes to your preference. I Close cover. 31 LIST Displays the channel list. RETURN Allows the user to TV viewing. Right/ENTER) MENU Displays the main menu or clears all on the back and install the batteries matching correct polarity. WATCHING...
THUMBSTICK (Up/Down/Left Navigates the on-screen menus and adjusts the system settings to the last channel viewed. Installing Batteries I Install two 1.5V AAA batteries. I Open the battery compartment cover on -screen displays and returns to move return ... old or used batteries with new ones. FLASHBK Tunes to your preference. I Close cover. 31 LIST Displays the channel list. RETURN Allows the user to TV viewing. Right/ENTER) MENU Displays the main menu or clears all on the back and install the batteries matching correct polarity. WATCHING...

Owner's Manual (English)
Page 35
...batteries matching correct polarity. I Install two 1.5V AAA batteries. G p.34 CHANNEL Changes the channel. WATCHING TV / CHANNEL CONTROL THUMBSTICK Navigates the on-screen menus and adjusts the system settings to your preference. (Up/Down/Left Right/ENTER) RETURN Allows the user to move return one full... set of the screen. UP/DOWN PAGE Moves from one step in an interactive application or other user ...
...batteries matching correct polarity. I Install two 1.5V AAA batteries. G p.34 CHANNEL Changes the channel. WATCHING TV / CHANNEL CONTROL THUMBSTICK Navigates the on-screen menus and adjusts the system settings to your preference. (Up/Down/Left Right/ENTER) RETURN Allows the user to move return one full... set of the screen. UP/DOWN PAGE Moves from one step in an interactive application or other user ...
Owner's Manual (English)
Page 37
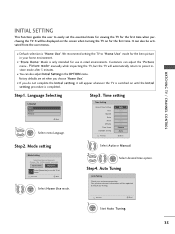
...Step2. The previous channel information will be updated during Auto Tuning. It will be displayed on the screen when turning the TV on until the Initial setting procedure is "Home Use". Customers can also be activated from the user menus. Step1. Step4. Auto Tuning Auto Tuning...Previous Next 1 ENTER Start Auto Tuning. 35 I "Store Demo" Mode is switched on for the best picture in retail environments. We recommend setting the TV to "Home Use" mode for the first time. Store Demo Home Use Select [Home Use] to use in your antenna connection. I If...
...Step2. The previous channel information will be updated during Auto Tuning. It will be displayed on the screen when turning the TV on until the Initial setting procedure is "Home Use". Customers can also be activated from the user menus. Step1. Step4. Auto Tuning Auto Tuning...Previous Next 1 ENTER Start Auto Tuning. 35 I "Store Demo" Mode is switched on for the best picture in retail environments. We recommend setting the TV to "Home Use" mode for the first time. Store Demo Home Use Select [Home Use] to use in your antenna connection. I If...
Owner's Manual (English)
Page 38
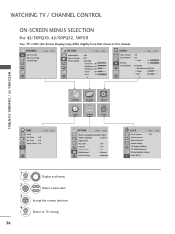
..., 50PS11 Your TV's OSD (On Screen Display) may differ slightly from that shown in this manual. CHANNEL Auto Tuning Manual Tuning Channel Edit Move Enter PICTURE Move Enter Aspect Ratio : 16:9 Power Saving : Off Picture Mode : Standard • Contrast 90 • Brightness 50 ...: Off Caption : Off Demo Mode : Off ISM Method : Normal Initial Setting : Home Use 1 MENU 2 ENTER Display each menu. Return to TV viewing. 36 LOCK Move Enter Lock System : Off Set Password Block Channel Movie Rating TV Rating-Children TV Rating-General Downloadable Rating Input Block
..., 50PS11 Your TV's OSD (On Screen Display) may differ slightly from that shown in this manual. CHANNEL Auto Tuning Manual Tuning Channel Edit Move Enter PICTURE Move Enter Aspect Ratio : 16:9 Power Saving : Off Picture Mode : Standard • Contrast 90 • Brightness 50 ...: Off Caption : Off Demo Mode : Off ISM Method : Normal Initial Setting : Home Use 1 MENU 2 ENTER Display each menu. Return to TV viewing. 36 LOCK Move Enter Lock System : Off Set Password Block Channel Movie Rating TV Rating-Children TV Rating-General Downloadable Rating Input Block
Owner's Manual (English)
Page 39
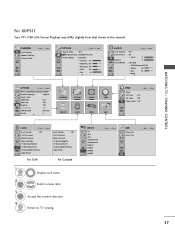
...; Bass 50 • Reset E WATCHING TV / CHANNEL CONTROL OPTION Move Enter Menu Language(Language): English Audio Language : English Input Label SIMPLINK : On Key Lock : Off Caption : Off Demo Mode : Off ISM Method : Normal Set ID : 1 E CHANNEL PICTURE AUDIO TIME OPTION...Off Move Enter LOCK Move Enter Lock System : Off Set Password Block Channel Movie Rating TV Rating-Children TV Rating-General Downloadable Rating Input Block Lock System : Off Set Password Block Channel TV Rating-English TV Rating-French Downloadable Rating Input Block For USA For ...
...; Bass 50 • Reset E WATCHING TV / CHANNEL CONTROL OPTION Move Enter Menu Language(Language): English Audio Language : English Input Label SIMPLINK : On Key Lock : Off Caption : Off Demo Mode : Off ISM Method : Normal Set ID : 1 E CHANNEL PICTURE AUDIO TIME OPTION...Off Move Enter LOCK Move Enter Lock System : Off Set Password Block Channel Movie Rating TV Rating-Children TV Rating-General Downloadable Rating Input Block Lock System : Off Set Password Block Channel TV Rating-English TV Rating-French Downloadable Rating Input Block For USA For ...

Owner's Manual (English)
Page 41
... DTV Channel 8 DTV : 0 Found Channel(s) ATV : 0 Found Channel(s) Next(TV) Close 1 MENU 2 ENTER 3 ENTER Select CHANNEL. MENU I When setting the Auto Tuning or Manual Tuning, the number of maximum channels you set up in memory on the broadcasting signal environment. 39 Use the password you can store... is subject to begin auto tuning. It is 900. Select Y e s. 4 ENTER Run Auto Tuning. 5 Return to TV viewing. WATCHING TV / CHANNEL CONTROL CHANNEL SETUP ...
... DTV Channel 8 DTV : 0 Found Channel(s) ATV : 0 Found Channel(s) Next(TV) Close 1 MENU 2 ENTER 3 ENTER Select CHANNEL. MENU I When setting the Auto Tuning or Manual Tuning, the number of maximum channels you set up in memory on the broadcasting signal environment. 39 Use the password you can store... is subject to begin auto tuning. It is 900. Select Y e s. 4 ENTER Run Auto Tuning. 5 Return to TV viewing. WATCHING TV / CHANNEL CONTROL CHANNEL SETUP ...


