
Owner's Manual (English)
Page 1
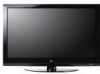
....lg.cwaw/ww.lgwuws.alg.comm/ ewrwciwa.l.lgco.cma Record it for future reference. Changing the factory default settings or enabling other features may increase power consumption that could exceed the limits necessary to qualify for ENERGY STAR in the "factory default (Home Use)" setting. The model and serial number of the TV is located on the back and one side of the TV. PLASMA TV OWNER'S MANUAL 42PQ10 50PQ10 50PS11 60PS11...
....lg.cwaw/ww.lgwuws.alg.comm/ ewrwciwa.l.lgco.cma Record it for future reference. Changing the factory default settings or enabling other features may increase power consumption that could exceed the limits necessary to qualify for ENERGY STAR in the "factory default (Home Use)" setting. The model and serial number of the TV is located on the back and one side of the TV. PLASMA TV OWNER'S MANUAL 42PQ10 50PQ10 50PS11 60PS11...
Owner's Manual (English)
Page 4
... screen with an exact replacement part by SWITCH" 2 If grounding methods are dangerous. Pay particular attention to a three-prong grounded AC outlet). Check the specification page of these conditions could result in . Do not overload wall outlets. Any of this unit is connected to the AC wall outlet, it , discontinue use a damaged or loose power cord. Protect the power cord from the AC power source...
... screen with an exact replacement part by SWITCH" 2 If grounding methods are dangerous. Pay particular attention to a three-prong grounded AC outlet). Check the specification page of these conditions could result in . Do not overload wall outlets. Any of this unit is connected to the AC wall outlet, it , discontinue use a damaged or loose power cord. Protect the power cord from the AC power source...
Owner's Manual (English)
Page 6
... Panel Information 8 Back Panel Information 10 Stand Instruction 11 Desktop Pedestal Installation 12 Swivel Stand 12 Cable Arrangement 12 VESA Wall Mounting 13 Securing the TV to the wall to prevent falling when the TV is used on a stand 14 Antenna or Cable Connection 15 EXTERNAL EQUIPMENT SETUP HD Receiver Setup 16 DVD Setup 19 VCR Setup 21 Other A/V Source Setup 23 Audio Out Connection 23 USB Connection 24 PC Setup 25 WATCHING TV / CHANNEL CONTROL Remote Control Functions 30 Turning On TV 34 Channel Selection 34 Volume Adjustment 34 Initial Setting 35 On-Screen...
... Panel Information 8 Back Panel Information 10 Stand Instruction 11 Desktop Pedestal Installation 12 Swivel Stand 12 Cable Arrangement 12 VESA Wall Mounting 13 Securing the TV to the wall to prevent falling when the TV is used on a stand 14 Antenna or Cable Connection 15 EXTERNAL EQUIPMENT SETUP HD Receiver Setup 16 DVD Setup 19 VCR Setup 21 Other A/V Source Setup 23 Audio Out Connection 23 USB Connection 24 PC Setup 25 WATCHING TV / CHANNEL CONTROL Remote Control Functions 30 Turning On TV 34 Channel Selection 34 Volume Adjustment 34 Initial Setting 35 On-Screen...
Owner's Manual (English)
Page 12
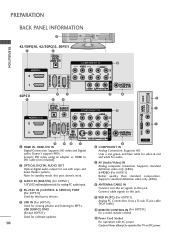
... DVI video using an adapter or HDMI to DVI cable (not included). 2 OPTICAL DIGITAL AUDIO OUT Optical digital audio output for use with AC power. Doesn't support 480i. Uses a red, green, and blue cable for video & red and white for software updates. 10 11 Power Cord Socket For operation with amps and home theater systems. Note: In standby mode, this jack. USB SERVICE ONLY (Except 60PS11) 9 RGB IN (PC) (For 60PS11) Analog PC Connection. Uses a D-sub 15 pin cable (VGA cable). 10 REMOTE CONTROL IN (For 60PS11) For a wired remote control...
... DVI video using an adapter or HDMI to DVI cable (not included). 2 OPTICAL DIGITAL AUDIO OUT Optical digital audio output for use with AC power. Doesn't support 480i. Uses a red, green, and blue cable for video & red and white for software updates. 10 11 Power Cord Socket For operation with amps and home theater systems. Note: In standby mode, this jack. USB SERVICE ONLY (Except 60PS11) 9 RGB IN (PC) (For 60PS11) Analog PC Connection. Uses a D-sub 15 pin cable (VGA cable). 10 REMOTE CONTROL IN (For 60PS11) For a wired remote control...
Owner's Manual (English)
Page 15
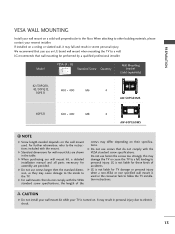
... VESA standard screw specifications. Model VESA (A * B) A Standard Screw Quantity B Wall Mounting bracket (sold separately) 42/50PQ10, 42/50PQ12, 50PS11 400 * 400 M6 4 AW-50PG60MS 60PS11 600 * 400 M8 4 AW-60PG60MS ! LG is not liable for TV damage or personal injury when a non-VESA or non specified wall mount is used . G When purchasing our wall mount kit, a detailed installation manual and all parts necessary for wall mount kits are provided. PREPARATION VESA WALL MOUNTING Install your wall mount on a solid wall...
... VESA standard screw specifications. Model VESA (A * B) A Standard Screw Quantity B Wall Mounting bracket (sold separately) 42/50PQ10, 42/50PQ12, 50PS11 400 * 400 M6 4 AW-50PG60MS 60PS11 600 * 400 M8 4 AW-60PG60MS ! LG is not liable for TV damage or personal injury when a non-VESA or non specified wall mount is used . G When purchasing our wall mount kit, a detailed installation manual and all parts necessary for wall mount kits are provided. PREPARATION VESA WALL MOUNTING Install your wall mount on a solid wall...
Owner's Manual (English)
Page 18
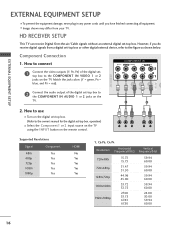
... COMPONENT IN VIDEO AUDIO 2 L R 1 VIDEO (MONO) AUDIO 1 2 2. How to use I Select the Component1 or 2 input source on the TV using the INPUT button on the TV. operation) I Turn on the TV. HD RECEIVER SETUP This TV can receive Digital Over-the-air/Cable signals without an external digital set -top box or other digital external device, refer to the COMPONENT IN VIDEO 1 or 2 jacks on the digital set -top box. Match the jack colors (Y = green, PB = blue, and PR = red). 2 Connect the audio output of the digital settop box to...
... COMPONENT IN VIDEO AUDIO 2 L R 1 VIDEO (MONO) AUDIO 1 2 2. How to use I Select the Component1 or 2 input source on the TV using the INPUT button on the TV. operation) I Turn on the TV. HD RECEIVER SETUP This TV can receive Digital Over-the-air/Cable signals without an external digital set -top box or other digital external device, refer to the COMPONENT IN VIDEO 1 or 2 jacks on the digital set -top box. Match the jack colors (Y = green, PB = blue, and PR = red). 2 Connect the audio output of the digital settop box to...
Owner's Manual (English)
Page 19
NOTE G Check HDMI cable over version 1.3. HDMI supports both audio and video. How to use the latest cables that support HDMI version 1.3. If the HDMI cables don't support HDMI version 1.3, it can cause flickers or no screen display. In this case use 1 I Refer to the HDMI IN 1 or 2 (For 42/50PQ10, 42/50PQ12, 50PS11), HDMI/DVI IN 1, 2 or 3 (For 60PS11) jack on the remote control. HDMI-DVD OUTPUT HDMI-DTV Resolution Horizontal Vertical Frequency(KHz) Frequency(Hz) 720x480p 1280x720p 1920x1080i...
NOTE G Check HDMI cable over version 1.3. HDMI supports both audio and video. How to use the latest cables that support HDMI version 1.3. If the HDMI cables don't support HDMI version 1.3, it can cause flickers or no screen display. In this case use 1 I Refer to the HDMI IN 1 or 2 (For 42/50PQ10, 42/50PQ12, 50PS11), HDMI/DVI IN 1, 2 or 3 (For 60PS11) jack on the remote control. HDMI-DVD OUTPUT HDMI-DTV Resolution Horizontal Vertical Frequency(KHz) Frequency(Hz) 720x480p 1280x720p 1920x1080i...
Owner's Manual (English)
Page 20
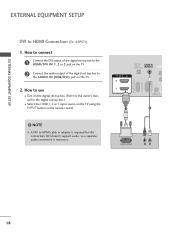
... to connect 1 Connect the DVI output of the digital set-top box to the HDMI/DVI IN 1, 2 or 3 jack on the TV. 2 Connect the audio output of the digital set-top box to HDMI cable or adapter is necessary. OPTICAL DIGITAL AUDIO OUT AUDIO IN (RGB/DVI) HDMI/DVI IN 2 1 REMOTE CONTROL IN 1 2 DVI-DTV OUTPUT R L AV IN 1 18 RGB IN (PC) RS-232C IN (CONTROL & SERVICE) EXTERNAL EQUIPMENT SETUP EXTERNAL EQUIPMENT SETUP DVI to the owner's manual for this connection. How to use I Select the HDMI1, 2 or 3 input source on the TV using the INPUT button...
... to connect 1 Connect the DVI output of the digital set-top box to the HDMI/DVI IN 1, 2 or 3 jack on the TV. 2 Connect the audio output of the digital set-top box to HDMI cable or adapter is necessary. OPTICAL DIGITAL AUDIO OUT AUDIO IN (RGB/DVI) HDMI/DVI IN 2 1 REMOTE CONTROL IN 1 2 DVI-DTV OUTPUT R L AV IN 1 18 RGB IN (PC) RS-232C IN (CONTROL & SERVICE) EXTERNAL EQUIPMENT SETUP EXTERNAL EQUIPMENT SETUP DVI to the owner's manual for this connection. How to use I Select the HDMI1, 2 or 3 input source on the TV using the INPUT button...

Owner's Manual (English)
Page 22
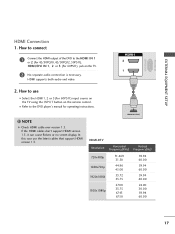
RS-232C IN (SERVICE ONLY) EXTERNAL EQUIPMENT SETUP EXTERNAL EQUIPMENT SETUP HDMI Connection 1. HDMI supports both audio and video. 2. How to use I Refer to the HDMI IN 1 or 2 (For 42/50PQ10, 42/50PQ12, 50PS11), HDMI/DVI IN 1, 2 or 3 (For 60PS11) jack on the remote control. How to connect 1 Connect the HDMI output of the DVD to the DVD player's manual for operating instructions. IN 2 1 1 HDMI-DVD OUTPUT 20 I Select the HDMI1, 2 or 3(For 60PS11) input source on the TV using the INPUT button on the TV. 2 No separate audio connection is necessary.
RS-232C IN (SERVICE ONLY) EXTERNAL EQUIPMENT SETUP EXTERNAL EQUIPMENT SETUP HDMI Connection 1. HDMI supports both audio and video. 2. How to use I Refer to the HDMI IN 1 or 2 (For 42/50PQ10, 42/50PQ12, 50PS11), HDMI/DVI IN 1, 2 or 3 (For 60PS11) jack on the remote control. How to connect 1 Connect the HDMI output of the DVD to the DVD player's manual for operating instructions. IN 2 1 1 HDMI-DVD OUTPUT 20 I Select the HDMI1, 2 or 3(For 60PS11) input source on the TV using the INPUT button on the TV. 2 No separate audio connection is necessary.
Owner's Manual (English)
Page 24
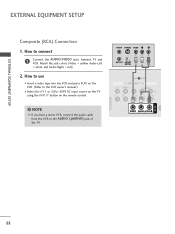
... TV. ANT IN S-VIDEO VIDEO L R ANT OUT OUTPUT SWITCH 1 COMPONENT IN VIDEO AUDIO 2 L R 1 VIDEO (MONO) AUDIO 22 AV IN USB SERVICE ONLY EXTERNAL EQUIPMENT SETUP EXTERNAL EQUIPMENT SETUP Composite (RCA) Connection 1. NOTE G If you have a mono VCR, connect the audio cable from the VCR to the VCR owner's manual.) I Select the A V 1 or 2(For 60PS11) input source on the TV using the INPUT button on the remote control. ! Match the jack colors (Video = yellow, Audio Left = white, and Audio Right = red) 2. How to connect 1 Connect the AUDIO/VIDEO jacks between TV...
... TV. ANT IN S-VIDEO VIDEO L R ANT OUT OUTPUT SWITCH 1 COMPONENT IN VIDEO AUDIO 2 L R 1 VIDEO (MONO) AUDIO 22 AV IN USB SERVICE ONLY EXTERNAL EQUIPMENT SETUP EXTERNAL EQUIPMENT SETUP Composite (RCA) Connection 1. NOTE G If you have a mono VCR, connect the audio cable from the VCR to the VCR owner's manual.) I Select the A V 1 or 2(For 60PS11) input source on the TV using the INPUT button on the remote control. ! Match the jack colors (Video = yellow, Audio Left = white, and Audio Right = red) 2. How to connect 1 Connect the AUDIO/VIDEO jacks between TV...
Owner's Manual (English)
Page 28
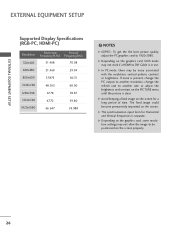
... the resolution, vertical pattern, contrast or brightness. If noise is present, change the PC output to another rate or adjust the brightness and contrast on the PICTURE menu until the picture is clear. The fixed image could become permanently imprinted on the screen for Horizontal and Vertical frequencies is in use. G The synchronization input form for a long period of time. EXTERNAL EQUIPMENT SETUP EXTERNAL EQUIPMENT SETUP Supported Display Specifications (RGB-PC, HDMI-PC) Resolution Horizontal Vertical...
... the resolution, vertical pattern, contrast or brightness. If noise is present, change the PC output to another rate or adjust the brightness and contrast on the PICTURE menu until the picture is clear. The fixed image could become permanently imprinted on the screen for Horizontal and Vertical frequencies is in use. G The synchronization input form for a long period of time. EXTERNAL EQUIPMENT SETUP EXTERNAL EQUIPMENT SETUP Supported Display Specifications (RGB-PC, HDMI-PC) Resolution Horizontal Vertical...
Owner's Manual (English)
Page 37
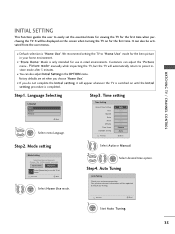
... be updated during Auto Tuning. I If you do not complete the Initial setting, it will be activated from the user menus. Mode Setting Selecting the environment. Store Demo Home Use Select [Home Use] to preset instore mode after 5 minutes. Auto Tuning Auto Tuning Check your home environment. Factory defaults are set the essential items for viewing the TV for the best picture in the OPTION menu. Step1. Step2. Step4. WATCHING TV / CHANNEL CONTROL INITIAL SETTING...
... be updated during Auto Tuning. I If you do not complete the Initial setting, it will be activated from the user menus. Mode Setting Selecting the environment. Store Demo Home Use Select [Home Use] to preset instore mode after 5 minutes. Auto Tuning Auto Tuning Check your home environment. Factory defaults are set the essential items for viewing the TV for the best picture in the OPTION menu. Step1. Step2. Step4. WATCHING TV / CHANNEL CONTROL INITIAL SETTING...
Owner's Manual (English)
Page 45
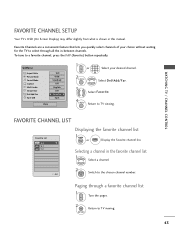
... the favorite channel list 1 Select a channel. 2 ENTER Switch to the chosen channel number. Favorite Channels are a convenient feature that lets you quickly select channels of your desired channel. 2 Q. MENU Select Del/Add/Fav. 3 Select Favorite. 4 Q. Selecting a channel in this manual. WATCHING TV / CHANNEL CONTROL FAVORITE CHANNEL LIST Favorite List DTV 83-0 DTV 15-1 DTV 18-2 Displaying the favorite channel list 1 MARK FAV or FAV Display the Favorite channel list. Q.Menu Aspect Ratio Picture Mode Sound Mode Caption Multi Audio Sleep Timer CH...
... the favorite channel list 1 Select a channel. 2 ENTER Switch to the chosen channel number. Favorite Channels are a convenient feature that lets you quickly select channels of your desired channel. 2 Q. MENU Select Del/Add/Fav. 3 Select Favorite. 4 Q. Selecting a channel in this manual. WATCHING TV / CHANNEL CONTROL FAVORITE CHANNEL LIST Favorite List DTV 83-0 DTV 15-1 DTV 18-2 Displaying the favorite channel list 1 MARK FAV or FAV Display the Favorite channel list. Q.Menu Aspect Ratio Picture Mode Sound Mode Caption Multi Audio Sleep Timer CH...

Owner's Manual (English)
Page 50
... SIMPLINK device with an OPTICAL cable. 48 RETURN Return to the previous menu. NOTE G Connect the HDMI/DVI IN or HDMI IN terminal of the TV to the DIGITAL AUDIO IN terminal on the back of the TV to the rear terminal (HDMI terminal) of the SIMPLINK device with the HDMI cable. WATCHING TV / CHANNEL CONTROL OPTION Menu Language Audio Language Input Label SIMPLINK Key Lock Caption Demo Mode ISM Method Set ID E Move Enter : English...
... SIMPLINK device with an OPTICAL cable. 48 RETURN Return to the previous menu. NOTE G Connect the HDMI/DVI IN or HDMI IN terminal of the TV to the DIGITAL AUDIO IN terminal on the back of the TV to the rear terminal (HDMI terminal) of the SIMPLINK device with the HDMI cable. WATCHING TV / CHANNEL CONTROL OPTION Menu Language Audio Language Input Label SIMPLINK Key Lock Caption Demo Mode ISM Method Set ID E Move Enter : English...
Owner's Manual (English)
Page 52
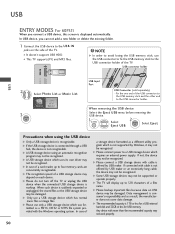
... of the TV. When such device is not supported by USB maker. In USB device, you connect a USB device, this screen is recognizable. USB connector holder MI IN 3 USB IN USB 2 Select Photo List or Music List. 3 ENTER Photo List Music List USB Input Port USB Connector (sold separately) - G In case of a card reader, up to the USB connector holder of a files name. G Only use a USB storage device which requires an external power supply. G Please...
... of the TV. When such device is not supported by USB maker. In USB device, you connect a USB device, this screen is recognizable. USB connector holder MI IN 3 USB IN USB 2 Select Photo List or Music List. 3 ENTER Photo List Music List USB Input Port USB Connector (sold separately) - G In case of a card reader, up to the USB connector holder of a files name. G Only use a USB storage device which requires an external power supply. G Please...
Owner's Manual (English)
Page 63
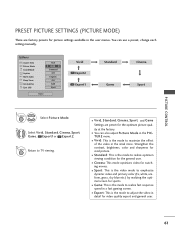
... use a preset, change each setting manually. Strengthen the contrast, brightness, color and sharpness for the general user. Q.Menu Aspect Ratio Picture Mode Sound Mode Caption Multi Audio Sleep Timer CH Del/Add/Fav Eject USB F 1166::99 G F VViivviidd G Standard Off English Off Add Eject Close Vivid Expert2 Expert1 Standard Game Cinema Sport 1 Q. I Vivid: This is the video mode to TV viewing. You can also adjust Picture Mode in the user menus. TURE menu. ity at the factory...
... use a preset, change each setting manually. Strengthen the contrast, brightness, color and sharpness for the general user. Q.Menu Aspect Ratio Picture Mode Sound Mode Caption Multi Audio Sleep Timer CH Del/Add/Fav Eject USB F 1166::99 G F VViivviidd G Standard Off English Off Add Eject Close Vivid Expert2 Expert1 Standard Game Cinema Sport 1 Q. I Vivid: This is the video mode to TV viewing. You can also adjust Picture Mode in the user menus. TURE menu. ity at the factory...
Owner's Manual (English)
Page 88
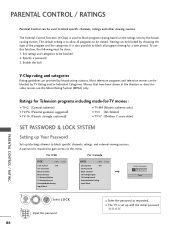
... the categories. Ratings for Television programs including made-for a time period. A password is set up blocking schemes to block specific channels, ratings, and external viewing sources. PARENTAL CONTROL / RATINGS Parental Control can be used to block program viewing based on the ratings sent by the broadcasting station. I Enter the password as requested. Viewing can be blocked by TV Rating and/or Individual Categories. Enable the lock V-Chip rating and categories...
... the categories. Ratings for Television programs including made-for a time period. A password is set up blocking schemes to block specific channels, ratings, and external viewing sources. PARENTAL CONTROL / RATINGS Parental Control can be used to block program viewing based on the ratings sent by the broadcasting station. I Enter the password as requested. Viewing can be blocked by TV Rating and/or Individual Categories. Enable the lock V-Chip rating and categories...

Owner's Manual (English)
Page 100
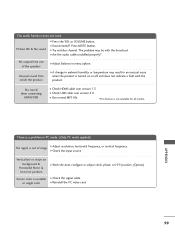
... antenna). The remote control doesn't work I Install new batteries. *This feature is any function to another product's power cord into wall power outlet? The video function does not work normally. I Check to receive weaker station. The problem may be automatically turned off I Check whether the product is set ? No or poor color or poor picture I Adjust Color in pictures I Check your service center, if the picture has not appeared after switching on some channels I TV...
... antenna). The remote control doesn't work I Install new batteries. *This feature is any function to another product's power cord into wall power outlet? The video function does not work normally. I Check to receive weaker station. The problem may be automatically turned off I Check whether the product is set ? No or poor color or poor picture I Adjust Color in pictures I Check your service center, if the picture has not appeared after switching on some channels I TV...
Owner's Manual (English)
Page 101
... connecting HDMI/USB I Adjust resolution, horizontal frequency, or vertical frequency. Vertical bar or stripe on or off and does not indicate a fault with the broadcast. APPENDIX 99 I Are the audio cables installed properly? The problem may result in menu option. I Try another channel. No output from one of range I Check HDMI cable over version 2.0. or single color I Press the VOL or VOLUME button. Picture OK & No sound I Reinstall the PC video card. The audio...
... connecting HDMI/USB I Adjust resolution, horizontal frequency, or vertical frequency. Vertical bar or stripe on or off and does not indicate a fault with the broadcast. APPENDIX 99 I Are the audio cables installed properly? The problem may result in menu option. I Try another channel. No output from one of range I Check HDMI cable over version 2.0. or single color I Press the VOL or VOLUME button. Picture OK & No sound I Reinstall the PC video card. The audio...
Owner's Manual (English)
Page 104
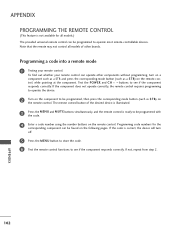
.... Programming code numbers for all models of the desired device is illuminated. 3 Press the MENU and MUTE buttons simultaneously, and the remote control is ready to be programmed with the code. 4 Enter a code number using the number buttons on the remote control. If the code is not available for the corresponding component can operate other brands. To find out whether your remote control. If not, repeat from step 2. Programming a code into a remote mode 1 Testing...
.... Programming code numbers for all models of the desired device is illuminated. 3 Press the MENU and MUTE buttons simultaneously, and the remote control is ready to be programmed with the code. 4 Enter a code number using the number buttons on the remote control. If the code is not available for the corresponding component can operate other brands. To find out whether your remote control. If not, repeat from step 2. Programming a code into a remote mode 1 Testing...


