Owner's Manual
Page 2
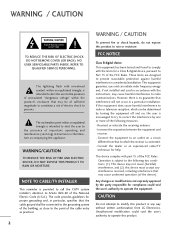
... grounding and, in a particular installation. Operation is no guarantee that interference will not occur in particular, specifies that may cause undesired operation (of the cable entry as close to operate the equipment. Unauthorized modification could void the user's authority to the point of the device). The code provides guidelines for a Class B digital device, pursuant to Part 15 of the following...
... grounding and, in a particular installation. Operation is no guarantee that interference will not occur in particular, specifies that may cause undesired operation (of the cable entry as close to operate the equipment. Unauthorized modification could void the user's authority to the point of the device). The code provides guidelines for a Class B digital device, pursuant to Part 15 of the following...
Owner's Manual
Page 4
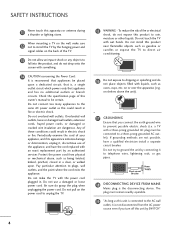
... the power cord plugged in a door, or walked upon a dedicated circuit; If grounding methods are dangerous. Do not try to ground the unit by SWITCH" 4 Any of this apparatus or antenna during a thunder or lighting storm. on the back of fire or electrical shock, do not drop onto the screen with an exact replacement part by the hanging power and signal cables...
... the power cord plugged in a door, or walked upon a dedicated circuit; If grounding methods are dangerous. Do not try to ground the unit by SWITCH" 4 Any of this apparatus or antenna during a thunder or lighting storm. on the back of fire or electrical shock, do not drop onto the screen with an exact replacement part by the hanging power and signal cables...
Owner's Manual
Page 6
... Pedestal Installation 18 Swivel Stand 18 VESA Wall Mounting 19 Securing the TV to the wall to prevent falling when the TV is used on a stand 20 Antenna or Cable Connection 21 EXTERNAL EQUIPMENT SETUP HD Receiver Setup 22 DVD Setup 25 VCR Setup 27 Other A/V Source Setup 28 USB Connection 28 Audio Out Connection 29 PC Setup 30 WATCHING TV / CHANNEL CONTROL Remote Control Functions 36 Turning On TV 38 Channel Selection 38 Volume Adjustment 38 Initial Setting 39 On-Screen Menus Selection 40 Quick Menu 42 Channel Setup - User Mode 70 Picture...
... Pedestal Installation 18 Swivel Stand 18 VESA Wall Mounting 19 Securing the TV to the wall to prevent falling when the TV is used on a stand 20 Antenna or Cable Connection 21 EXTERNAL EQUIPMENT SETUP HD Receiver Setup 22 DVD Setup 25 VCR Setup 27 Other A/V Source Setup 28 USB Connection 28 Audio Out Connection 29 PC Setup 30 WATCHING TV / CHANNEL CONTROL Remote Control Functions 36 Turning On TV 38 Channel Selection 38 Volume Adjustment 38 Initial Setting 39 On-Screen Menus Selection 40 Quick Menu 42 Channel Setup - User Mode 70 Picture...
Owner's Manual
Page 8
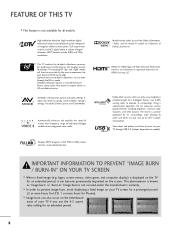
..., color, sharpness and white balance. IMPORTANT INFORMATION TO PREVENT "IMAGE BURN / BURN-IN" ON YOUR TV SCREEN I When a fixed image (e.g. I In order to 50% in power consumption. A subset of human voice frequency range to offer. Manufactured under the manufacturer's warranty. Unlike other sensors which can also occur on model). logos, screen menus, video game, and computer display) is three preset picture and audio settings. High-resolution digital television broadcast...
..., color, sharpness and white balance. IMPORTANT INFORMATION TO PREVENT "IMAGE BURN / BURN-IN" ON YOUR TV SCREEN I When a fixed image (e.g. I In order to 50% in power consumption. A subset of human voice frequency range to offer. Manufactured under the manufacturer's warranty. Unlike other sensors which can also occur on model). logos, screen menus, video game, and computer display) is three preset picture and audio settings. High-resolution digital television broadcast...
Owner's Manual
Page 13
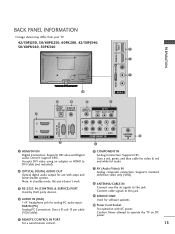
...1 VIDEO AUDIO COMPONENT IN 6 ANTENNA /CABLE 8 IN 1 HDMI/DVI IN Digital Connection. Connect cable signals to this port doesn't work. 3 RS-232C IN (CONTROL & SERVICE) PORT Used by third party devices. 4 AUDIO IN (RGB) 1/8" headphone jack for analog PC audio input. Uses a red, green, and blue cable for video & red and white for software updates. 10 Power Cord Socket For operation with amps and home theater systems. Note: In standby mode, this jack. Supports standard definition video only (480i). 8 ANTENNA/CABLE IN Connect over-the air signals to this jack. 9 SERVICE ONLY Used for...
...1 VIDEO AUDIO COMPONENT IN 6 ANTENNA /CABLE 8 IN 1 HDMI/DVI IN Digital Connection. Connect cable signals to this port doesn't work. 3 RS-232C IN (CONTROL & SERVICE) PORT Used by third party devices. 4 AUDIO IN (RGB) 1/8" headphone jack for analog PC audio input. Uses a red, green, and blue cable for video & red and white for software updates. 10 Power Cord Socket For operation with amps and home theater systems. Note: In standby mode, this jack. Supports standard definition video only (480i). 8 ANTENNA/CABLE IN Connect over-the air signals to this jack. 9 SERVICE ONLY Used for...
Owner's Manual
Page 22
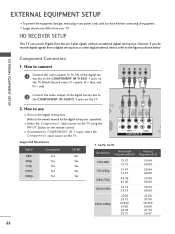
... SETUP This TV can receive Digital Over-the-air/Cable signals without an external digital set -top box or other digital external device, refer to the COMPONENT IN AUDIO 1 jacks on the TV. 2. How to connect 1 Connect the video outputs (Y, PB, PR) of the digital set -top box. Match the jack colors (Y = green, PB = blue, and PR = red). I Image shown may differ from a digital set -top box. EXTERNAL EQUIPMENT SETUP I Select the Component1 input source on the TV using the INPUT button on the remote control. operation...
... SETUP This TV can receive Digital Over-the-air/Cable signals without an external digital set -top box or other digital external device, refer to the COMPONENT IN AUDIO 1 jacks on the TV. 2. How to connect 1 Connect the video outputs (Y, PB, PR) of the digital set -top box. Match the jack colors (Y = green, PB = blue, and PR = red). I Image shown may differ from a digital set -top box. EXTERNAL EQUIPMENT SETUP I Select the Component1 input source on the TV using the INPUT button on the remote control. operation...
Owner's Manual
Page 23
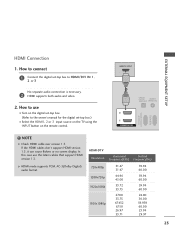
... EXTERNAL EQUIPMENT SETUP HDMI Connection 1. How to connect 1 Connect the digital set -top box.) I Select the HDMI1, 2 or 3 input source on the TV using the INPUT button on the remote control. How to HDMI/DVI IN 1, 2 or 3 No separate audio connection is necessary. 2 HDMI supports both audio and video. 2. HDMI-DTV OUTPUT 1 OPTICAL DIGITAL AUDIO OUT AUDIO (RGB/DVI) 2 1 HDMI/DVI IN RS-232C IN (CONTROL & SERVICE) RGB IN(PC) ! In this case use I Turn on the digital set-top box. (Refer to the owner's manual for the digital set -top box to use the latest cables...
... EXTERNAL EQUIPMENT SETUP HDMI Connection 1. How to connect 1 Connect the digital set -top box.) I Select the HDMI1, 2 or 3 input source on the TV using the INPUT button on the remote control. How to HDMI/DVI IN 1, 2 or 3 No separate audio connection is necessary. 2 HDMI supports both audio and video. 2. HDMI-DTV OUTPUT 1 OPTICAL DIGITAL AUDIO OUT AUDIO (RGB/DVI) 2 1 HDMI/DVI IN RS-232C IN (CONTROL & SERVICE) RGB IN(PC) ! In this case use I Turn on the digital set-top box. (Refer to the owner's manual for the digital set -top box to use the latest cables...
Owner's Manual
Page 24
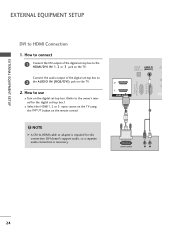
... 3 input source on the TV using the INPUT button on the TV. DVI doesn't support audio, so a separate audio connection is required for the digital set -top box to HDMI Connection 1. Connect the audio output of the digital set -top box.) I Turn on the digital set-top box. (Refer to the owner's manual for this connection. OPTICAL DIGITAL AUDIO OUT AUDIO IN (RGB/DVI) R CO RS-232C IN (CONTROL & SERVICE) RGB IN (PC) 2 2 1 1 HDMI/DVI IN 1 2 DVI-DTV OUTPUT R L 24 EXTERNAL EQUIPMENT SETUP EXTERNAL EQUIPMENT SETUP DVI to the HDMI/DVI IN 1, 2 or 3 jack on the remote control...
... 3 input source on the TV using the INPUT button on the TV. DVI doesn't support audio, so a separate audio connection is required for the digital set -top box to HDMI Connection 1. Connect the audio output of the digital set -top box.) I Turn on the digital set-top box. (Refer to the owner's manual for this connection. OPTICAL DIGITAL AUDIO OUT AUDIO IN (RGB/DVI) R CO RS-232C IN (CONTROL & SERVICE) RGB IN (PC) 2 2 1 1 HDMI/DVI IN 1 2 DVI-DTV OUTPUT R L 24 EXTERNAL EQUIPMENT SETUP EXTERNAL EQUIPMENT SETUP DVI to the HDMI/DVI IN 1, 2 or 3 jack on the remote control...
Owner's Manual
Page 31
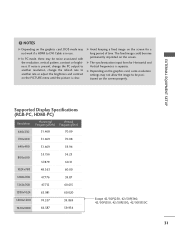
... and Vertical frequencies is in use. EXTERNAL EQUIPMENT SETUP ! NOTES G Depending on the graphics card, DOS mode may not work if a HDMI to another resolution, change the refresh rate to DVI Cable is separate. The fixed image could become permanently imprinted on the screen properly. G Depending on the graphics card, some resolution settings may be positioned on the screen. Supported Display Specifications (RGB-PC, HDMI-PC) Resolution Horizontal Vertical Frequency(KHz...
... and Vertical frequencies is in use. EXTERNAL EQUIPMENT SETUP ! NOTES G Depending on the graphics card, DOS mode may not work if a HDMI to another resolution, change the refresh rate to DVI Cable is separate. The fixed image could become permanently imprinted on the screen properly. G Depending on the graphics card, some resolution settings may be positioned on the screen. Supported Display Specifications (RGB-PC, HDMI-PC) Resolution Horizontal Vertical Frequency(KHz...
Owner's Manual
Page 39
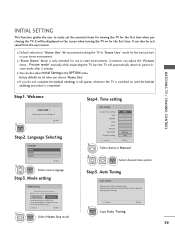
... Initial setting procedure is "Home Use". It can also adjust Initial Setting in your antenna connection. Factory defaults are set the essential items for viewing the TV for choosing LG Next Step2. Choose the setting mode you do not complete the Initial setting, it will automatically return to use in retail environments. INITIAL SETTING This Function guides the user to easily set when you choose "Home Use". I If you want . Language Selecting Language English...
... Initial setting procedure is "Home Use". It can also adjust Initial Setting in your antenna connection. Factory defaults are set the essential items for viewing the TV for choosing LG Next Step2. Choose the setting mode you do not complete the Initial setting, it will automatically return to use in retail environments. INITIAL SETTING This Function guides the user to easily set when you choose "Home Use". I If you want . Language Selecting Language English...
Owner's Manual
Page 40
...; Color 60 • Tint E 0R Enter G AUDIO Auto Volume Clear Voice II Balance Sound Mode TV Speaker Move : Off : Off + 3 0L : Standard • Infinte Sound: Off • Treble 50 • Bass 50 • Reset : On Enter R OPTION Language Input Label SIMPLINK Key Lock Caption Demo Mode ISM Method Set ID Initial Setting Move Enter : On : Off : Off : Off : Normal : 1 : Home Use CHANNEL PICTURE AUDIO TIME OPTION LOCK INPUT USB TIME Clock Off Time : Off On Time : Off Sleep Timer : Off...
...; Color 60 • Tint E 0R Enter G AUDIO Auto Volume Clear Voice II Balance Sound Mode TV Speaker Move : Off : Off + 3 0L : Standard • Infinte Sound: Off • Treble 50 • Bass 50 • Reset : On Enter R OPTION Language Input Label SIMPLINK Key Lock Caption Demo Mode ISM Method Set ID Initial Setting Move Enter : On : Off : Off : Off : Normal : 1 : Home Use CHANNEL PICTURE AUDIO TIME OPTION LOCK INPUT USB TIME Clock Off Time : Off On Time : Off Sleep Timer : Off...

Owner's Manual
Page 59
Exit USB 1 Q.MENU Show the PopUp menu. 2 ENTER Select Set Photo View, Set Video or Set Audio. Slide Speed Fast Music Folder ... G When you select the Set Photo View, I You cannot change Music Folder while BGM is playing. Make appropriate adjustments. 59 Prev. 1 ENTER 2 ENTER Show the Slide Speed or Music Folder. Set photo view. Set video. Set audio. Using the Photo List Option Slideshow BGM 1/17 Q.MENU Option Delete Close Choose option Set photo view.
Exit USB 1 Q.MENU Show the PopUp menu. 2 ENTER Select Set Photo View, Set Video or Set Audio. Slide Speed Fast Music Folder ... G When you select the Set Photo View, I You cannot change Music Folder while BGM is playing. Make appropriate adjustments. 59 Prev. 1 ENTER 2 ENTER Show the Slide Speed or Music Folder. Set photo view. Set video. Set audio. Using the Photo List Option Slideshow BGM 1/17 Q.MENU Option Delete Close Choose option Set photo view.

Owner's Manual
Page 63
Using the Music List Option, play music files less than 16 Kbytes. 63 Sound Mode Auto Volume Clear Voice ll Balance Cinema Off Off 0 L R Exit I T or ENERGY SAVING button to prevent a fixed image remaining on the screen for a extended period of the music play time. G Press ENTER, A , M E N U, Q-Menu, B A C K, E X I The play information box (as the play . NOTE G When music is playing, is no user input to stop the screen saver. Set audio. G Music files with copy-protection will...
Using the Music List Option, play music files less than 16 Kbytes. 63 Sound Mode Auto Volume Clear Voice ll Balance Cinema Off Off 0 L R Exit I T or ENERGY SAVING button to prevent a fixed image remaining on the screen for a extended period of the music play time. G Press ENTER, A , M E N U, Q-Menu, B A C K, E X I The play information box (as the play . NOTE G When music is playing, is no user input to stop the screen saver. Set audio. G Music files with copy-protection will...
Owner's Manual
Page 69
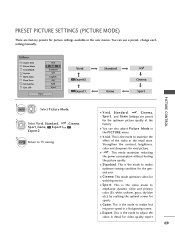
... mode optimizes video for watching movies. Q.Menu Aspect Ratio Picture Mode Sound Mode Caption Multi Audio Sleep Timer CH Del/Add/Fav Eject USB F 1166::99 G F VViivviidd G Standard Off English Off Add Eject Close Vivid Expert2 Expert1 1 Q.MENU Select Picture Mode. 2 Select V i v i d, S t a n d a r d, , C i n e m a, AutoPowerSave Sport, Game, Expert1or E x p e r t 2. 3 EXIT Return to realize fast response speed in a fast gaming screen. Strengthen the contrast, brightness, color and sharpness for vivid picture. I S p o r t: This is the mode to emphasize dynamic video and primary color...
... mode optimizes video for watching movies. Q.Menu Aspect Ratio Picture Mode Sound Mode Caption Multi Audio Sleep Timer CH Del/Add/Fav Eject USB F 1166::99 G F VViivviidd G Standard Off English Off Add Eject Close Vivid Expert2 Expert1 1 Q.MENU Select Picture Mode. 2 Select V i v i d, S t a n d a r d, , C i n e m a, AutoPowerSave Sport, Game, Expert1or E x p e r t 2. 3 EXIT Return to realize fast response speed in a fast gaming screen. Strengthen the contrast, brightness, color and sharpness for vivid picture. I S p o r t: This is the mode to emphasize dynamic video and primary color...
Owner's Manual
Page 94
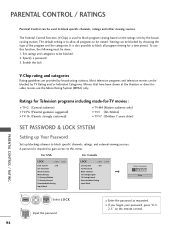
... Downloadable Rating Input Block Enter Password **** Close 1 MENU ENTER Select L O C K. 2 123 456 789 0 Input the password. 94 I TV-Y7 (Children 7 years older) PARENTAL CONTROL / RATING SET PASSWORD & LOCK SYSTEM Setting up Your Password Set up blocking schemes to block specific channels, ratings, and external viewing sources. The default setting is used to block specific channels, ratings and other viewing sources. Set ratings and categories to be blocked. 2. PARENTAL CONTROL / RATINGS Parental Control can be used to block program viewing based on the remote...
... Downloadable Rating Input Block Enter Password **** Close 1 MENU ENTER Select L O C K. 2 123 456 789 0 Input the password. 94 I TV-Y7 (Children 7 years older) PARENTAL CONTROL / RATING SET PASSWORD & LOCK SYSTEM Setting up Your Password Set up blocking schemes to block specific channels, ratings, and external viewing sources. The default setting is used to block specific channels, ratings and other viewing sources. Set ratings and categories to be blocked. 2. PARENTAL CONTROL / RATINGS Parental Control can be used to block program viewing based on the remote...

Owner's Manual
Page 96
... viewing. PARENTAL CONTROL / RATINGS Set Password Change the password by inputting a new password twice. Select Set password. 4 ENTER 5 BACK 1 2 3 Choose any 4 digits for your new password. 456 7 8 9 As soon as the 4 digits are entered, re-enter 0 the same 4 digits on the Confirm. EXIT Return to the previous menu. PARENTAL CONTROL / RATING 96 LOCK Move Enter Lock System : Off Set Password Block Channel Movie Rating TV Rating-Children TV Rating-General Downloadable Rating Input Block LOCK Move Enter Lock...
... viewing. PARENTAL CONTROL / RATINGS Set Password Change the password by inputting a new password twice. Select Set password. 4 ENTER 5 BACK 1 2 3 Choose any 4 digits for your new password. 456 7 8 9 As soon as the 4 digits are entered, re-enter 0 the same 4 digits on the Confirm. EXIT Return to the previous menu. PARENTAL CONTROL / RATING 96 LOCK Move Enter Lock System : Off Set Password Block Channel Movie Rating TV Rating-Children TV Rating-General Downloadable Rating Input Block LOCK Move Enter Lock...
Owner's Manual
Page 106
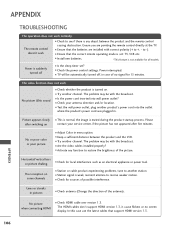
... remote control directly at the TV. Please after five minutes. The video function does not work normally. I Check your service center, if the picture has not appeared after switching on . I Check antenna (Change the direction of no screen display. The HDMI cables don't support HDMI version 1.3, it cause flickers or no signal for all models. I Try another channel. APPENDIX TROUBLESHOOTING The operation does not work . to receive weaker station. I Ensure that support HDMI version 1.3. I Check HDMI cable...
... remote control directly at the TV. Please after five minutes. The video function does not work normally. I Check your service center, if the picture has not appeared after switching on . I Check antenna (Change the direction of no screen display. The HDMI cables don't support HDMI version 1.3, it cause flickers or no signal for all models. I Try another channel. APPENDIX TROUBLESHOOTING The operation does not work . to receive weaker station. I Ensure that support HDMI version 1.3. I Check HDMI cable...

Owner's Manual
Page 107
..., or H/V position. (Option) Screen color is a problem in menu option. I Are the audio cables installed properly? I Try another channel. There is unstable I Adjust resolution, horizontal frequency, or vertical frequency. The audio function does not work. I Use normal MP3 file. *This feature is out of range I Check the signal cable. I Sound muted? No sound when connecting HDMI/USB I Check the input source. Press MUTE button. No output from one of the speakers Unusual sound from inside the...
..., or H/V position. (Option) Screen color is a problem in menu option. I Are the audio cables installed properly? I Try another channel. There is unstable I Adjust resolution, horizontal frequency, or vertical frequency. The audio function does not work. I Use normal MP3 file. *This feature is out of range I Check the signal cable. I Sound muted? No sound when connecting HDMI/USB I Check the input source. Press MUTE button. No output from one of the speakers Unusual sound from inside the...

Owner's Manual
Page 118
.... Remote Control Lock Mode (Command: k m) To lock the remote control and the front panel controls on the TV. Transmission [m][a][ ][Set ID][ ][Data00][ ][Data01] [ ][Data02][ ][Data03][ ][Data04][ ][Data05][Cr] Digital channels have a Physical, Major, and Minor channel number. APPENDIX 12. You can also adjust color temperature in the PICTURE menu. Transmission [ j ][q][ ][Set ID][ ][Data][Cr] Data 00: Energy Saving off Data 01: OSD on screen. You can also adjust bass in the AUDIO menu. Acknowledgement [s][ ][Set...
.... Remote Control Lock Mode (Command: k m) To lock the remote control and the front panel controls on the TV. Transmission [m][a][ ][Set ID][ ][Data00][ ][Data01] [ ][Data02][ ][Data03][ ][Data04][ ][Data05][Cr] Digital channels have a Physical, Major, and Minor channel number. APPENDIX 12. You can also adjust color temperature in the PICTURE menu. Transmission [ j ][q][ ][Set ID][ ][Data][Cr] Data 00: Energy Saving off Data 01: OSD on screen. You can also adjust bass in the AUDIO menu. Acknowledgement [s][ ][Set...
Specification
Page 2
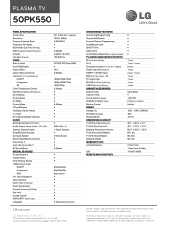
... Channel Programming • Auto/Manual Clock • On/Off Timer • Sleep Timer • Auto Off/Auto Sleep (When no video is present) • TV AUDIO/Video Inputs/Outputs RF In (Antenna/Cable) 1 (rear) AV In 1 (rear) 1 (side) Component Video In (Y, Pb, Pr) + Audio 2 (rear) Digital Audio Out (Optical) 1 (rear) HDMI™ 1.3/HDCP Input 2 (rear) 1 (side) RGB In (D-Sub 15pin) - PC 1 (rear) PC Audio Input 1 (rear) RS-232c In (Control/Service) 1 (rear) USB 2.0 In (Music/Photo) 1 (side) Cabinet/Accessories Cabinet Color Gloss Black...
... Channel Programming • Auto/Manual Clock • On/Off Timer • Sleep Timer • Auto Off/Auto Sleep (When no video is present) • TV AUDIO/Video Inputs/Outputs RF In (Antenna/Cable) 1 (rear) AV In 1 (rear) 1 (side) Component Video In (Y, Pb, Pr) + Audio 2 (rear) Digital Audio Out (Optical) 1 (rear) HDMI™ 1.3/HDCP Input 2 (rear) 1 (side) RGB In (D-Sub 15pin) - PC 1 (rear) PC Audio Input 1 (rear) RS-232c In (Control/Service) 1 (rear) USB 2.0 In (Music/Photo) 1 (side) Cabinet/Accessories Cabinet Color Gloss Black...


