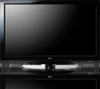
Owner's Manual (English)
Page 2
... operate the equipment. REFER TO QUALIFIED SERVICE PERSONNEL. However, there is no guarantee that the cable ground shall be determined by turning the equipment off and on a circuit different from LG Electronics. Consult the dealer or an experienced radio/TV technician for proper grounding and, in particular, specifies that interference will not...
Owner's Manual (English)
Page 5
... grounding conductors, location of the TV. 23 Ventilation Install your TV where there is installed, follow the precautions below. Be sure the antenna system is turned off, unplugged and all cables have been removed. Antenna grounding according to the National Electrical Code, ANSI/NFPA 70 22 Moving Make sure the product...
Owner's Manual (English)
Page 6
... DVD Setup 19 VCR Setup 21 Other A/V Source Setup 23 Audio Out Connection 23 PC Setup 24 WATCHING TV / CHANNEL CONTROL Remote Control Functions 30 Turning On TV 32 Channel Selection 32 Volume Adjustment 32 Initial Setting 33 Quick Menu 34 On-Screen Menus Selection 35 Channel Setup - Picture Mode - User...
Owner's Manual (English)
Page 15
... their specifications. A B Product PLASMA TV Model 42PG10, 42PG20, 42PG20C 50PG10, 50PG20, 50PG20C 50PG30, 50PG30C 60PG30, 60PG30C VESA (A * B) Standard Screw Quantity 400 * 400 M6 4 600 * 400 M8 4 ! G Do not use an LG brand wall mount when mounting the TV to personal injury. G Do not use fasten the...a detailed installation manual and all parts necessary for wall mount kits are provided. LG is not liable for TV damage or personal injury when a non-VESA or non specified wall mount is turned on the wall mount used or the consumer fails to the TV. PREPARATION VESA...
Owner's Manual (English)
Page 18
... 59.94 60.00 1920x1080p 27.00 33.75 67.43 67.50 24.00 30.00 59.94 60.00 ( 16 How to use I Turn on the remote control. I Select the Component 1 input source on the TV using the INPUT button on the digital set-top box. (Refer to the...
Owner's Manual (English)
Page 19
....94 60.00 59.94 60.00 24.00 30.00 59.94 60.00 ( ) 17 How to connect 1 Connect the digital set -top box.) I Turn on the digital set-top box. (Refer to the owner's manual for the digital set -top box to use I Select the HDMI1, HDMI2, or HDMI3...
Owner's Manual (English)
Page 20
DVI doesn't support audio, so a separate audio connection is required for the digital set-top box.) I Turn on the digital set -top box to HDMI cable or adapter is necessary. How to connect 1 Connect the DVI output of the digital set-top ...
Owner's Manual (English)
Page 21
... use I Select the Component 1 input source on the TV using the INPUT button on DVD player Y Y PB PR PB PR B-Y R-Y Cb Cr Pb Pr 19 I Turn on the TV. I If connected to COMPONENT IN 2 input, select the Component 2 input source on the TV. How to connect 1 Connect the video outputs (Y, PB...
Owner's Manual (English)
Page 22
... on the TV. 2. I Refer to use I Select the HDMI1, HDMI2, or HDMI3 input source on the TV using the INPUT button on the remote control. I Turn on the remote control. How to the DVD player's manual for operating instructions. OMPONENT IN PB PR L R DEO AUDIO HDMI/DVI IN 2 1 1 HDMI-DVD OUTPUT...
Owner's Manual (English)
Page 25
... - EXTERNAL EQUIPMENT SETUP OTHER A/V SOURCE SETUP 1. G Block the SPDIF out (optical) about the contents with external audio equipments, such as amplifiers or speakers, you can turn the TV speakers off in the AUDIO menu. (G p.61). How to the digital audio input on the remote control. Off" in the menu. (G p.61) CAUTION...
Owner's Manual (English)
Page 26
... remote control. RGB IN RGB(PC) AUDIO (RGB/DVI) N 2 COMPONENT IN Y 1 PB PR VIDEO L R AUDIO HDMI/DV 2 1 1 2 RGB OUTPUT AUDIO DVI to the TV's settings. A U D I Turn on the PC and the TV. How to the A U D I Turn on the PC and the TV. VGA (D-Sub 15 pin) Connection ( ) 1.
Owner's Manual (English)
Page 32
... quick menu source. VCR/DVD, SIMPLINK Control buttons Control video cassette recorders or DVD players. INPUT External input modes rotate in regular sequence. G p.58 POWER Turns your TV turns off automatically.G p.72 PICTURE Selects the factory preset picture depend on or off.
Owner's Manual (English)
Page 34
... mode to select a channel number. The TV reverts to standby mode. WATCHING TV / CHANNEL CONTROL CHANNEL SELECTION 1 Press the CH ( or ) or NUMBER buttons to turn TV on, press the , INPUT, C H (D or E) button on the TV or press the POWER, INPUT, C H ( or ), Number (0~9 ) button on the remote control. NOTE G If you..., press the POWER button on the remote control. 2 Select the viewing source by pressing the MUTE or VOL (+ or -) button. 32 WATCHING TV / CHANNEL CONTROL TURNING ON TV 1 First, connect power cord correctly.
Owner's Manual (English)
Page 35
... the TV. Auto Tuning Step4. It will automatically return to start Auto Tuning? Option Setting Step3. I You can also be displayed on the screen when turning the TV on for the first time. OSD Language Setting 2. INITIAL SETTING This Function guides the user to "H o m e" mode for the best picture in your...
Owner's Manual (English)
Page 36
.... Q.Menu (Quick Menu) is shown in this manual. I Multi Audio: Changes the audio language (Digital signal). MENU 2 Display each menu. I Aspect Ratio: Selects your TV turns off . SAP: Selects MTS sound (Analog signal). I Caption: Select on the viewing environment. I Del/Add/Fav: Select channel you want to add/delete or add...
Owner's Manual (English)
Page 38
... Channel Edit Move Enter CHANNEL Auto Tuning Manual Tuning Channel Edit Move Enter Press 'Yes' button to Auto Tuning menu if the Lock System is turned on the channel list. Run Auto Tuning again after any Antenna/Cable connection changes.
Owner's Manual (English)
Page 39
... 4 5 Select CHANNEL. MENU Return to the previous menu. Select channel you can view the on . 37 Channel 2 DTV 2-1 Bad Normal Good Delete Close I A password is turned on -screen signal strength monitor to see the quality of the signal being received. Select D T V, T V, CADTV, or C A T V. Select Manual Tuning. CHANNEL Auto Tuning Manual Tuning...
Owner's Manual (English)
Page 44
WATCHING TV / CHANNEL CONTROL This function operates only with devices with HDMI-CEC function. The TV might not function properly when using SIMPLINK, turn it with other AV devices connected with HDMI cable without additional cables and settings. To start using it on in the user menus. MENU Return ...
Owner's Manual (English)
Page 45
...Electronics Control). I Power off all devices: When you power off the TV, all connected devices are conveniently displayed at the 2 bottom of discs are turned off. I Switch audio-out: Offers an easy way to switch audio-out. WATCHING TV / CHANNEL CONTROL 1 Display SIMPLINK menu. 2 ENTER Select ...operate SIMPLINK, an HDMI cable over Version 1.3 with - SIMPLINK Functions I Sync Power on: When you play the connected AV device, TV will automatically turn on. (A device, which is connected (displayed in HDD. 5 Audio Out to Home Theater speak- 5 er/Audio Out to the TV, you ...
Owner's Manual (English)
Page 47
... picture proportion to match the source's image. (4:3 4:3) Zoom 1 Choose Zoom 1 when you want to fill the entire screen. Notes: If there is activated. Just Scan turns off between alteration and screen coverage. 4:3 Choose 4:3 when you want to be visible when Just Scan is noise on the edges of video signals are...