
Owner's Manual (English)
Page 1
...LGE U. Retain it for energy efficiency. A.,Inc. has determined that this information to your set . Environmental Protection Agency(EPA). P/NO : SAC30708031 (0808-REV04) www.lgusa.com / www.lg.ca / www.lgcommercial.com Record model number and serial number of power-saving guidelines issued... by the U.S. ENERGY STAR is a set of the set . S. PLASMA TV OWNER'S MANUAL 42PG10 42PG20 42PG20C 50PG30 50PG30C 50PG10 50PG20 50PG20C 60PG30 60PG30C Please...
...LGE U. Retain it for energy efficiency. A.,Inc. has determined that this information to your set . Environmental Protection Agency(EPA). P/NO : SAC30708031 (0808-REV04) www.lgusa.com / www.lg.ca / www.lgcommercial.com Record model number and serial number of power-saving guidelines issued... by the U.S. ENERGY STAR is a set of the set . S. PLASMA TV OWNER'S MANUAL 42PG10 42PG20 42PG20C 50PG30 50PG30C 50PG10 50PG20 50PG20C 60PG30 60PG30C Please...
Owner's Manual (English)
Page 6
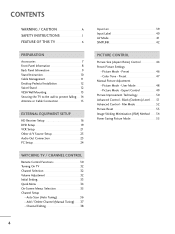
... Tone - Channel Editing 38 Input List 39 Input Label 40 AV Mode 41 SIMPLINK 42 PICTURE CONTROL Picture Size (Aspect Ratio) Control 44 Preset Picture Settings - CONTENTS WARNING / CAUTION A SAFETY INSTRUCTIONS 1 FEATURE OF THIS TV 6 PREPARATION Accessories 7 Front Panel Information 8 Back Panel Information 9 Stand Instruction 10 Cable Management 11 ... 23 PC Setup 24 WATCHING TV / CHANNEL CONTROL Remote Control Functions 30 Turning On TV 32 Channel Selection 32 Volume Adjustment 32 Initial Setting 33 Quick Menu 34 On-Screen Menus Selection 35 Channel Setup -
... Tone - Channel Editing 38 Input List 39 Input Label 40 AV Mode 41 SIMPLINK 42 PICTURE CONTROL Picture Size (Aspect Ratio) Control 44 Preset Picture Settings - CONTENTS WARNING / CAUTION A SAFETY INSTRUCTIONS 1 FEATURE OF THIS TV 6 PREPARATION Accessories 7 Front Panel Information 8 Back Panel Information 9 Stand Instruction 10 Cable Management 11 ... 23 PC Setup 24 WATCHING TV / CHANNEL CONTROL Remote Control Functions 30 Turning On TV 32 Channel Selection 32 Volume Adjustment 32 Initial Setting 33 Quick Menu 34 On-Screen Menus Selection 35 Channel Setup -

Owner's Manual (English)
Page 7
... Broadcasting System Captions 67 - Auto Clock Setup 69 Manual Clock Setup 70 Auto On/Off Time Setting 71 Sleep Timer Setting 72 Auto Shut-off Setting 73 PARENTAL CONTROL / RATINGS Set Password & Lock System 74 Channel Blocking 77 Movie & TV Rating 78 Downloadable Rating 83 External Input Blocking... Control Through RS-232C 92 5 SOUND & LANGUAGE CONTROL Auto Volume Leveler (Auto Volume 56 Clear Voice 57 Preset Sound Setting (Sound Mode 58 Sound Setting Adjustment - User Mode 59 Balance 60 TV Speakers On/Off Setup 61 Audio Reset 62 Stereo/SAP Broadcasts Setup 63 Audio...
... Broadcasting System Captions 67 - Auto Clock Setup 69 Manual Clock Setup 70 Auto On/Off Time Setting 71 Sleep Timer Setting 72 Auto Shut-off Setting 73 PARENTAL CONTROL / RATINGS Set Password & Lock System 74 Channel Blocking 77 Movie & TV Rating 78 Downloadable Rating 83 External Input Blocking... Control Through RS-232C 92 5 SOUND & LANGUAGE CONTROL Auto Volume Leveler (Auto Volume 56 Clear Voice 57 Preset Sound Setting (Sound Mode 58 Sound Setting Adjustment - User Mode 59 Balance 60 TV Speakers On/Off Setup 61 Audio Reset 62 Stereo/SAP Broadcasts Setup 63 Audio...
Owner's Manual (English)
Page 16
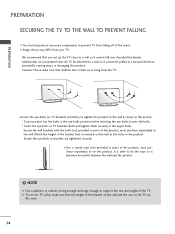
... one on the wall to a wall so it becomes horizontal between the wall and the product. ! G To use the TV safely, make sure that you set up the TV close to the holes in the upper holes. I Insert the eye-bolts (or TV brackets and bolts) to tighten the product to...
... one on the wall to a wall so it becomes horizontal between the wall and the product. ! G To use the TV safely, make sure that you set up the TV close to the holes in the upper holes. I Insert the eye-bolts (or TV brackets and bolts) to tighten the product to...
Owner's Manual (English)
Page 18
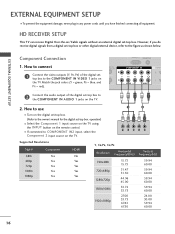
...(PC) (RGB/DVI) COMPONENT IN VIDEO AUDIO HDMI/ 2 1 2 Connect the audio output of the digital settop box to the owner's manual for the digital set -top box. I If connected to the COMPONENT IN AUDIO 1 jacks on the TV. 1 2 Y PB PR L R Supported Resolutions Signal 480i 480p 720p ... (Y = green, PB = blue, and( ) PR = red). How to connect MOTE TROL IN 2 1 Connect the video outputs (Y, PB, PR) of the digital set-top box to COMPONENT IN2 input, select the Component 2 input source on the TV. 2. However, if you have finished connecting all equipment. HD RECEIVER SETUP...
...(PC) (RGB/DVI) COMPONENT IN VIDEO AUDIO HDMI/ 2 1 2 Connect the audio output of the digital settop box to the owner's manual for the digital set -top box. I If connected to the COMPONENT IN AUDIO 1 jacks on the TV. 1 2 Y PB PR L R Supported Resolutions Signal 480i 480p 720p ... (Y = green, PB = blue, and( ) PR = red). How to connect MOTE TROL IN 2 1 Connect the video outputs (Y, PB, PR) of the digital set-top box to COMPONENT IN2 input, select the Component 2 input source on the TV. 2. However, if you have finished connecting all equipment. HD RECEIVER SETUP...
Owner's Manual (English)
Page 19
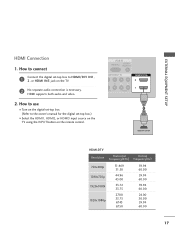
... 24.00 30.00 59.94 60.00 ( ) 17 EXTERNAL EQUIPMENT SETUP HDMI Connection 1. How to connect 1 Connect the digital set-top box to the owner's manual for the digital set-top box.) I Turn on the digital set-top box. (Refer to HDMI/DVI IN1, 2, or HDMI IN3 jack on the remote control.
... 24.00 30.00 59.94 60.00 ( ) 17 EXTERNAL EQUIPMENT SETUP HDMI Connection 1. How to connect 1 Connect the digital set-top box to the owner's manual for the digital set-top box.) I Turn on the digital set-top box. (Refer to HDMI/DVI IN1, 2, or HDMI IN3 jack on the remote control.
Owner's Manual (English)
Page 20
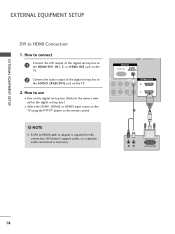
.../DVI) CABLE IN COMPONENT IN PB PR L R VIDEO AUDIO HDMI/DVI IN 2 1 2 1 ! DVI doesn't support audio, so a separate audio connection is required for the digital set -top box to the HDMI/DVI IN1, 2, or HDMI IN3 jack on the TV. 2 Connect the audio output of the digital... control. EXTERNAL EQUIPMENT SETUP EXTERNAL EQUIPMENT SETUP DVI to HDMI cable or adapter is necessary. How to connect 1 Connect the DVI output of the digital set -top box.) I Select the HDMI1, HDMI2, or HDMI3 input source on the TV using the INPUT button on the TV. 2. R L DVI-DTV OUTPUT 18 How...
.../DVI) CABLE IN COMPONENT IN PB PR L R VIDEO AUDIO HDMI/DVI IN 2 1 2 1 ! DVI doesn't support audio, so a separate audio connection is required for the digital set -top box to the HDMI/DVI IN1, 2, or HDMI IN3 jack on the TV. 2 Connect the audio output of the digital... control. EXTERNAL EQUIPMENT SETUP EXTERNAL EQUIPMENT SETUP DVI to HDMI cable or adapter is necessary. How to connect 1 Connect the DVI output of the digital set -top box.) I Select the HDMI1, HDMI2, or HDMI3 input source on the TV using the INPUT button on the TV. 2. R L DVI-DTV OUTPUT 18 How...

Owner's Manual (English)
Page 23
... out socket of the VCR to the ANTENNA/CABLE IN socket on the screen for a long period of the VCR. 2. EXTERNAL EQUIPMENT SETUP VCR SETUP I Set VCR output switch to 3 or 4 and then tune TV to the same channel number. I Insert a video tape into the VCR and press PLAY on the...
... out socket of the VCR to the ANTENNA/CABLE IN socket on the screen for a long period of the VCR. 2. EXTERNAL EQUIPMENT SETUP VCR SETUP I Set VCR output switch to 3 or 4 and then tune TV to the same channel number. I Insert a video tape into the VCR and press PLAY on the...

Owner's Manual (English)
Page 25
... V 1 input source on the TV. Match the jack colors. (Video = yellow, Audio Left = white, and Audio Right = red) Camcorder Video Game Set VIDEO L R USB SERVICE ONLY HDMI IN 3 VIDEO L/MONO AUDIO R 2. How to external audio equipment via the Audio Output port. 1. See the external ...ACP (Audio Copy Protection) function. 23 I Select the A V 2 input source on the TV using 1 the INPUT button on the audio equipment. 3 Set the "TV Speaker option - G Block the SPDIF out (optical) about the contents with external audio equipments, such as amplifiers or speakers, you can turn...
... V 1 input source on the TV. Match the jack colors. (Video = yellow, Audio Left = white, and Audio Right = red) Camcorder Video Game Set VIDEO L R USB SERVICE ONLY HDMI IN 3 VIDEO L/MONO AUDIO R 2. How to external audio equipment via the Audio Output port. 1. See the external ...ACP (Audio Copy Protection) function. 23 I Select the A V 2 input source on the TV using 1 the INPUT button on the audio equipment. 3 Set the "TV Speaker option - G Block the SPDIF out (optical) about the contents with external audio equipments, such as amplifiers or speakers, you can turn...

Owner's Manual (English)
Page 26
... on the TV. 2. RGB IN RGB(PC) AUDIO (RGB/DVI) N 2 COMPONENT IN Y 1 PB PR VIDEO L R AUDIO HDMI/DV 2 1 1 2 RGB OUTPUT AUDIO DVI to the TV's settings. EXTERNAL EQUIPMENT SETUP EXTERNAL EQUIPMENT SETUP PC SETUP This TV provides Plug and Play capability, meaning that the PC adjusts automatically to HDMI Connection 1. VGA...
... on the TV. 2. RGB IN RGB(PC) AUDIO (RGB/DVI) N 2 COMPONENT IN Y 1 PB PR VIDEO L R AUDIO HDMI/DV 2 1 1 2 RGB OUTPUT AUDIO DVI to the TV's settings. EXTERNAL EQUIPMENT SETUP EXTERNAL EQUIPMENT SETUP PC SETUP This TV provides Plug and Play capability, meaning that the PC adjusts automatically to HDMI Connection 1. VGA...

Owner's Manual (English)
Page 27
... work if a HDMI to 1360x768. G Avoid keeping a fixed image on the PICTURE menu until the picture is separate. G Depending on the graphics card, some resolution settings may be positioned on the screen. NOTES G To get the the best picture quality, adjust the PC graphics card to DVI Cable is present, change...
... work if a HDMI to 1360x768. G Avoid keeping a fixed image on the PICTURE menu until the picture is separate. G Depending on the graphics card, some resolution settings may be positioned on the screen. NOTES G To get the the best picture quality, adjust the PC graphics card to DVI Cable is present, change...
Owner's Manual (English)
Page 29
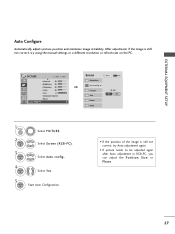
... RGB-PC, you can adjust the Position, S i z e or P h a s e. 27 EXTERNAL EQUIPMENT SETUP Auto Configure Automatically adjusts picture position and minimizes image instability. To Set Yes No 1 MENU 2 ENTER 3 ENTER Select PICTURE. After adjustment, if the image is still not correct, try using the manual... settings or a different resolution or refresh rate on the PC. PICTURE Move Enter E • Contrast 50 • Brightness 50 • Sharpness 50 • Color 50...
... RGB-PC, you can adjust the Position, S i z e or P h a s e. 27 EXTERNAL EQUIPMENT SETUP Auto Configure Automatically adjusts picture position and minimizes image instability. To Set Yes No 1 MENU 2 ENTER 3 ENTER Select PICTURE. After adjustment, if the image is still not correct, try using the manual... settings or a different resolution or refresh rate on the PC. PICTURE Move Enter E • Contrast 50 • Brightness 50 • Sharpness 50 • Color 50...
Owner's Manual (English)
Page 31
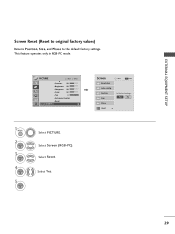
... Reset G 29 Select Reset. Select Y e s. Screen Resolution Move MENU Prev. This feature operates only in RGB-PC mode. Select Screen (RGB-PC). Position Size Initialize Settings. PICTURE Move Enter E • Contrast 50 • Brightness 50 • Sharpness 50 • Color 50 • Tint 0R G • Advanced Control • Reset Screen (RGB...
... Reset G 29 Select Reset. Select Y e s. Screen Resolution Move MENU Prev. This feature operates only in RGB-PC mode. Select Screen (RGB-PC). Position Size Initialize Settings. PICTURE Move Enter E • Contrast 50 • Brightness 50 • Sharpness 50 • Color 50 • Tint 0R G • Advanced Control • Reset Screen (RGB...

Owner's Manual (English)
Page 33
... used batteries with -). SIMPLINK See a list of screen information to the next one. I Install two 1.5V AAA batteries. When you select and set of AV devices connected to TV. G p.32 CHANNEL Select available channels. G p.42-43 AV MODE It helps you toggle this button, the SIMPLINK menu... screen. WATCHING TV / CHANNEL CONTROL THUMBSTICK Navigate the on-screen menus and adjust the system settings to your preference. (Up/Down/Left Right/ENTER) RETURN Allows the user to move return one full set images and sounds when connecting AV devices. I Close cover. 31 G p.34 MUTE Switch ...
... used batteries with -). SIMPLINK See a list of screen information to the next one. I Install two 1.5V AAA batteries. When you select and set of AV devices connected to TV. G p.32 CHANNEL Select available channels. G p.42-43 AV MODE It helps you toggle this button, the SIMPLINK menu... screen. WATCHING TV / CHANNEL CONTROL THUMBSTICK Navigate the on-screen menus and adjust the system settings to your preference. (Up/Down/Left Right/ENTER) RETURN Allows the user to move return one full set images and sounds when connecting AV devices. I Close cover. 31 G p.34 MUTE Switch ...
Owner's Manual (English)
Page 34
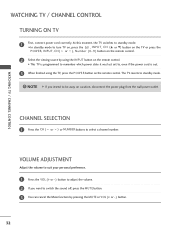
.... 2 Select the viewing source by pressing the MUTE or VOL (+ or -) button. 32 I This TV is programmed to remember which power state it was last set to switch the sound off, press the MUTE button. 3 You can cancel the Mute function by using the TV, press the POWER button on the...
.... 2 Select the viewing source by pressing the MUTE or VOL (+ or -) button. 32 I This TV is programmed to remember which power state it was last set to switch the sound off, press the MUTE button. 3 You can cancel the Mute function by using the TV, press the POWER button on the...
Owner's Manual (English)
Page 35
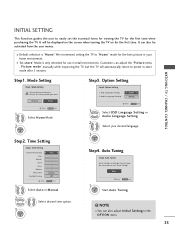
... displayed on the screen when turning the TV on for the best picture in retail environments. It can change channel map. Mode Setting Step1. Option Setting 1. Auto Tuning Step4. We recommend setting the TV to "H o m e" mode for the first time. WATCHING TV / CHANNEL CONTROL Step1. In Store Home Enter...the "Picture menu - Picture mode" manually while inspecting the TV, but the TV will be activated from the user menus. Mode Setting ! Time Setting Step2. Do you want to start Auto Tuning? NOTE I Default selection is only intended for the first time when purchasing the TV.
... displayed on the screen when turning the TV on for the best picture in retail environments. It can change channel map. Mode Setting Step1. Option Setting 1. Auto Tuning Step4. We recommend setting the TV to "H o m e" mode for the first time. WATCHING TV / CHANNEL CONTROL Step1. In Store Home Enter...the "Picture menu - Picture mode" manually while inspecting the TV, but the TV will be activated from the user menus. Mode Setting ! Time Setting Step2. Do you want to start Auto Tuning? NOTE I Default selection is only intended for the first time when purchasing the TV.
Owner's Manual (English)
Page 37
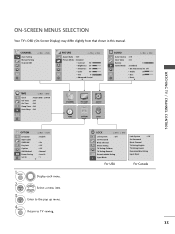
... Block Channel Movie Rating TV Rating-Children TV Rating-General Downloadable Rating Input Block Lock System : Off Set Password Block Channel TV Rating-English TV Rating-French Downloadable Rating Input Block For USA For Canada 35 CHANNEL Auto ...PICTURE AUDIO TIME OPTION LOCK OPTION Move Enter Language : English Input Label SIMPLINK : On Key Lock : Off Caption : Off ISM Method : Normal Power Saving : Level 0 Set ID : 1 E 1 MENU Display each menu. 2 ENTER Select a menu item. 3 ENTER Enter to the pop up menu. 4 MENU Return to TV viewing. WATCHING...
... Block Channel Movie Rating TV Rating-Children TV Rating-General Downloadable Rating Input Block Lock System : Off Set Password Block Channel TV Rating-English TV Rating-French Downloadable Rating Input Block For USA For Canada 35 CHANNEL Auto ...PICTURE AUDIO TIME OPTION LOCK OPTION Move Enter Language : English Input Label SIMPLINK : On Key Lock : Off Caption : Off ISM Method : Normal Power Saving : Level 0 Set ID : 1 E 1 MENU Display each menu. 2 ENTER Select a menu item. 3 ENTER Enter to the pop up menu. 4 MENU Return to TV viewing. WATCHING...
Owner's Manual (English)
Page 41
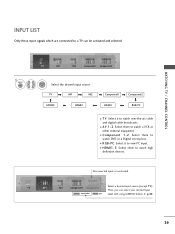
... T V). WATCHING TV / CHANNEL CONTROL INPUT LIST Only these input signals which are connected to view PC input. I AV 1-2: Select them to watch DVD or a Digital set-top box. I RGB-PC: Select it to watch over-the-air, cable and digital cable broadcasts. I C o m p o n e n t 1 - 2: Select them to watch a VCR or other external equipment...
... T V). WATCHING TV / CHANNEL CONTROL INPUT LIST Only these input signals which are connected to view PC input. I AV 1-2: Select them to watch DVD or a Digital set-top box. I RGB-PC: Select it to watch over-the-air, cable and digital cable broadcasts. I C o m p o n e n t 1 - 2: Select them to watch a VCR or other external equipment...
Owner's Manual (English)
Page 42
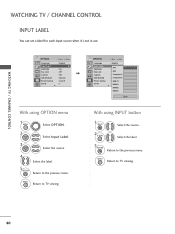
... : English Input Label AV1 F G SIMPLINK : On Key Lock : OAffV2 Caption : OCfof mponent1 ISM Method : NCoormmpaol nent2 Power Saving : LeRvGeBl-0PC Set ID : 1HDMI1 E HDMI2 HDMI3 Close With using OPTION menu 1 MENU Select OPTION. 2 ENTER 3 ENTER Select Input Label. WATCHING TV / CHANNEL CONTROL ...WATCHING TV / CHANNEL CONTROL INPUT LABEL You can set a label for each input source when it's not in use. MENU Return to the previous menu. Select the source. 4 Select the label...
... : English Input Label AV1 F G SIMPLINK : On Key Lock : OAffV2 Caption : OCfof mponent1 ISM Method : NCoormmpaol nent2 Power Saving : LeRvGeBl-0PC Set ID : 1HDMI1 E HDMI2 HDMI3 Close With using OPTION menu 1 MENU Select OPTION. 2 ENTER 3 ENTER Select Input Label. WATCHING TV / CHANNEL CONTROL ...WATCHING TV / CHANNEL CONTROL INPUT LABEL You can set a label for each input source when it's not in use. MENU Return to the previous menu. Select the source. 4 Select the label...

Owner's Manual (English)
Page 44
The TV might not function properly when using SIMPLINK, turn it with other AV devices connected with HDMI cable without additional cables and settings. MENU Return to the previous menu. G If a connected SIMPLINK home theater system doesn't play other products with an OPTICAL cable. 42 G When you... on the remote control, the SIMPLINK device will stop. OPTION Move Enter Language Input Label SIMPLINK Key Lock Caption ISM Method Power Saving Set ID E : English : On : Off : Off : Normal : Level 0 : 1 OPTION Move Enter Language Input Label SIMPLINK Key Lock Caption ISM Method...
The TV might not function properly when using SIMPLINK, turn it with other AV devices connected with HDMI cable without additional cables and settings. MENU Return to the previous menu. G If a connected SIMPLINK home theater system doesn't play other products with an OPTICAL cable. 42 G When you... on the remote control, the SIMPLINK device will stop. OPTION Move Enter Language Input Label SIMPLINK Key Lock Caption ISM Method Power Saving Set ID E : English : On : Off : Off : Normal : Level 0 : 1 OPTION Move Enter Language Input Label SIMPLINK Key Lock Caption ISM Method...


