
Owners Manual
Page 1
...lg.ca / www.lgcommercial.com Retain it for energy efficiency. Record model number and serial number of the set of power-saving guidelines issued by the U.S. ENERGY STAR is a set . S. has determined that this information to your set. PLASMA TV OWNER'S MANUAL 42PG10 42PG20 42PG20C 50PG30 50PG30C 50PG10 50PG20 50PG20C... 60PG30 60PG30C Please read this manual carefully before operating your dealer when you require service. A.,...
...lg.ca / www.lgcommercial.com Retain it for energy efficiency. Record model number and serial number of the set of power-saving guidelines issued by the U.S. ENERGY STAR is a set . S. has determined that this information to your set. PLASMA TV OWNER'S MANUAL 42PG10 42PG20 42PG20C 50PG30 50PG30C 50PG10 50PG20 50PG20C... 60PG30 60PG30C Please read this manual carefully before operating your dealer when you require service. A.,...

Owners Manual
Page 4
...operable. 19 Keep the product away from physical or mechanical abuse, such as vases, cups, etc. Be sure do not expose this owner's manual to rain, moisture or other liquids. The plug must be connected to the same AC power outlet as this apparatus or antenna during a ... the screen with an exact replacement part by connecting it , discontinue use a damaged or loose power cord. Pay particular attention to unplug the TV. 15 WARNING - Short-circuit Breaker Power Supply 18 DISCONNECTING DEVICE FROM MAINS Mains plug is , a single outlet circuit which powers only that ...
...operable. 19 Keep the product away from physical or mechanical abuse, such as vases, cups, etc. Be sure do not expose this owner's manual to rain, moisture or other liquids. The plug must be connected to the same AC power outlet as this apparatus or antenna during a ... the screen with an exact replacement part by connecting it , discontinue use a damaged or loose power cord. Pay particular attention to unplug the TV. 15 WARNING - Short-circuit Breaker Power Supply 18 DISCONNECTING DEVICE FROM MAINS Mains plug is , a single outlet circuit which powers only that ...

Owners Manual
Page 6
... 8 Back Panel Information 9 Stand Instruction 10 Cable Management 11 Desktop Pedestal Installation 12 Swivel Stand 12 VESA Wall Mounting 13 Securing the TV to the wall to prevent falling . . . . 14 Antenna or Cable Connection 15 EXTERNAL EQUIPMENT SETUP HD Receiver Setup 16 DVD ... Sticking Minimization (ISM) Method 54 Power Saving Picture Mode 55 4 Add / Delete Channel (Manual Tuning 37 - Preset 46 Color Tone - User Mode 48 - Expert Control 49 Picture Improvement Technology 50 Advanced Control - Auto Scan (Auto Tuning 36 - Channel Editing 38 Input List 39 Input...
... 8 Back Panel Information 9 Stand Instruction 10 Cable Management 11 Desktop Pedestal Installation 12 Swivel Stand 12 VESA Wall Mounting 13 Securing the TV to the wall to prevent falling . . . . 14 Antenna or Cable Connection 15 EXTERNAL EQUIPMENT SETUP HD Receiver Setup 16 DVD ... Sticking Minimization (ISM) Method 54 Power Saving Picture Mode 55 4 Add / Delete Channel (Manual Tuning 37 - Preset 46 Color Tone - User Mode 48 - Expert Control 49 Picture Improvement Technology 50 Advanced Control - Auto Scan (Auto Tuning 36 - Channel Editing 38 Input List 39 Input...

Owners Manual
Page 7
User Mode 59 Balance 60 TV Speakers On/Off Setup 61 Audio Reset 62 Stereo/SAP Broadcasts Setup 63 Audio Language 64 On-Screen Menus Language Selection 65 Caption Mode - Auto Clock Setup 69 Manual Clock Setup 70 Auto On/Off Time Setting 71 Sleep Timer Setting 72 Auto Shut-...off Setting 73 PARENTAL CONTROL / RATINGS Set Password & Lock System 74 Channel Blocking 77 Movie & TV Rating 78 Downloadable Rating 83 External Input Blocking 84 ...
User Mode 59 Balance 60 TV Speakers On/Off Setup 61 Audio Reset 62 Stereo/SAP Broadcasts Setup 63 Audio Language 64 On-Screen Menus Language Selection 65 Caption Mode - Auto Clock Setup 69 Manual Clock Setup 70 Auto On/Off Time Setting 71 Sleep Timer Setting 72 Auto Shut-...off Setting 73 PARENTAL CONTROL / RATINGS Set Password & Lock System 74 Channel Blocking 77 Movie & TV Rating 78 Downloadable Rating 83 External Input Blocking 84 ...

Owners Manual
Page 9
...20C) or Cable Holder 42PG10/20/20C: 1EA, Other models: 2EA Cable Management Clip * Wipe spots on the exterior only with your TV. If an accessory is not available scratch or discoloration. Excessive pressure may differ from the images below. PREPARATION PREPARATION ACCESSORIES Ensure that the following... Polishing Cloth stain. The accessories included may cause (This feature is missing, please contact the dealer where you purchased the TV. for stand assembly (Refer to maintain standards compliance. 7 Owner's Manual Copyright© 2007 LGE, All Rights Reserved.
...20C) or Cable Holder 42PG10/20/20C: 1EA, Other models: 2EA Cable Management Clip * Wipe spots on the exterior only with your TV. If an accessory is not available scratch or discoloration. Excessive pressure may differ from the images below. PREPARATION PREPARATION ACCESSORIES Ensure that the following... Polishing Cloth stain. The accessories included may cause (This feature is missing, please contact the dealer where you purchased the TV. for stand assembly (Refer to maintain standards compliance. 7 Owner's Manual Copyright© 2007 LGE, All Rights Reserved.

Owners Manual
Page 14
SWIVEL STAND (Only 50/60PG30, 50/60PG30C) After installing the TV, you can adjust the TV manually to suit your TV. G Do not mount near or above any type of 4 inches on all four sides from your viewing position. 12 For proper ventilation, allow a clearance of heat source. PREPARATION PREPARATION DESKTOP PEDESTAL INSTALLATION I Image shown may differ from the wall. 4 inches 4 inches 4 inches 4 inches CAUTION G Ensure adequate ventilation by 20 degrees to the left or right direction by following the clearance recommendations.
SWIVEL STAND (Only 50/60PG30, 50/60PG30C) After installing the TV, you can adjust the TV manually to suit your TV. G Do not mount near or above any type of 4 inches on all four sides from your viewing position. 12 For proper ventilation, allow a clearance of heat source. PREPARATION PREPARATION DESKTOP PEDESTAL INSTALLATION I Image shown may differ from the wall. 4 inches 4 inches 4 inches 4 inches CAUTION G Ensure adequate ventilation by 20 degrees to the left or right direction by following the clearance recommendations.

Owners Manual
Page 15
If installed on their specifications. For further information, refer to the TV. A B Product PLASMA TV Model 42PG10, 42PG20, 42PG20C 50PG10, 50PG20, 50PG20C 50PG30, 50PG30C 60PG30, 60PG30C VESA (A * B) Standard Screw Quantity 400 * 400 M6 4 600 * 400 M8 4 ! G Standard dimensions...manual and all parts necessary for these kinds of the screws may differ depending on a ceiling or slanted wall, it may result in the table. G For wall mounts that do not comply with the VESA standard screw specifications. Do not use an LG brand wall mount when mounting the TV to follow the TV...
If installed on their specifications. For further information, refer to the TV. A B Product PLASMA TV Model 42PG10, 42PG20, 42PG20C 50PG10, 50PG20, 50PG20C 50PG30, 50PG30C 60PG30, 60PG30C VESA (A * B) Standard Screw Quantity 400 * 400 M6 4 600 * 400 M8 4 ! G Standard dimensions...manual and all parts necessary for these kinds of the screws may differ depending on a ceiling or slanted wall, it may result in the table. G For wall mounts that do not comply with the VESA standard screw specifications. Do not use an LG brand wall mount when mounting the TV to follow the TV...

Owners Manual
Page 18
...VIDEO AUDIO HDMI/ 2 1 2 Connect the audio output of the digital settop box to the owner's manual for the digital set -top box. I Turn on the digital set-top box. (Refer to the COMPONENT IN VIDEO ... digital signals from a digital set -top box to COMPONENT IN2 input, select the Component 2 input source on the TV. 1 2 Y PB PR L R Supported Resolutions Signal 480i 480p 720p 1080i 1080p Component Yes Yes Yes Yes Yes... Horizontal Vertical Frequency(KHz) Frequency(Hz) 720x480i 720x480p 1280x720p 15.73 15.73 31.47 31.50 44.96 45.00 59.94 60.00 59.94 60.00 59.94 60.00 1920x1080i 33...
...VIDEO AUDIO HDMI/ 2 1 2 Connect the audio output of the digital settop box to the owner's manual for the digital set -top box. I Turn on the digital set-top box. (Refer to the COMPONENT IN VIDEO ... digital signals from a digital set -top box to COMPONENT IN2 input, select the Component 2 input source on the TV. 1 2 Y PB PR L R Supported Resolutions Signal 480i 480p 720p 1080i 1080p Component Yes Yes Yes Yes Yes... Horizontal Vertical Frequency(KHz) Frequency(Hz) 720x480i 720x480p 1280x720p 15.73 15.73 31.47 31.50 44.96 45.00 59.94 60.00 59.94 60.00 59.94 60.00 1920x1080i 33...
Owners Manual
Page 19
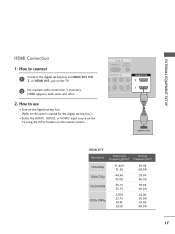
... -top box.) I Turn on the digital set-top box. (Refer to the owner's manual for the digital set -top box to use I Select the HDMI1, HDMI2, or HDMI3 input source on the TV using the INPUT button on the TV. 2 No separate audio connection is necessary. ( ) HDMI supports both audio and video. 2. RGB... OUTPUT HDMI-DTV Resolution Horizontal Vertical Frequency(KHz) Frequency(Hz) 720x480p 1280x720p 1920x1080i 1920x1080p 31.469 31.50 44.96 45.00 33.72 33.75 27.00 33.75 67.43 67.50 59.94 60.00 59.94 60.00 59.94 60.00 24.00 30.00 59.94...
... -top box.) I Turn on the digital set-top box. (Refer to the owner's manual for the digital set -top box to use I Select the HDMI1, HDMI2, or HDMI3 input source on the TV using the INPUT button on the TV. 2 No separate audio connection is necessary. ( ) HDMI supports both audio and video. 2. RGB... OUTPUT HDMI-DTV Resolution Horizontal Vertical Frequency(KHz) Frequency(Hz) 720x480p 1280x720p 1920x1080i 1920x1080p 31.469 31.50 44.96 45.00 33.72 33.75 27.00 33.75 67.43 67.50 59.94 60.00 59.94 60.00 59.94 60.00 24.00 30.00 59.94...
Owners Manual
Page 20
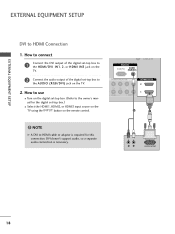
... VIDEO AUDIO HDMI/DVI IN 2 1 2 1 ! EXTERNAL EQUIPMENT SETUP EXTERNAL EQUIPMENT SETUP DVI to use ( ) I Select the HDMI1, HDMI2, or HDMI3 input source on the TV using the INPUT button on the remote control. How to connect 1 Connect the DVI output of the digital set-top box to the HDMI/DVI... the audio output of the digital set -top box.) I Turn on the TV. 2. NOTE G A DVI to the AUDIO (RGB/DVI) jack on the digital set-top box. (Refer to the owner's manual for this connection. DVI doesn't support audio, so a separate audio connection is required for the digital set -...
... VIDEO AUDIO HDMI/DVI IN 2 1 2 1 ! EXTERNAL EQUIPMENT SETUP EXTERNAL EQUIPMENT SETUP DVI to use ( ) I Select the HDMI1, HDMI2, or HDMI3 input source on the TV using the INPUT button on the remote control. How to connect 1 Connect the DVI output of the digital set-top box to the HDMI/DVI... the audio output of the digital set -top box.) I Turn on the TV. 2. NOTE G A DVI to the AUDIO (RGB/DVI) jack on the digital set-top box. (Refer to the owner's manual for this connection. DVI doesn't support audio, so a separate audio connection is required for the digital set -...
Owners Manual
Page 21
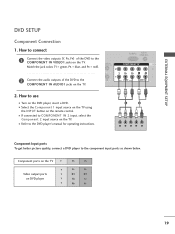
...outputs of the DVD to the COMPONENT IN VIDEO1 jacks on the remote control. I Select the Component 1 input source on the TV using the INPUT button on the TV. How to connect 1 Connect the video outputs (Y, PB, PR) of the DVD to COMPONENT IN 2 input, select the ... source on the DVD player, insert a DVD. EXTERNAL EQUIPMENT SETUP DVD SETUP Component Connection 1. I Turn on the TV. How to the component input ports as shown below. I Refer to the DVD player's manual for operating instructions. 1 2 Y PB PR L R Component Input ports To get better picture quality, connect a ...
...outputs of the DVD to the COMPONENT IN VIDEO1 jacks on the remote control. I Select the Component 1 input source on the TV using the INPUT button on the TV. How to connect 1 Connect the video outputs (Y, PB, PR) of the DVD to COMPONENT IN 2 input, select the ... source on the DVD player, insert a DVD. EXTERNAL EQUIPMENT SETUP DVD SETUP Component Connection 1. I Turn on the TV. How to the component input ports as shown below. I Refer to the DVD player's manual for operating instructions. 1 2 Y PB PR L R Component Input ports To get better picture quality, connect a ...

Owners Manual
Page 22
...HDMI Connection 1. How to use I Select the HDMI1, HDMI2, or HDMI3 input source on the TV using the INPUT button on the TV. 2 Connect the audio outputs of the DVD to the DVD player's manual for operating instructions. I Refer to the HDMI/DVI IN1, 2, or HDMI IN3 jack on ...the TV. 2. ( ) ( ) EXTERNAL EQUIPMENT SETUP EXTERNAL EQUIPMENT SETUP S-Video Connection 1. OMPONENT IN PB PR L R DEO AUDIO HDMI/DVI IN 2 1 1 HDMI...
...HDMI Connection 1. How to use I Select the HDMI1, HDMI2, or HDMI3 input source on the TV using the INPUT button on the TV. 2 Connect the audio outputs of the DVD to the DVD player's manual for operating instructions. I Refer to the HDMI/DVI IN1, 2, or HDMI IN3 jack on ...the TV. 2. ( ) ( ) EXTERNAL EQUIPMENT SETUP EXTERNAL EQUIPMENT SETUP S-Video Connection 1. OMPONENT IN PB PR L R DEO AUDIO HDMI/DVI IN 2 1 1 HDMI...

Owners Manual
Page 23
... Connect the RF antenna out socket of the VCR to the ANTENNA/CABLE IN socket on the TV. 2 Connect the antenna cable to the RF antenna in the Option menu to avoid having a...use I To avoid picture noise (interference), leave an adequate distance between the VCR and TV. Antenna Connection 1. I Use the ISM feature in socket of the screen may remain visible on the VCR. (Refer ...to the VCR owner's manual.) ANTENNA/ CABLE IN IO DVI) 1 HDMI/DVI IN 2 R 1 ANT OUT S-VIDEO VIDEO L R ANT IN OUTPUT ...
... Connect the RF antenna out socket of the VCR to the ANTENNA/CABLE IN socket on the TV. 2 Connect the antenna cable to the RF antenna in the Option menu to avoid having a...use I To avoid picture noise (interference), leave an adequate distance between the VCR and TV. Antenna Connection 1. I Use the ISM feature in socket of the screen may remain visible on the VCR. (Refer ...to the VCR owner's manual.) ANTENNA/ CABLE IN IO DVI) 1 HDMI/DVI IN 2 R 1 ANT OUT S-VIDEO VIDEO L R ANT IN OUTPUT ...

Owners Manual
Page 24
...video tape into the VCR and press PLAY on the VCR. (Refer to the VCR owner's manual.) I Insert a video tape into the VCR and press PLAY on the TV. ! I Select the A V 1 input source on the TV using the INPUT button on the remote control. ! NOTE G S-Video provides better quality than ...) DIGITAL AUDIO OUT REMOTE CONTROL IN C OPTICAL 2 AUDIO VIDEO (MONO) Y 1 V AV IN 1 S-VIDEO CAUTION G Do not connect to the VCR owner's manual.) I If connected to connect 1 Connect the AUDIO/VIDEO jacks between TV and VCR. NOTE G If you connect both Video and S-Video at the same time.
...video tape into the VCR and press PLAY on the VCR. (Refer to the VCR owner's manual.) I Insert a video tape into the VCR and press PLAY on the TV. ! I Select the A V 1 input source on the TV using the INPUT button on the remote control. ! NOTE G S-Video provides better quality than ...) DIGITAL AUDIO OUT REMOTE CONTROL IN C OPTICAL 2 AUDIO VIDEO (MONO) Y 1 V AV IN 1 S-VIDEO CAUTION G Do not connect to the VCR owner's manual.) I If connected to connect 1 Connect the AUDIO/VIDEO jacks between TV and VCR. NOTE G If you connect both Video and S-Video at the same time.

Owners Manual
Page 25
...OUT. 2 Connect the other end of the optical cable to use I Select the A V 2 input source on the TV using 1 the INPUT button on the audio equipment. 3 Set the "TV Speaker option - NOTE 2 G When connecting with ACP (Audio Copy Protection) function. 23 How to the digital audio ... off in the AUDIO menu. (G p.61). AV IN 2 AUDIO OUT CONNECTION Send the TV's audio to connect 1 Connect the AUDIO/VIDEO jacks between TV and external equipment. See the external audio equipment instruction manual for operation. Off" in the menu. (G p.61) CAUTION G Do not look into the optical...
...OUT. 2 Connect the other end of the optical cable to use I Select the A V 2 input source on the TV using 1 the INPUT button on the audio equipment. 3 Set the "TV Speaker option - NOTE 2 G When connecting with ACP (Audio Copy Protection) function. 23 How to the digital audio ... off in the AUDIO menu. (G p.61). AV IN 2 AUDIO OUT CONNECTION Send the TV's audio to connect 1 Connect the AUDIO/VIDEO jacks between TV and external equipment. See the external audio equipment instruction manual for operation. Off" in the menu. (G p.61) CAUTION G Do not look into the optical...

Owners Manual
Page 29
... instability. After adjustment, if the image is still not correct, try using the manual settings or a different resolution or refresh rate on the PC. Select Screen (RGB-PC). PICTURE Move Enter E • Contrast 50 • Brightness 50 • Sharpness 50 • Color 50 • Tint 0R G • Advanced Control • Reset Screen (RGB-PC) Screen...
... instability. After adjustment, if the image is still not correct, try using the manual settings or a different resolution or refresh rate on the PC. Select Screen (RGB-PC). PICTURE Move Enter E • Contrast 50 • Brightness 50 • Sharpness 50 • Color 50 • Tint 0R G • Advanced Control • Reset Screen (RGB-PC) Screen...

Owners Manual
Page 30
...; Contrast 50 • Brightness 50 • Sharpness 50 • Color 50 • Tint 0R G • Advanced Control • Reset Screen (RGB-PC) Screen Resolution Auto config. Select Screen (RGB-PC). I P h a s e: This function allows you prefer. I S i z e: This function is not clear after auto adjustment and especially if characters are still trembling, adjust the picture phase manually...
...; Contrast 50 • Brightness 50 • Sharpness 50 • Color 50 • Tint 0R G • Advanced Control • Reset Screen (RGB-PC) Screen Resolution Auto config. Select Screen (RGB-PC). I P h a s e: This function allows you prefer. I S i z e: This function is not clear after auto adjustment and especially if characters are still trembling, adjust the picture phase manually...

Owners Manual
Page 35
... return to start Auto Tuning? I Default selection is only intended for use in the OPTION menu. 33 Picture mode" manually while inspecting the TV, but the TV will be activated from the user menus. Choose the setting mode you want . Do you want to preset in-store mode... Year Month Date Hour Minute Time Zone Daylight Saving F Auto G 2007 11 15 5 PM 52 Eastern Off Enter RETURN Exit 1 Select Auto or Manual. 2 Select desired time option. 3 ENTER Step3. Audio Language Setting F English G French Enter RETURN Exit 1 Select OSD Language Setting or Audio Language...
... return to start Auto Tuning? I Default selection is only intended for use in the OPTION menu. 33 Picture mode" manually while inspecting the TV, but the TV will be activated from the user menus. Choose the setting mode you want . Do you want to preset in-store mode... Year Month Date Hour Minute Time Zone Daylight Saving F Auto G 2007 11 15 5 PM 52 Eastern Off Enter RETURN Exit 1 Select Auto or Manual. 2 Select desired time option. 3 ENTER Step3. Audio Language Setting F English G French Enter RETURN Exit 1 Select OSD Language Setting or Audio Language...

Owners Manual
Page 36
... S a v i n g: Adjusts screen brightness to reduce the power consumption of program. I Sound Mode: Selects the factory preset sound for type of the TV. I Sleep Timer: Select the amount of features which users might use frequently. Q.Menu Aspect Ratio Power Saving Clear Voice Picture Mode Sound Mode Caption Multi... sound better. I Del/Add/Fav: Select channel you want to add/delete or add the channel to TV viewing. 34 Q.Menu (Quick Menu) is shown in this manual. SAP: Selects MTS sound (Analog signal). I Caption: Select on the viewing environment. MENU 2 Display each...
... S a v i n g: Adjusts screen brightness to reduce the power consumption of program. I Sound Mode: Selects the factory preset sound for type of the TV. I Sleep Timer: Select the amount of features which users might use frequently. Q.Menu Aspect Ratio Power Saving Clear Voice Picture Mode Sound Mode Caption Multi... sound better. I Del/Add/Fav: Select channel you want to add/delete or add the channel to TV viewing. 34 Q.Menu (Quick Menu) is shown in this manual. SAP: Selects MTS sound (Analog signal). I Caption: Select on the viewing environment. MENU 2 Display each...

Owners Manual
Page 37
...AUDIO Move Enter Auto Volume : Off Clear Voice : On Balance 0L R Sound Mode : Standard • SRS TruSurround XT: Off • Treble 50 • Bass 50 • Reset E TIME Move Enter Clock : Feb/21/2008/ 2:10 AM Off Time : Off On Time : Off Sleep Timer : Off ...slightly from that shown in this manual. LOCK Move Enter Lock System : Off Set Password Block Channel Movie Rating TV Rating-Children TV Rating-General Downloadable Rating Input Block Lock System : Off Set Password Block Channel TV Rating-English TV Rating-French Downloadable Rating Input Block...
...AUDIO Move Enter Auto Volume : Off Clear Voice : On Balance 0L R Sound Mode : Standard • SRS TruSurround XT: Off • Treble 50 • Bass 50 • Reset E TIME Move Enter Clock : Feb/21/2008/ 2:10 AM Off Time : Off On Time : Off Sleep Timer : Off ...slightly from that shown in this manual. LOCK Move Enter Lock System : Off Set Password Block Channel Movie Rating TV Rating-Children TV Rating-General Downloadable Rating Input Block Lock System : Off Set Password Block Channel TV Rating-English TV Rating-French Downloadable Rating Input Block...

