Owner's Manual
Page 4
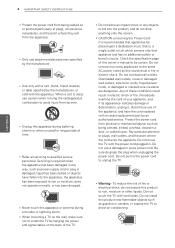
... allow an impact shock or any way, such as this product to rain or moisture, does not operate normally, or has been dropped. Do not connect too many appliances to direct air conditioning. Pay particular attention to qualified service personnel. yyUse only with wet hands. Protect the power cord from physical...
... allow an impact shock or any way, such as this product to rain or moisture, does not operate normally, or has been dropped. Do not connect too many appliances to direct air conditioning. Pay particular attention to qualified service personnel. yyUse only with wet hands. Protect the power cord from physical...
Owner's Manual
Page 5
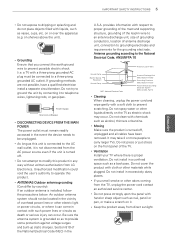
... National Electrical Code (NEC) in a confined space such as vases, cups, etc. Do not install in the U.S.A. yyIf you connect the earth ground wire to operate this product. Power Supply Short-circuit Breaker yyDISCONNECTING DEVICE FROM THE MAIN POWER The power outlet must ... power lines or other materials while plugged. yyKeep the product away from LG Electronics. on or over the apparatus (e.g. yyAs long as this product in the vicinity of antenna discharge unit, connection to grounding electrodes and requirements for the grounding electrode. Do not clean with...
... National Electrical Code (NEC) in a confined space such as vases, cups, etc. Do not install in the U.S.A. yyIf you connect the earth ground wire to operate this product. Power Supply Short-circuit Breaker yyDISCONNECTING DEVICE FROM THE MAIN POWER The power outlet must ... power lines or other materials while plugged. yyKeep the product away from LG Electronics. on or over the apparatus (e.g. yyAs long as this product in the vicinity of antenna discharge unit, connection to grounding electrodes and requirements for the grounding electrode. Do not clean with...
Owner's Manual
Page 7
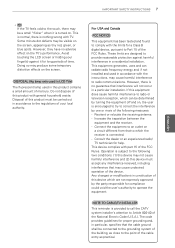
...Code (U.S.A.). If this equipment does cause harmful interference to radio or television reception, which are designed to provide reasonable protection against it is connected. - Operation is subject to the following measures: - Consult the dealer or an experienced radio/ TV technician for a Class B digital... device, pursuant to Part 15 of the FCC Rules. Connect the equipment to an outlet on the TV's performance. However, there is no adverse effect on a circuit different from that interference will...
...Code (U.S.A.). If this equipment does cause harmful interference to radio or television reception, which are designed to provide reasonable protection against it is connected. - Operation is subject to the following measures: - Consult the dealer or an experienced radio/ TV technician for a Class B digital... device, pursuant to Part 15 of the FCC Rules. Connect the equipment to an outlet on the TV's performance. However, there is no adverse effect on a circuit different from that interference will...
Owner's Manual
Page 8
... - Using favorite channels 40 - AUDIO Settings 68 - OPTION Settings 73 MAKING CONNECTIONS 74 Connection Overview 75 Connecting to HDMI Connection 76 - DVI to a HD receiver, DVD, or VCR player 75 - Attaching the stand 28 - Connecting an antenna or basic cable 36 - Locking the buttons on a wall 31...69 - Using the product or service informa- Mounting on for the first time 38 Watching TV 38 Managing channels 38 - Connecting a cable box 37 Connecting to music 61 CUSTOMIZING TV SETTINGS 61 The Main Menus 62 Customizing Settings 62 - Browsing files 53 - PICTURE Settings 67 ...
... - Using favorite channels 40 - AUDIO Settings 68 - OPTION Settings 73 MAKING CONNECTIONS 74 Connection Overview 75 Connecting to HDMI Connection 76 - DVI to a HD receiver, DVD, or VCR player 75 - Attaching the stand 28 - Connecting an antenna or basic cable 36 - Locking the buttons on a wall 31...69 - Using the product or service informa- Mounting on for the first time 38 Watching TV 38 Managing channels 38 - Connecting a cable box 37 Connecting to music 61 CUSTOMIZING TV SETTINGS 61 The Main Menus 62 Customizing Settings 62 - Browsing files 53 - PICTURE Settings 67 ...
Owner's Manual
Page 9
... an Audio System 79 - DVI to a Headphone ( LCD ) 80 SIMPLINK Connection 80 - Activating and Using the SIMPLINK menus 81 MAINTENANCE 81 Cleaning Your TV 81 - Cabinet and stand 81 - Power cord 81 Preventing "Image burn" or "... TV screen 82 TROUBLESHOOTING 84 SPECIFICATIONS 90 IR CODES 92 EXTERNAL CONTROL DEVICE SETUP 100 OPEN SOURCE LICENSE TABLE OF CONTENTS 9 ENEGNLGISH Digital optical audio connection 79 Connecting to a USB 79 Connecting to HDMI Connection 78 - HDMI Connection 77 -
... an Audio System 79 - DVI to a Headphone ( LCD ) 80 SIMPLINK Connection 80 - Activating and Using the SIMPLINK menus 81 MAINTENANCE 81 Cleaning Your TV 81 - Cabinet and stand 81 - Power cord 81 Preventing "Image burn" or "... TV screen 82 TROUBLESHOOTING 84 SPECIFICATIONS 90 IR CODES 92 EXTERNAL CONTROL DEVICE SETUP 100 OPEN SOURCE LICENSE TABLE OF CONTENTS 9 ENEGNLGISH Digital optical audio connection 79 Connecting to a USB 79 Connecting to HDMI Connection 78 - HDMI Connection 77 -
Owner's Manual
Page 13
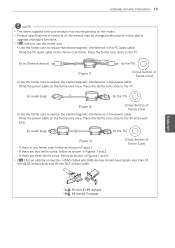
... cable. Place the ferrite core close to the TV and a wall plug. [to a wall plug] [to upgrade of Ferrite Core] - yy( LCD ) For an optimal connection, HDMI cables and USB devices should have bezels less than 10 mm (0.39 inches) thick and 18 mm (0.7 inches) width.
... cable. Place the ferrite core close to the TV and a wall plug. [to a wall plug] [to upgrade of Ferrite Core] - yy( LCD ) For an optimal connection, HDMI cables and USB devices should have bezels less than 10 mm (0.39 inches) thick and 18 mm (0.7 inches) width.
Owner's Manual
Page 14
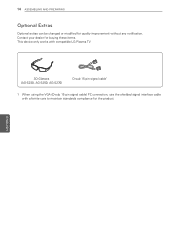
ENEGNLGISH 14 ASSEMBLING AND PREPARING Optional Extras Optional extras can be changed or modified for the product. Contact your dealer for buying these items. This device only works with compatible LG Plasma TV. 3D Glasses (AG-S230, AG-S250, AG-S270) D-sub 15 pin signal cable1 1 When using the VGA (D-sub 15 pin signal cable) PC connection, use the shielded signal interface cable with a ferrite core to maintain standards compliance for quality improvement without any notification.
ENEGNLGISH 14 ASSEMBLING AND PREPARING Optional Extras Optional extras can be changed or modified for the product. Contact your dealer for buying these items. This device only works with compatible LG Plasma TV. 3D Glasses (AG-S230, AG-S250, AG-S270) D-sub 15 pin signal cable1 1 When using the VGA (D-sub 15 pin signal cable) PC connection, use the shielded signal interface cable with a ferrite core to maintain standards compliance for quality improvement without any notification.
Owner's Manual
Page 15
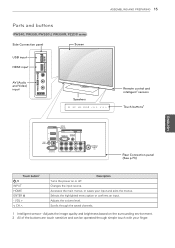
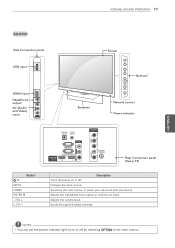
... an input. Changes the input source. Adjusts the volume level. ASSEMBLING AND PREPARING 15 Parts and buttons PW340, PW350, PW350U, PW350R, PZ200 series Side Connection panel Screen IN 3 USB IN USB input HDMI input VIDEO L/MONO AUDIO R AV (Audio and Video) input AV IN 2 Speakers INPUT HOME ENTER ...AUDIO IN RGB IN (PC) (RGB/DVI) 1 REMOTE CONTROL IN RS-232C IN (CONTROL & SERVICE) Y PB VIDEO 2 PR L R 1 AUDIO COMPONENT IN ANTENNA /CABLE IN Rear Connection panel (See p.73) Touch button2 / I INPUT HOME ENTER ⊙ - Adjusts the image quality and brightness based on or off.
... an input. Changes the input source. Adjusts the volume level. ASSEMBLING AND PREPARING 15 Parts and buttons PW340, PW350, PW350U, PW350R, PZ200 series Side Connection panel Screen IN 3 USB IN USB input HDMI input VIDEO L/MONO AUDIO R AV (Audio and Video) input AV IN 2 Speakers INPUT HOME ENTER ...AUDIO IN RGB IN (PC) (RGB/DVI) 1 REMOTE CONTROL IN RS-232C IN (CONTROL & SERVICE) Y PB VIDEO 2 PR L R 1 AUDIO COMPONENT IN ANTENNA /CABLE IN Rear Connection panel (See p.73) Touch button2 / I INPUT HOME ENTER ⊙ - Adjusts the image quality and brightness based on or off.
Owner's Manual
Page 16
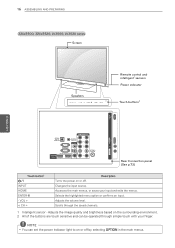
... L/MONO AUDIO R RGB IN(PC) / DVI IN RS-232C IN(CONTROL & SERVICE) 2 1 L ANTENNA / CABLE IN AUDIO R 2 1 OPATUICDAILODOIGUITTAL ACNATBELNENINA/ AV IN 2 H/P VIDEO / AUDIO IINN 33 Rear Connection panel (See p.73) Touch button2 / I INPUT HOME ENTER ⊙ - VOL + v CH ^ Description Turns the power on or off . Adjusts the volume level. Adjusts the image...
... L/MONO AUDIO R RGB IN(PC) / DVI IN RS-232C IN(CONTROL & SERVICE) 2 1 L ANTENNA / CABLE IN AUDIO R 2 1 OPATUICDAILODOIGUITTAL ACNATBELNENINA/ AV IN 2 H/P VIDEO / AUDIO IINN 33 Rear Connection panel (See p.73) Touch button2 / I INPUT HOME ENTER ⊙ - VOL + v CH ^ Description Turns the power on or off . Adjusts the volume level. Adjusts the image...
Owner's Manual
Page 17
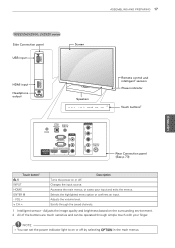
...input. Changes the input source. Adjusts the volume level. ASSEMBLING AND PREPARING 17 ENEGNLGISH 19/22/26LV2500, LV2520 series Side Connection panel USB input Screen USB IN HDMI input Headphone output IN 3 Speakers CH VOL ENTER HOME INPUT Remote control and ...VIDEO L/MONO AUDIO R / DVI IN RS-232C IN(CONTROL & SERVICE) 2 1 AUDIO VIDEO R L PR PB Y COMPONENT IN ANTENNA / CABLE IN Rear Connection panel (See p.73) Touch button2 / I INPUT HOME ENTER ⊙ - NOTE yyYou can be operated through the saved channels. 1 Intelligent sensor - Scrolls through...
...input. Changes the input source. Adjusts the volume level. ASSEMBLING AND PREPARING 17 ENEGNLGISH 19/22/26LV2500, LV2520 series Side Connection panel USB input Screen USB IN HDMI input Headphone output IN 3 Speakers CH VOL ENTER HOME INPUT Remote control and ...VIDEO L/MONO AUDIO R / DVI IN RS-232C IN(CONTROL & SERVICE) 2 1 AUDIO VIDEO R L PR PB Y COMPONENT IN ANTENNA / CABLE IN Rear Connection panel (See p.73) Touch button2 / I INPUT HOME ENTER ⊙ - NOTE yyYou can be operated through the saved channels. 1 Intelligent sensor - Scrolls through...
Owner's Manual
Page 18
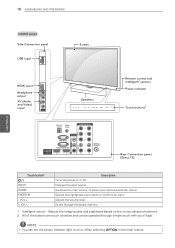
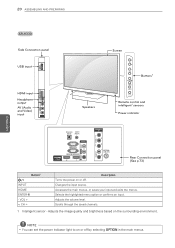
... menu option or confirms an input. Accesses the main menus, or saves your finger. 18 ASSEMBLING AND PREPARING ENEGNLGISH LK450 series Side Connection panel USB input Screen USB IN IN 3 HDMI input Headphone output AV (Audio and Video) input AV IN 2 VIDEO L/MONO AUDIO... IN (CONTROL&SERVICE) 2 1 2 R L PR ANTENNA / CABLE IN 1 Remote control and intelligent1 sensors Power indicator Touch buttons2 32/37/42/47LK450-UB Rear Connection panel (See p.73) Touch button2 / I INPUT HOME ENTER ⊙ - Scrolls through simple touch with your input and exits the menus. VOL + v CH...
... menu option or confirms an input. Accesses the main menus, or saves your finger. 18 ASSEMBLING AND PREPARING ENEGNLGISH LK450 series Side Connection panel USB input Screen USB IN IN 3 HDMI input Headphone output AV (Audio and Video) input AV IN 2 VIDEO L/MONO AUDIO... IN (CONTROL&SERVICE) 2 1 2 R L PR ANTENNA / CABLE IN 1 Remote control and intelligent1 sensors Power indicator Touch buttons2 32/37/42/47LK450-UB Rear Connection panel (See p.73) Touch button2 / I INPUT HOME ENTER ⊙ - Scrolls through simple touch with your input and exits the menus. VOL + v CH...
Owner's Manual
Page 19
... saved channels. Accesses the main menus, or saves your input and exits the menus. Adjusts the volume level. ASSEMBLING AND PREPARING 19 ENEGNLGISH 26LK330 Side Connection panel USB input HDMI input Headphone output AV (Audio and Video) input AV IN 2 VIDEO L/MONO AUDIO R IN 3 USB IN Speakers Screen CH VOL ENTER...) / DVI IN VIDEO L/MONO AUDIO R AV IN 1 RGB IN (PC) RS-232C IN (CONTROL&SERVICE) 2 1 AUDIO VIDEO R L PR PB Y COMPONENT IN ANTENNA / CABLE IN Rear Connection panel (See p.73) Button2 / I INPUT HOME ENTER ⊙ -
... saved channels. Accesses the main menus, or saves your input and exits the menus. Adjusts the volume level. ASSEMBLING AND PREPARING 19 ENEGNLGISH 26LK330 Side Connection panel USB input HDMI input Headphone output AV (Audio and Video) input AV IN 2 VIDEO L/MONO AUDIO R IN 3 USB IN Speakers Screen CH VOL ENTER...) / DVI IN VIDEO L/MONO AUDIO R AV IN 1 RGB IN (PC) RS-232C IN (CONTROL&SERVICE) 2 1 AUDIO VIDEO R L PR PB Y COMPONENT IN ANTENNA / CABLE IN Rear Connection panel (See p.73) Button2 / I INPUT HOME ENTER ⊙ -
Owner's Manual
Page 20
...NOTE yyYou can set the power indicator light to on the surrounding environment. Adjusts the volume level. 20 ASSEMBLING AND PREPARING ENEGNLGISH 32LK330 Side Connection panel USB input HDMI input Headphone output AV (Audio and Video) input AV IN 2 VIDEO L/MONO AUDIO R IN 3 USB IN ...AUDIO R AV IN 1 RGB IN (PC) RS-232C IN (CONTROL&SERVICE) 2 1 AUDIO VIDEO R L PR PB Y COMPONENT IN ANTENNA / CABLE IN Rear Connection panel (See p.73) Button2 / I INPUT HOME ENTER ⊙ - Accesses the main menus, or saves your input and exits the menus. Adjusts the image quality and...
...NOTE yyYou can set the power indicator light to on the surrounding environment. Adjusts the volume level. 20 ASSEMBLING AND PREPARING ENEGNLGISH 32LK330 Side Connection panel USB input HDMI input Headphone output AV (Audio and Video) input AV IN 2 VIDEO L/MONO AUDIO R IN 3 USB IN ...AUDIO R AV IN 1 RGB IN (PC) RS-232C IN (CONTROL&SERVICE) 2 1 AUDIO VIDEO R L PR PB Y COMPONENT IN ANTENNA / CABLE IN Rear Connection panel (See p.73) Button2 / I INPUT HOME ENTER ⊙ - Accesses the main menus, or saves your input and exits the menus. Adjusts the image quality and...
Owner's Manual
Page 21
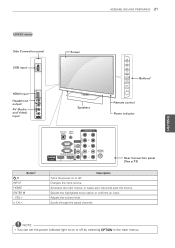
ASSEMBLING AND PREPARING 21 ENEGNLGISH LK430 series Side Connection panel USB input USB IN IN 3 HDMI input Headphone output VIDEO L/MONO AUDIO R AV (Audio and Video) input AV IN 2 Screen Speakers CH VOL ENTER ... COMPONENT IN Y PB VIDEO / DVI IN AUDIO VIDEO L/MONO AUDIO R AV IN 1 RGB IN (PC) RS-232C IN (CONTROL&SERVICE) 2 1 2 R L PR ANTENNA / CABLE IN 1 Rear Connection panel (See p.73) Description Turns the power on or off . Accesses the main menus, or saves your input and exits the menus. NOTE yyYou can...
ASSEMBLING AND PREPARING 21 ENEGNLGISH LK430 series Side Connection panel USB input USB IN IN 3 HDMI input Headphone output VIDEO L/MONO AUDIO R AV (Audio and Video) input AV IN 2 Screen Speakers CH VOL ENTER ... COMPONENT IN Y PB VIDEO / DVI IN AUDIO VIDEO L/MONO AUDIO R AV IN 1 RGB IN (PC) RS-232C IN (CONTROL&SERVICE) 2 1 2 R L PR ANTENNA / CABLE IN 1 Rear Connection panel (See p.73) Description Turns the power on or off . Accesses the main menus, or saves your input and exits the menus. NOTE yyYou can...
Owner's Manual
Page 22
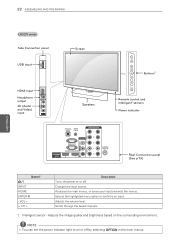
... the input source. Adjusts the volume level. Adjusts the image quality and brightness based on or off . 22 ASSEMBLING AND PREPARING ENEGNLGISH LK520 series Side Connection panel USB input USB IN IN 3 HDMI input Headphone output VIDEO L/MONO AUDIO R AV (Audio and Video) input AV IN 2 Screen Speakers CH VOL ENTER... COMPONENT IN Y PB VIDEO / DVI IN AUDIO VIDEO L/MONO AUDIO R AV IN 1 RGB IN (PC) RS-232C IN (CONTROL&SERVICE) 2 1 2 R L PR ANTENNA / CABLE IN 1 Rear Connection panel (See p.73) Button2 / I INPUT HOME ENTER ⊙ -
... the input source. Adjusts the volume level. Adjusts the image quality and brightness based on or off . 22 ASSEMBLING AND PREPARING ENEGNLGISH LK520 series Side Connection panel USB input USB IN IN 3 HDMI input Headphone output VIDEO L/MONO AUDIO R AV (Audio and Video) input AV IN 2 Screen Speakers CH VOL ENTER... COMPONENT IN Y PB VIDEO / DVI IN AUDIO VIDEO L/MONO AUDIO R AV IN 1 RGB IN (PC) RS-232C IN (CONTROL&SERVICE) 2 1 2 R L PR ANTENNA / CABLE IN 1 Rear Connection panel (See p.73) Button2 / I INPUT HOME ENTER ⊙ -
Owner's Manual
Page 28
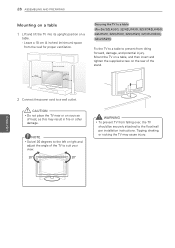
CAUTION yyDo not place the TV near or on sources of heat, as this may cause injury. ENEGNLGISH 2 Connect the power cord to the floor/wall per installation instructions. NOTE yySwivel 20 degrees to the left or right and adjust the angle of the ...
CAUTION yyDo not place the TV near or on sources of heat, as this may cause injury. ENEGNLGISH 2 Connect the power cord to the floor/wall per installation instructions. NOTE yySwivel 20 degrees to the left or right and adjust the angle of the ...
Owner's Manual
Page 29
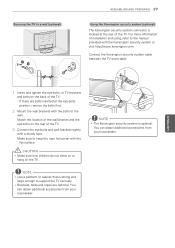
...yyThe Kensington security system is strong and large enough to support the TV securely. You can obtain additional accessories from your local dealer. Connect the Kensington security system cable between the TV and a table. Make sure to keep the rope horizontal with the bolts to the ... Kensington security system or visit http://www.kensington.com. yyBrackets, bolts and ropes are bolts inserted at the rear of the TV. 3 Connect the eye-bolts and wall brackets tightly with a sturdy rope. CAUTION yyMake sure that is optional. You can obtain additional accessories from your...
...yyThe Kensington security system is strong and large enough to support the TV securely. You can obtain additional accessories from your local dealer. Connect the Kensington security system cable between the TV and a table. Make sure to keep the rope horizontal with the bolts to the ... Kensington security system or visit http://www.kensington.com. yyBrackets, bolts and ropes are bolts inserted at the rear of the TV. 3 Connect the eye-bolts and wall brackets tightly with a sturdy rope. CAUTION yyMake sure that is optional. You can obtain additional accessories from your...
Owner's Manual
Page 34
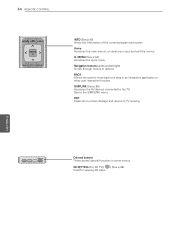
... to the TV; Colored buttons These access special functions in an interactive application or other user interaction function. SIMPLINK (See p.80) Accesses the AV devices connected to TV viewing. Home Accesses the main menus, or saves your input and exit the menus. ENEGNLGISH 456 34 7REMO8TE CO9NTROL 0 LIST MARK FAV VOL...
... to the TV; Colored buttons These access special functions in an interactive application or other user interaction function. SIMPLINK (See p.80) Accesses the AV devices connected to TV viewing. Home Accesses the main menus, or saves your input and exit the menus. ENEGNLGISH 456 34 7REMO8TE CO9NTROL 0 LIST MARK FAV VOL...

Owner's Manual
Page 36
...;). CAUTION yyMake sure not to your TV. Copper wire yyComplete all connections between devices, and then connect the power cord to the power outlet to prevent damage to bend the copper wire of the RF cable. Connecting a cable box Connect the TV to a cable box and the cable box to the... following. yyVisit http://lgknowledgebase.com for antenna. Search for more than 2 TVs. 36 WATCHING TV WATCHING TV Connecting to an antenna or cable Connect an antenna, cable, or cable box to watch TV while referring to a wall antenna socket with an RF cable (75 Ω...
...;). CAUTION yyMake sure not to your TV. Copper wire yyComplete all connections between devices, and then connect the power cord to the power outlet to prevent damage to bend the copper wire of the RF cable. Connecting a cable box Connect the TV to a cable box and the cable box to the... following. yyVisit http://lgknowledgebase.com for antenna. Search for more than 2 TVs. 36 WATCHING TV WATCHING TV Connecting to an antenna or cable Connect an antenna, cable, or cable box to watch TV while referring to a wall antenna socket with an RF cable (75 Ω...
Owner's Manual
Page 37
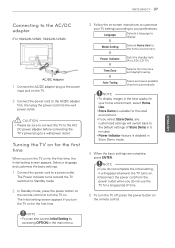
..., it will switch back to the default settings of time. 5 To turn the TV on. CAUTION yyPlease be sure to connect the TV to the AC/ DC power adapter before connecting the TV's power plug to turn the TV off, press the power button on for the first time, the Initial setting... screen appears. The Initial setting screen appears if you turn the TV on the remote control. Select a language and customize the basic settings. 1 Connect the power cord to the AC/DC adapter first, then plug the power cord into the wall power outlet. Auto Tuning Scans and saves available...
..., it will switch back to the default settings of time. 5 To turn the TV on. CAUTION yyPlease be sure to connect the TV to the AC/ DC power adapter before connecting the TV's power plug to turn the TV off, press the power button on for the first time, the Initial setting... screen appears. The Initial setting screen appears if you turn the TV on the remote control. Select a language and customize the basic settings. 1 Connect the power cord to the AC/DC adapter first, then plug the power cord into the wall power outlet. Auto Tuning Scans and saves available...


