Owner's Manual
Page 1
LCD TV MODELS 32LD400 42LD400 47LD500 P/NO :1947-1600-1050 www.lg.com OWNER'S MANUAL LCD TV Please read this manual carefully before operating your set and retain it for future reference.
LCD TV MODELS 32LD400 42LD400 47LD500 P/NO :1947-1600-1050 www.lg.com OWNER'S MANUAL LCD TV Please read this manual carefully before operating your set and retain it for future reference.
Owner's Manual
Page 6
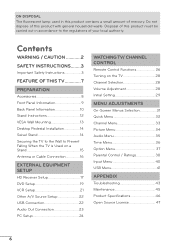
... Connection 23 PC Setup 24 WATCHING TV/ CHANNEL CONTROL Remote Control Functions 26 Turning on the TV 28 Channel Selection 28 Volume Adjustment 28 Initial Setting 29 MENU ADJUSTMENTS On-Screen Menus Selection 31 Quick Menu 32 Channel Menu 33 Picture Menu 34 Audio Menu 35 Time Menu 36 Option Menu...
... Connection 23 PC Setup 24 WATCHING TV/ CHANNEL CONTROL Remote Control Functions 26 Turning on the TV 28 Channel Selection 28 Volume Adjustment 28 Initial Setting 29 MENU ADJUSTMENTS On-Screen Menus Selection 31 Quick Menu 32 Channel Menu 33 Picture Menu 34 Audio Menu 35 Time Menu 36 Option Menu...

Owner's Manual
Page 7
High-definition television. Dolby and the double-D symbol are trademarks of your TV if you use the 4:3 aspect ratio setting for LCD). IMPORTANT INFORMATION TO PREVENT "IMAGE BURN / BURN-IN" ON YOUR TV SCREEN a When a fixed image (e.g. a In order to music on model). View videos ...
High-definition television. Dolby and the double-D symbol are trademarks of your TV if you use the 4:3 aspect ratio setting for LCD). IMPORTANT INFORMATION TO PREVENT "IMAGE BURN / BURN-IN" ON YOUR TV SCREEN a When a fixed image (e.g. a In order to music on model). View videos ...

Owner's Manual
Page 14
Swivel Stand After installing the TV, you can adjust the TV set manually to suit your TV. a Do not mount near or above any type of 10.1 cm (4 inches) on all four sides from your viewing position. 14 PREPARATION Desktop Pedestal Installation r Image shown may differ from the wall. 10.1 cm (4 inches) 10.1 cm (4 inches) 10.1 cm (4 inches) 10.1 cm (4 inches) CAUTION a Ensure adequate ventilation by 30º to the left or right direction by following the clearance recommendations. For proper ventilation, allow a clearance of heat source.
Swivel Stand After installing the TV, you can adjust the TV set manually to suit your TV. a Do not mount near or above any type of 10.1 cm (4 inches) on all four sides from your viewing position. 14 PREPARATION Desktop Pedestal Installation r Image shown may differ from the wall. 10.1 cm (4 inches) 10.1 cm (4 inches) 10.1 cm (4 inches) 10.1 cm (4 inches) CAUTION a Ensure adequate ventilation by 30º to the left or right direction by following the clearance recommendations. For proper ventilation, allow a clearance of heat source.
Owner's Manual
Page 15
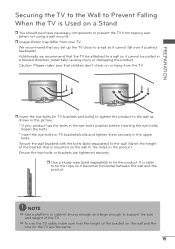
... TV be pulled in a forward direction, potentially causing injury or damaging the product. r Image shown may differ from the TV. Additionally, we recommend that you set up the TV close to tie the rope so it becomes horizontal between the wall and the product. a To use the TV safely make sure...
... TV be pulled in a forward direction, potentially causing injury or damaging the product. r Image shown may differ from the TV. Additionally, we recommend that you set up the TV close to tie the rope so it becomes horizontal between the wall and the product. a To use the TV safely make sure...

Owner's Manual
Page 17
... Receiver Setup This TV can receive digital over-the-air/digital cable signals without an external digital set-top box. How to use DVI AUDIO Y PB PR VIDEO AUDIO AUDIO OUT r Turn on the digital set-top box. (Refer to the COMPONENT IN AUDIO jack on the remote control. However, if you... have finished connecting all equipment. How to connect 1 Connect the video outputs (Y, PB, PR) of the digital set-top box to the owner's manual for the digital set-top box operation.) r Select the Component input source on the TV using the INPUT button on the TV. / DVI IN RGB...
... Receiver Setup This TV can receive digital over-the-air/digital cable signals without an external digital set-top box. How to use DVI AUDIO Y PB PR VIDEO AUDIO AUDIO OUT r Turn on the digital set-top box. (Refer to the COMPONENT IN AUDIO jack on the remote control. However, if you... have finished connecting all equipment. How to connect 1 Connect the video outputs (Y, PB, PR) of the digital set-top box to the owner's manual for the digital set-top box operation.) r Select the Component input source on the TV using the INPUT button on the TV. / DVI IN RGB...

Owner's Manual
Page 18
... the INPUT button on the TV. 2 No separate audio connection is necessary. In this case use r Turn on the digital set-top box. (Refer to the owner's manual for the digital set -top box to use the latest cables that support High Speed HDMI. a HDMI Audio Supported Format: Dolby Digital (32 kHz....00 59.94 60.00 18 HDMI supports both audio and video. 2. How to HDMI/DVI IN 1, 2, or 3* jack on the remote control. * HDMI 3: For 47LD500 / DVI IN RGB IN RGB (PC) AUDIO 1 AV IN VIDEO AUDIO ANTENNA/ CABLE IN OPTICAL DIGITAL AUDIO OUT COMPONENT IN 2 DVI AUDIO Y PB PR VIDEO...
... the INPUT button on the TV. 2 No separate audio connection is necessary. In this case use r Turn on the digital set-top box. (Refer to the owner's manual for the digital set -top box to use the latest cables that support High Speed HDMI. a HDMI Audio Supported Format: Dolby Digital (32 kHz....00 59.94 60.00 18 HDMI supports both audio and video. 2. How to HDMI/DVI IN 1, 2, or 3* jack on the remote control. * HDMI 3: For 47LD500 / DVI IN RGB IN RGB (PC) AUDIO 1 AV IN VIDEO AUDIO ANTENNA/ CABLE IN OPTICAL DIGITAL AUDIO OUT COMPONENT IN 2 DVI AUDIO Y PB PR VIDEO...

Owner's Manual
Page 19
...'t support audio, so a separate audio connection is required for this connection. How to connect 1 Connect the video outputs (Y, PB, PR) of the digital set -top box to the COMPONENT IN VIDEO jack on the TV. / DVI IN RGB IN RGB (PC) AUDIO 1 AV IN VIDEO AUDIO ANTENNA/ CABLE ...= green, PB = blue, and PR = red). Y PB PR L R 1 2 2 Connect the audio output of the digital set -top box to use r Turn on the digital set-top box. (Refer to the owner's manual for the digital set -top box audio output to HDMI cable or adapter is necessary. r Refer to HDMI Connection 1. How...
...'t support audio, so a separate audio connection is required for this connection. How to connect 1 Connect the video outputs (Y, PB, PR) of the digital set -top box to the COMPONENT IN VIDEO jack on the TV. / DVI IN RGB IN RGB (PC) AUDIO 1 AV IN VIDEO AUDIO ANTENNA/ CABLE ...= green, PB = blue, and PR = red). Y PB PR L R 1 2 2 Connect the audio output of the digital set -top box to use r Turn on the digital set-top box. (Refer to the owner's manual for the digital set -top box audio output to HDMI cable or adapter is necessary. r Refer to HDMI Connection 1. How...
Owner's Manual
Page 20
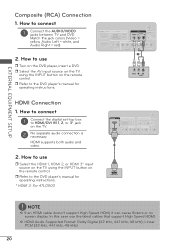
How to connect 1 Connect the digital set-top box to use r Turn on the TV. 2 No separate audio connection is necessary. How to HDMI/DVI IN 1, 2, or 3* jack on the DVD player, ... the remote control. r Refer to use the latest cables that support High Speed HDMI. How to the DVD player's manual for operating instructions. * HDMI 3: For 47LD500 / DVI IN RGB IN RGB (PC) AUDIO 1 AV IN VIDEO AUDIO ANTENNA/ CABLE IN OPTICAL DIGITAL AUDIO OUT COMPONENT IN 2 DVI AUDIO Y PB PR VIDEO...
How to connect 1 Connect the digital set-top box to use r Turn on the TV. 2 No separate audio connection is necessary. How to HDMI/DVI IN 1, 2, or 3* jack on the DVD player, ... the remote control. r Refer to use the latest cables that support High Speed HDMI. How to the DVD player's manual for operating instructions. * HDMI 3: For 47LD500 / DVI IN RGB IN RGB (PC) AUDIO 1 AV IN VIDEO AUDIO ANTENNA/ CABLE IN OPTICAL DIGITAL AUDIO OUT COMPONENT IN 2 DVI AUDIO Y PB PR VIDEO...

Owner's Manual
Page 21
... IN OUTPUT SWITCH 2 Wall Jack Antenna Composite (RCA) Connection 1. Match the jack colors (Video = yellow, Audio Left = white, and Audio Right = red) 2. How to use r Set VCR output switch to 3 or 4 and then tune TV to connect 1 Connect the AUDIO/VIDEO jacks between TV and VCR. EXTERNAL EQUIPMENT SETUP VCR Setup...
... IN OUTPUT SWITCH 2 Wall Jack Antenna Composite (RCA) Connection 1. Match the jack colors (Video = yellow, Audio Left = white, and Audio Right = red) 2. How to use r Set VCR output switch to 3 or 4 and then tune TV to connect 1 Connect the AUDIO/VIDEO jacks between TV and VCR. EXTERNAL EQUIPMENT SETUP VCR Setup...
Owner's Manual
Page 22
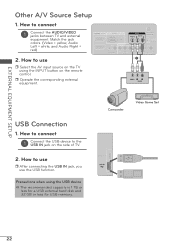
... USB device a The recommended capacity is 1 TB or less for a USB external hard disk and 32 GB or less for USB memory. Camcorder Video Game Set Memory Key 22 r Operate the corresponding external equipment. / DVI IN RGB IN RGB (PC) AUDIO 1 AV IN VIDEO AUDIO ANTENNA/ CABLE IN OPTICAL DIGITAL AUDIO...
... USB device a The recommended capacity is 1 TB or less for a USB external hard disk and 32 GB or less for USB memory. Camcorder Video Game Set Memory Key 22 r Operate the corresponding external equipment. / DVI IN RGB IN RGB (PC) AUDIO 1 AV IN VIDEO AUDIO ANTENNA/ CABLE IN OPTICAL DIGITAL AUDIO...

Owner's Manual
Page 23
... IN RGB (PC) AUDIO 1 AV IN VIDEO AUDIO ANTENNA/ CABLE IN OPTICAL DIGITAL AUDIO OUT 1 COMPONENT IN 2 DVI AUDIO Y PB PR VIDEO AUDIO AUDIO OUT 3 Set the "TV Speaker option Off" in the AUDIO menu. How to connect 1 Connect one end of the optical cable to the TV port of OPTICAL.... See the external audio equipment instruction manual for operation. Audio Out Connection Send the TV's audio to the digital audio input on the audio equipment. 3 Set the "TV Speaker option Off" in the AUDIO menu. Looking at the laser beam may block digital audio output.
... IN RGB (PC) AUDIO 1 AV IN VIDEO AUDIO ANTENNA/ CABLE IN OPTICAL DIGITAL AUDIO OUT 1 COMPONENT IN 2 DVI AUDIO Y PB PR VIDEO AUDIO AUDIO OUT 3 Set the "TV Speaker option Off" in the AUDIO menu. How to connect 1 Connect one end of the optical cable to the TV port of OPTICAL.... See the external audio equipment instruction manual for operation. Audio Out Connection Send the TV's audio to the digital audio input on the audio equipment. 3 Set the "TV Speaker option Off" in the AUDIO menu. Looking at the laser beam may block digital audio output.
Owner's Manual
Page 24
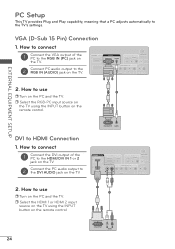
... on the TV. 2 Connect PC audio output to use r Turn on the TV. How to use r Turn on the remote control. 1 2 DVI to the TV's settings. VGA (D-Sub 15 Pin) Connection 1.
... on the TV. 2 Connect PC audio output to use r Turn on the TV. How to use r Turn on the remote control. 1 2 DVI to the TV's settings. VGA (D-Sub 15 Pin) Connection 1.

Owner's Manual
Page 25
... card to another rate or adjust the brightness and contrast on the screen for a long period of time. a Depending on the graphics card, some resolution settings may be positioned on the screen properly.
... card to another rate or adjust the brightness and contrast on the screen for a long period of time. a Depending on the graphics card, some resolution settings may be positioned on the screen properly.

Owner's Manual
Page 27
... displays and return to TV viewing. r Close cover. MENU Displays the main menu or clears all on -screen menus and adjusts the system 4 (Up/Down/ settings to move return one step in an interactive application or other user interaction function. VOLUME Adjusts the volume. (UP/DOWN) Q.MENU Opens the list of...
... displays and return to TV viewing. r Close cover. MENU Displays the main menu or clears all on -screen menus and adjusts the system 4 (Up/Down/ settings to move return one step in an interactive application or other user interaction function. VOLUME Adjusts the volume. (UP/DOWN) Q.MENU Opens the list of...

Owner's Manual
Page 29
...TV, but the TV will be activated from the user menus. r "In Store" Mode is an optimal setting for the first time. Time Setting Step2. r If you want. After all settings are 4 ENTER completed, press the ENTER button. 29 Customers can adjust Picture quality accordingly through Picture Mode menu... option. It will automatically return to set the essential items for viewing the TV for use in retail environments. It can also be displayed on the screen when turning the...
...TV, but the TV will be activated from the user menus. r "In Store" Mode is an optimal setting for the first time. Time Setting Step2. r If you want. After all settings are 4 ENTER completed, press the ENTER button. 29 Customers can adjust Picture quality accordingly through Picture Mode menu... option. It will automatically return to set the essential items for viewing the TV for use in retail environments. It can also be displayed on the screen when turning the...
Owner's Manual
Page 30
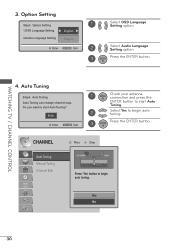
... connection and press the ENTER button to start Auto Tuning? Yes No 30 Option Setting 1.OSD Language Setting 2.Audio Language Setting English English Enter RETURN Exit 1 Select OSD Language Setting option. 2 Select Audio Language Setting option. 3 Press the ENTER button. Option Setting Step3. ENTER CHANNEL Auto Tuning Manual Tuning Channel Edit Move Enter Press 'Yes' button...
... connection and press the ENTER button to start Auto Tuning? Yes No 30 Option Setting 1.OSD Language Setting 2.Audio Language Setting English English Enter RETURN Exit 1 Select OSD Language Setting option. 2 Select Audio Language Setting option. 3 Press the ENTER button. Option Setting Step3. ENTER CHANNEL Auto Tuning Manual Tuning Channel Edit Move Enter Press 'Yes' button...

Owner's Manual
Page 31
... Treble 50 Bass 50 Reset TV Speaker : On Digital Audio Out : PCM Analog Audio Out : Variable OPTION OPTION Language Input Label Key Lock Caption Initial Setting Move Enter English : Off : Off TIME TIME Clock Off Time On Time Sleep Timer Auto Sleep Move Enter Off : Off : Off : On LOCK Move Enter...
... Treble 50 Bass 50 Reset TV Speaker : On Digital Audio Out : PCM Analog Audio Out : Variable OPTION OPTION Language Input Label Key Lock Caption Initial Setting Move Enter English : Off : Off TIME TIME Clock Off Time On Time Sleep Timer Auto Sleep Move Enter Off : Off : Off : On LOCK Move Enter...
Owner's Manual
Page 32
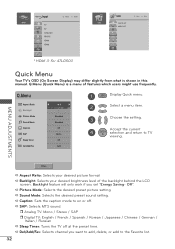
... the Favorite list. 32 a Caption: Sets the caption mode to on or off at the preset time. INPUT Input TV AV Component RPG-PC HDMI1 HDMI2 Move Enter USB Move Enter USB PHOTO LIST MUSIC LIST * HDMI 3: For 47LD500 Quick Menu Your TV's OSD (On Screen... the TV off . a Backlight: Selects your desired picture format. a Sound Mode: Selects the desired preset sound setting. a Picture Mode: Selects the desired preset picture setting. a Del/Add/Fav: Selects channel you set "Energy Saving- Off". Q.Menu (Quick Menu) is shown in this manual. a SAP: Selects MTS sound. ...
... the Favorite list. 32 a Caption: Sets the caption mode to on or off at the preset time. INPUT Input TV AV Component RPG-PC HDMI1 HDMI2 Move Enter USB Move Enter USB PHOTO LIST MUSIC LIST * HDMI 3: For 47LD500 Quick Menu Your TV's OSD (On Screen... the TV off . a Backlight: Selects your desired picture format. a Sound Mode: Selects the desired preset sound setting. a Picture Mode: Selects the desired preset picture setting. a Del/Add/Fav: Selects channel you set "Energy Saving- Off". Q.Menu (Quick Menu) is shown in this manual. a SAP: Selects MTS sound. ...

Owner's Manual
Page 33
... to select it in Manual Tuning, you will be unable to TV viewing. r Auto Tuning memorizes only the channels available at the time. Yes No 3 Set the setting. r Run this function if you wish to begin auto tuning. CHANNEL Auto Tuning Manual Tuning Channel Edit Move Enter 1 MENU Display CHANNEL ENTER menu...
... to select it in Manual Tuning, you will be unable to TV viewing. r Auto Tuning memorizes only the channels available at the time. Yes No 3 Set the setting. r Run this function if you wish to begin auto tuning. CHANNEL Auto Tuning Manual Tuning Channel Edit Move Enter 1 MENU Display CHANNEL ENTER menu...

