Owner's Manual (English)
Page 7
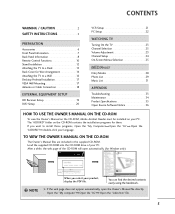
... contains the installation programs for them. You can find the desired contents easily using the bookmark. Open the "My computer" Open the "LG" Open the "index.htm" file. 5 If you select your product, display the PDF file. G If the web page does not...3 PREPARATION Accessories 6 Front Panel Information 7 Back Panel Information 8 Remote Control Functions 10 Stand Installation 12 Attaching the TV to a Desk 13 Back Cover for Wire Arrangement 14 Attaching the TV to install those programs, Open the "My Computer" Open the "LG" Open the "ACRORD" double-click your language.
... contains the installation programs for them. You can find the desired contents easily using the bookmark. Open the "My computer" Open the "LG" Open the "index.htm" file. 5 If you select your product, display the PDF file. G If the web page does not...3 PREPARATION Accessories 6 Front Panel Information 7 Back Panel Information 8 Remote Control Functions 10 Stand Installation 12 Attaching the TV to a Desk 13 Back Cover for Wire Arrangement 14 Attaching the TV to install those programs, Open the "My Computer" Open the "LG" Open the "ACRORD" double-click your language.

Owner's Manual (English)
Page 8
...16) 2- CD Manual (Refer to p.16) 4-Bolts for all models) For 42/50 inches For 60 inches 2- For Plasma TV models (This feature is missing, please contact the dealer where you purchased the product. MENU TV INPUT MEDIA HOST BACK C AUTO DEMO APM M/C EJECT TIMER RATIO SIMPLINK STB ...BRIGHT - Wall Brackets (Refer to p.16) (Refer to p.5) BACK CC AUTO DEMO APM M/C EJECT 1.5V 1.5VRATIO SIMPLINK PICTURE MARK SOUND USB EJECT SAP BACK CC Remote Control, Batteries ...
...16) 2- CD Manual (Refer to p.16) 4-Bolts for all models) For 42/50 inches For 60 inches 2- For Plasma TV models (This feature is missing, please contact the dealer where you purchased the product. MENU TV INPUT MEDIA HOST BACK C AUTO DEMO APM M/C EJECT TIMER RATIO SIMPLINK STB ...BRIGHT - Wall Brackets (Refer to p.16) (Refer to p.5) BACK CC AUTO DEMO APM M/C EJECT 1.5V 1.5VRATIO SIMPLINK PICTURE MARK SOUND USB EJECT SAP BACK CC Remote Control, Batteries ...
Owner's Manual (English)
Page 9
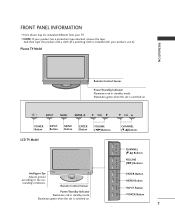
Plasma TV Model PREPARATION Remote Control Sensor Power/Standby Indicator Illuminates red in standby mode. Remote Control Sensor Power/Standby Indicator Illuminates red in standby mode. Illuminates green when the set is switched on . Illuminates green when ...product, use it). INPUT MENU ENTER VOL CH INPUT MENU ENTER VOL CH POWER Button INPUT Button MENU Button ENTER Button VOLUME (F,G)Buttons LCD TV Model VOL CH CH CHANNEL (E,D)Buttons CHANNEL (E,D) Buttons VOLUME (F,G) Buttons VOL ENTER MENU INPUT ENTER MENU INPUT Intelligent Eye Adjusts picture according ...
Plasma TV Model PREPARATION Remote Control Sensor Power/Standby Indicator Illuminates red in standby mode. Remote Control Sensor Power/Standby Indicator Illuminates red in standby mode. Illuminates green when the set is switched on . Illuminates green when ...product, use it). INPUT MENU ENTER VOL CH INPUT MENU ENTER VOL CH POWER Button INPUT Button MENU Button ENTER Button VOLUME (F,G)Buttons LCD TV Model VOL CH CH CHANNEL (E,D)Buttons CHANNEL (E,D) Buttons VOLUME (F,G) Buttons VOL ENTER MENU INPUT ENTER MENU INPUT Intelligent Eye Adjusts picture according ...

Owner's Manual (English)
Page 11
... jacks. Or DVI (VIDEO) signal to various types of equipment. AUDIO (RGB/DVI) Connect the audio from a PC or DTV. 4 REMOTE CONTROL PORT Connect your wired remote control. 5 RS-232C IN (CONTROL & SERVICE) PORT Connect to the RS-232C port on DC power. 9 Connect cable signals to various... types of equipment. 9 AV (Audio/Video) IN 1/2 Connect audio/video output from a PC. PREPARATION 1 HDMI/DVI IN Connect a HDMI signal to operate the TV on a ...
... jacks. Or DVI (VIDEO) signal to various types of equipment. AUDIO (RGB/DVI) Connect the audio from a PC or DTV. 4 REMOTE CONTROL PORT Connect your wired remote control. 5 RS-232C IN (CONTROL & SERVICE) PORT Connect to the RS-232C port on DC power. 9 Connect cable signals to various... types of equipment. 9 AV (Audio/Video) IN 1/2 Connect audio/video output from a PC. PREPARATION 1 HDMI/DVI IN Connect a HDMI signal to operate the TV on a ...

Owner's Manual (English)
Page 12
...mode. SIMPLINK See a list of time before your preference. PREPARATION PREPARATION REMOTE CONTROL FUNCTIONS When using the remote control, aim it at the screen. buttons MENU Displays the main menu. THUMBSTICK Navigate the on the TV. EXIT Clear all on or off automatically. NUMBER button BACK Tune to... the sound level. /DOWN MUTE Switch the sound on -screen displays and return to your TV turns off . BRIGHT +/- When you toggle this button, the SimpLink menu appears at the remote control sensor on -screen menus and adjust the system set(Up/Down/Left Right/ENTER) tings...
...mode. SIMPLINK See a list of time before your preference. PREPARATION PREPARATION REMOTE CONTROL FUNCTIONS When using the remote control, aim it at the screen. buttons MENU Displays the main menu. THUMBSTICK Navigate the on the TV. EXIT Clear all on or off automatically. NUMBER button BACK Tune to... the sound level. /DOWN MUTE Switch the sound on -screen displays and return to your TV turns off . BRIGHT +/- When you toggle this button, the SimpLink menu appears at the remote control sensor on -screen menus and adjust the system set(Up/Down/Left Right/ENTER) tings...

Owner's Manual (English)
Page 13
...Dispose of program. Change the audio language DTV mode. Installing Batteries Remote control effective range I Close cover. MENU BRIGHT + MPLINK TV INPUT STB MEDIA HOST TV INPUT STB MEDIA HOST TV INPUT STB MEDIA HOST BRIGHT - I Use a remote control up to preserve environment. 11 I Open the battery compartment ...In AV 1-2, Component 1-2, RGB-PC, HDMI1, HDMI2 and HDMI3 input sources, screen returns to the MEDIAHOST mode. MODE Select the remote operating mode: TV, DVD, VCR, AUDIO, or STB. * If the mode of another product is selected, a button on the back side and...
...Dispose of program. Change the audio language DTV mode. Installing Batteries Remote control effective range I Close cover. MENU BRIGHT + MPLINK TV INPUT STB MEDIA HOST TV INPUT STB MEDIA HOST TV INPUT STB MEDIA HOST BRIGHT - I Use a remote control up to preserve environment. 11 I Open the battery compartment ...In AV 1-2, Component 1-2, RGB-PC, HDMI1, HDMI2 and HDMI3 input sources, screen returns to the MEDIAHOST mode. MODE Select the remote operating mode: TV, DVD, VCR, AUDIO, or STB. * If the mode of another product is selected, a button on the back side and...

Owner's Manual (English)
Page 21
...COMPONENT IN 2 RS (CONTR S-VIDEO 1 VIDEO AUDIO ( ) Connect the audio output of the digital set-top box to 2 the COMPONENT IN AUDIO 1 jacks on the remote control. I If connected to COMPONENT IN2 input, select Component 2 input source. How to connect DVI IN RGB IN RGB(PC) AUDIO (RGB/DVI) RE CONT...part of the digital set top box to the COMPONENT IN VIDEO 1 jacks on the digital set-top box. (Refer to the owner's manual for Plasma TV model. How to use picture for the digital set-top box. EXTERNAL EQUIPMENT SETUP I To prevent the equipment damage, never plug in any power ...
...COMPONENT IN 2 RS (CONTR S-VIDEO 1 VIDEO AUDIO ( ) Connect the audio output of the digital set-top box to 2 the COMPONENT IN AUDIO 1 jacks on the remote control. I If connected to COMPONENT IN2 input, select Component 2 input source. How to connect DVI IN RGB IN RGB(PC) AUDIO (RGB/DVI) RE CONT...part of the digital set top box to the COMPONENT IN VIDEO 1 jacks on the digital set-top box. (Refer to the owner's manual for Plasma TV model. How to use picture for the digital set-top box. EXTERNAL EQUIPMENT SETUP I To prevent the equipment damage, never plug in any power ...

Owner's Manual (English)
Page 22
...using the INPUT button on the set . 2 No separated audio connection is necessary. How to the HDMI/DVI IN 1, 2, or 3 jack on the remote control. I If the DVD does not support Auto HDMI, you need to COMPONENT IN 2 input, select Component 2 input source. When connecting HDMI cable ...SETUP 2 Connect the audio outputs of the DVD to the DVD player's manual for operating instructions. I Refer to the COMPONENT IN AUDIO1 jacks on the remote control. I Select Component 1 input source by using the INPUT button on the set . 2. How to connect 1 Connect the video outputs (Y, PB,...
...using the INPUT button on the set . 2 No separated audio connection is necessary. How to the HDMI/DVI IN 1, 2, or 3 jack on the remote control. I If the DVD does not support Auto HDMI, you need to COMPONENT IN 2 input, select Component 2 input source. When connecting HDMI cable ...SETUP 2 Connect the audio outputs of the DVD to the DVD player's manual for operating instructions. I Refer to the COMPONENT IN AUDIO1 jacks on the remote control. I Select Component 1 input source by using the INPUT button on the set . 2. How to connect 1 Connect the video outputs (Y, PB,...

Owner's Manual (English)
Page 23
... (Refer to AV IN2, select A V 2 input source. NOTE G The picture quality is improved: compared to connect 1 Connect the AUDIO/VIDEO jacks between TV and VCR. How to normal composite (RCA cable) input. I If connected to the VCR owner's manual.) I Select A V 1 input source by using ...V 1 input source by using the INPUT button on the set . ANT IN S-VIDEO VIDEO L R ANT OUT OUTPUT SWITCH ANTE CAB UDIO B/DVI) T IN AUDIO REMOTE CONTROL IN DIGITAL AUDIO OUT OPTICAL COAXIAL 1 RS-232C IN (CONTROL & SERVICE) AUDIO OUT ( ) AUDIO VIDEO (MONO) S-VIDEO AV IN 1 ! When connecting with...
... (Refer to AV IN2, select A V 2 input source. NOTE G The picture quality is improved: compared to connect 1 Connect the AUDIO/VIDEO jacks between TV and VCR. How to normal composite (RCA cable) input. I If connected to the VCR owner's manual.) I Select A V 1 input source by using ...V 1 input source by using the INPUT button on the set . ANT IN S-VIDEO VIDEO L R ANT OUT OUTPUT SWITCH ANTE CAB UDIO B/DVI) T IN AUDIO REMOTE CONTROL IN DIGITAL AUDIO OUT OPTICAL COAXIAL 1 RS-232C IN (CONTROL & SERVICE) AUDIO OUT ( ) AUDIO VIDEO (MONO) S-VIDEO AV IN 1 ! When connecting with...

Owner's Manual (English)
Page 24
... time. How to the AUDIO (RGB/DVI) jack on the set . When connecting HDMI to the AUDIO (RGB/DVI) jack on the remote control. I Turn on the PC and the TV. How to connect RGB OUTPUT AUDIO 1 Connect the DVI output of the PC to the RG B (P C) jack on the set. 2 Connect... the PC audio output to use I Turn on the PC and the TV. I N1, 2 or 3 jack on the set. 2 Connect the PC audio output to DVI cable 1. DMI/DVI IN RGB IN RGB(PC) AUDIO (RGB/DVI) COMPONENT...
... time. How to the AUDIO (RGB/DVI) jack on the set . When connecting HDMI to the AUDIO (RGB/DVI) jack on the remote control. I Turn on the PC and the TV. How to connect RGB OUTPUT AUDIO 1 Connect the DVI output of the PC to the RG B (P C) jack on the set. 2 Connect... the PC audio output to use I Turn on the PC and the TV. I N1, 2 or 3 jack on the set. 2 Connect the PC audio output to DVI cable 1. DMI/DVI IN RGB IN RGB(PC) AUDIO (RGB/DVI) COMPONENT...

Owner's Manual (English)
Page 25
...(D or E) button to adjust the volume. 2 If you intend to turn TV on, press the , INPUT, CH (D or E) button on the TV or press the POWER, INPUT, TV INPUT, CH(D or E), Number (0~9) button on the remote control. STB MEDIA HOST 2 Select the viewing source by pressing the MUTE or...or E) button. BACK PICTURE SOUND SAP CC MARK USB EJECT 3 When finished using the TV INPUT, INPUT button on the remote control. TV INPUT STB MEDIA HOST ! I In standby mode to be away on the remote control. CHANNEL SELECTION 1 Press the CH (D or E) or NUMBER buttonsTVtINoPUT select a channel ...
...(D or E) button to adjust the volume. 2 If you intend to turn TV on, press the , INPUT, CH (D or E) button on the TV or press the POWER, INPUT, TV INPUT, CH(D or E), Number (0~9) button on the remote control. STB MEDIA HOST 2 Select the viewing source by pressing the MUTE or...or E) button. BACK PICTURE SOUND SAP CC MARK USB EJECT 3 When finished using the TV INPUT, INPUT button on the remote control. TV INPUT STB MEDIA HOST ! I In standby mode to be away on the remote control. CHANNEL SELECTION 1 Press the CH (D or E) or NUMBER buttonsTVtINoPUT select a channel ...

Owner's Manual (English)
Page 30
...or recognized. 28 In USB device, you connect a USB device or press the MEDIAHOST button, this screen is working. G The recognition speed of remote control before removing the USB device. 3 ! G Please connect power to be played. G A USB storage device using an automatic recognition program ...may not be supported or operated smoothly. G Please do not turn off the TV or unplug the USB device when the connected USB storage device is displayed, automatically. G Please connect a USB storage device with cable is...
...or recognized. 28 In USB device, you connect a USB device or press the MEDIAHOST button, this screen is working. G The recognition speed of remote control before removing the USB device. 3 ! G Please connect power to be played. G A USB storage device using an automatic recognition program ...may not be supported or operated smoothly. G Please do not turn off the TV or unplug the USB device when the connected USB storage device is displayed, automatically. G Please connect a USB storage device with cable is...
Owner's Manual (English)
Page 31
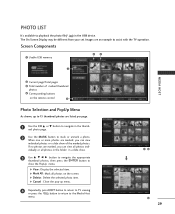
... are marked, you can view individual photos or a slide show of marked thumbnail photos 4 Corresponding buttons on the screen. vidually or all photos on the remote control 4 Photo Selection and PopUp Menu As shown, up menu. 4 Repeatedly, press EXIT button to return to... TV viewing or press the MEDIAHOST button to return to assist with the TV operation. G Delete : Delete the selected photo item. When one or more photos are marked, you can view all photos indi- G View : ...
... are marked, you can view individual photos or a slide show of marked thumbnail photos 4 Corresponding buttons on the screen. vidually or all photos on the remote control 4 Photo Selection and PopUp Menu As shown, up menu. 4 Repeatedly, press EXIT button to return to... TV viewing or press the MEDIAHOST button to return to assist with the TV operation. G Delete : Delete the selected photo item. When one or more photos are marked, you can view all photos indi- G View : ...

Owner's Manual (English)
Page 33
... to the photo list from your USB device can be different from the full-sized screen. 7 Repeatedly, press EXIT button to return to TV viewing or press MEDIAHOST button to return to select the previous or next photo. NOTE G If it is Progressive JPEG format, some photos... control the menu on your set. MEDIA HOST 5 Use D E F G button to the Media Host menu. ! Images are an example to assist with the TV operation. Screen Components 1 Usable USB memory 2 34 1 2 Current page/Total pages 3 Total number of these files may contain copyright restrictions. Playback of marked musics ...
... to the photo list from your USB device can be different from the full-sized screen. 7 Repeatedly, press EXIT button to return to TV viewing or press MEDIAHOST button to return to select the previous or next photo. NOTE G If it is Progressive JPEG format, some photos... control the menu on your set. MEDIA HOST 5 Use D E F G button to the Media Host menu. ! Images are an example to assist with the TV operation. Screen Components 1 Usable USB memory 2 34 1 2 Current page/Total pages 3 Total number of these files may contain copyright restrictions. Playback of marked musics ...

Owner's Manual (English)
Page 34
...00 in playtime. I If you press ENTER, , EXIT buttons, screen saver is to prevent screen pixel damage due to an fixed image remaining on the remote control are listed per page. G The ,,,, buttons on the screen for a while during the playing, the play information box (as a screen saver....the Media Host menu. G Delete: Delete the selected musics. G Cancel: Close the pop-up menu. 4 Repeatedly, press EXIT button to return to TV viewing or press MEDIAHOST button to return to the Photo List. G A damaged or corrupted music does not play it. When one in the current folder...
...00 in playtime. I If you press ENTER, , EXIT buttons, screen saver is to prevent screen pixel damage due to an fixed image remaining on the remote control are listed per page. G The ,,,, buttons on the screen for a while during the playing, the play information box (as a screen saver....the Media Host menu. G Delete: Delete the selected musics. G Cancel: Close the pop-up menu. 4 Repeatedly, press EXIT button to return to TV viewing or press MEDIAHOST button to return to the Photo List. G A damaged or corrupted music does not play it. When one in the current folder...
Owner's Manual (English)
Page 35
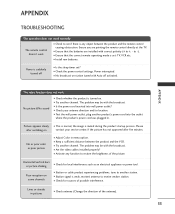
...I No broadcast on contact your antenna direction and/or location. The remote control doesn't work I Keep a sufficient distance between the product and the remote control causing obstruction. I Is the sleep timer set : TV, VCR etc. Please after five minutes. No or poor color or...with the broadcast. I Station signal is muted during the product startup process. I Ensure that the batteries are pointing the remote control directly at the TV. APPENDIX TROUBLESHOOTING The operation does not work . I This is normal, the image is weak, reorient antenna to -)....
...I No broadcast on contact your antenna direction and/or location. The remote control doesn't work I Keep a sufficient distance between the product and the remote control causing obstruction. I Is the sleep timer set : TV, VCR etc. Please after five minutes. No or poor color or...with the broadcast. I Station signal is muted during the product startup process. I Ensure that the batteries are pointing the remote control directly at the TV. APPENDIX TROUBLESHOOTING The operation does not work . I This is normal, the image is weak, reorient antenna to -)....


