
Owner's Manual
Page 6
... a Wall 13 Stand Installation 14 VESA Wall Mounting 15 Desktop Pedestal Installation 15 Antenna or Cable Connection 16 EXTERNAL EQUIPMENT SETUP HD Receiver Setup 17 DVD Setup 20 VCR Setup 22 Other A/V Source Setup 24 PC Setup 25 AV Out Setup 28 Digital Audio Output 29 WATCHING TV / CHANNEL CONTROL Remote Control Key Functions 30 Turning On TV 32 Channel Selection 32 Volume Adjustment 32 On-Screen Menus Selection 33 Channel Search 34 - User Mode 53 Balance 54 TV Speakers On/Off Setup 55 Stereo/SAP Broadcasts Setup 56 Audio Language 57 On-Screen...
... a Wall 13 Stand Installation 14 VESA Wall Mounting 15 Desktop Pedestal Installation 15 Antenna or Cable Connection 16 EXTERNAL EQUIPMENT SETUP HD Receiver Setup 17 DVD Setup 20 VCR Setup 22 Other A/V Source Setup 24 PC Setup 25 AV Out Setup 28 Digital Audio Output 29 WATCHING TV / CHANNEL CONTROL Remote Control Key Functions 30 Turning On TV 32 Channel Selection 32 Volume Adjustment 32 On-Screen Menus Selection 33 Channel Search 34 - User Mode 53 Balance 54 TV Speakers On/Off Setup 55 Stereo/SAP Broadcasts Setup 56 Audio Language 57 On-Screen...

Owner's Manual
Page 9
User must use shielded signal interface cables (D-sub 15 pin cable) with ferrite cores to p.13) Twist Holder Arrange the wires with the twist holder. INPUT RATIO PICTURCEOMPS1OUHNDDMIA1DJRUGSBT-PC POWER TMVODE DVD VCR SIMPLINK * EXIT CC MENU SAP ENTER TIMER VOL FAV 1 MUTE CH 4 2 7 5 3 8 6 0 9 BACK TIVNPUT INPUT RATIO PICTURCEOMPS1OUHNDDMIA1DJURGSBT-PC POWER TMVODE DVD VCR SIMPLINK * EXIT CC MENU SAP ENTER TIMER VOL FAV 1 MUTE CH 4 2 7 5 3 8 6 0 9 BACK 1.5V 1.5V Owner's Manual CD Manual Remote Control, Batteries Power Cord This feature...
User must use shielded signal interface cables (D-sub 15 pin cable) with ferrite cores to p.13) Twist Holder Arrange the wires with the twist holder. INPUT RATIO PICTURCEOMPS1OUHNDDMIA1DJRUGSBT-PC POWER TMVODE DVD VCR SIMPLINK * EXIT CC MENU SAP ENTER TIMER VOL FAV 1 MUTE CH 4 2 7 5 3 8 6 0 9 BACK TIVNPUT INPUT RATIO PICTURCEOMPS1OUHNDDMIA1DJURGSBT-PC POWER TMVODE DVD VCR SIMPLINK * EXIT CC MENU SAP ENTER TIMER VOL FAV 1 MUTE CH 4 2 7 5 3 8 6 0 9 BACK 1.5V 1.5V Owner's Manual CD Manual Remote Control, Batteries Power Cord This feature...
Owner's Manual
Page 19
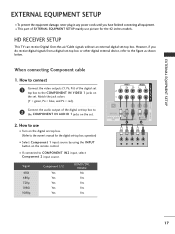
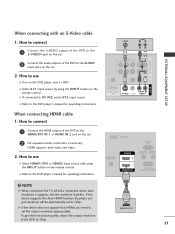
... other digital external device, refer to the COMPONENT IN AUDIO 1 jacks on the remote control. HD RECEIVER SETUP This TV can receive Digital Over-the-air/Cable signals without an external digital set -top box to the figure as shown below. How to use picture for the digital set . 2. When connecting Component cable 1. How to the COMPONENT IN VIDEO 1 jacks on the digital set . I If connected to the owner's manual for the 42 inches models. operation) I Turn on the set -top box. (Refer to COMPONENT IN2 input, select Component 2 input source. Signal...
... other digital external device, refer to the COMPONENT IN AUDIO 1 jacks on the remote control. HD RECEIVER SETUP This TV can receive Digital Over-the-air/Cable signals without an external digital set -top box to the figure as shown below. How to use picture for the digital set . 2. When connecting Component cable 1. How to the COMPONENT IN VIDEO 1 jacks on the digital set . I If connected to the owner's manual for the 42 inches models. operation) I Turn on the set -top box. (Refer to COMPONENT IN2 input, select Component 2 input source. Signal...
Owner's Manual
Page 20
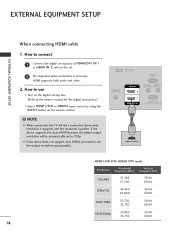
... connected, the TV will be automatically set the output resolution appropriately. EXTERNAL EQUIPMENT SETUP EXTERNAL EQUIPMENT SETUP When connecting HDMI cable 1. G If the device does not support Auto HDMI, you need to set to 720p. How to connect 1 Connect the digital set-top box to HDMI/DVI IN 1 or HDMI IN 2 jack on the set -top box.) I Turn on the digital set-top box. (Refer to use I Select HDMI1/DVI or HDMI2 input source by using the INPUT button on the remote control. ! How to the owner's manual for the digital set . 2 No separated audio connection...
... connected, the TV will be automatically set the output resolution appropriately. EXTERNAL EQUIPMENT SETUP EXTERNAL EQUIPMENT SETUP When connecting HDMI cable 1. G If the device does not support Auto HDMI, you need to set to 720p. How to connect 1 Connect the digital set-top box to HDMI/DVI IN 1 or HDMI IN 2 jack on the set -top box.) I Turn on the digital set-top box. (Refer to use I Select HDMI1/DVI or HDMI2 input source by using the INPUT button on the remote control. ! How to the owner's manual for the digital set . 2 No separated audio connection...
Owner's Manual
Page 21
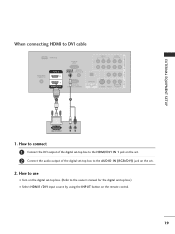
.... 2 Connect the audio output of the digital set-top box to the AUDIO IN (RGB/DVI) jack on the remote control. 19 EXTERNAL EQUIPMENT SETUP COMPONENT IN AV OUT AV IN 1 When connecting HDMI to the owner's manual for the digital set-top box.) I Select HDMI1/DVI input source by using the INPUT button on the set. 2. How to use I Turn on the digital set-top box. (Refer to DVI cable SERVICE RGB IN (PC) VIDEO AUDIO ANTENNA/ CABLE IN HDMI IN 2 1 HDMI/DVI IN AUDIO IN REMOTE (RGB/DVI) CONTROL IN RS-232C IN (CONTROL & SERVICE) OPTICAL DIGITAL AUDIO OUT S-VIDEO VIDEO (MONO) AUDIO 1 2 DVI...
.... 2 Connect the audio output of the digital set-top box to the AUDIO IN (RGB/DVI) jack on the remote control. 19 EXTERNAL EQUIPMENT SETUP COMPONENT IN AV OUT AV IN 1 When connecting HDMI to the owner's manual for the digital set-top box.) I Select HDMI1/DVI input source by using the INPUT button on the set. 2. How to use I Turn on the digital set-top box. (Refer to DVI cable SERVICE RGB IN (PC) VIDEO AUDIO ANTENNA/ CABLE IN HDMI IN 2 1 HDMI/DVI IN AUDIO IN REMOTE (RGB/DVI) CONTROL IN RS-232C IN (CONTROL & SERVICE) OPTICAL DIGITAL AUDIO OUT S-VIDEO VIDEO (MONO) AUDIO 1 2 DVI...

Owner's Manual
Page 22
... to the DVD player's manual for operating instructions. I Select Component 1 input source by using the INPUT button on the remote control. VIDEO AUDIO OPTICAL DIGITAL AUDIO OUT (MONO) S-VIDEO VIDEO AUDIO 1 2 Y PB PR L R Component Input ports To get better picture quality, connect a DVD player to the COMPONENT IN VIDEO1 jacks on DVD player Y PB PR Y B-Y R-Y Y Cb Cr Y Pb Pr 20 How to connect 1 Connect the video outputs (Y, PB, PR) of the DVD to COMPONENT IN 2 input, select Component 2 input source. I Turn on the set . Component ports on the...
... to the DVD player's manual for operating instructions. I Select Component 1 input source by using the INPUT button on the remote control. VIDEO AUDIO OPTICAL DIGITAL AUDIO OUT (MONO) S-VIDEO VIDEO AUDIO 1 2 Y PB PR L R Component Input ports To get better picture quality, connect a DVD player to the COMPONENT IN VIDEO1 jacks on DVD player Y PB PR Y B-Y R-Y Y Cb Cr Y Pb Pr 20 How to connect 1 Connect the video outputs (Y, PB, PR) of the DVD to COMPONENT IN 2 input, select Component 2 input source. I Turn on the set . Component ports on the...
Owner's Manual
Page 23
...support Auto HDMI, you need to the HDMI/DVI IN 1 or HDMI IN 2 jack on the set the output resolution appropriately. HDMI-DVD OUTPUT To get the best picture quality, adjust the output resolution of the DVD to 720p. I Select A V 1 input source by using the INPUT button on the DVD player, insert a DVD. HDMI supports both audio and video. 2. I Select HDMI1/DVI or HDMI2 input source with an S-Video cable 1. S-VIDEO AUDIO L R VIDEO 1 AUDIO 2 OPTICAL DIGITAL AUDIO OUT S-VIDEO VIDEO (MONO) AUDIO SERVICE RGB IN (PC) ANTENNA/ CABLE IN HDMI IN 2 1 HDMI/DVI IN AUDIO IN REMOT...
...support Auto HDMI, you need to the HDMI/DVI IN 1 or HDMI IN 2 jack on the set the output resolution appropriately. HDMI-DVD OUTPUT To get the best picture quality, adjust the output resolution of the DVD to 720p. I Select A V 1 input source by using the INPUT button on the DVD player, insert a DVD. HDMI supports both audio and video. 2. I Select HDMI1/DVI or HDMI2 input source with an S-Video cable 1. S-VIDEO AUDIO L R VIDEO 1 AUDIO 2 OPTICAL DIGITAL AUDIO OUT S-VIDEO VIDEO (MONO) AUDIO SERVICE RGB IN (PC) ANTENNA/ CABLE IN HDMI IN 2 1 HDMI/DVI IN AUDIO IN REMOT...

Owner's Manual
Page 24
I Set VCR output switch to 3 or 4 and then tune TV to all manufactures and in socket of the VCR. 2. EXTERNAL EQUIPMENT SETUP EXTERNAL EQUIPMENT SETUP VCR SETUP VIDEO ( ) AUDIO I Insert a video tape into the VCR and press PLAY on the screen. When connecting with an antenna 1 S-VIDEO VIDEO L R ANT OUT OUTPUT SWITCH ANT IN Wall Jack 2 RGB IN (PC) ANTENNA/ CABLE IN HDMI IN 2 1 HDMI/DVI IN AUDIO IN REMOTE (RGB/DVI) CONTROL IN RS-232C IN (CONTROL & SERVICE) OPTICAL DIGITAL AUDIO OUT S-VID Antenna 1. How to connect 1 Connect the RF antenna out socket...
I Set VCR output switch to 3 or 4 and then tune TV to all manufactures and in socket of the VCR. 2. EXTERNAL EQUIPMENT SETUP EXTERNAL EQUIPMENT SETUP VCR SETUP VIDEO ( ) AUDIO I Insert a video tape into the VCR and press PLAY on the screen. When connecting with an antenna 1 S-VIDEO VIDEO L R ANT OUT OUTPUT SWITCH ANT IN Wall Jack 2 RGB IN (PC) ANTENNA/ CABLE IN HDMI IN 2 1 HDMI/DVI IN AUDIO IN REMOTE (RGB/DVI) CONTROL IN RS-232C IN (CONTROL & SERVICE) OPTICAL DIGITAL AUDIO OUT S-VID Antenna 1. How to connect 1 Connect the RF antenna out socket...

Owner's Manual
Page 25
...the remote control. 1 2 N OPTICAL DIGITAL AUDIO OUT S-VIDEO VIDEO (MONO) AUDIO I If connected to the AUDIO input jacks on the set . NOTE G If you connect both Video and S-Video at the same time. ANT OUT OUTPUT SWITCH 2 Connect the audio outputs of the set. 1. VIDEO ( ) AUDIO When connecting with an S-Video cable N OPTICAL DIGITAL AUDIO OUT S-VIDEO VIDEO (MONO) AUDIO ! How to normal composite (RCA cable) input. Match the jack colors (Video = yellow, Audio Left = white, and Audio Right = red) ANT OUT OUTPUT SWITCH VIDEO AUDIO 1 EXTERNAL EQUIPMENT SETUP COMPONENT IN...
...the remote control. 1 2 N OPTICAL DIGITAL AUDIO OUT S-VIDEO VIDEO (MONO) AUDIO I If connected to the AUDIO input jacks on the set . NOTE G If you connect both Video and S-Video at the same time. ANT OUT OUTPUT SWITCH 2 Connect the audio outputs of the set. 1. VIDEO ( ) AUDIO When connecting with an S-Video cable N OPTICAL DIGITAL AUDIO OUT S-VIDEO VIDEO (MONO) AUDIO ! How to normal composite (RCA cable) input. Match the jack colors (Video = yellow, Audio Left = white, and Audio Right = red) ANT OUT OUTPUT SWITCH VIDEO AUDIO 1 EXTERNAL EQUIPMENT SETUP COMPONENT IN...

Owner's Manual
Page 27
... AUDIO IN 2 (RGB/DVI) jack on the set . I Turn on the PC and the TV. Connect the PC audio output to use I Turn on the PC and the TV. EXTERNAL EQUIPMENT SETUP PC SETUP This TV provides Plug and Play capability, meaning that the PC adjusts automatically to DVI cable 1. How to the HDMI/DVI I Select RGB-PC input source by using the INPUT button on the remote control. 1 2 DVI-PC OUTPUT AUDIO 25 When connecting HDMI to the TV's settings. How to connect 1 Connect...
... AUDIO IN 2 (RGB/DVI) jack on the set . I Turn on the PC and the TV. Connect the PC audio output to use I Turn on the PC and the TV. EXTERNAL EQUIPMENT SETUP PC SETUP This TV provides Plug and Play capability, meaning that the PC adjusts automatically to DVI cable 1. How to the HDMI/DVI I Select RGB-PC input source by using the INPUT button on the remote control. 1 2 DVI-PC OUTPUT AUDIO 25 When connecting HDMI to the TV's settings. How to connect 1 Connect...

Owner's Manual
Page 29
... the screen background. Adjustment for PC mode Overview When the RGB input of the set is connected to a PC output, select the RGB-PC as you change . In HDMI/DVI-PC mode, Phase is used. Phase This function allows you select resolution of XGA/WXGA. Resolution Position Size Phase Reset Initialize Settings Yes No D MENU Close FG E Move Ok 123 27 INPUT TV POWER MODE TV INPUT DVD RATIO VCR COMP1 HDMI1 RGB-PC SIMPLINK PICTURE SOUND ADJUST * CC EXIT MENU SAP TIMER Resolution Position Size...
... the screen background. Adjustment for PC mode Overview When the RGB input of the set is connected to a PC output, select the RGB-PC as you change . In HDMI/DVI-PC mode, Phase is used. Phase This function allows you select resolution of XGA/WXGA. Resolution Position Size Phase Reset Initialize Settings Yes No D MENU Close FG E Move Ok 123 27 INPUT TV POWER MODE TV INPUT DVD RATIO VCR COMP1 HDMI1 RGB-PC SIMPLINK PICTURE SOUND ADJUST * CC EXIT MENU SAP TIMER Resolution Position Size...

Owner's Manual
Page 32
...-PC, HDMI1/DVI, and HDMI2 input sources, screen returns to your TV or any other programmed equipment on or off . UP/DOWN NUMBER button - (DASH) Used to the last channel viewed. BACK Tune to enter a program number for multiple program channels such as 2-1, 2-2, etc. INPUT TV POWER MODE TV INPUT DVD RATIO VCR COMP1 HDMI1 RGB-PC SIMPLINK * PICTURE SOUND ADJUST CC EXIT MENU SAP TIMER ENTER FAV VOL CH MUTE 1 2 3 4 5 6 7 8 9 0 BACK 30 VCR/DVD control buttons Control video cassette recorders or DVD players.
...-PC, HDMI1/DVI, and HDMI2 input sources, screen returns to your TV or any other programmed equipment on or off . UP/DOWN NUMBER button - (DASH) Used to the last channel viewed. BACK Tune to enter a program number for multiple program channels such as 2-1, 2-2, etc. INPUT TV POWER MODE TV INPUT DVD RATIO VCR COMP1 HDMI1 RGB-PC SIMPLINK * PICTURE SOUND ADJUST CC EXIT MENU SAP TIMER ENTER FAV VOL CH MUTE 1 2 3 4 5 6 7 8 9 0 BACK 30 VCR/DVD control buttons Control video cassette recorders or DVD players.

Owner's Manual
Page 33
... SIMPLINK * PICTURE SOUND ADJUST CC EXIT MENU SAP TIMER ENTER FAV VOL CH MUTE I Install two 1.5V AA batteries. Don't mix old or used batteries in a recycle bin to TV. G p.44 SOUND Selects the factory preset sound for type of time before your TV turns off automatically. with new ones. G p.65 Installing Batteries Remote control effective range I Close cover. G p.52 ADJUST Adjust the screen resolution, position, size and phase. WATCHING TV / CHANNEL CONTROL MODE Select the remote's operating mode: TV, DVD, VCR. I Use a remote control up...
... SIMPLINK * PICTURE SOUND ADJUST CC EXIT MENU SAP TIMER ENTER FAV VOL CH MUTE I Install two 1.5V AA batteries. Don't mix old or used batteries in a recycle bin to TV. G p.44 SOUND Selects the factory preset sound for type of time before your TV turns off automatically. with new ones. G p.65 Installing Batteries Remote control effective range I Close cover. G p.52 ADJUST Adjust the screen resolution, position, size and phase. WATCHING TV / CHANNEL CONTROL MODE Select the remote's operating mode: TV, DVD, VCR. I Use a remote control up...

Owner's Manual
Page 44
INPUT TV POWER MODE TV INPUT DVD RATIO VCR COMP1 HDMI1 RGB-PC SIMPLINK PICTURE SOUND ADJUST * ! Set By Program 4:3 (16:9 16:9) Set By Program 42 PICTURE CONTROL PICTURE CONTROL PICTURE SIZE (ASPECT RATIO) CONTROL This feature allows an analog picture with a 4:3 aspect ratio is displayed on the screen and remain visible. I RGB-PC/DVI-PC input source use 4:3 or 16:9 aspect ratio. NOTE G If a fixed image is displayed on the screen for a long time, the image may become imprinted on your 16:9 TV, you need to specify how the picture is common...
INPUT TV POWER MODE TV INPUT DVD RATIO VCR COMP1 HDMI1 RGB-PC SIMPLINK PICTURE SOUND ADJUST * ! Set By Program 4:3 (16:9 16:9) Set By Program 42 PICTURE CONTROL PICTURE CONTROL PICTURE SIZE (ASPECT RATIO) CONTROL This feature allows an analog picture with a 4:3 aspect ratio is displayed on the screen and remain visible. I RGB-PC/DVI-PC input source use 4:3 or 16:9 aspect ratio. NOTE G If a fixed image is displayed on the screen for a long time, the image may become imprinted on your 16:9 TV, you need to specify how the picture is common...

Owner's Manual
Page 46
... Picture menu based on the program category. Daylight, Normal, Night Time Settings are not adjustable. INPUT TV POWER MODE TV INPUT DVD RATIO VCR COMP1 HDMI1 RGB-PC SIMPLINK PICTURE SOUND ADJUST * CC EXIT MENU SAP TIMER ENTER 2 Press the EXIT button to save and return to select the picture appearance setup option as below : Daylight, Normal, Night Time, User1, and User2 (your own settings). PICTURE CONTROL PRESET PICTURE SETTINGS EZ Picture - In the User1 and User2 modes only, user can also use the VIDEO menu...
... Picture menu based on the program category. Daylight, Normal, Night Time Settings are not adjustable. INPUT TV POWER MODE TV INPUT DVD RATIO VCR COMP1 HDMI1 RGB-PC SIMPLINK PICTURE SOUND ADJUST * CC EXIT MENU SAP TIMER ENTER 2 Press the EXIT button to save and return to select the picture appearance setup option as below : Daylight, Normal, Night Time, User1, and User2 (your own settings). PICTURE CONTROL PRESET PICTURE SETTINGS EZ Picture - In the User1 and User2 modes only, user can also use the VIDEO menu...

Owner's Manual
Page 49
... MENU SAP TIMER ENTER FAV VOL CH MUTE 1 2 3 EZ Picture Color Temperature XD Advanced Video Reset PICTURE CONTROL EZ Picture Color Temperature XD Advanced Video Reset 1 Cool Medium Warm User G Selection ( G or ) leads you to the previous menu. I The adjustment range of R e d, G r e e n, or B l u e is 20~ +20. 6 Press EXIT button to return to TV viewing or press MENU button to return to the detailed setting screen. User Mode You can also adjust the detailed settings (Red, Green, Blue) by selecting...
... MENU SAP TIMER ENTER FAV VOL CH MUTE 1 2 3 EZ Picture Color Temperature XD Advanced Video Reset PICTURE CONTROL EZ Picture Color Temperature XD Advanced Video Reset 1 Cool Medium Warm User G Selection ( G or ) leads you to the previous menu. I The adjustment range of R e d, G r e e n, or B l u e is 20~ +20. 6 Press EXIT button to return to TV viewing or press MENU button to return to the detailed setting screen. User Mode You can also adjust the detailed settings (Red, Green, Blue) by selecting...

Owner's Manual
Page 61
... programmed to TV viewing. INPUT TV POWER MODE TV INPUT DVD RATIO VCR COMP1 HDMI1 RGB-PC SIMPLINK PICTURE SOUND ADJUST * CC EXIT MENU SAP TIMER ENTER 1 Use the C C button repeatedly to select Caption/Text. Analog caption displays information at the bottom position and is used for a data service, generally not program related. When you turn the power off. SOUND & LANGUAGE CONTROL CAPTION / TEXT Analog Broadcasting System Captions Select a caption mode for displaying captioning information if provided on the screen and is usually the program's dialog. I You can also use...
... programmed to TV viewing. INPUT TV POWER MODE TV INPUT DVD RATIO VCR COMP1 HDMI1 RGB-PC SIMPLINK PICTURE SOUND ADJUST * CC EXIT MENU SAP TIMER ENTER 1 Use the C C button repeatedly to select Caption/Text. Analog caption displays information at the bottom position and is used for a data service, generally not program related. When you turn the power off. SOUND & LANGUAGE CONTROL CAPTION / TEXT Analog Broadcasting System Captions Select a caption mode for displaying captioning information if provided on the screen and is usually the program's dialog. I You can also use...
Owner's Manual
Page 69
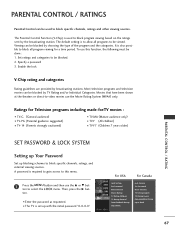
... a password 3. Ratings for Television programs including made-for a time period. The default setting is also possible to block all programs to block program viewing based on the ratings sent by TV Rating and/or Individual Categories. Set ratings and categories to be used to be blocked by the broadcasting station. I The TV is required to gain access to block specific channels, ratings, and external viewing sources. A password is set...
... a password 3. Ratings for Television programs including made-for a time period. The default setting is also possible to block all programs to block program viewing based on the ratings sent by TV Rating and/or Individual Categories. Set ratings and categories to be used to be blocked by the broadcasting station. I The TV is required to gain access to block specific channels, ratings, and external viewing sources. A password is set...

Owner's Manual
Page 75
... color or poor picture I Adjust Color in pictures I Try another channel. I Check antenna (Change the direction of the antenna). 73 I Station signal is set ? I Activate any object between the product and the VCR. I Check the power control settings. I Is the power cord inserted into the outlet where the product's power cord was plugged in. I No broadcast on . Picture appears slowly I Ensure that the batteries are pointing the remote control directly at the TV. I Check your service...
... color or poor picture I Adjust Color in pictures I Try another channel. I Check antenna (Change the direction of the antenna). 73 I Station signal is set ? I Activate any object between the product and the VCR. I Check the power control settings. I Is the power cord inserted into the outlet where the product's power cord was plugged in. I No broadcast on . Picture appears slowly I Ensure that the batteries are pointing the remote control directly at the TV. I Check your service...
Owner's Manual
Page 79
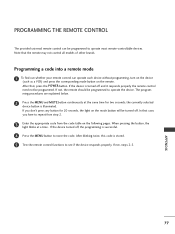
... button, the light blinks at the same time for 20 seconds, the light on the mode button will be programmed. After blinking twice, this code is successful. 4 Press the MENU button to operate most remote-controllable devices. The program- In that the remote may not control all models of other brands. PROGRAMMING THE REMOTE CONTROL The provided universal remote control can operate each device without programming, turn on the device (such as a VCR) and press the corresponding mode button on the remote...
... button, the light blinks at the same time for 20 seconds, the light on the mode button will be programmed. After blinking twice, this code is successful. 4 Press the MENU button to operate most remote-controllable devices. The program- In that the remote may not control all models of other brands. PROGRAMMING THE REMOTE CONTROL The provided universal remote control can operate each device without programming, turn on the device (such as a VCR) and press the corresponding mode button on the remote...

