
Owner's Manual (English)
Page 1
Record model number and serial number of the set . Retain it for future reference. See the label attached on the back cover and quote t tion to your set . LCD TV PLASMA TV OWNER'S MANUAL LCD TV MODELS PLASMA TV MODEL 32LC5DC 32LC50C 42PX8DC 32LC5DCS 32LC50CS 32LC5DCB 32LC50CB 37LC5DC 32LX50C 37LC5DCB 32LX50CS 37LC5DC1 37LC50C 42LC5DC 37LC50CB 32LX5DC 42LB50C 32LX5DCS 42LC50C 42LB5DC Please read this manual carefully before operating your dealer when you require service. www.lgcommercial.com
Record model number and serial number of the set . Retain it for future reference. See the label attached on the back cover and quote t tion to your set . LCD TV PLASMA TV OWNER'S MANUAL LCD TV MODELS PLASMA TV MODEL 32LC5DC 32LC50C 42PX8DC 32LC5DCS 32LC50CS 32LC5DCB 32LC50CB 37LC5DC 32LX50C 37LC5DCB 32LX50CS 37LC5DC1 37LC50C 42LC5DC 37LC50CB 32LX5DC 42LB50C 32LX5DCS 42LC50C 42LB5DC Please read this manual carefully before operating your dealer when you require service. www.lgcommercial.com

Owner's Manual (English)
Page 8
... the touch, there may be exchanged or returned. Therefore, a certain level of mercury. FOR LCD TV If the TV feels cold to be present on the Plasma TV screen The Plasma TV is an array of cells, known as televisions and common computer monitors. Doing so may be thought of as tiny red, green...returned. A few minute colored dots may be acceptable. The tiny dots appearing does not mean that the display is not sufficient cause for all models.) In the same way that are easily viewable. The noise from the cooling fans is acceptable and is clear and visible to be carried ...
... the touch, there may be exchanged or returned. Therefore, a certain level of mercury. FOR LCD TV If the TV feels cold to be present on the Plasma TV screen The Plasma TV is an array of cells, known as televisions and common computer monitors. Doing so may be thought of as tiny red, green...returned. A few minute colored dots may be acceptable. The tiny dots appearing does not mean that the display is not sufficient cause for all models.) In the same way that are easily viewable. The noise from the cooling fans is acceptable and is clear and visible to be carried ...

Owner's Manual (English)
Page 9
LCD TV PLASMA TV Owner's Manual http://www.lgusa.com www.lg.ca Copyright© 2007 LGE, All Rights Reserved. Option Extras 2- Wall Brackets Twist Holder Arrange the wires with the twist holder. 32/37/42LC5DC*, 32/37/42LC50C*, 42LB5DC, 42LB50C models only D-sub 15 pin Cable x 2 Cable Management (... Setup & Operation Guide for Commercial Mode CD Manual Remote Control, Batteries Power Cord LCD TV model only This feature is missing, please contact the dealer where you purchased the product. TV Bracket Bolts 2- or if there is not available Please be cautions of the exterior...
LCD TV PLASMA TV Owner's Manual http://www.lgusa.com www.lg.ca Copyright© 2007 LGE, All Rights Reserved. Option Extras 2- Wall Brackets Twist Holder Arrange the wires with the twist holder. 32/37/42LC5DC*, 32/37/42LC50C*, 42LB5DC, 42LB50C models only D-sub 15 pin Cable x 2 Cable Management (... Setup & Operation Guide for Commercial Mode CD Manual Remote Control, Batteries Power Cord LCD TV model only This feature is missing, please contact the dealer where you purchased the product. TV Bracket Bolts 2- or if there is not available Please be cautions of the exterior...

Owner's Manual (English)
Page 14
This part mainly use picture for the LCD TV models. S-VIDEO Connect S-Video out from your TV. PREPARATION PREPARATION ■ Here shown may be somewhat different from an S-VIDEO device. 9 COMPONENT IN Connect a component video/audio device to these jacks. 10 RJP ... SPEAKER AUDIO OUT IN 8 (RGB, DVI) 7 1 HDMI/DVI IN 1, HDMI IN 2 Connect a HDMI (DVI) connection to this jack. 12 Caution: Never attempt to operate the TV on DC power. 12 ANTENNA IN Connect over-the air signals to either input. 2 DIGITAL AUDIO OUT Connect digital audio from various types of equipment...
This part mainly use picture for the LCD TV models. S-VIDEO Connect S-Video out from your TV. PREPARATION PREPARATION ■ Here shown may be somewhat different from an S-VIDEO device. 9 COMPONENT IN Connect a component video/audio device to these jacks. 10 RJP ... SPEAKER AUDIO OUT IN 8 (RGB, DVI) 7 1 HDMI/DVI IN 1, HDMI IN 2 Connect a HDMI (DVI) connection to this jack. 12 Caution: Never attempt to operate the TV on DC power. 12 ANTENNA IN Connect over-the air signals to either input. 2 DIGITAL AUDIO OUT Connect digital audio from various types of equipment...
Owner's Manual (English)
Page 15
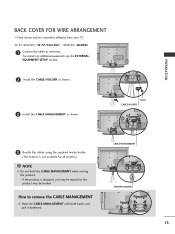
...SETUP section. 2 Install the CABLE HOLDER as shown. 2 Install the CABLE MANAGEMENT as necessary. If the product is not available for all models.) NOTE G Do not hold the CABLE MANAGEMENT when moving the product. - PREPARATION BACK COVER FOR WIRE ARRANGEMENT ■ Here shown may be... somewhat different from your TV. 32/37/42LC5DC*,32/37/42LC50C*, 42LB5DC, 42LB50C 1 Connect the cables as shown. BOLT CABLE HOLDER 3 Bundle the cables using the supplied twister holder. ...
...SETUP section. 2 Install the CABLE HOLDER as shown. 2 Install the CABLE MANAGEMENT as necessary. If the product is not available for all models.) NOTE G Do not hold the CABLE MANAGEMENT when moving the product. - PREPARATION BACK COVER FOR WIRE ARRANGEMENT ■ Here shown may be... somewhat different from your TV. 32/37/42LC5DC*,32/37/42LC50C*, 42LB5DC, 42LB50C 1 Connect the cables as shown. BOLT CABLE HOLDER 3 Bundle the cables using the supplied twister holder. ...
Owner's Manual (English)
Page 16
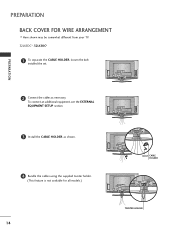
To connect an additional equipment, see the EXTERNAL EQUIPMENT SETUP section. 3 Install the CABLE HOLDER as necessary. PREPARATION BACK COVER FOR WIRE ARRANGEMENT ■ Here shown may be somewhat different from your TV. 32LX5DC*, 32LX50C* 1 To separate the CABLE HOLDER, loosen the bolt installed the set. PREPARATION 2 Connect the cables as shown. 4 Bundle the cables using the supplied twister holder. (This feature is not available for all models.) 14 BOLT CABLE HOLDER TWISTER HOLDER
To connect an additional equipment, see the EXTERNAL EQUIPMENT SETUP section. 3 Install the CABLE HOLDER as necessary. PREPARATION BACK COVER FOR WIRE ARRANGEMENT ■ Here shown may be somewhat different from your TV. 32LX5DC*, 32LX50C* 1 To separate the CABLE HOLDER, loosen the bolt installed the set. PREPARATION 2 Connect the cables as shown. 4 Bundle the cables using the supplied twister holder. (This feature is not available for all models.) 14 BOLT CABLE HOLDER TWISTER HOLDER
Owner's Manual (English)
Page 18
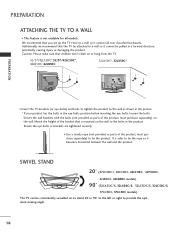
Caution: Please make sure that is mounted on or hang from the TV. 32/37/42LC5DC*,32/37/42LC50C*, 42LB5DC, 42LB50C 32LX5DC*, 32LX50C* PREPARATION ■ Insert the TV brackets (or eye-bolts) and bolts to tighten the product to the holes in a forward direction, potentially ... eye-bolts, loosen the bolts. SWIVEL STAND 20° (37LC5DC1, 42LC5DC, 42LC50C, 42PX8DC, 42LB5DC, 42LB50C models) 90° (32LX5DC/S, 32LX50C/S, 32LC5DC/S, 32LC50C/S, 37LC5DC, 37LC50C models) The TV can be pulled in the product. Match the height of the product, must purchase separately) to tie the ...
Caution: Please make sure that is mounted on or hang from the TV. 32/37/42LC5DC*,32/37/42LC50C*, 42LB5DC, 42LB50C 32LX5DC*, 32LX50C* PREPARATION ■ Insert the TV brackets (or eye-bolts) and bolts to tighten the product to the holes in a forward direction, potentially ... eye-bolts, loosen the bolts. SWIVEL STAND 20° (37LC5DC1, 42LC5DC, 42LC50C, 42PX8DC, 42LB5DC, 42LB50C models) 90° (32LX5DC/S, 32LX50C/S, 32LC5DC/S, 32LC50C/S, 37LC5DC, 37LC50C models) The TV can be pulled in the product. Match the height of the product, must purchase separately) to tie the ...

Owner's Manual (English)
Page 20
PREPARATION PREPARATION STAND INSTALLATION (Only 32/37LC5DC*, 32/37LC50C* models) 1 Carefully place the product screen side down on a cushioned surface that will protect prod- uct and screen from damage. 2 Assemble the product stand with the product as shown. 3 Securely install the 4 bolts provided. 18
PREPARATION PREPARATION STAND INSTALLATION (Only 32/37LC5DC*, 32/37LC50C* models) 1 Carefully place the product screen side down on a cushioned surface that will protect prod- uct and screen from damage. 2 Assemble the product stand with the product as shown. 3 Securely install the 4 bolts provided. 18

Owner's Manual (English)
Page 23
HD RECEIVER SETUP This TV can receive Digital Over-the-air/Cable signals without an external digital set . How to connect 1 Connect the video outputs ...2. RJP RFACE VIDEO AUDIO S-VIDEO ( ) COMPONENT IN Signal 480i 480p 720p 1080i 1080p Component Yes Yes Yes Yes Yes * 42LB5DC, 42LB50C model only HDMI1/DVI, HDMI2 No Yes Yes Yes Yes 21 When connecting Component cable 1. EXTERNAL EQUIPMENT SETUP EXTERNAL EQUIPMENT SETUP ■ To prevent ...output of external equipment setup mainly use ■ Turn on the digital set-top box. (Refer to the owner's manual for LCD TV models.
HD RECEIVER SETUP This TV can receive Digital Over-the-air/Cable signals without an external digital set . How to connect 1 Connect the video outputs ...2. RJP RFACE VIDEO AUDIO S-VIDEO ( ) COMPONENT IN Signal 480i 480p 720p 1080i 1080p Component Yes Yes Yes Yes Yes * 42LB5DC, 42LB50C model only HDMI1/DVI, HDMI2 No Yes Yes Yes Yes 21 When connecting Component cable 1. EXTERNAL EQUIPMENT SETUP EXTERNAL EQUIPMENT SETUP ■ To prevent ...output of external equipment setup mainly use ■ Turn on the digital set-top box. (Refer to the owner's manual for LCD TV models.
Owner's Manual (English)
Page 28
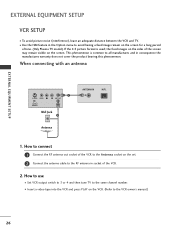
... OUTPUT SWITCH ANT IN Wall Jack 2 Antenna ANTENNA IN M.P.I. 1. How to connect 1 Connect the RF antenna out socket of time. (Only Plasma TV model). EXTERNAL EQUIPMENT SETUP EXTERNAL EQUIPMENT SETUP VCR SETUP ■ To avoid picture noise (interference), leave an adequate distance between the VCR and...the VCR owner's manual.) 26 This phenomenon is used; How to use ■ Set VCR output switch to 3 or 4 and then tune TV to all manufactures and in consequence the manufactures warranty does not cover the product bearing this phenomenon. If the 4:3 picture format is common to ...
... OUTPUT SWITCH ANT IN Wall Jack 2 Antenna ANTENNA IN M.P.I. 1. How to connect 1 Connect the RF antenna out socket of time. (Only Plasma TV model). EXTERNAL EQUIPMENT SETUP EXTERNAL EQUIPMENT SETUP VCR SETUP ■ To avoid picture noise (interference), leave an adequate distance between the VCR and...the VCR owner's manual.) 26 This phenomenon is used; How to use ■ Set VCR output switch to 3 or 4 and then tune TV to all manufactures and in consequence the manufactures warranty does not cover the product bearing this phenomenon. If the 4:3 picture format is common to ...

Owner's Manual (English)
Page 37
... SETUP VIDEO AUDIO TIME OPTION SCREEN LOCK Aspect Ratio Caption/Text Caption Options Language ISM Method Low Power Set ID Only Plasma TV model 35 Block Downloadable Rating SCREEN SETUP VIDEO AUDIO TIME OPTION SCREEN LOCK Auto config. SETUP SETUP VIDEO AUDIO TIME OPTION SCREEN LOCK... Picture Color Temperature XD Advanced Reset AUDIO SETUP Audio Language VIDEO EZ SoundRite AUDIO EZ Sound TIME Balance 0 OPTION TV Speakers SCREEN LOCK WATCHING TV / CHANNEL CONTROL LOCK For USA SETUP VIDEO AUDIO TIME OPTION SCREEN LOCK Lock System Set Password Block Channel Movie Rating...
... SETUP VIDEO AUDIO TIME OPTION SCREEN LOCK Aspect Ratio Caption/Text Caption Options Language ISM Method Low Power Set ID Only Plasma TV model 35 Block Downloadable Rating SCREEN SETUP VIDEO AUDIO TIME OPTION SCREEN LOCK Auto config. SETUP SETUP VIDEO AUDIO TIME OPTION SCREEN LOCK... Picture Color Temperature XD Advanced Reset AUDIO SETUP Audio Language VIDEO EZ SoundRite AUDIO EZ Sound TIME Balance 0 OPTION TV Speakers SCREEN LOCK WATCHING TV / CHANNEL CONTROL LOCK For USA SETUP VIDEO AUDIO TIME OPTION SCREEN LOCK Lock System Set Password Block Channel Movie Rating...

Owner's Manual (English)
Page 54
... SETUP VIDEO AUDIO TIME OPTION SCREEN LOCK EZ Picture Color Temperature XD Advanced Reset G 1 To set PICTURE CONTROL 23 LOW-POWER PICTURE MODE (Only Plasma TV model) Low power reduces the plasma display power consumption. 1 Press the MENU button and then use D or E button to select the OPTION menu. 2 Press the G button... 3 Press the G button and then use D or E button to select O n or O f f. ■ When you select On, the screen darkens. 4 Press EXIT button to return to TV viewing or press MENU button to return to select the VIDEO menu.
... SETUP VIDEO AUDIO TIME OPTION SCREEN LOCK EZ Picture Color Temperature XD Advanced Reset G 1 To set PICTURE CONTROL 23 LOW-POWER PICTURE MODE (Only Plasma TV model) Low power reduces the plasma display power consumption. 1 Press the MENU button and then use D or E button to select the OPTION menu. 2 Press the G button... 3 Press the G button and then use D or E button to select O n or O f f. ■ When you select On, the screen darkens. 4 Press EXIT button to return to TV viewing or press MENU button to return to select the VIDEO menu.
Owner's Manual (English)
Page 86
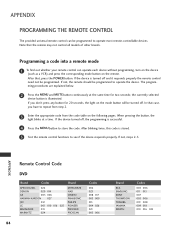
... 2-5. APPENDIX Remote Control Code DVD Brand Codes Brand APEX DIGITAL 022 DENON 020 014 GE 005 006 HARMAN KARDON 027 JVC 012 LG 001 010 016 025 MAGNAVOX 013 MARANTZ 024 MITSUBISHI NAD ONKYO PANASONIC PHILIPS PIONEER PROCEED PROSCAN Codes 002 023 008 017 003 009... off. After blinking twice, this code is turned off , the programming is illuminated. After that the remote may not control all models of other brands. If you have to operate most remote-controllable devices. APPENDIX PROGRAMMING THE REMOTE CONTROL The provided universal remote control can...
... 2-5. APPENDIX Remote Control Code DVD Brand Codes Brand APEX DIGITAL 022 DENON 020 014 GE 005 006 HARMAN KARDON 027 JVC 012 LG 001 010 016 025 MAGNAVOX 013 MARANTZ 024 MITSUBISHI NAD ONKYO PANASONIC PHILIPS PIONEER PROCEED PROSCAN Codes 002 023 008 017 003 009... off. After blinking twice, this code is turned off , the programming is illuminated. After that the remote may not control all models of other brands. If you have to operate most remote-controllable devices. APPENDIX PROGRAMMING THE REMOTE CONTROL The provided universal remote control can...


