Owner's Manual (English)
Page 6
... Technology 49 Advanced - Analog Broadcasting System Captions 62 - User Mode 48 XD - EZ Picture - CONTENTS WARNING / CAUTION 1 SAFETY INSTRUCTION 2 FEATURE OF THIS TV 6 PREPARATION Accessories 7 Front Panel Controls 8 Back Panel Information 11 Back Cover for Wire Arrangement 13 Attaching the... Setup 24 VCR Setup 26 Other A/V Source Setup 28 Digital Audio Output 28 PC Setup 29 WATCHING TV / CHANNEL CONTROL Remote Control Functions 32 Turning On TV 34 Channel Selection 34 Volume Adjustment 34 On-Screen Menus Selection 35 Channel Setup 36 - Preset 45 -
... Technology 49 Advanced - Analog Broadcasting System Captions 62 - User Mode 48 XD - EZ Picture - CONTENTS WARNING / CAUTION 1 SAFETY INSTRUCTION 2 FEATURE OF THIS TV 6 PREPARATION Accessories 7 Front Panel Controls 8 Back Panel Information 11 Back Cover for Wire Arrangement 13 Attaching the... Setup 24 VCR Setup 26 Other A/V Source Setup 28 Digital Audio Output 28 PC Setup 29 WATCHING TV / CHANNEL CONTROL Remote Control Functions 32 Turning On TV 34 Channel Selection 34 Volume Adjustment 34 On-Screen Menus Selection 35 Channel Setup 36 - Preset 45 -

Owner's Manual (English)
Page 8
... controlled by advanced electronics to produce over 160 degrees. Cooling Fan Noise (This feature is not available for long periods of cells, known as televisions and common computer monitors. Avoid touching the LCD screen or holding your finger(s) against it easy to produce colored light (red,...defects will normally occur in a variety of noise could occur while the fans are easily viewable. FOR LCD TV If the TV feels cold to view your plasma display in the Plasma TV manufacturing process. Do not dispose of mercury. This also occurs in the room. The fan noise doesn...
... controlled by advanced electronics to produce over 160 degrees. Cooling Fan Noise (This feature is not available for long periods of cells, known as televisions and common computer monitors. Avoid touching the LCD screen or holding your finger(s) against it easy to produce colored light (red,...defects will normally occur in a variety of noise could occur while the fans are easily viewable. FOR LCD TV If the TV feels cold to view your plasma display in the Plasma TV manufacturing process. Do not dispose of mercury. This also occurs in the room. The fan noise doesn...

Owner's Manual (English)
Page 9
...Holder Arrange the wires with the polishing cloth for the product exteri- This feature is not available for all models. may cause scratch or discoloration. 7 LCD TV PLASMA TV Owner's Manual http://www.lgusa.com www.lg.ca Copyright© 2007 LGE, All Rights Reserved. PIP CH SWAP ...Refer to p.13) 1-Bolt for fixing the 4-Bolts for stand Cable Holder assembly (Refer to p.13) (Refer to p.18) 32/37LC5DC*, 32/37LC50C* models only M4xL22 Torx plus Star head screw (Refer to maintain standard compliance for the product. PREPARATION PREPARATION ACCESSORIES Ensure that ...
...Holder Arrange the wires with the polishing cloth for the product exteri- This feature is not available for all models. may cause scratch or discoloration. 7 LCD TV PLASMA TV Owner's Manual http://www.lgusa.com www.lg.ca Copyright© 2007 LGE, All Rights Reserved. PIP CH SWAP ...Refer to p.13) 1-Bolt for fixing the 4-Bolts for stand Cable Holder assembly (Refer to p.13) (Refer to p.18) 32/37LC5DC*, 32/37LC50C* models only M4xL22 Torx plus Star head screw (Refer to maintain standard compliance for the product. PREPARATION PREPARATION ACCESSORIES Ensure that ...
Owner's Manual (English)
Page 15
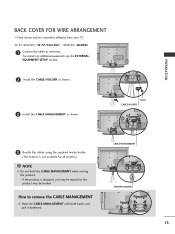
...pull it backward. CABLE MANAGEMENT TWISTER HOLDER 13 PREPARATION BACK COVER FOR WIRE ARRANGEMENT ■ Here shown may be somewhat different from your TV. 32/37/42LC5DC*,32/37/42LC50C*, 42LB5DC, 42LB50C 1 Connect the cables as shown. If the product is not available for all models.) NOTE G Do ...not hold the CABLE MANAGEMENT when moving the product. - BOLT CABLE HOLDER 3 Bundle the cables using the supplied twister holder. (This feature is dropped, you...
...pull it backward. CABLE MANAGEMENT TWISTER HOLDER 13 PREPARATION BACK COVER FOR WIRE ARRANGEMENT ■ Here shown may be somewhat different from your TV. 32/37/42LC5DC*,32/37/42LC50C*, 42LB5DC, 42LB50C 1 Connect the cables as shown. If the product is not available for all models.) NOTE G Do ...not hold the CABLE MANAGEMENT when moving the product. - BOLT CABLE HOLDER 3 Bundle the cables using the supplied twister holder. (This feature is dropped, you...
Owner's Manual (English)
Page 16
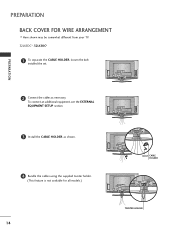
PREPARATION BACK COVER FOR WIRE ARRANGEMENT ■ Here shown may be somewhat different from your TV. 32LX5DC*, 32LX50C* 1 To separate the CABLE HOLDER, loosen the bolt installed the set. PREPARATION 2 Connect the cables as shown. 4 Bundle the cables using the supplied twister holder. (This feature is not available for all models.) 14 BOLT CABLE HOLDER TWISTER HOLDER To connect an additional equipment, see the EXTERNAL EQUIPMENT SETUP section. 3 Install the CABLE HOLDER as necessary.
PREPARATION BACK COVER FOR WIRE ARRANGEMENT ■ Here shown may be somewhat different from your TV. 32LX5DC*, 32LX50C* 1 To separate the CABLE HOLDER, loosen the bolt installed the set. PREPARATION 2 Connect the cables as shown. 4 Bundle the cables using the supplied twister holder. (This feature is not available for all models.) 14 BOLT CABLE HOLDER TWISTER HOLDER To connect an additional equipment, see the EXTERNAL EQUIPMENT SETUP section. 3 Install the CABLE HOLDER as necessary.
Owner's Manual (English)
Page 18
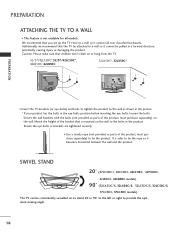
...all models. Caution: Please make sure that you set up the TV close to provide the optimum viewing angle. 16 PREPARATION ATTACHING THE TV TO A WALL ■ This feature is mounted on the wall to tie the rope so it ...32/37/42LC50C*, 42LB5DC, 42LB50C 32LX5DC*, 32LX50C* PREPARATION ■ Insert the TV brackets (or eye-bolts) and bolts to tighten the product to a wall so it cannot fall over if pushed backwards. SWIVEL STAND 20° (37LC5DC1, 42LC5DC, 42LC50C, 42PX8DC, 42LB5DC, 42LB50C models) 90° (32LX5DC/S, 32LX50C/S, 32LC5DC/S, 32LC50C/S, 37LC5DC, 37LC50C models) The TV...
...all models. Caution: Please make sure that you set up the TV close to provide the optimum viewing angle. 16 PREPARATION ATTACHING THE TV TO A WALL ■ This feature is mounted on the wall to tie the rope so it ...32/37/42LC50C*, 42LB5DC, 42LB50C 32LX5DC*, 32LX50C* PREPARATION ■ Insert the TV brackets (or eye-bolts) and bolts to tighten the product to a wall so it cannot fall over if pushed backwards. SWIVEL STAND 20° (37LC5DC1, 42LC5DC, 42LC50C, 42PX8DC, 42LB5DC, 42LB50C models) 90° (32LX5DC/S, 32LX50C/S, 32LC5DC/S, 32LC50C/S, 37LC5DC, 37LC50C models) The TV...
Owner's Manual (English)
Page 28
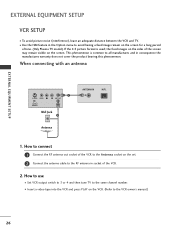
...having a fixed image remain on the screen for a long period of the screen may remain visible on the sides of time. (Only Plasma TV model). If the 4:3 picture format is common to the VCR owner's manual.) 26 EXTERNAL EQUIPMENT SETUP EXTERNAL EQUIPMENT SETUP VCR SETUP ■ ...To avoid picture noise (interference), leave an adequate distance between the VCR and TV. ■ Use the ISM feature in the Option menu to the RF antenna in consequence the manufactures warranty does not cover the product bearing this phenomenon.
...having a fixed image remain on the screen for a long period of the screen may remain visible on the sides of time. (Only Plasma TV model). If the 4:3 picture format is common to the VCR owner's manual.) 26 EXTERNAL EQUIPMENT SETUP EXTERNAL EQUIPMENT SETUP VCR SETUP ■ ...To avoid picture noise (interference), leave an adequate distance between the VCR and TV. ■ Use the ISM feature in the Option menu to the RF antenna in consequence the manufactures warranty does not cover the product bearing this phenomenon.

Owner's Manual (English)
Page 41
... SCREEN LOCK EZ Scan Manual Scan Channel Edit DTV Signal Channel Label 1 Bad Normal Good 23 39 Press EXIT button to return to TV viewing or press 4 MENU button to return to see 3 the quality of the signal being received and indicates whether you are to ...experience picture degradation. WATCHING TV / CHANNEL CONTROL DTV SIGNAL STRENGTH This feature displays the DTV signal levels being received. CH 2 3 5 6 8 9 0 1 Press the MENU button and then use D or E button to...
... SCREEN LOCK EZ Scan Manual Scan Channel Edit DTV Signal Channel Label 1 Bad Normal Good 23 39 Press EXIT button to return to TV viewing or press 4 MENU button to return to see 3 the quality of the signal being received and indicates whether you are to ...experience picture degradation. WATCHING TV / CHANNEL CONTROL DTV SIGNAL STRENGTH This feature displays the DTV signal levels being received. CH 2 3 5 6 8 9 0 1 Press the MENU button and then use D or E button to...

Owner's Manual (English)
Page 45
... CC EXIT RATIO MENU SAP ENTER Set By Program Set By Program 4:3 Choose 4:3 when you need to specify how the picture is displayed on your TV. Set by program Selects the proper picture proportion to view a picture with a 4:3 aspect ratio is to be displayed. ■ RGB-PC/DVI-PC input source... proportion to fill the entire screen. 16:9 43 PICTURE CONTROL 4:3 16:9 Adjust the picture horizontally, in the OPTION menu. PICTURE SIZE (ASPECT RATIO) CONTROL This feature allows an analog picture with an original 4:3 aspect ratio.
... CC EXIT RATIO MENU SAP ENTER Set By Program Set By Program 4:3 Choose 4:3 when you need to specify how the picture is displayed on your TV. Set by program Selects the proper picture proportion to view a picture with a 4:3 aspect ratio is to be displayed. ■ RGB-PC/DVI-PC input source... proportion to fill the entire screen. 16:9 43 PICTURE CONTROL 4:3 16:9 Adjust the picture horizontally, in the OPTION menu. PICTURE SIZE (ASPECT RATIO) CONTROL This feature allows an analog picture with an original 4:3 aspect ratio.
Owner's Manual (English)
Page 49
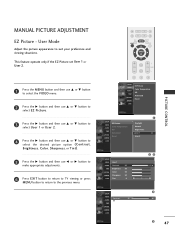
...50 OPTION Color 50 SCREEN Sharpness 50 LOCK Tint 0 R 23 G G SETUP VIDEO AUDIO TIME OPTION SCREEN LOCK Contrast E 85 F 4 G 5 47 This feature operate only if the EZ Picture set User 1 or CH User 2. 2 3 5 6 8 9 0 1 Press the MENU button and then use D or..., Color, Sharpness, or Tint). 5 Press the G button and then use F or G button to make appropriate adjustments. 6 Press EXIT button to return to TV viewing or press MENU button to return to suit your preference and viewing situations. MANUAL PICTURE ADJUSTMENT EZ Picture - User Mode Adjust the picture appearance...
...50 OPTION Color 50 SCREEN Sharpness 50 LOCK Tint 0 R 23 G G SETUP VIDEO AUDIO TIME OPTION SCREEN LOCK Contrast E 85 F 4 G 5 47 This feature operate only if the EZ Picture set User 1 or CH User 2. 2 3 5 6 8 9 0 1 Press the MENU button and then use D or..., Color, Sharpness, or Tint). 5 Press the G button and then use F or G button to make appropriate adjustments. 6 Press EXIT button to return to TV viewing or press MENU button to return to suit your preference and viewing situations. MANUAL PICTURE ADJUSTMENT EZ Picture - User Mode Adjust the picture appearance...
Owner's Manual (English)
Page 52
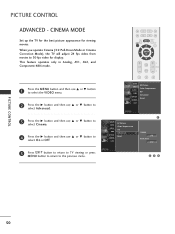
This feature operates only in Analog, AV1, AV2, and CH Component 480i mode. 1 2 3 4 5 6 7 8 0 9 1 Press the MENU button and then use D or E button to select O n or O f f. 5 Press EXIT button to return to TV viewing or press MENU button to return to the previous menu. CINEMA MODE Set up the TV for the best picture ...appearance for display. When you operate Cinema (3:2 Pull-Down Mode or Cinema Correction Mode), the TV will adjust 24 fps video from movies to select the VIDEO menu. CC EXIT RATIO MENU SAP ENTER VOL TIMER MUTE CH PAGE 1 2 3 SETUP VIDEO...
This feature operates only in Analog, AV1, AV2, and CH Component 480i mode. 1 2 3 4 5 6 7 8 0 9 1 Press the MENU button and then use D or E button to select O n or O f f. 5 Press EXIT button to return to TV viewing or press MENU button to return to the previous menu. CINEMA MODE Set up the TV for the best picture ...appearance for display. When you operate Cinema (3:2 Pull-Down Mode or Cinema Correction Mode), the TV will adjust 24 fps video from movies to select the VIDEO menu. CC EXIT RATIO MENU SAP ENTER VOL TIMER MUTE CH PAGE 1 2 3 SETUP VIDEO...
Owner's Manual (English)
Page 53
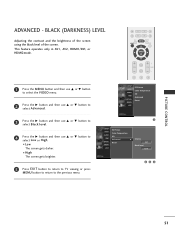
...button to select L o w or High. ■ Low The screen gets darker. ■ High The screen gets brighter. 5 Press EXIT button to return to TV viewing or press MENU button to return to the previous menu. VOL TIMER MUTE CH PAGE 1 2 3 SETUP VIDEO AUDIO TIME OPTION SCREEN LOCK EZ Picture... Reset 1 SETUP VIDEO AUDIO TIME OPTION SCREEN LOCK EZ Picture Color Temperature XD Advanced G Reset Cinema Off Black level Low 234 51 This feature operates only in AV1, AV2, HDMI1/DVI, or HDMI2mode. BLACK (DARKNESS) LEVEL Adjusting the contrast and the brightness of the screen using ...
...button to select L o w or High. ■ Low The screen gets darker. ■ High The screen gets brighter. 5 Press EXIT button to return to TV viewing or press MENU button to return to the previous menu. VOL TIMER MUTE CH PAGE 1 2 3 SETUP VIDEO AUDIO TIME OPTION SCREEN LOCK EZ Picture... Reset 1 SETUP VIDEO AUDIO TIME OPTION SCREEN LOCK EZ Picture Color Temperature XD Advanced G Reset Cinema Off Black level Low 234 51 This feature operates only in AV1, AV2, HDMI1/DVI, or HDMI2mode. BLACK (DARKNESS) LEVEL Adjusting the contrast and the brightness of the screen using ...
Owner's Manual (English)
Page 60
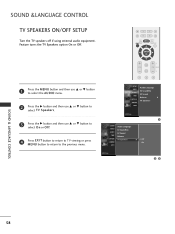
...then use D or E button to select TV Speakers. 3 Press the G button and then use D or E button to select O n or O f f. 4 Press EXIT button to return to TV viewing or press MENU button to return to the previous menu. Feature turns the TV Speakers option On or Off. SOUND & LANGUAGE... CONTROL SOUND &LANGUAGE CONTROL TV SPEAKERS ON/OFF SETUP Turn the TV speakers off if using external audio equipment.
...then use D or E button to select TV Speakers. 3 Press the G button and then use D or E button to select O n or O f f. 4 Press EXIT button to return to TV viewing or press MENU button to return to the previous menu. Feature turns the TV Speakers option On or Off. SOUND & LANGUAGE... CONTROL SOUND &LANGUAGE CONTROL TV SPEAKERS ON/OFF SETUP Turn the TV speakers off if using external audio equipment.

Owner's Manual (English)
Page 62
This feature operates only in DTV/CADTV mode. CH 1 2 3 4 5 6 7 8 9 0 1 Press the MENU button and then use D or E button to select the AUDIO menu. 2 Press the G button and ... E button to select Audio Language. 3 Press the G button and then use D or E button to select: English, Spanish, or French. 4 Press EXIT button to return to TV viewing or press MENU button to return to the previous menu. CC EXIT RATIO MENU SAP ENTER VOL TIMER MUTE CH PAGE 1 2 3 SETUP Audio Language...
This feature operates only in DTV/CADTV mode. CH 1 2 3 4 5 6 7 8 9 0 1 Press the MENU button and then use D or E button to select the AUDIO menu. 2 Press the G button and ... E button to select Audio Language. 3 Press the G button and then use D or E button to select: English, Spanish, or French. 4 Press EXIT button to return to TV viewing or press MENU button to return to the previous menu. CC EXIT RATIO MENU SAP ENTER VOL TIMER MUTE CH PAGE 1 2 3 SETUP Audio Language...

