
Specification (English)
Page 1
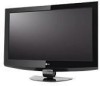
... enhancing color as well as reducing signal noise. LG SIMPLINK™ Allows for convenient control of the industry's widest viewing angles. LG's XD Engine® takes the low resolution of analog signals to picture improvement. LG's Exclusive XD Engine® Six distinct processes contribute... of other LG SimpLink™ products using the existing HDMI™ connection. even while viewing at the most extreme angles. USB MEDIA HOST Experience your digital music (MP3) and photo (JPEG) library with consistent contrast and color - 32" CLASS LCD HDTV (31.5" diagonal) 32LB9D • ...
... enhancing color as well as reducing signal noise. LG SIMPLINK™ Allows for convenient control of the industry's widest viewing angles. LG's XD Engine® takes the low resolution of analog signals to picture improvement. LG's Exclusive XD Engine® Six distinct processes contribute... of other LG SimpLink™ products using the existing HDMI™ connection. even while viewing at the most extreme angles. USB MEDIA HOST Experience your digital music (MP3) and photo (JPEG) library with consistent contrast and color - 32" CLASS LCD HDTV (31.5" diagonal) 32LB9D • ...

Specification (English)
Page 2
... SIDE AV IN 2 LG Electronics U.S.A., Inc. 1000 Sylvan Avenue, Englewood Cliffs, NJ 07632 (800)243-0000 © 2007 LG Electronics U.S.A., Inc., Englewood Cliffs, NJ. "LG Life's Good" is ...) • Enhanced Line Doubled • 3:2 Pull-Down Correction 3:2 (480i/1080i) Picture Selection Mode 5 Modes Black Stretcher (Black Level Enhancer) • DTV Signal Strength Indicator... respective owners. 32" CLASS LCD HDTV (31.5" diagonal) 31.7" 3.1" 32LB9D 7.9" 3.9" 24.4" 21.8" 11.2" 16.4" TV ATSC/NTSC/QAM Clear Tuner • Video Screen Size Class: 32" (31.5" ...
... SIDE AV IN 2 LG Electronics U.S.A., Inc. 1000 Sylvan Avenue, Englewood Cliffs, NJ 07632 (800)243-0000 © 2007 LG Electronics U.S.A., Inc., Englewood Cliffs, NJ. "LG Life's Good" is ...) • Enhanced Line Doubled • 3:2 Pull-Down Correction 3:2 (480i/1080i) Picture Selection Mode 5 Modes Black Stretcher (Black Level Enhancer) • DTV Signal Strength Indicator... respective owners. 32" CLASS LCD HDTV (31.5" diagonal) 31.7" 3.1" 32LB9D 7.9" 3.9" 24.4" 21.8" 11.2" 16.4" TV ATSC/NTSC/QAM Clear Tuner • Video Screen Size Class: 32" (31.5" ...
Owner's Manual (English)
Page 2
... can play MP3 music from a MP3 player, such as iPOD, and JPEG images from Dolby Laboratories. LG TV with one remote control. "Dolby "and the double-D symbol are trademarks of a full digital image processor, six different main picture quality factors. R TruSurround XT R TruSurround XT is incorporated under license from a digital camera through the...
... can play MP3 music from a MP3 player, such as iPOD, and JPEG images from Dolby Laboratories. LG TV with one remote control. "Dolby "and the double-D symbol are trademarks of a full digital image processor, six different main picture quality factors. R TruSurround XT R TruSurround XT is incorporated under license from a digital camera through the...
Owner's Manual (English)
Page 4
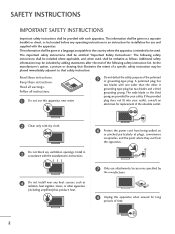
... to be given in a language acceptable to the country where the apparatus is intended to that safety instruction: Read these instructions. At the manufacturer's option, a picture or drawing that produce heat. 6 Protect the power cord from being walked on or pinched particularly at plugs, convenience receptacles, and the point where they...
... to be given in a language acceptable to the country where the apparatus is intended to that safety instruction: Read these instructions. At the manufacturer's option, a picture or drawing that produce heat. 6 Protect the power cord from being walked on or pinched particularly at plugs, convenience receptacles, and the point where they...
Owner's Manual (English)
Page 6
... Balance 72 Stereo / SAP Broadcast Setup 73 TV Speakers On/ Off Setup 74 Audio Language 75 On-Screen Menus Language Selection 76 Caption Mode - Auto Scan ( Auto Tuning 42 - Color Tone - Black( Darkness) Level 63 Picture Reset 64 Image Sticking Minimization( ISM) Method...28 USB In Setup 34 Audio Out Setup 35 WATCHING TV / CHANNEL CONTROL Remote Control Functions 36 Turning on TV 38 Channel Selection 39 Volume Adjustment 40 On-Screen Menus Selection 41 Channel Setup - User Mode 60 XD - Picture Improvement Technology 61 Advanced - Digital Broadcasting System Captions . ...
... Balance 72 Stereo / SAP Broadcast Setup 73 TV Speakers On/ Off Setup 74 Audio Language 75 On-Screen Menus Language Selection 76 Caption Mode - Auto Scan ( Auto Tuning 42 - Color Tone - Black( Darkness) Level 63 Picture Reset 64 Image Sticking Minimization( ISM) Method...28 USB In Setup 34 Audio Out Setup 35 WATCHING TV / CHANNEL CONTROL Remote Control Functions 36 Turning on TV 38 Channel Selection 39 Volume Adjustment 40 On-Screen Menus Selection 41 Channel Setup - User Mode 60 XD - Picture Improvement Technology 61 Advanced - Digital Broadcasting System Captions . ...

Owner's Manual (English)
Page 11
PREPARATION 47LC7DF CH CHANNEL (E,D) Buttons VOLUME VOL (F,G) Buttons ENTER MENU INPUT /I INPUT Button Intelligent Eye Adjusts picture according to the surrounding conditions. POWER Button Remote Control Power/Standby Indicator Sensor • illuminates red in standby ... 9 Power/Standby Indicator Remote Control Sensor • illuminates red in standby mode. • illuminates green when the set is switched on . 32LB9D* CH CH CHANNEL (E,D) ButtonsCH VOL VOLUME (F,G) Buttons VOL ENTER Button MENU Button VOL ENTER MENU INPUT /I ENTER Button MENU Button INPUT Button...
PREPARATION 47LC7DF CH CHANNEL (E,D) Buttons VOLUME VOL (F,G) Buttons ENTER MENU INPUT /I INPUT Button Intelligent Eye Adjusts picture according to the surrounding conditions. POWER Button Remote Control Power/Standby Indicator Sensor • illuminates red in standby ... 9 Power/Standby Indicator Remote Control Sensor • illuminates red in standby mode. • illuminates green when the set is switched on . 32LB9D* CH CH CHANNEL (E,D) ButtonsCH VOL VOLUME (F,G) Buttons VOL ENTER Button MENU Button VOL ENTER MENU INPUT /I ENTER Button MENU Button INPUT Button...
Owner's Manual (English)
Page 14
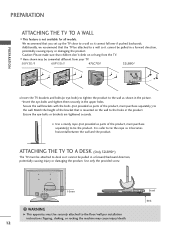
...Tipping, shaking, or rocking the machine may be somewhat different from the TV. PREPARATION ATTACHING THE TV TO A WALL I This feature is mounted on or hang from your TV. 50PY3D/F 60PY3D/F 47LC7DF 32LB9D* PREPARATION I Insert the TV brackets and bolts(or eye-bolts) to tighten the product to the .... 12 Stand Desk We recommend that is not available for all models. I Use a sturdy rope (not provided as shown in the picture. *Insert the eye-bolts and tighten them securely in a forward direction, potentially causing injury or damaging the product. Caution: Please make sure...
...Tipping, shaking, or rocking the machine may be somewhat different from the TV. PREPARATION ATTACHING THE TV TO A WALL I This feature is mounted on or hang from your TV. 50PY3D/F 60PY3D/F 47LC7DF 32LB9D* PREPARATION I Insert the TV brackets and bolts(or eye-bolts) to tighten the product to the .... 12 Stand Desk We recommend that is not available for all models. I Use a sturdy rope (not provided as shown in the picture. *Insert the eye-bolts and tighten them securely in a forward direction, potentially causing injury or damaging the product. Caution: Please make sure...

Owner's Manual (English)
Page 21
... installed properly, contact your dealer for outdoor antenna) Copper Wire Be careful not to be split for two TV's, install a 2-Way Signal Splitter. For optimum picture quality, adjust antenna direction if needed. AV IN 2 Wall Antenna Socket Multi-family Dwellings/Apartments (Connect to... IN Outdoor Antenna (VHF, UHF) 2. PREPARATION ANTENNA OR CABLE CONNECTION 1. I To improve the picture quality in a poor signal area, please purchase a signal amplifier and install properly. NOTE The TV will let you know when the analog, cable, and digital channel scans are complete. 19
... installed properly, contact your dealer for outdoor antenna) Copper Wire Be careful not to be split for two TV's, install a 2-Way Signal Splitter. For optimum picture quality, adjust antenna direction if needed. AV IN 2 Wall Antenna Socket Multi-family Dwellings/Apartments (Connect to... IN Outdoor Antenna (VHF, UHF) 2. PREPARATION ANTENNA OR CABLE CONNECTION 1. I To improve the picture quality in a poor signal area, please purchase a signal amplifier and install properly. NOTE The TV will let you know when the analog, cable, and digital channel scans are complete. 19

Owner's Manual (English)
Page 22
When connecting Component cable 1. How to use picture for the 47LC7DF model. However, if you do receive ...connect 1 Connect the video outputs (Y, PB, PR) of the digital set . Y PB PR L R 1 2 2. This TV supports HDCP (High-bandwidth Digital Contents Protection) protocol for the digital set-top bo(xDV.)I) I Turn on the set top box ...red). 2 Connect the audio output of the digital set . EXTERNAL EQUIPMENT SETUP EXTERNAL EQUIPMENT SETUP HD RECEIVER SETUP This TV can receive Digital Over-the-air/Cable signals without an external digital set -top box. (Refer to the figure as...
When connecting Component cable 1. How to use picture for the 47LC7DF model. However, if you do receive ...connect 1 Connect the video outputs (Y, PB, PR) of the digital set . Y PB PR L R 1 2 2. This TV supports HDCP (High-bandwidth Digital Contents Protection) protocol for the digital set-top bo(xDV.)I) I Turn on the set top box ...red). 2 Connect the audio output of the digital set . EXTERNAL EQUIPMENT SETUP EXTERNAL EQUIPMENT SETUP HD RECEIVER SETUP This TV can receive Digital Over-the-air/Cable signals without an external digital set -top box. (Refer to the figure as...

Owner's Manual (English)
Page 25
I Refer to the component input ports as shown below. Y PB PR L R 1 2 Component Input ports To get better picture quality, connect a DVD player to the DVD player's manual for operating instruc- How to COMPONENT IN 2 input, select COM- PONENT 2 input source. ... 1 input source with using the INPUT button on DVD player Y PB PR Y Pb Pr Y B-Y R-Y Y Cb Cr 23 tions. Component ports on the TV Y PB PR Video output ports on the remote control. EXTERNAL EQUIPMENT SETUP DVD SETUP When connecting Component cable 1. I Turn on the DVD player, insert a DVD...
I Refer to the component input ports as shown below. Y PB PR L R 1 2 Component Input ports To get better picture quality, connect a DVD player to the DVD player's manual for operating instruc- How to COMPONENT IN 2 input, select COM- PONENT 2 input source. ... 1 input source with using the INPUT button on DVD player Y PB PR Y Pb Pr Y B-Y R-Y Y Cb Cr 23 tions. Component ports on the TV Y PB PR Video output ports on the remote control. EXTERNAL EQUIPMENT SETUP DVD SETUP When connecting Component cable 1. I Turn on the DVD player, insert a DVD...
Owner's Manual (English)
Page 27
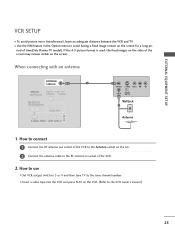
... Set VCR output switch to 3 or 4 and then tune TV to the same channel number. riod of the screen may remain visible on the screen for a long pe- How to connect 1 Connect the RF antenna out socket of the VCR. 2. If the 4:3 picture format is used; When connecting with an antenna ANTENNA... fixed image remain on the screen. the fixed images on the sides of time(Only Plasma TV model). EXTERNAL EQUIPMENT SETUP VCR SETUP I To avoid picture noise (interference), leave an adequate distance between the VCR and TV I Use the ISM feature in socket of the VCR to the Antenna socket on the VCR...
... Set VCR output switch to 3 or 4 and then tune TV to the same channel number. riod of the screen may remain visible on the screen for a long pe- How to connect 1 Connect the RF antenna out socket of the VCR. 2. If the 4:3 picture format is used; When connecting with an antenna ANTENNA... fixed image remain on the screen. the fixed images on the sides of time(Only Plasma TV model). EXTERNAL EQUIPMENT SETUP VCR SETUP I To avoid picture noise (interference), leave an adequate distance between the VCR and TV I Use the ISM feature in socket of the VCR to the Antenna socket on the VCR...

Owner's Manual (English)
Page 28
How to AV IN 2, select A V 2 input source. When connecting with a RCA cable 1. I If connected to connect 1 Connect the AUDIO/VIDEO jacks between TV and VCR. VIDEO L R S-VIDEO ANT IN ANTENNA/ OUTPUT ANT OUT SWITCH CABLE IN 1 NOTE If you connect both Video and the S-Video cables, only the... manual.) I Insert a video tape into the VCR and press PLAY on the VCR. (Refer to the VCR owner's manual.) I D E O input on the remote control. The picture quality is improved; How to use I Insert a video tape into the VCR and press PLAY on the VCR. (Refer to the AUDIO L/MONO jack of...
How to AV IN 2, select A V 2 input source. When connecting with a RCA cable 1. I If connected to connect 1 Connect the AUDIO/VIDEO jacks between TV and VCR. VIDEO L R S-VIDEO ANT IN ANTENNA/ OUTPUT ANT OUT SWITCH CABLE IN 1 NOTE If you connect both Video and the S-Video cables, only the... manual.) I Insert a video tape into the VCR and press PLAY on the VCR. (Refer to the VCR owner's manual.) I D E O input on the remote control. The picture quality is improved; How to use I Insert a video tape into the VCR and press PLAY on the VCR. (Refer to the AUDIO L/MONO jack of...

Owner's Manual (English)
Page 30
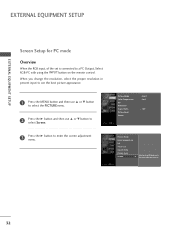
...RGB 1 2 NOTE G Check the image on the VIDEO menu until the picture is clear. I Turn on the set . If the refresh rate of the...the INPUT button on the remote control. RGB OUTPUT AUDIO 28 EXTERNAL EQUIPMENT SETUP EXTERNAL EQUIPMENT SETUP PC SETUP This TV provides Plug and Play capability, meaning that the PC adjusts automatically to the AUDIO (RGB/DVI) jack on .... When connecting D-sub 15 pin cable 1. How to another rate or adjust the brightness and contrast on your TV. There may be changed, change the refresh rate to connect 1 Connect the RGB output of the PC graphic card...
...RGB 1 2 NOTE G Check the image on the VIDEO menu until the picture is clear. I Turn on the set . If the refresh rate of the...the INPUT button on the remote control. RGB OUTPUT AUDIO 28 EXTERNAL EQUIPMENT SETUP EXTERNAL EQUIPMENT SETUP PC SETUP This TV provides Plug and Play capability, meaning that the PC adjusts automatically to the AUDIO (RGB/DVI) jack on .... When connecting D-sub 15 pin cable 1. How to another rate or adjust the brightness and contrast on your TV. There may be changed, change the refresh rate to connect 1 Connect the RGB output of the PC graphic card...

Owner's Manual (English)
Page 31
... AUDIO 1 Connect the DVI output of PC graphics card's output resolution to the AUDIO(RGB/DVI) jack on the remote control. To get the best picture quality, adjust the output resolution of the PC to the HDMI/DVI IN1, 2 or 3 jack on the set. (Use the HDMI to DVI cable) 2 Connect... the PC audio output to 1920x1080, 60Hz. (32LB9D* model: 1360x768, 60Hz) 29 When connecting HDMI to use I Turn on the PC and the set I Select HDMI1, HDMI2 or HDMI3 input source with using...
... AUDIO 1 Connect the DVI output of PC graphics card's output resolution to the AUDIO(RGB/DVI) jack on the remote control. To get the best picture quality, adjust the output resolution of the PC to the HDMI/DVI IN1, 2 or 3 jack on the set. (Use the HDMI to DVI cable) 2 Connect... the PC audio output to 1920x1080, 60Hz. (32LB9D* model: 1360x768, 60Hz) 29 When connecting HDMI to use I Turn on the PC and the set I Select HDMI1, HDMI2 or HDMI3 input source with using...

Owner's Manual (English)
Page 32
... input form for a long period of the PC graphic card. If noise is clear. EXTERNAL EQUIPMENT SETUP 30 G Check the image on the PICTURE menu until the picture is present, change the PC output to another resolution, change the PC graphic card or consult the manufacturer of time. If the refresh rate... rate to DVI Cable is separate. The fixed image may not work if a HDMI to another rate or adjust the brightness and contrast on your TV.
... input form for a long period of the PC graphic card. If noise is clear. EXTERNAL EQUIPMENT SETUP 30 G Check the image on the PICTURE menu until the picture is present, change the PC output to another resolution, change the PC graphic card or consult the manufacturer of time. If the refresh rate... rate to DVI Cable is separate. The fixed image may not work if a HDMI to another rate or adjust the brightness and contrast on your TV.
Owner's Manual (English)
Page 34
...Selection ( G or ) leads you change the resolution, select the proper resolution in present input to see the best picture appearance. 1 Press the MENU button and then use D or E button to select the PICTURE menu. 2 Press the G button and then use D or E button to select Screen. 3 Press the G... button to the screen adjustment menu. 32 When you to enter the screen adjustment menu. EXTERNAL EQUIPMENT SETUP EXTERNAL EQUIPMENT SETUP...
...Selection ( G or ) leads you change the resolution, select the proper resolution in present input to see the best picture appearance. 1 Press the MENU button and then use D or E button to select the PICTURE menu. 2 Press the G button and then use D or E button to select Screen. 3 Press the G... button to the screen adjustment menu. 32 When you to enter the screen adjustment menu. EXTERNAL EQUIPMENT SETUP EXTERNAL EQUIPMENT SETUP...

Owner's Manual (English)
Page 35
This function is to adjust picture to left/right and up/down as you prefer. Position This function is you to remove any vertical bars or stripes visible on the screen ...
This function is to adjust picture to left/right and up/down as you prefer. Position This function is you to remove any vertical bars or stripes visible on the screen ...

Owner's Manual (English)
Page 39
... to preserve environment. 37 I Install two 1.5V AA batteries. DAY + LIVE TV INPUT MODE DAY - MEDIAHOST Inside the Sliding Cover BACK PICTURE SOUND SAP CC MARK USB EJECT PICTURE Adjust the factory preset picture depend on the mode. G p. 73 CC Select the Caption On/Off. INPUT... External input modes rotate in a recycle bin to the MEDIAHOST mode. SOUND Select the appropriate type of sound for the selected product can control the TV. G p.34 Remote control effective range 50/60PY3D 47LC7DF 32LB9D*...
... to preserve environment. 37 I Install two 1.5V AA batteries. DAY + LIVE TV INPUT MODE DAY - MEDIAHOST Inside the Sliding Cover BACK PICTURE SOUND SAP CC MARK USB EJECT PICTURE Adjust the factory preset picture depend on the mode. G p. 73 CC Select the Caption On/Off. INPUT... External input modes rotate in a recycle bin to the MEDIAHOST mode. SOUND Select the appropriate type of sound for the selected product can control the TV. G p.34 Remote control effective range 50/60PY3D 47LC7DF 32LB9D*...

Owner's Manual (English)
Page 40
...press the (or ON/OFF), INPUT, CH (D or E) button on the TV or press the POWER, INPUT, TV INPUT, CH(D or E), Number (0~9) button on the remote control. 2 Select the viewing source by using the TV, press the POWER button on vacation, disconnect the power plug from the wall ... on the remote control. I This TV is programmed to remember which mode it was last set to standby mode. WATCHING TV / CHANNEL CONTROL WATCHING TV /CHANNEL CONTROL TURNING ON TV 1 First, connect power cord correctly. MENU BRIGHT + TIMER RATIO SIMPLINK BACK PICTURE SOUND SAP CC MARK USB EJECT 38...
...press the (or ON/OFF), INPUT, CH (D or E) button on the TV or press the POWER, INPUT, TV INPUT, CH(D or E), Number (0~9) button on the remote control. 2 Select the viewing source by using the TV, press the POWER button on vacation, disconnect the power plug from the wall ... on the remote control. I This TV is programmed to remember which mode it was last set to standby mode. WATCHING TV / CHANNEL CONTROL WATCHING TV /CHANNEL CONTROL TURNING ON TV 1 First, connect power cord correctly. MENU BRIGHT + TIMER RATIO SIMPLINK BACK PICTURE SOUND SAP CC MARK USB EJECT 38...

Owner's Manual (English)
Page 41
CHANNEL SELECTION 1 Press the CH D or E or NUMBER buttons to select a channel number. TV INPUT STB MEDIA HOST TIMER RATIO SIMPLINK BACK PICTURE SOUND SAP CC MARK USB EJECT WATCHING TV / CHANNEL CONTROL 39
CHANNEL SELECTION 1 Press the CH D or E or NUMBER buttons to select a channel number. TV INPUT STB MEDIA HOST TIMER RATIO SIMPLINK BACK PICTURE SOUND SAP CC MARK USB EJECT WATCHING TV / CHANNEL CONTROL 39

