
Owner's Manual (English)
Page 1
...LCD TV PLASMA TV OWNER'S MANUAL LCD TV MODELS PLASMA TV MODELS 32LB9D 32LB9DB 47LC7DF 50PY3D 50PY3DF 60PY3D 60PY3DF Please read this product meets the ENERGY STAR guidelines for future reference. Retain it for energy efficiency. Environmental Protection Agency(EPA). See the label attached on the back cover and quote this information to your set . ENERGY STAR is a set... of the set . Record model number and serial number of power-saving guidelines issued by the U.S. www.lgusa.com / www.lg.ca As an ENERGY STAR ...
...LCD TV PLASMA TV OWNER'S MANUAL LCD TV MODELS PLASMA TV MODELS 32LB9D 32LB9DB 47LC7DF 50PY3D 50PY3DF 60PY3D 60PY3DF Please read this product meets the ENERGY STAR guidelines for future reference. Retain it for energy efficiency. Environmental Protection Agency(EPA). See the label attached on the back cover and quote this information to your set . ENERGY STAR is a set... of the set . Record model number and serial number of power-saving guidelines issued by the U.S. www.lgusa.com / www.lg.ca As an ENERGY STAR ...
Owner's Manual (English)
Page 6
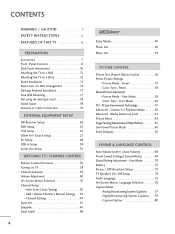
... MEDIAHOST MEDIAHOST Entry Modes 49 Photo List 50 Music List 54 PICTURE CONTROL Picture Size (Aspect Ratio) Control 56 Preset Picture Settings - Preset 58 Manual Picture Adjustment - Picture Mode - Color Tone - User Mode 60 XD - User Mode 59 -...Setting Adjustment - Caption Option 80 Digital Broadcasting System Captions . . .79 - Cinema 3:2 Pulldown Mode 62 Advanced - CONTENTS WARNING / CAUTION 1 SAFETY INSTRUCTIONS 2 FEATURES OF THIS TV 6 PREPARATION Accessories 7 Front Panel Controls 8 Back Panel Information 10 Attaching the TV to a Wall 12 Attaching the TV...
... MEDIAHOST MEDIAHOST Entry Modes 49 Photo List 50 Music List 54 PICTURE CONTROL Picture Size (Aspect Ratio) Control 56 Preset Picture Settings - Preset 58 Manual Picture Adjustment - Picture Mode - Color Tone - User Mode 60 XD - User Mode 59 -...Setting Adjustment - Caption Option 80 Digital Broadcasting System Captions . . .79 - Cinema 3:2 Pulldown Mode 62 Advanced - CONTENTS WARNING / CAUTION 1 SAFETY INSTRUCTIONS 2 FEATURES OF THIS TV 6 PREPARATION Accessories 7 Front Panel Controls 8 Back Panel Information 10 Attaching the TV to a Wall 12 Attaching the TV...
Owner's Manual (English)
Page 7
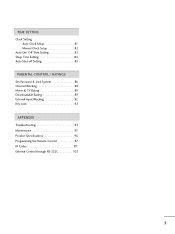
Manual Clock Setup 82 Auto On/ Off Time Setting 83 Sleep Time Setting 84 Auto Shut-off Setting 85 PARENTAL CONTROL / RATINGS Set Password & Lock System 86 Channel Blocking 88 Movie & TV Rating 89 Downloadable Rating 89 External Input Blocking 92 Key Lock 92 APPENDIX Troubleshooting 93 Maintenance 95 Product Specifications 96 Programming the Remote Control 97 IR Codes 101 External Control through RS-232C 103 5 TIME SETTING Clock Setting - Auto Clock Setup 81 -
Manual Clock Setup 82 Auto On/ Off Time Setting 83 Sleep Time Setting 84 Auto Shut-off Setting 85 PARENTAL CONTROL / RATINGS Set Password & Lock System 86 Channel Blocking 88 Movie & TV Rating 89 Downloadable Rating 89 External Input Blocking 92 Key Lock 92 APPENDIX Troubleshooting 93 Maintenance 95 Product Specifications 96 Programming the Remote Control 97 IR Codes 101 External Control through RS-232C 103 5 TIME SETTING Clock Setting - Auto Clock Setup 81 -
Owner's Manual (English)
Page 10
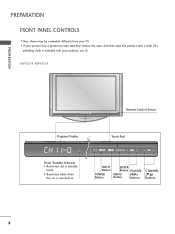
And then wipe the product with a cloth (If a polishing cloth is switched on. Power Standby Indicator • illuminates red in standby mode. • illuminates white when the set is included with your product, use it). 50PY3D/F, 60PY3D/F PREPARATION Remote Control Sensor Program Display . . PREPARATION FRONT PANEL CONTROLS I If your product has a protection tape attached, remove the tape. I Here shown may be somewhat different from your TV. Touch Pad ENTER INPUT Button POWER Button ENTER Button VOLUME MENU Button (F,G) Buttons CHANNEL (E,D) Buttons 8
And then wipe the product with a cloth (If a polishing cloth is switched on. Power Standby Indicator • illuminates red in standby mode. • illuminates white when the set is included with your product, use it). 50PY3D/F, 60PY3D/F PREPARATION Remote Control Sensor Program Display . . PREPARATION FRONT PANEL CONTROLS I If your product has a protection tape attached, remove the tape. I Here shown may be somewhat different from your TV. Touch Pad ENTER INPUT Button POWER Button ENTER Button VOLUME MENU Button (F,G) Buttons CHANNEL (E,D) Buttons 8

Owner's Manual (English)
Page 11
Power/Standby Indicator Remote Control Sensor • illuminates red in standby mode. • illuminates green when the set is switched on . 32LB9D* CH CH CHANNEL (E,D) ButtonsCH VOL VOLUME (F,G) Buttons VOL ENTER Button MENU Button VOL ENTER MENU INPUT /I ENTER Button MENU Button INPUT Button POWER Button Intelligent ... picture according to the surrounding conditions. POWER Button Remote Control Power/Standby Indicator Sensor • illuminates red in standby mode. • illuminates green when the set is switched on . 9
Power/Standby Indicator Remote Control Sensor • illuminates red in standby mode. • illuminates green when the set is switched on . 32LB9D* CH CH CHANNEL (E,D) ButtonsCH VOL VOLUME (F,G) Buttons VOL ENTER Button MENU Button VOL ENTER MENU INPUT /I ENTER Button MENU Button INPUT Button POWER Button Intelligent ... picture according to the surrounding conditions. POWER Button Remote Control Power/Standby Indicator Sensor • illuminates red in standby mode. • illuminates green when the set is switched on . 9
Owner's Manual (English)
Page 14
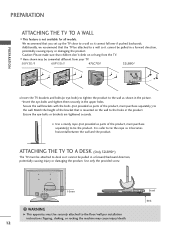
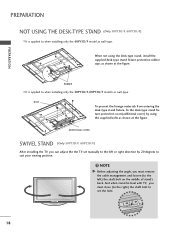
...the product. Match the height of the bracket that children don't climb on the wall to the holes in the product. ATTACHING THE TV TO A DESK (Only 32LB9D*) The TV must purchase separately) to the wall. Secure the wall brackets with the bolts (not provided as parts of the product, must be...to a wall so it becomes horizontal between the wall and the product. PREPARATION ATTACHING THE TV TO A WALL I Here shown may cause injury/death. 12 Stand Desk Additionally, we recommend that you set up the TV close to tie the rope so it cannot fall over if pushed backwards. It is not...
...the product. Match the height of the bracket that children don't climb on the wall to the holes in the product. ATTACHING THE TV TO A DESK (Only 32LB9D*) The TV must purchase separately) to the wall. Secure the wall brackets with the bolts (not provided as parts of the product, must be...to a wall so it becomes horizontal between the wall and the product. PREPARATION ATTACHING THE TV TO A WALL I Here shown may cause injury/death. 12 Stand Desk Additionally, we recommend that you set up the TV close to tie the rope so it cannot fall over if pushed backwards. It is not...
Owner's Manual (English)
Page 20
... protection cover(additional cover) by 20 degrees to suit your viewing position. NOTE G Before adjusting the angle, you can adjust the the TV set the hole. 18 When not using the supplied bolts as shown at the figure. ADDITIONAL COVER SWIVEL STAND (Only 50PY3D/F, 60PY3D/F) After installing ...the TV, you must close (to the right) the shaft bolt to set manually to when installing only the 50PY3D/F, 60PY3D/F models as shown at the figure. RUBBER I It is applied...
... protection cover(additional cover) by 20 degrees to suit your viewing position. NOTE G Before adjusting the angle, you can adjust the the TV set the hole. 18 When not using the supplied bolts as shown at the figure. ADDITIONAL COVER SWIVEL STAND (Only 50PY3D/F, 60PY3D/F) After installing ...the TV, you must close (to the right) the shaft bolt to set manually to when installing only the 50PY3D/F, 60PY3D/F models as shown at the figure. RUBBER I It is applied...

Owner's Manual (English)
Page 22
... for the digital set . Signal 480i 480p 720p 1080i 1080p Component 1/2 Yes Yes Yes Yes Yes HDMI/DVI1, 2 or 3 No Yes Yes Yes Yes 20 How to use picture for Digital Contents. EXTERNAL EQUIPMENT SETUP EXTERNAL EQUIPMENT SETUP HD RECEIVER SETUP This TV can receive Digital ...Over-the-air/Cable signals without an external digital set -top box or other digital external device, refer to the figure as shown below. I Select COMPONENT...
... for the digital set . Signal 480i 480p 720p 1080i 1080p Component 1/2 Yes Yes Yes Yes Yes HDMI/DVI1, 2 or 3 No Yes Yes Yes Yes 20 How to use picture for Digital Contents. EXTERNAL EQUIPMENT SETUP EXTERNAL EQUIPMENT SETUP HD RECEIVER SETUP This TV can receive Digital ...Over-the-air/Cable signals without an external digital set -top box or other digital external device, refer to the figure as shown below. I Select COMPONENT...

Owner's Manual (English)
Page 23
... box to use I Select RGB-PC input source with using the INPUT button on the remote control. How to connect 1 Connect the digital set . I Select HDMI1, HDMI2 or HDMI3 input source with using the INPUT button on the remote control. RGB 1 2 When connecting HDMI cable 1. RGB OUTPUT L R (DVI) 1 ...HDMI-DTV OUTPUT 21 How to use I Turn on the digital set-top box. (Refer to the owner's manual for the digital set-top box.) I If the digital set-top box player does not support Auto HDMI, you need to the AUDIO (RGB/DVI) jack on the...
... box to use I Select RGB-PC input source with using the INPUT button on the remote control. How to connect 1 Connect the digital set . I Select HDMI1, HDMI2 or HDMI3 input source with using the INPUT button on the remote control. RGB 1 2 When connecting HDMI cable 1. RGB OUTPUT L R (DVI) 1 ...HDMI-DTV OUTPUT 21 How to use I Turn on the digital set-top box. (Refer to the owner's manual for the digital set-top box.) I If the digital set-top box player does not support Auto HDMI, you need to the AUDIO (RGB/DVI) jack on the...

Owner's Manual (English)
Page 24
EXTERNAL EQUIPMENT SETUP When connecting HDMI to the AUDIO(RGB/DVI) jack on the set. 2. How to connect 1 Connect the DVI output of the digital set-top box to the HDMI/DVI IN1, 2 or 3 jack on the set. 2 Connect the audio output of the digital set -top box.) I Turn on the remote control. 22 How to use I Select HDMI1, HDMI2 or HDMI3 input source with using the INPUT button on the digital set-top box. (Refer to the owner's manual for the digital set -top box to DVI cable RGB 3 EXTERNAL EQUIPMENT SETUP 2 1 DVI-DTV OUTPUT L R 1.
EXTERNAL EQUIPMENT SETUP When connecting HDMI to the AUDIO(RGB/DVI) jack on the set. 2. How to connect 1 Connect the DVI output of the digital set-top box to the HDMI/DVI IN1, 2 or 3 jack on the set. 2 Connect the audio output of the digital set -top box.) I Turn on the remote control. 22 How to use I Select HDMI1, HDMI2 or HDMI3 input source with using the INPUT button on the digital set-top box. (Refer to the owner's manual for the digital set -top box to DVI cable RGB 3 EXTERNAL EQUIPMENT SETUP 2 1 DVI-DTV OUTPUT L R 1.

Owner's Manual (English)
Page 25
... (Y = green, PB = blue, and PR = red). 2 Connect the audio outputs of the DVD to use I If connected to the COMPONENT IN AUDIO1 jacks on the set . How to connect 1 Connect the video outputs (Y, PB, PR) of the DVD to COMPONENT IN 2 input, select COM- I Turn on the remote control. EXTERNAL EQUIPMENT...
... (Y = green, PB = blue, and PR = red). 2 Connect the audio outputs of the DVD to use I If connected to the COMPONENT IN AUDIO1 jacks on the set . How to connect 1 Connect the video outputs (Y, PB, PR) of the DVD to COMPONENT IN 2 input, select COM- I Turn on the remote control. EXTERNAL EQUIPMENT...

Owner's Manual (English)
Page 26
.... I Refer to the DVD player's manual for operating instructions. How to connect 1 Connect the S-VIDEO output of the DVD to the S-VIDEO input on the set . 2. I Refer to the DVD player's manual for operating instructions. EXTERNAL EQUIPMENT SETUP When connecting with using the INPUT button on the... the audio outputs of the DVD to the AUDIO input jacks on the remote control. I Turn on the set the output resolution appropriately. 24 1 HDMI-DVD OUTPUT How to connect 1 Connect the HDMI output of the DVD to the HDMI/DVI IN1, 2 or 3 jack ...
.... I Refer to the DVD player's manual for operating instructions. How to connect 1 Connect the S-VIDEO output of the DVD to the S-VIDEO input on the set . 2. I Refer to the DVD player's manual for operating instructions. EXTERNAL EQUIPMENT SETUP When connecting with using the INPUT button on the... the audio outputs of the DVD to the AUDIO input jacks on the remote control. I Turn on the set the output resolution appropriately. 24 1 HDMI-DVD OUTPUT How to connect 1 Connect the HDMI output of the DVD to the HDMI/DVI IN1, 2 or 3 jack ...
Owner's Manual (English)
Page 27
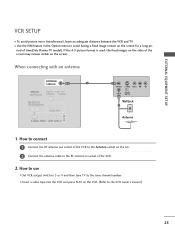
... the VCR. (Refer to the RF antenna in the Option menu to the same channel number. riod of the screen may remain visible on the set. 2 Connect the antenna cable to the VCR owner's manual.) 25 How to connect 1 Connect the RF antenna out socket of the VCR. 2. If the 4:3 picture... is used; the fixed images on the screen for a long pe- How to use I Set VCR output switch to 3 or 4 and then tune TV to avoid having a fixed image remain on the sides of time(Only Plasma TV model). EXTERNAL EQUIPMENT SETUP VCR SETUP I To avoid picture noise (interference), leave an adequate distance...
... the VCR. (Refer to the RF antenna in the Option menu to the same channel number. riod of the screen may remain visible on the set. 2 Connect the antenna cable to the VCR owner's manual.) 25 How to connect 1 Connect the RF antenna out socket of the VCR. 2. If the 4:3 picture... is used; the fixed images on the screen for a long pe- How to use I Set VCR output switch to 3 or 4 and then tune TV to avoid having a fixed image remain on the sides of time(Only Plasma TV model). EXTERNAL EQUIPMENT SETUP VCR SETUP I To avoid picture noise (interference), leave an adequate distance...

Owner's Manual (English)
Page 28
...V 1 input source with using the INPUT button on the remote control. I D E O input on the set . The picture quality is improved; EXTERNAL EQUIPMENT SETUP EXTERNAL EQUIPMENT SETUP When connecting with an S-Video cable 1. ... have a mono VCR, connect the audio cable from the VCR to the AUDIO input jacks on the set. How to AV IN 2, select A V 2 input source. VIDEO L R S-VIDEO ANT IN ...How to connect 1 Connect the S-VIDEO output of the VCR to the AUDIO L/MONO jack of the set . 2. compared to normal composite (RCA cable) input. 2 Connect the audio outputs of the VCR to...
...V 1 input source with using the INPUT button on the remote control. I D E O input on the set . The picture quality is improved; EXTERNAL EQUIPMENT SETUP EXTERNAL EQUIPMENT SETUP When connecting with an S-Video cable 1. ... have a mono VCR, connect the audio cable from the VCR to the AUDIO input jacks on the set. How to AV IN 2, select A V 2 input source. VIDEO L R S-VIDEO ANT IN ...How to connect 1 Connect the S-VIDEO output of the VCR to the AUDIO L/MONO jack of the set . 2. compared to normal composite (RCA cable) input. 2 Connect the audio outputs of the VCR to...

Owner's Manual (English)
Page 29
EXTERNAL EQUIPMENT SETUP OTHER A/V SOURCE SETUP USB IN VIDEO L/MONO AUDIO R S-VIDEO 1 AV IN 2 VIDEO L R Camcorder Video Game Set 1. I Select AV2 input source with using the INPUT button on the remote control. How to use I If connected to connect 1 Connect the AUDIO/VIDEO jacks between TV and external equipment. I Operate the corresponding external equipment. 27 How to AV IN 1 input, select AV1 input source. Match the jack colors. (Video = yellow, Audio Left = white, and Audio Right = red) 2.
EXTERNAL EQUIPMENT SETUP OTHER A/V SOURCE SETUP USB IN VIDEO L/MONO AUDIO R S-VIDEO 1 AV IN 2 VIDEO L R Camcorder Video Game Set 1. I Select AV2 input source with using the INPUT button on the remote control. How to use I If connected to connect 1 Connect the AUDIO/VIDEO jacks between TV and external equipment. I Operate the corresponding external equipment. 27 How to AV IN 1 input, select AV1 input source. Match the jack colors. (Video = yellow, Audio Left = white, and Audio Right = red) 2.

Owner's Manual (English)
Page 30
...until the picture is clear. EXTERNAL EQUIPMENT SETUP EXTERNAL EQUIPMENT SETUP PC SETUP This TV provides Plug and Play capability, meaning that the PC adjusts automatically to another resolution, change the refresh rate to the TV's settings. If the refresh rate of the PC graphic card can not be noise ...associated with using the INPUT button on the PC and the set . 2. How to connect 1 Connect the RGB output of the PC graphic ...
...until the picture is clear. EXTERNAL EQUIPMENT SETUP EXTERNAL EQUIPMENT SETUP PC SETUP This TV provides Plug and Play capability, meaning that the PC adjusts automatically to another resolution, change the refresh rate to the TV's settings. If the refresh rate of the PC graphic card can not be noise ...associated with using the INPUT button on the PC and the set . 2. How to connect 1 Connect the RGB output of the PC graphic ...

Owner's Manual (English)
Page 31
When connecting HDMI to 1920x1080, 60Hz. (32LB9D* model: 1360x768, 60Hz) 29 G If the PC does not support Auto DVI, you need to set I Turn on the PC and the set the output resolution appropriately. To get the best picture quality, adjust the output resolution of the PC to the HDMI/DVI IN1, 2 or 3 ...jack on the set. (Use the HDMI to DVI cable) 2 Connect the PC audio output to use I Select HDMI1, HDMI2 or HDMI3 input source with using the INPUT ...
When connecting HDMI to 1920x1080, 60Hz. (32LB9D* model: 1360x768, 60Hz) 29 G If the PC does not support Auto DVI, you need to set I Turn on the PC and the set the output resolution appropriately. To get the best picture quality, adjust the output resolution of the PC to the HDMI/DVI IN1, 2 or 3 ...jack on the set. (Use the HDMI to DVI cable) 2 Connect the PC audio output to use I Select HDMI1, HDMI2 or HDMI3 input source with using the INPUT ...
Owner's Manual (English)
Page 34
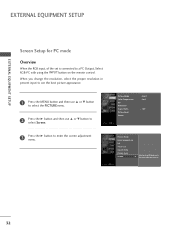
... the INPUT button on the remote control. EXTERNAL EQUIPMENT SETUP EXTERNAL EQUIPMENT SETUP Screen Setup for PC mode Overview When the RGB input, of the set is connected to the screen adjustment menu...
... the INPUT button on the remote control. EXTERNAL EQUIPMENT SETUP EXTERNAL EQUIPMENT SETUP Screen Setup for PC mode Overview When the RGB input, of the set is connected to the screen adjustment menu...

Owner's Manual (English)
Page 35
... E button to select Reset. 2 Press the ENTER button and then use D / E or F / G button to select the Default Sync Time. Resolution Position Size Phase Reset G Initialize Settings. I The Size adjustment range is -16 ~ +16. I The Phase adjustment range is -30 ~ +30. 3 Press the ENTER button. This function is to adjust picture to...
... E button to select Reset. 2 Press the ENTER button and then use D / E or F / G button to select the Default Sync Time. Resolution Position Size Phase Reset G Initialize Settings. I The Size adjustment range is -16 ~ +16. I The Phase adjustment range is -30 ~ +30. 3 Press the ENTER button. This function is to adjust picture to...

Owner's Manual (English)
Page 37
... or COAXIAL port of DIGITAL AUDIO OUT. 2 Connect the other end of the optical or coaxial cable to the TV's AUDIO OUT jacks 1 2 Set the "TV Speaker option - NOTE G When connecting with ACP(Audio Copy Protection) function. 1 2 35 How to connect Analog L R S-VIDEO 1 Connect... audio outputs to the digital audio input on the audio equipment. 3 Set the "TV Speaker option - Off" in the AUDIO menu. (G p.74). See the external audio equipment instruction manual for operation. G Block the SPDIF out(optical/...
... or COAXIAL port of DIGITAL AUDIO OUT. 2 Connect the other end of the optical or coaxial cable to the TV's AUDIO OUT jacks 1 2 Set the "TV Speaker option - NOTE G When connecting with ACP(Audio Copy Protection) function. 1 2 35 How to connect Analog L R S-VIDEO 1 Connect... audio outputs to the digital audio input on the audio equipment. 3 Set the "TV Speaker option - Off" in the AUDIO menu. (G p.74). See the external audio equipment instruction manual for operation. G Block the SPDIF out(optical/...


