

Owners Manual
Page 1
Retain it for future reference. OWNER'S MANUAL MODELS: 26LX2R _ 32LX2R Internet Home Page ' h_p:/h¢,-c_w.lge.com http:l/_r¢_v.lge.com.br Please read this information to your set . P/NO 38289UO498D (0512-REV01) Printed in Korea See the label attached on the back cover and quote this manual carefully before operating your dealer when you require service. Record model number and serial number of the set .
Retain it for future reference. OWNER'S MANUAL MODELS: 26LX2R _ 32LX2R Internet Home Page ' h_p:/h¢,-c_w.lge.com http:l/_r¢_v.lge.com.br Please read this information to your set . P/NO 38289UO498D (0512-REV01) Printed in Korea See the label attached on the back cover and quote this manual carefully before operating your dealer when you require service. Record model number and serial number of the set .
Owners Manual
Page 2
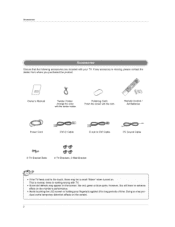
... on . Doing so may appear on the screen. 2 This is normal, there is missing, please contact the dealer from where you purchased the product, Owner's Manual Twister Holder Arrange the wires with your fingera(s) against it for long periods of time.
... on . Doing so may appear on the screen. 2 This is normal, there is missing, please contact the dealer from where you purchased the product, Owner's Manual Twister Holder Arrange the wires with your fingera(s) against it for long periods of time.
Owners Manual
Page 4
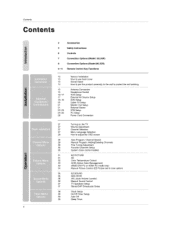
Contents 4 2 3 6 7 8 9_1;1 Acc_essori_ Safety Instructions Controls Connection Options (Model: 32LX2R) Connection Options (Model:26LX2R) Remote Control Key Functions 12 13 13 14 15 15 16-17 17 18_19 20 21 21 22--23 24_25 26 Various Installation How to ...) + + ++ + 31 EZ PICTURE 31 XD 32 Co,or Temperature Control 33 ACM (Active Co_or Management) 33 sRG8 (DVI PC or HDMI PC mode oniy) 34 Manual Picture Comtrel (_ Picture set to User option) r < <
Contents 4 2 3 6 7 8 9_1;1 Acc_essori_ Safety Instructions Controls Connection Options (Model: 32LX2R) Connection Options (Model:26LX2R) Remote Control Key Functions 12 13 13 14 15 15 16-17 17 18_19 20 21 21 22--23 24_25 26 Various Installation How to ...) + + ++ + 31 EZ PICTURE 31 XD 32 Co,or Temperature Control 33 ACM (Active Co_or Management) 33 sRG8 (DVI PC or HDMI PC mode oniy) 34 Manual Picture Comtrel (_ Picture set to User option) r < <
Owners Manual
Page 5
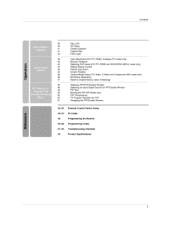
... Key Lock 40 XD Demo 41 Closed Captions 41 Caption/Text 42 Front Light 43 Auto Adjustment (DW PC (RGB), A_a_ogue PC mode only) 43 Manual Configure 44 Selecting XGA mo_ (DW PC (RGB) and XGAJ_NXGA (60Hz) mode o_y) 44 Setting Picture Format 45 Picture Size Zoom 45 Screen Position 46...
... Key Lock 40 XD Demo 41 Closed Captions 41 Caption/Text 42 Front Light 43 Auto Adjustment (DW PC (RGB), A_a_ogue PC mode only) 43 Manual Configure 44 Selecting XGA mo_ (DW PC (RGB) and XGAJ_NXGA (60Hz) mode o_y) 44 Setting Picture Format 45 Picture Size Zoom 45 Screen Position 46...
Owners Manual
Page 10
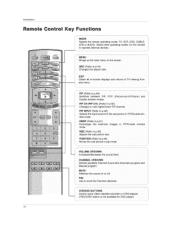
.../sub mode. images in pip mode VOLUME UPK)OWN Increases/decreases the sound Ilevel, CHANNEL UP/DOWN Selects available channels found with Automatic program and Manual program MUTE Switches the sound on -screen any menu. disptays and returns to TV viewing from PIP (Refer to p,48) Switches oetween P[R POP (Picture-out...
.../sub mode. images in pip mode VOLUME UPK)OWN Increases/decreases the sound Ilevel, CHANNEL UP/DOWN Selects available channels found with Automatic program and Manual program MUTE Switches the sound on -screen any menu. disptays and returns to TV viewing from PIP (Refer to p,48) Switches oetween P[R POP (Picture-out...

Owners Manual
Page 17
... set_ insert a video tape into the VCR and press PLAY on the remote control I Operate the co[responding external equipment. IRefer to the VCR owneCs manual ) Select S-Video input source with using the INPUT button on the VCR.
... set_ insert a video tape into the VCR and press PLAY on the remote control I Operate the co[responding external equipment. IRefer to the VCR owneCs manual ) Select S-Video input source with using the INPUT button on the VCR.

Owners Manual
Page 18
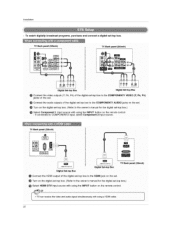
Installation ;o input sour_ w!th using the INPUT bu_on on the remote cont[oL TV Back panel (32inch) o m 1 DVD OVD TV Back panel (26|rich} Connect the HDMI output of the DVD to the HDM| jack ot_ the set. ,Select FIDMI DTV input source with using the INPUT button on _:he remote control Refer to the DVD player's manual for operating instructions. _can receive the wdeo and audio _ignal s_multaneously w_th using a HDMI cable. ) 18
Installation ;o input sour_ w!th using the INPUT bu_on on the remote cont[oL TV Back panel (32inch) o m 1 DVD OVD TV Back panel (26|rich} Connect the HDMI output of the DVD to the HDM| jack ot_ the set. ,Select FIDMI DTV input source with using the INPUT button on _:he remote control Refer to the DVD player's manual for operating instructions. _can receive the wdeo and audio _ignal s_multaneously w_th using a HDMI cable. ) 18

Owners Manual
Page 19
... with using the INPUT button on DVD payer 'Y Y Y •¥ Pb Pr B_Y _:__;_ Ob 19 select Component2 input source. Refer to the DVD player's manual for operating instructions, • Component input ports To get better picture qualit't, connect a DVD player to COMPONENT2. Connect the audio outputs of the DVD to...
... with using the INPUT button on DVD payer 'Y Y Y •¥ Pb Pr B_Y _:__;_ Ob 19 select Component2 input source. Refer to the DVD player's manual for operating instructions, • Component input ports To get better picture qualit't, connect a DVD player to COMPONENT2. Connect the audio outputs of the DVD to...
Owners Manual
Page 22
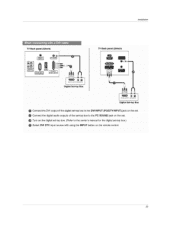
To w_ch digRally broadcast programs, purchase and connect a digital set4op box. Dig_al _4op Box Connect the HDMI ou_ut of the digital set-top box to the owner's manual for the digital set-top box,) Select HDMI DTV nput source w_th using the iNPUT button on the remote control 22 Turn on the set -top box_ _Refer to the HDM! jack on the digital set . Installation - TV Back panel (32inch) Q D|gita| Set-top Box TV Sack pane! (26_nch) !
To w_ch digRally broadcast programs, purchase and connect a digital set4op box. Dig_al _4op Box Connect the HDMI ou_ut of the digital set-top box to the owner's manual for the digital set-top box,) Select HDMI DTV nput source w_th using the iNPUT button on the remote control 22 Turn on the set -top box_ _Refer to the HDM! jack on the digital set . Installation - TV Back panel (32inch) Q D|gita| Set-top Box TV Sack pane! (26_nch) !
Owners Manual
Page 23
TV Back panel (32inch) O lnsL_/lation TV B_k panel (26inch) 1 i e 1 Digital Set-top Box Connect the DVL output of the dig4tai set-top box to the DVI INPUT (PC/DTV INPUT) jack on the set Connect the digital audio outputs of the set*top box to the PC SOUND jack on the set, Turn on the digital set-top box (Refer to the owner's manual for the digital set-top box,_ SeEect DMI DTV input source with using the INPUT button on the remote control. 23
TV Back panel (32inch) O lnsL_/lation TV B_k panel (26inch) 1 i e 1 Digital Set-top Box Connect the DVL output of the dig4tai set-top box to the DVI INPUT (PC/DTV INPUT) jack on the set Connect the digital audio outputs of the set*top box to the PC SOUND jack on the set, Turn on the digital set-top box (Refer to the owner's manual for the digital set-top box,_ SeEect DMI DTV input source with using the INPUT button on the remote control. 23

Owners Manual
Page 26
... mode, DPM mode is separate, DPM (Display Power Management) mode If the PC goes to power saving mode, the monitor automatically switches to the operating manual for Horizontal and Vertical frequencies is not available, Connect the power cord as shown. 26 If you are using). c The synchronization input form for the...
... mode, DPM mode is separate, DPM (Display Power Management) mode If the PC goes to power saving mode, the monitor automatically switches to the operating manual for Horizontal and Vertical frequencies is not available, Connect the power cord as shown. 26 If you are using). c The synchronization input form for the...
Owners Manual
Page 29
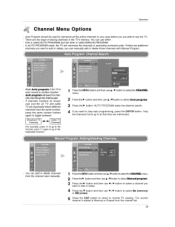
... TV. - Only the channels found up to at that time are two ways of storing channels in the TV's memor_ ;_ou can manually add or delete those channels with Manual Program. In AUTO PROGRAM mode, the 7q/ will memorize the channels in ascending numerical order, ff there are additional channels you want...
... TV. - Only the channels found up to at that time are two ways of storing channels in the TV's memor_ ;_ou can manually add or delete those channels with Manual Program. In AUTO PROGRAM mode, the 7q/ will memorize the channels in ascending numerical order, ff there are additional channels you want...

Owners Manual
Page 30
... channel number changes to yellow_ 1 Pressther_NUbL,_tonand_n _eA/V button to select the CI,J,,_N't,,,_ELmenu. 2 Press the I_ button and then use A l V button to select Manual ]l_o_mT_. 3 Press the !_ button and then use A / V button to select P,&L4_, PAL-N, NTSC ou MulH_ 4 Press the EXIT button to return to normal TV viewing... use this function to normal TV viewing. - Favorite Channels is poor, To remove fine tuning from a channel, reprogram the finelytuned channel with Auto program or Manual Program_ -
... channel number changes to yellow_ 1 Pressther_NUbL,_tonand_n _eA/V button to select the CI,J,,_N't,,,_ELmenu. 2 Press the I_ button and then use A l V button to select Manual ]l_o_mT_. 3 Press the !_ button and then use A / V button to select P,&L4_, PAL-N, NTSC ou MulH_ 4 Press the EXIT button to return to normal TV viewing... use this function to normal TV viewing. - Favorite Channels is poor, To remove fine tuning from a channel, reprogram the finelytuned channel with Auto program or Manual Program_ -
Owners Manual
Page 31
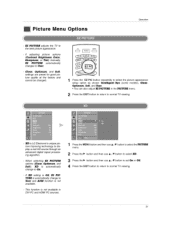
...Options Operation - When selecting EZ PICTURE options (Clever, Opffmum, and Soft), XD is automatically change to User and ACM function is LG Electronic's unique picture improving technology to normal TV viewing_ - _ is not available - This function is not available in the PICTURE ... EZ PICTURE adjusts the TV to the best picture appearance. -If adjusting picture options (Contrast, Brightness, Color, Sharpness, or Tint) manually, EZ PIC_RE automatically changes to select the picture appearance setup option as shown: Intelligent Eye (some models>, CI_ Optimum, Soft, and ...
...Options Operation - When selecting EZ PICTURE options (Clever, Opffmum, and Soft), XD is automatically change to User and ACM function is LG Electronic's unique picture improving technology to normal TV viewing_ - _ is not available - This function is not available in the PICTURE ... EZ PICTURE adjusts the TV to the best picture appearance. -If adjusting picture options (Contrast, Brightness, Color, Sharpness, or Tint) manually, EZ PIC_RE automatically changes to select the picture appearance setup option as shown: Intelligent Eye (some models>, CI_ Optimum, Soft, and ...

Owners Manual
Page 32
... button and then use A t T button to select either: Cool (Preset) Normal (Default)_ or Warm (Preset) 4 Press the EXIT button to return to normal TV viewing, * Manual Color Temperature Control (_C set to User option) - To initialize values (reset to default settings), select the Normal option, Press the MENU button and then...
... button and then use A t T button to select either: Cool (Preset) Normal (Default)_ or Warm (Preset) 4 Press the EXIT button to return to normal TV viewing, * Manual Color Temperature Control (_C set to User option) - To initialize values (reset to default settings), select the Normal option, Press the MENU button and then...
Owners Manual
Page 35
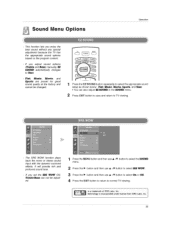
Sound Menu Options Operation o This function lets you (Treble SOUND to User, adjust sound options and _ss) manually, EZ automatically changes - o If you enjoy the best sound without any special adjustment because the TV has the appropriate sound options based on the program ...
Sound Menu Options Operation o This function lets you (Treble SOUND to User, adjust sound options and _ss) manually, EZ automatically changes - o If you enjoy the best sound without any special adjustment because the TV has the appropriate sound options based on the program ...

Owners Manual
Page 38
... the same time, The TV must be in standby mode for the On timer to work. - If current time setting is wrong, ,_set the clock manually, 1 Press the MENU bb_:tonand then we A tV button to select the _ menu. 2 Press the I_ button and then use A / T button to select Clock 3 Press...
... the same time, The TV must be in standby mode for the On timer to work. - If current time setting is wrong, ,_set the clock manually, 1 Press the MENU bb_:tonand then we A tV button to select the _ menu. 2 Press the I_ button and then use A / T button to select Clock 3 Press...
Owners Manual
Page 43
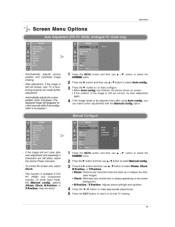
and phase, (The displayed image will be adjusted more after auto adjustment and especially if characters are still jittery, adjust the picture Phase manually. If the image still isn't clear after using Auto ¢onflg., you can make further adjustments with the Manu_ con_g, option. - Phase: Remove any vertical ...
and phase, (The displayed image will be adjusted more after auto adjustment and especially if characters are still jittery, adjust the picture Phase manually. If the image still isn't clear after using Auto ¢onflg., you can make further adjustments with the Manu_ con_g, option. - Phase: Remove any vertical ...
Owners Manual
Page 47
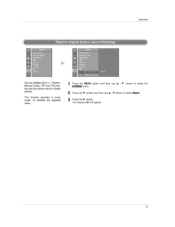
To initialize the adjusted value. You can initJafize Zoom +% Pc_si#bn, Manual Config. Press the MENU button and then use A z V button to setect Reset. 3 Press the i_ button. The display OK will appear 47 button to select the 2 Press the I_ button and then use ,L /T S_EEN menu. PIP size, PIP position and sub picture size for Double window -This function operates in every mode. Operatio_ -
To initialize the adjusted value. You can initJafize Zoom +% Pc_si#bn, Manual Config. Press the MENU button and then use A z V button to setect Reset. 3 Press the i_ button. The display OK will appear 47 button to select the 2 Press the I_ button and then use ,L /T S_EEN menu. PIP size, PIP position and sub picture size for Double window -This function operates in every mode. Operatio_ -


