Specification (English)
Page 2
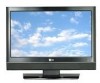
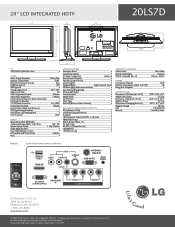
... Dimensions w/Out Stand (W x H x D) 20.0" x 14.0" x 2.9" Weight w/Out Stand 13.2 lbs. Dimensions w/Packaging (W x H x D) 22.2" x 16.7" x 6.8" Weight In Package 18.3 lbs. UPC 719192171340 Warranty 1 Year Parts/Labor REMOTE REAR AUDIO/VIDEO INPUTS/OUTPUTS SERVICE ONLY HDMI IN...0000 www.LGusa.com © 2007 LG Electronics U.S.A., Inc., Englewood Cliffs, NJ. LG Design and Life's Good are the property of LG Electronics, Inc. 20" LCD INTEGRATED HDTV 19.7" 2.9" 3.9" 20LS7D 3.9" 6.9" 15.8" 14.0" 12.9" 6.9" TV ATSC/NTSC/QAM Clear Tuner •...
... Dimensions w/Out Stand (W x H x D) 20.0" x 14.0" x 2.9" Weight w/Out Stand 13.2 lbs. Dimensions w/Packaging (W x H x D) 22.2" x 16.7" x 6.8" Weight In Package 18.3 lbs. UPC 719192171340 Warranty 1 Year Parts/Labor REMOTE REAR AUDIO/VIDEO INPUTS/OUTPUTS SERVICE ONLY HDMI IN...0000 www.LGusa.com © 2007 LG Electronics U.S.A., Inc., Englewood Cliffs, NJ. LG Design and Life's Good are the property of LG Electronics, Inc. 20" LCD INTEGRATED HDTV 19.7" 2.9" 3.9" 20LS7D 3.9" 6.9" 15.8" 14.0" 12.9" 6.9" TV ATSC/NTSC/QAM Clear Tuner •...
Owner's Manual (English)
Page 6
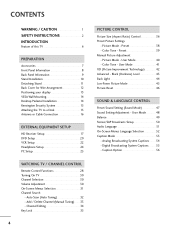
... 47 Sound Setting Adjustment - Digital Broadcasting System Captions 55 - CONTENTS WARNING / CAUTION 1 SAFETY INSTRUCTIONS 2 INTRODUCTION Feature of this TV 6 PREPARATION Accessories 7 Front Panel Information 8 Back Panel Information 9 Stand Installation 10 Detaching Stand 11 Back Cover for Wire Arrangement 12... Connection 16 EXTERNAL EQUIPMENT SETUP HD Receiver Setup 17 DVD Setup 20 VCR Setup 22 Headphone Setup 24 PC Setup 25 WATCHING TV / CHANNEL CONTROL Remote Control Functions 28 Turning On TV 30 Channel Selection 30 Volume Adjustment 30 On-Screen Menus Selection...
... 47 Sound Setting Adjustment - Digital Broadcasting System Captions 55 - CONTENTS WARNING / CAUTION 1 SAFETY INSTRUCTIONS 2 INTRODUCTION Feature of this TV 6 PREPARATION Accessories 7 Front Panel Information 8 Back Panel Information 9 Stand Installation 10 Detaching Stand 11 Back Cover for Wire Arrangement 12... Connection 16 EXTERNAL EQUIPMENT SETUP HD Receiver Setup 17 DVD Setup 20 VCR Setup 22 Headphone Setup 24 PC Setup 25 WATCHING TV / CHANNEL CONTROL Remote Control Functions 28 Turning On TV 30 Channel Selection 30 Volume Adjustment 30 On-Screen Menus Selection...

Owner's Manual (English)
Page 9
...scratch or discoloration. Owner's Manual CD Manual Remote Control, Batteries Power Cord Cable Management Option ...cautions of the exterior. * Do not wipe roughly when removing stain. LCD TV Owner's Manual 1 4 2 SOUND NPUT TIMER 7 5 3 - 8 6 0 9 VOL ADJUST FAV MUTE CC CH BACK EXIT TV SAP POWER PICTURE 1 SOUND INPUT 4 2 TIMER 7 5 3 ...- 8 6 0 9 MENU VOL ADJUST MUTE CC CH BACK EXIT FAV 1.5V 1.5V ENTER http://www.lgusa.com www.lg.ca Copyright© 2007 LGE,...
...scratch or discoloration. Owner's Manual CD Manual Remote Control, Batteries Power Cord Cable Management Option ...cautions of the exterior. * Do not wipe roughly when removing stain. LCD TV Owner's Manual 1 4 2 SOUND NPUT TIMER 7 5 3 - 8 6 0 9 VOL ADJUST FAV MUTE CC CH BACK EXIT TV SAP POWER PICTURE 1 SOUND INPUT 4 2 TIMER 7 5 3 ...- 8 6 0 9 MENU VOL ADJUST MUTE CC CH BACK EXIT FAV 1.5V 1.5V ENTER http://www.lgusa.com www.lg.ca Copyright© 2007 LGE,...

Owner's Manual (English)
Page 10
PREPARATION PREPARATION FRONT PANEL INFORMATION I INPUT MENU ENTER VOL CH Remote Control Sensor Power/Standby Indicator Illuminates red in standby mode. NOTE G If your product, use it). 8 POWER INPUT MENU ENTER VOLUME CHANNEL Button Button Button Button (F,G)Buttons (E,D)Buttons /I Here shown may be somewhat different from your TV. And then wipe the product with a cloth (If a polishing cloth is switched on. ! Illuminates green when the set is included with your product has a protection tape attached, remove the tape.
PREPARATION PREPARATION FRONT PANEL INFORMATION I INPUT MENU ENTER VOL CH Remote Control Sensor Power/Standby Indicator Illuminates red in standby mode. NOTE G If your product, use it). 8 POWER INPUT MENU ENTER VOLUME CHANNEL Button Button Button Button (F,G)Buttons (E,D)Buttons /I Here shown may be somewhat different from your TV. And then wipe the product with a cloth (If a polishing cloth is switched on. ! Illuminates green when the set is included with your product has a protection tape attached, remove the tape.
Owner's Manual (English)
Page 19
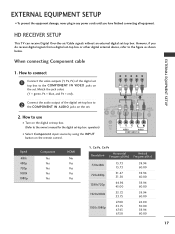
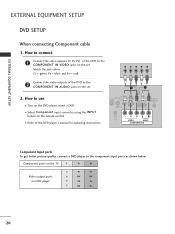
How to connect 1 Connect the video outputs (Y, PB, PR) of the digital set-top box to the COMPONENT IN AUDIO jacks on the remote control. When connecting Component cable EXTERNAL EQUIPMENT SETUP 1. How to use I Select Component input source by using the INPUT button on the set. 2. operation) I Turn ... 59.94 60.00 59.94 60.00 59.94 60.00 24.00 30.00 59.94 60.00 17 HD RECEIVER SETUP This TV can receive Digital Over-the-air/Cable signals without an external digital set . Match the jack colors (Y = green, PB = blue, and PR = red). 2 Connect the...
How to connect 1 Connect the video outputs (Y, PB, PR) of the digital set-top box to the COMPONENT IN AUDIO jacks on the remote control. When connecting Component cable EXTERNAL EQUIPMENT SETUP 1. How to use I Select Component input source by using the INPUT button on the set. 2. operation) I Turn ... 59.94 60.00 59.94 60.00 59.94 60.00 24.00 30.00 59.94 60.00 17 HD RECEIVER SETUP This TV can receive Digital Over-the-air/Cable signals without an external digital set . Match the jack colors (Y = green, PB = blue, and PR = red). 2 Connect the...
Owner's Manual (English)
Page 20
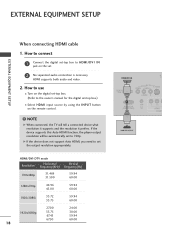
How to connect 1 Connect the digital set to HDMI/DVI IN jack on the remote control. ! NOTE G When connected, the TV will be automatically set -top box to 720p. G If the device does not support Auto HDMI, you need to the owner's manual for the digital ...
How to connect 1 Connect the digital set to HDMI/DVI IN jack on the remote control. ! NOTE G When connected, the TV will be automatically set -top box to 720p. G If the device does not support Auto HDMI, you need to the owner's manual for the digital ...
Owner's Manual (English)
Page 21
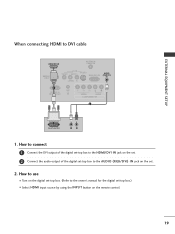
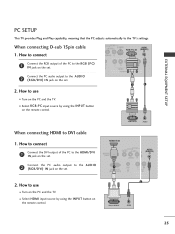
... set. 2 Connect the audio output of the digital set-top box to the AUDIO (RGB/DVI) I N jack on the set -top box.) I Turn on the remote control. 19 How to use I Select HDMI input source by using the INPUT button on the digital set-top box. (Refer to DVI cable HDMI...
... set. 2 Connect the audio output of the digital set-top box to the AUDIO (RGB/DVI) I N jack on the set -top box.) I Turn on the remote control. 19 How to use I Select HDMI input source by using the INPUT button on the digital set-top box. (Refer to DVI cable HDMI...
Owner's Manual (English)
Page 22
... = green, PB = blue, and PR = red). How to use I Turn on DVD player Y PB PR Y B-Y R-Y Y Cb Cr Y Pb Pr 20 Component ports on the TV Y PB PR Video output ports on the DVD player, insert a DVD. VIDEO AV IN AUDIO S-VIDEO RGB (PC) IN AUDIO (RGB/DVI) IN L(MONO...COMPONENT IN AUDIO jacks on the set . 1 ANTENNA/ CABLE IN 2 2. I Select Component input source by using the INPUT button on the remote control. EXTERNAL EQUIPMENT SETUP EXTERNAL EQUIPMENT SETUP DVD SETUP When connecting Component cable 1. I Refer to the component input ports as shown below.
... = green, PB = blue, and PR = red). How to use I Turn on DVD player Y PB PR Y B-Y R-Y Y Cb Cr Y Pb Pr 20 Component ports on the TV Y PB PR Video output ports on the DVD player, insert a DVD. VIDEO AV IN AUDIO S-VIDEO RGB (PC) IN AUDIO (RGB/DVI) IN L(MONO...COMPONENT IN AUDIO jacks on the set . 1 ANTENNA/ CABLE IN 2 2. I Select Component input source by using the INPUT button on the remote control. EXTERNAL EQUIPMENT SETUP EXTERNAL EQUIPMENT SETUP DVD SETUP When connecting Component cable 1. I Refer to the component input ports as shown below.

Owner's Manual (English)
Page 23
...) H/P 2 VIDEO AUDIO COMPONENT IN 1 L R AUDIO S-VIDEO When connecting HDMI cable 1. NOTE G When connected, the TV will be automatically set . 2. G If the device does not support Auto HDMI, you need to the AUDIO input jacks... H D M I Turn on the set to the HDMI/DVI IN jack on the remote control. How to connect 1 Connect the HDMI output of the DVD to 720p. I Select A V input source by... using the INPUT button on the remote control. How to 720p. How to connect 1 Connect the S-VIDEO output of the DVD to the...
...) H/P 2 VIDEO AUDIO COMPONENT IN 1 L R AUDIO S-VIDEO When connecting HDMI cable 1. NOTE G When connected, the TV will be automatically set . 2. G If the device does not support Auto HDMI, you need to the AUDIO input jacks... H D M I Turn on the set to the HDMI/DVI IN jack on the remote control. How to connect 1 Connect the HDMI output of the DVD to 720p. I Select A V input source by... using the INPUT button on the remote control. How to 720p. How to connect 1 Connect the S-VIDEO output of the DVD to the...
Owner's Manual (English)
Page 25
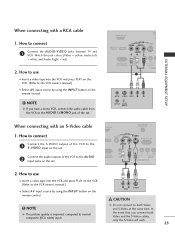
... S-Video will work. 23 NOTE G The picture quality is improved: compared to connect 1 Connect the AUDIO/VIDEO jacks between TV and VCR. I Select A V input source by using the INPUT button on the remote control. How to use I Insert a video tape into the VCR and press PLAY on the VCR. (Refer to the... AUDIO L/MONO jack of the VCR to the AUDIO input jacks on the remote control. ! NOTE G If you connect both Video and S-Video at the same time. Match the jack colors (Video = yellow, Audio Left = white, and Audio Right...
... S-Video will work. 23 NOTE G The picture quality is improved: compared to connect 1 Connect the AUDIO/VIDEO jacks between TV and VCR. I Select A V input source by using the INPUT button on the remote control. How to use I Insert a video tape into the VCR and press PLAY on the VCR. (Refer to the... AUDIO L/MONO jack of the VCR to the AUDIO input jacks on the remote control. ! NOTE G If you connect both Video and S-Video at the same time. Match the jack colors (Video = yellow, Audio Left = white, and Audio Right...
Owner's Manual (English)
Page 27
...to use I Turn on the PC and the TV. HDMI/DVI IN SERVICE ONLY VIDEO AV IN AUDIO AUDIO N (RGB/DVI) IN L(MONO) R 1 H/P RS-232C IN (SERVICE ONLY) IO 2. I Select HDMI input source by using the INPUT button on the remote control. 2 DVI-PC OUTPUT AUDIO 25 I Select... RGB-PC input source by using the INPUT button on the remote control. When connecting D-sub 15pin cable 1. How to DVI cable 1. Connect the PC audio output to the TV's settings. EXTERNAL EQUIPMENT SETUP PC SETUP This TV provides Plug and Play capability, meaning that the PC adjusts automatically ...
...to use I Turn on the PC and the TV. HDMI/DVI IN SERVICE ONLY VIDEO AV IN AUDIO AUDIO N (RGB/DVI) IN L(MONO) R 1 H/P RS-232C IN (SERVICE ONLY) IO 2. I Select HDMI input source by using the INPUT button on the remote control. 2 DVI-PC OUTPUT AUDIO 25 I Select... RGB-PC input source by using the INPUT button on the remote control. When connecting D-sub 15pin cable 1. How to DVI cable 1. Connect the PC audio output to the TV's settings. EXTERNAL EQUIPMENT SETUP PC SETUP This TV provides Plug and Play capability, meaning that the PC adjusts automatically ...
Owner's Manual (English)
Page 30
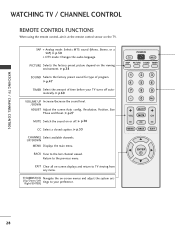
... all on or off automatically. PICTURE Selects the factory preset picture depend on the TV. WATCHING TV / CHANNEL CONTROL WATCHING TV / CHANNEL CONTROL REMOTE CONTROL FUNCTIONS When using the remote control, aim it at the remote control sensor on the viewing environment. POWER TV INPUT SAP PICTURE SOUND TIMER 1 2 3 4 56 789 - 0 FAV ADJUST VOL MUTE CC MENU...
... all on or off automatically. PICTURE Selects the factory preset picture depend on the TV. WATCHING TV / CHANNEL CONTROL WATCHING TV / CHANNEL CONTROL REMOTE CONTROL FUNCTIONS When using the remote control, aim it at the remote control sensor on the viewing environment. POWER TV INPUT SAP PICTURE SOUND TIMER 1 2 3 4 56 789 - 0 FAV ADJUST VOL MUTE CC MENU...
Owner's Manual (English)
Page 31
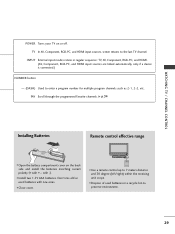
...of used batteries with -). with new ones. POWER TV INPUT SAP PICTURE SOUND TIMER 1 2 3 4 56 789 - 0 FAV I Install two 1.5V AAA batteries. G p.34 WATCHING TV / CHANNEL CONTROL Installing Batteries Remote control effective range I Close cover. FAV Scroll through... the programmed Favorite channels. I Use a remote control up to the last TV channel. TV In AV, Component, RGB-PC, and HDMI input ...
...of used batteries with -). with new ones. POWER TV INPUT SAP PICTURE SOUND TIMER 1 2 3 4 56 789 - 0 FAV I Install two 1.5V AAA batteries. G p.34 WATCHING TV / CHANNEL CONTROL Installing Batteries Remote control effective range I Close cover. FAV Scroll through... the programmed Favorite channels. I Use a remote control up to the last TV channel. TV In AV, Component, RGB-PC, and HDMI input ...
Owner's Manual (English)
Page 32
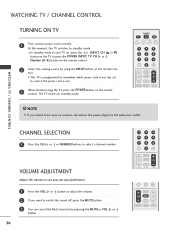
... the VOL (+ or -) button to adjust the volume. 2 If you intend to turn TV on, press the , INPUT, CH (D or E) button on the TV or press the POWER, INPUT, TV, CH (+ or -), Number (0~9) button on the remote con- The TV reverts to standby mode. I In standby mode to be away on the... if the power cord is programmed to remember which power state it was last set to select a channel number. I This TV is out. 3 When finished using the INPUT button on the remote control. 2 Select the viewing source by pressing the MUTE or VOL (+ or -) button. 30 1 2 3 4 56 7 8 9 - 0 ...
... the VOL (+ or -) button to adjust the volume. 2 If you intend to turn TV on, press the , INPUT, CH (D or E) button on the TV or press the POWER, INPUT, TV, CH (+ or -), Number (0~9) button on the remote con- The TV reverts to standby mode. I In standby mode to be away on the... if the power cord is programmed to remember which power state it was last set to select a channel number. I This TV is out. 3 When finished using the INPUT button on the remote control. 2 Select the viewing source by pressing the MUTE or VOL (+ or -) button. 30 1 2 3 4 56 7 8 9 - 0 ...

Owner's Manual (English)
Page 36
...Channel Edit 1 Auto Tuning Manual Tuning Channel Edit TV 2-0 G 4-0 6-0 9-0 11-0 13-0 14-0 FAV Favorite Add/Delete 2 Auto Tuning Manual Tuning Channel Edit D E TV G 2-0 4-0 6-0 9-0 11-0 13-0 14-0 FAV Favorite Add/Delete 34 Use the F A V button on the remote control when a channel is "Favorite List" in... order to the Favorite List. Both of that channel number. 5 Press the EXIT button to return to TV viewing or press the B A C K button to return to add...
...Channel Edit 1 Auto Tuning Manual Tuning Channel Edit TV 2-0 G 4-0 6-0 9-0 11-0 13-0 14-0 FAV Favorite Add/Delete 2 Auto Tuning Manual Tuning Channel Edit D E TV G 2-0 4-0 6-0 9-0 11-0 13-0 14-0 FAV Favorite Add/Delete 34 Use the F A V button on the remote control when a channel is "Favorite List" in... order to the Favorite List. Both of that channel number. 5 Press the EXIT button to return to TV viewing or press the B A C K button to return to add...

Owner's Manual (English)
Page 37
... 23 35 This feature can be used to prevent unauthorized viewing by locking out the front panel controls. This TV is programmed to remember which option it can only be used with the remote control. CC MENU BACK EXIT ENTER 1 Press the MENU button and then use D or E button to select the...
... 23 35 This feature can be used to prevent unauthorized viewing by locking out the front panel controls. This TV is programmed to remember which option it can only be used with the remote control. CC MENU BACK EXIT ENTER 1 Press the MENU button and then use D or E button to select the...
Owner's Manual (English)
Page 52
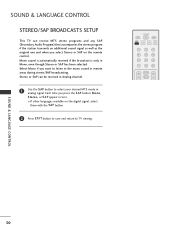
... automatically received if the broadcast is only in analog signal. even though Stereo or SAP has been selected. I If other languages available on the remote control. Each time you select Stereo or SAP on the digital signal, select them with the S A P button. 2 Press EXIT button to... save and return to TV viewing. SOUND & LANGUAGE CONTROL STEREO/SAP BROADCASTS SETUP This TV can be received in Analog channel. 1 Use the S A P button to the mono sound in remote areas during stereo/SAP broadcasting. Select Mono if you want to listen to select...
... automatically received if the broadcast is only in analog signal. even though Stereo or SAP has been selected. I If other languages available on the remote control. Each time you select Stereo or SAP on the digital signal, select them with the S A P button. 2 Press EXIT button to... save and return to TV viewing. SOUND & LANGUAGE CONTROL STEREO/SAP BROADCASTS SETUP This TV can be received in Analog channel. 1 Use the S A P button to the mono sound in remote areas during stereo/SAP broadcasting. Select Mono if you want to listen to select...

Owner's Manual (English)
Page 65
... Set password. 2 Press the G button and then choose any 4 digits for your changed password has been memorized. 3 Press the EXIT button to return to TV viewing or press the B A C K button to return to the previous menu. As soon as the 4 digits are entered, re-enter the same 4 ...digits on the remote control. Then your new password. I When you select O n, the Lock System is enable. 3 Press the EXIT button to return to TV viewing or press the B A C K button to return to the previous menu. !
... Set password. 2 Press the G button and then choose any 4 digits for your changed password has been memorized. 3 Press the EXIT button to return to TV viewing or press the B A C K button to return to the previous menu. As soon as the 4 digits are entered, re-enter the same 4 ...digits on the remote control. Then your new password. I When you select O n, the Lock System is enable. 3 Press the EXIT button to return to TV viewing or press the B A C K button to return to the previous menu. !
Owner's Manual (English)
Page 69
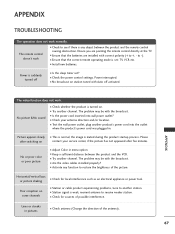
... station tuned with the broadcast. Power interrupted. I Check antenna (Change the direction of the antenna). 67 I Ensure that the batteries are pointing the remote control directly at the TV. to another product's power cord into wall power outlet? I Station signal is muted during the product startup process. I Try another channel. I Check the...
... station tuned with the broadcast. Power interrupted. I Check antenna (Change the direction of the antenna). 67 I Ensure that the batteries are pointing the remote control directly at the TV. to another product's power cord into wall power outlet? I Station signal is muted during the product startup process. I Try another channel. I Check the...


