Specification (English)
Page 1
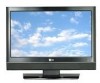
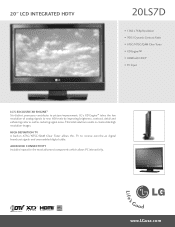
... this TV to receive over-the-air digital broadcast signals and unscrambled digital cable. advanced connectivity Includes inputs for the most advanced components which allows PC interactivity. LG's XD Engine™ takes the low resolution of analog signals to picture improvement. 20" LCD INTEGRATED HDTV 20LS7D • 1366 x 768p Resolution • 700:1 Dynamic Contrast Ratio • ATSC/NTSC/QAM Clear Tuner • XD Engine™ • HDMI with HDCP • PC Input LG...
... this TV to receive over-the-air digital broadcast signals and unscrambled digital cable. advanced connectivity Includes inputs for the most advanced components which allows PC interactivity. LG's XD Engine™ takes the low resolution of analog signals to picture improvement. 20" LCD INTEGRATED HDTV 20LS7D • 1366 x 768p Resolution • 700:1 Dynamic Contrast Ratio • ATSC/NTSC/QAM Clear Tuner • XD Engine™ • HDMI with HDCP • PC Input LG...
Specification (English)
Page 2
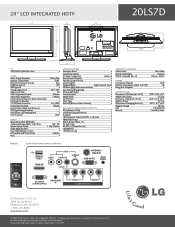
... Pull-Down Correction 3:2 (480i) Picture Selection Mode 5 Modes Black Stretcher (Black Level Enhancer) • DTV Signal Strength Indicator • ACM (Active Color Management) • Color Processor 10 Bit Audio Mono/Stereo/Dual (MTS/SAP) • Audio Output Power (Watts - Dimensions w/Stand (W x H x D) 20.0" x 16.0" x 6.9" Weight w/Stand 14.1 lbs. 20" LCD INTEGRATED HDTV 19.7" 2.9" 3.9" 20LS7D 3.9" 6.9" 15.8" 14.0" 12.9" 6.9" TV ATSC/NTSC/QAM Clear Tuner • Video Native Display Resolution 1366 x 768p Dynamic Contrast...
... Pull-Down Correction 3:2 (480i) Picture Selection Mode 5 Modes Black Stretcher (Black Level Enhancer) • DTV Signal Strength Indicator • ACM (Active Color Management) • Color Processor 10 Bit Audio Mono/Stereo/Dual (MTS/SAP) • Audio Output Power (Watts - Dimensions w/Stand (W x H x D) 20.0" x 16.0" x 6.9" Weight w/Stand 14.1 lbs. 20" LCD INTEGRATED HDTV 19.7" 2.9" 3.9" 20LS7D 3.9" 6.9" 15.8" 14.0" 12.9" 6.9" TV ATSC/NTSC/QAM Clear Tuner • Video Native Display Resolution 1366 x 768p Dynamic Contrast...
Owner's Manual (English)
Page 3
... cause harmful interference to radio or television reception, which the receiver is connected. - The code provides guidelines for compliance could void the user's authority to operate this equipment does cause harmful interference to radio communications. NO USER SERVICEABLE PARTS INSIDE. If this product 1 Consult the dealer or an experienced radio/TV technician for a Class B digital device, pursuant to correct the interference...
... cause harmful interference to radio or television reception, which the receiver is connected. - The code provides guidelines for compliance could void the user's authority to operate this equipment does cause harmful interference to radio communications. NO USER SERVICEABLE PARTS INSIDE. If this product 1 Consult the dealer or an experienced radio/TV technician for a Class B digital device, pursuant to correct the interference...
Owner's Manual (English)
Page 6
... display 13 VESA Wall Mounting 14 Desktop Pedestal Installation 14 Kensington Security System 15 Attaching the TV to a Desk 15 Antenna or Cable Connection 16 EXTERNAL EQUIPMENT SETUP HD Receiver Setup 17 DVD Setup 20 VCR Setup 22 Headphone Setup 24 PC Setup 25 WATCHING TV / CHANNEL CONTROL Remote Control Functions 28 Turning On TV 30 Channel Selection 30 Volume Adjustment 30 On-Screen Menus Selection 31 Channel Search - Picture Mode - Black (Darkness) Level 43 Back Light 44 Low-Power Picture Mode 45 Picture Reset 46 SOUND & LANGUAGE CONTROL Preset Sound Setting...
... display 13 VESA Wall Mounting 14 Desktop Pedestal Installation 14 Kensington Security System 15 Attaching the TV to a Desk 15 Antenna or Cable Connection 16 EXTERNAL EQUIPMENT SETUP HD Receiver Setup 17 DVD Setup 20 VCR Setup 22 Headphone Setup 24 PC Setup 25 WATCHING TV / CHANNEL CONTROL Remote Control Functions 28 Turning On TV 30 Channel Selection 30 Volume Adjustment 30 On-Screen Menus Selection 31 Channel Search - Picture Mode - Black (Darkness) Level 43 Back Light 44 Low-Power Picture Mode 45 Picture Reset 46 SOUND & LANGUAGE CONTROL Preset Sound Setting...
Owner's Manual (English)
Page 19
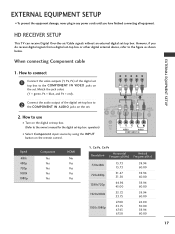
... RECEIVER SETUP This TV can receive Digital Over-the-air/Cable signals without an external digital set -top box or other digital external device, refer to the figure as shown below. However, if you have finished connecting all equipment. operation) I To prevent the equipment damage, never plug in any power cords until you do receive digital signals from a digital set -top box. EXTERNAL EQUIPMENT SETUP I Select Component input source by using the INPUT button on the digital set-top box. (Refer to the owner's manual for the digital set...
... RECEIVER SETUP This TV can receive Digital Over-the-air/Cable signals without an external digital set -top box or other digital external device, refer to the figure as shown below. However, if you have finished connecting all equipment. operation) I To prevent the equipment damage, never plug in any power cords until you do receive digital signals from a digital set -top box. EXTERNAL EQUIPMENT SETUP I Select Component input source by using the INPUT button on the digital set-top box. (Refer to the owner's manual for the digital set...
Owner's Manual (English)
Page 20
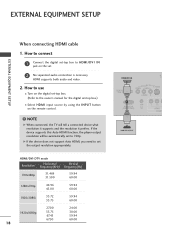
... a connected device what resolution it supports and the resolution it prefers. NOTE G When connected, the TV will be automatically set to set the output resolution appropriately. How to use I N P U T button on the set -top box. (Refer to HDMI/DVI IN jack on the remote control. ! How to connect 1 Connect the digital set-top box to the owner's manual for the digital set-top box.) I Select H D M I input source by using the I Turn on the digital set . 2 No separated audio connection is necessary. EXTERNAL EQUIPMENT SETUP EXTERNAL EQUIPMENT SETUP When connecting HDMI cable 1.
... a connected device what resolution it supports and the resolution it prefers. NOTE G When connected, the TV will be automatically set to set the output resolution appropriately. How to use I N P U T button on the set -top box. (Refer to HDMI/DVI IN jack on the remote control. ! How to connect 1 Connect the digital set-top box to the owner's manual for the digital set-top box.) I Select H D M I input source by using the I Turn on the digital set . 2 No separated audio connection is necessary. EXTERNAL EQUIPMENT SETUP EXTERNAL EQUIPMENT SETUP When connecting HDMI cable 1.
Owner's Manual (English)
Page 21
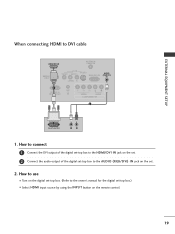
... HDMI input source by using the INPUT button on the remote control. 19 How to connect 1 Connect the DVI output of the digital set-top box to the HDMI/DVI IN jack on the set -top box to DVI cable HDMI/DVI IN ANTENNA/ CABLE IN SERVICE ONLY VIDEO AV IN S-VIDEO AUDIO RGB (PC) IN L(MONO) R AUDIO (RGB/DVI) IN 1 H/P RS-232C IN (SERVICE ONLY) VIDEO AUDIO COMPONENT IN 2 DVI-DTV OUTPUT L R 1. How to use I Turn on the digital set-top box. (Refer to the owner's manual...
... HDMI input source by using the INPUT button on the remote control. 19 How to connect 1 Connect the DVI output of the digital set-top box to the HDMI/DVI IN jack on the set -top box to DVI cable HDMI/DVI IN ANTENNA/ CABLE IN SERVICE ONLY VIDEO AV IN S-VIDEO AUDIO RGB (PC) IN L(MONO) R AUDIO (RGB/DVI) IN 1 H/P RS-232C IN (SERVICE ONLY) VIDEO AUDIO COMPONENT IN 2 DVI-DTV OUTPUT L R 1. How to use I Turn on the digital set-top box. (Refer to the owner's manual...
Owner's Manual (English)
Page 22
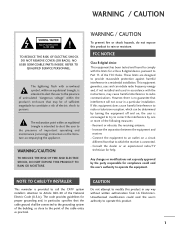
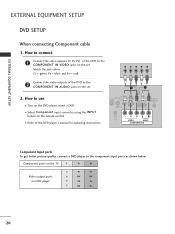
... picture quality, connect a DVD player to the DVD player's manual for operating instructions. Component ports on the TV Y PB PR Video output ports on the set . 1 ANTENNA/ CABLE IN 2 2. How to use I Select Component input source by using the INPUT button on the remote control. Match the jack colors (Y = green, PB = blue, and PR = red). I Turn on the set . I Refer to the component input ports as shown below. Y PB PR L R 2 Connect the audio outputs of the DVD to the COMPONENT IN AUDIO jacks on the DVD player, insert a DVD. EXTERNAL EQUIPMENT SETUP EXTERNAL...
... picture quality, connect a DVD player to the DVD player's manual for operating instructions. Component ports on the TV Y PB PR Video output ports on the set . 1 ANTENNA/ CABLE IN 2 2. How to use I Select Component input source by using the INPUT button on the remote control. Match the jack colors (Y = green, PB = blue, and PR = red). I Turn on the set . I Refer to the component input ports as shown below. Y PB PR L R 2 Connect the audio outputs of the DVD to the COMPONENT IN AUDIO jacks on the DVD player, insert a DVD. EXTERNAL EQUIPMENT SETUP EXTERNAL...

Owner's Manual (English)
Page 23
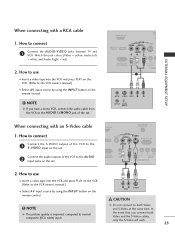
... IN ANTENNA/ CABLE IN VIDEO AV IN AUDIO S-VIDEO AU RGB (PC) IN (RG L(MONO) RR 32C IN CE ONLY) H/P 2 VIDEO AUDIO COMPONENT IN 1 L R AUDIO S-VIDEO When connecting HDMI cable 1. HDMI supports both audio and video. 2. How to use I Refer to the DVD player's manual for operating instructions. ! G If the device does not support Auto HDMI, you need to set to the HDMI/DVI IN jack on the remote control. I Select A V input source by using the INPUT button on the set . 2. If the device supports this Auto HDMI function, the player output resolution...
... IN ANTENNA/ CABLE IN VIDEO AV IN AUDIO S-VIDEO AU RGB (PC) IN (RG L(MONO) RR 32C IN CE ONLY) H/P 2 VIDEO AUDIO COMPONENT IN 1 L R AUDIO S-VIDEO When connecting HDMI cable 1. HDMI supports both audio and video. 2. How to use I Refer to the DVD player's manual for operating instructions. ! G If the device does not support Auto HDMI, you need to set to the HDMI/DVI IN jack on the remote control. I Select A V input source by using the INPUT button on the set . 2. If the device supports this Auto HDMI function, the player output resolution...
Owner's Manual (English)
Page 25
... VICE ONLY) H/P 2 VIDEO AUDIO COMPONENT IN 1 2. EXTERNAL EQUIPMENT SETUP When connecting with an S-Video cable 1. L R AUDIO S-VIDEO CAUTION ! NOTE G If you connect both Video and S-Video at the same time. How to connect 1 Connect the S-VIDEO output of the VCR to the S -VIDEO input on the remote control. ! NOTE G The picture quality is improved: compared to connect 1 Connect the AUDIO/VIDEO jacks between TV and VCR. How to use I Select A V input source by using the INPUT button on the set. 2 Connect the audio outputs of the set . How to...
... VICE ONLY) H/P 2 VIDEO AUDIO COMPONENT IN 1 2. EXTERNAL EQUIPMENT SETUP When connecting with an S-Video cable 1. L R AUDIO S-VIDEO CAUTION ! NOTE G If you connect both Video and S-Video at the same time. How to connect 1 Connect the S-VIDEO output of the VCR to the S -VIDEO input on the remote control. ! NOTE G The picture quality is improved: compared to connect 1 Connect the AUDIO/VIDEO jacks between TV and VCR. How to use I Select A V input source by using the INPUT button on the set. 2 Connect the audio outputs of the set . How to...
Owner's Manual (English)
Page 26
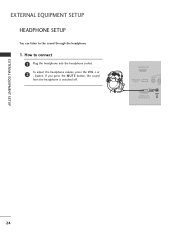
If you press the M U T E button, the sound from the headphone is switched off. HDMI/DVI IN SERVICE ONLY VIDEO A L(MON H/P RS-232C IN (SERVICE ONLY) EXTERNAL EQUIPMENT SETUP 24 How to the sound through the headphone. 1. button. EXTERNAL EQUIPMENT SETUP HEADPHONE SETUP You can listen to connect 1 Plug the headphone into the headphone socket. 2 To adjust the headphone volume, press the VOL + or -
If you press the M U T E button, the sound from the headphone is switched off. HDMI/DVI IN SERVICE ONLY VIDEO A L(MON H/P RS-232C IN (SERVICE ONLY) EXTERNAL EQUIPMENT SETUP 24 How to the sound through the headphone. 1. button. EXTERNAL EQUIPMENT SETUP HEADPHONE SETUP You can listen to connect 1 Plug the headphone into the headphone socket. 2 To adjust the headphone volume, press the VOL + or -
Owner's Manual (English)
Page 27
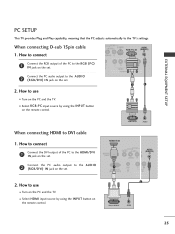
... INPUT button on the remote control. 2 DVI-PC OUTPUT AUDIO 25 RGB OUTPUT AUDIO When connecting HDMI to the TV's settings. Connect the PC audio output to use VIDEO AUDIO COMPONENT IN 1 2 I N jack on the PC and the TV. How to connect 1 Connect the DVI output of the PC to the R GB (P C) I N jack on the set . 2. HDMI/DVI IN SERVICE ONLY VIDEO AV IN AUDIO AUDIO N (RGB/DVI) IN L(MONO) R 1 H/P RS-232C IN (SERVICE ONLY) IO 2. When connecting D-sub 15pin cable 1. EXTERNAL EQUIPMENT SETUP...
... INPUT button on the remote control. 2 DVI-PC OUTPUT AUDIO 25 RGB OUTPUT AUDIO When connecting HDMI to the TV's settings. Connect the PC audio output to use VIDEO AUDIO COMPONENT IN 1 2 I N jack on the PC and the TV. How to connect 1 Connect the DVI output of the PC to the R GB (P C) I N jack on the set . 2. HDMI/DVI IN SERVICE ONLY VIDEO AV IN AUDIO AUDIO N (RGB/DVI) IN L(MONO) R 1 H/P RS-232C IN (SERVICE ONLY) IO 2. When connecting D-sub 15pin cable 1. EXTERNAL EQUIPMENT SETUP...
Owner's Manual (English)
Page 29
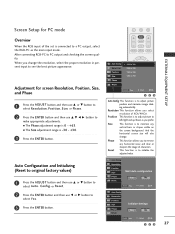
... then use D or E button to select Auto. Adjustment for PC mode - 0 FAV EXTERNAL EQUIPMENT SETUP Overview When the RGB input of the set is to adjust picture to left/right and up/down as the main input mode. And the horizontal screen size will also change the resolution, select the proper resolution in present input to see the best picture appearance. Config. Auto Config. When you select resolution of XGA/WXGA. Resolution Position Size Phase Reset...
... then use D or E button to select Auto. Adjustment for PC mode - 0 FAV EXTERNAL EQUIPMENT SETUP Overview When the RGB input of the set is to adjust picture to left/right and up/down as the main input mode. And the horizontal screen size will also change the resolution, select the proper resolution in present input to see the best picture appearance. Config. Auto Config. When you select resolution of XGA/WXGA. Resolution Position Size Phase Reset...
Owner's Manual (English)
Page 30
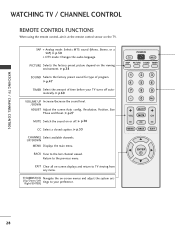
... -screen displays and return to your TV turns off . Return to the last channel viewed. SAP Analog mode: Selects MTS sound (Mono, Stereo, or a SAP) G p.50 DTV mode: Changes the audio language. G p.60 VOLUME UP Increase/decrease the sound level. /DOWN ADJUST Adjust the screen Auto config., Resolution, Position, Size Phase and Reset. EXIT Clear all on the viewing environment. G p.27 MUTE Switch the sound on the TV. POWER TV INPUT SAP PICTURE SOUND TIMER 1 2 3 4 56 789 - 0 FAV ADJUST VOL MUTE CC MENU...
... -screen displays and return to your TV turns off . Return to the last channel viewed. SAP Analog mode: Selects MTS sound (Mono, Stereo, or a SAP) G p.50 DTV mode: Changes the audio language. G p.60 VOLUME UP Increase/decrease the sound level. /DOWN ADJUST Adjust the screen Auto config., Resolution, Position, Size Phase and Reset. EXIT Clear all on the viewing environment. G p.27 MUTE Switch the sound on the TV. POWER TV INPUT SAP PICTURE SOUND TIMER 1 2 3 4 56 789 - 0 FAV ADJUST VOL MUTE CC MENU...
Owner's Manual (English)
Page 32
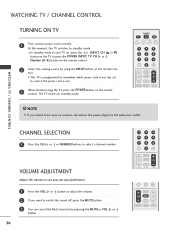
... TV switches to standby mode. I This TV is programmed to remember which power state it was last set to, even if the power cord is out. 3 When finished using the INPUT button on vacation, disconnect the power plug from the wall power outlet. POWER TV INPUT SAP PICTURE SOUND TIMER 1 2 3 4 56 789 - 0 FAV ADJUST VOL MUTE CH CC MENU BACK EXIT ! WATCHING TV / CHANNEL CONTROL TURNING ON TV 1 First, connect power cord correctly. trol. NOTE G If you want to select a channel number. The TV reverts to standby mode. VOLUME ADJUSTMENT Adjust...
... TV switches to standby mode. I This TV is programmed to remember which power state it was last set to, even if the power cord is out. 3 When finished using the INPUT button on vacation, disconnect the power plug from the wall power outlet. POWER TV INPUT SAP PICTURE SOUND TIMER 1 2 3 4 56 789 - 0 FAV ADJUST VOL MUTE CH CC MENU BACK EXIT ! WATCHING TV / CHANNEL CONTROL TURNING ON TV 1 First, connect power cord correctly. trol. NOTE G If you want to select a channel number. The TV reverts to standby mode. VOLUME ADJUSTMENT Adjust...
Owner's Manual (English)
Page 33
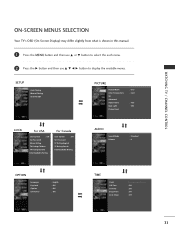
... this manual. 1 Press the MENU button and then use D or E button to select the each menu. 2 Press the G button and then use D E F G button to display the available menus. SETUP Auto Tuning Manual Tuning Channel Edit PICTURE Picture Mode Color Temperature XD Advanced Aspect Ratio Back Light Picture Reset : User : Cool : 16:9 : 100 LOCK For USA Lock System : Off Set Password Movie Rating TV Rating-Children TV Rating-General Downloadable Rating For Canada Lock System : Off Set Password TV Rating-English TV Rating-French Downloadable Rating AUDIO Sound Mode...
... this manual. 1 Press the MENU button and then use D or E button to select the each menu. 2 Press the G button and then use D E F G button to display the available menus. SETUP Auto Tuning Manual Tuning Channel Edit PICTURE Picture Mode Color Temperature XD Advanced Aspect Ratio Back Light Picture Reset : User : Cool : 16:9 : 100 LOCK For USA Lock System : Off Set Password Movie Rating TV Rating-Children TV Rating-General Downloadable Rating For Canada Lock System : Off Set Password TV Rating-English TV Rating-French Downloadable Rating AUDIO Sound Mode...
Owner's Manual (English)
Page 38
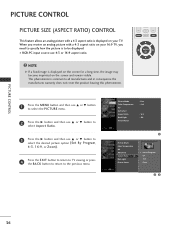
... ratio. ! PICTURE CONTROL PICTURE CONTROL PICTURE SIZE (ASPECT RATIO) CONTROL This feature allows an analog picture with a 4:3 aspect ratio on the screen and remain visible. When you need to specify how the picture is common to the previous menu. Picture Mode Color Temperature XD Advanced Aspect Ratio Back Light Picture Reset : User : Cool : 16:9 : 100 1 Picture Mode Color Temperature XD Advanced Aspect Ratio G Back Light Picture Reset Set By Program 4:3 16:9 Zoom 23 36 I RGB-PC input source use D or E button to...
... ratio. ! PICTURE CONTROL PICTURE CONTROL PICTURE SIZE (ASPECT RATIO) CONTROL This feature allows an analog picture with a 4:3 aspect ratio on the screen and remain visible. When you need to specify how the picture is common to the previous menu. Picture Mode Color Temperature XD Advanced Aspect Ratio Back Light Picture Reset : User : Cool : 16:9 : 100 1 Picture Mode Color Temperature XD Advanced Aspect Ratio G Back Light Picture Reset Set By Program 4:3 16:9 Zoom 23 36 I RGB-PC input source use D or E button to...
Owner's Manual (English)
Page 52
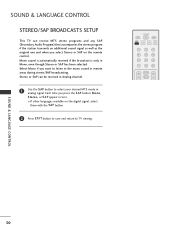
... turn. Select Mono if you press the S A P button, Mono, Stereo, or S A P appear in remote areas during stereo/SAP broadcasting. SOUND & LANGUAGE CONTROL STEREO/SAP BROADCASTS SETUP This TV can be received in Analog channel. 1 Use the S A P button to select your desired MTS mode in Mono; Mono sound is automatically received if the broadcast is only in analog signal. I If other languages available on the remote control. POWER TV INPUT SAP PICTURE SOUND TIMER 1 2 3 4 56 7 8 9 - 0 FAV ADJUST...
... turn. Select Mono if you press the S A P button, Mono, Stereo, or S A P appear in remote areas during stereo/SAP broadcasting. SOUND & LANGUAGE CONTROL STEREO/SAP BROADCASTS SETUP This TV can be received in Analog channel. 1 Use the S A P button to select your desired MTS mode in Mono; Mono sound is automatically received if the broadcast is only in analog signal. I If other languages available on the remote control. POWER TV INPUT SAP PICTURE SOUND TIMER 1 2 3 4 56 7 8 9 - 0 FAV ADJUST...
Owner's Manual (English)
Page 64
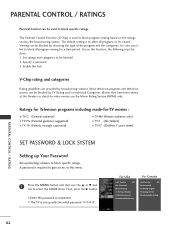
... 7 years older) SET PASSWORD & LOCK SYSTEM Setting up Your Password Set up with the initial password "0-0-0-0". Viewing can be viewed. To use this menu. 1 Press the MENU button and then use the Movie Rating System (MPAA) only. Ratings for Television programs including made-for a time period. For USA Lock System : Off Set Password Movie Rating TV Rating-Children TV Rating-General Downloadable Rating For Canada Lock System : Off Set Password TV Rating-English TV Rating-French Downloadable Rating PARENTAL CONTROL / RATING...
... 7 years older) SET PASSWORD & LOCK SYSTEM Setting up Your Password Set up with the initial password "0-0-0-0". Viewing can be viewed. To use this menu. 1 Press the MENU button and then use the Movie Rating System (MPAA) only. Ratings for Television programs including made-for a time period. For USA Lock System : Off Set Password Movie Rating TV Rating-Children TV Rating-General Downloadable Rating For Canada Lock System : Off Set Password TV Rating-English TV Rating-French Downloadable Rating PARENTAL CONTROL / RATING...
Owner's Manual (English)
Page 69
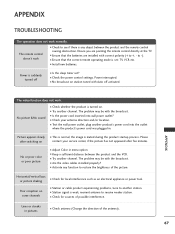
... set ? I Test the wall power outlet, plug another station. No or poor color or poor picture I Check the power control settings. I Adjust Color in menu option. I Check for local interference such as an electrical appliance or power tool. I Are the video cables installed properly? I Check your service center, if the picture has not appeared after switching on station tuned with the broadcast. No picture &No sound I Check antenna (Change the direction of the picture. I Install...
... set ? I Test the wall power outlet, plug another station. No or poor color or poor picture I Check the power control settings. I Adjust Color in menu option. I Check for local interference such as an electrical appliance or power tool. I Are the video cables installed properly? I Check your service center, if the picture has not appeared after switching on station tuned with the broadcast. No picture &No sound I Check antenna (Change the direction of the picture. I Install...


