
PRESCRIBE Commands Command Reference Manual Rev 4.8
Page 6
...69 DAF - select/deselect DUPleX mode 84 DXPG - change current Font SETting by Angle 82 DUPX - change current FONT 108 FPAT - GRaphic data ReaD 125 HUE - JOB Output 136 JOBP - set ID 65 CSTK - Change symbol SET by symbol-set MeDia type ATtribute 162 ...MID - DELete Macro 76 DPAT - JOB, print with Print options 138 JOBS - e-MPS Storage 165 InterNaTionaL characters 129 JOBD - JOB Start 140 JOBT - generate bitmap character for LoaDing FoNt 149 LDFN F - Multi-tray...
...69 DAF - select/deselect DUPleX mode 84 DXPG - change current Font SETting by Angle 82 DUPX - change current FONT 108 FPAT - GRaphic data ReaD 125 HUE - JOB Output 136 JOBP - set ID 65 CSTK - Change symbol SET by symbol-set MeDia type ATtribute 162 ...MID - DELete Macro 76 DPAT - JOB, print with Print options 138 JOBS - e-MPS Storage 165 InterNaTionaL characters 129 JOBD - JOB Start 140 JOBT - generate bitmap character for LoaDing FoNt 149 LDFN F - Multi-tray...
PRESCRIBE Commands Command Reference Manual Rev 4.8
Page 174
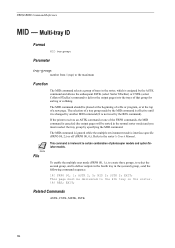
...one of the FRPO commands, the MID command is canceled (the output pages will be placed at the beginning of a file or program, or at the top of a tray group made by the MID command is effective until it is changed by specifying the MID command. The MID command should be sorted ...in the sorter, which is interface-specific (FRPO S0, 2;) or off (FRPO S0, 0;). Refer to deliver the output pages into the trays of photocopier models and option finisher models. MID 2; ...
...one of the FRPO commands, the MID command is canceled (the output pages will be placed at the beginning of a file or program, or at the top of a tray group made by the MID command is effective until it is changed by specifying the MID command. The MID command should be sorted ...in the sorter, which is interface-specific (FRPO S0, 2;) or off (FRPO S0, 0;). Refer to deliver the output pages into the trays of photocopier models and option finisher models. MID 2; ...
PRESCRIBE Commands Command Reference Manual Rev 4.8
Page 187
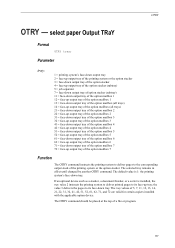
... changed by another OTRY command. Parameter tray: 1 = printing system's face-down output tray 2 = face-up output tray of the printing system or the option stacker 3 = face-down output tray of the option stacker 4 = face-up output tray of the option stacker (subtray) 5 = job separator 7 = face-down output tray of option stacher (subtray) 11 = face-down output tray of the option mailbox 1 12 = face-up output tray...
... changed by another OTRY command. Parameter tray: 1 = printing system's face-down output tray 2 = face-up output tray of the printing system or the option stacker 3 = face-down output tray of the option stacker 4 = face-up output tray of the option stacker (subtray) 5 = job separator 7 = face-down output tray of option stacher (subtray) 11 = face-down output tray of the option mailbox 1 12 = face-up output tray...
PRESCRIBE Commands Command Reference Manual Rev 4.8
Page 345
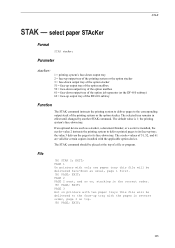
...: 1 = printing system's face-down output tray 2 = face-up output tray of the printing system or the option stacker 3 = face-down output tray of the option stacker 51 = face-up output tray of the option mailbox 52 = face-down output tray of the option mailbox 61 = face-down tray. The selected tray remains in reverse order, page 3 on... output tray of the option job separator (or the DF-610 subtray) 62 = face-up tray with only one paper tray this file will be placed at the top of the printing system or the option stacker. EXIT; PAGE 1 On printers with the pages in effect until changed...
...: 1 = printing system's face-down output tray 2 = face-up output tray of the printing system or the option stacker 3 = face-down output tray of the option stacker 51 = face-up output tray of the option mailbox 52 = face-down output tray of the option mailbox 61 = face-down tray. The selected tray remains in reverse order, page 3 on... output tray of the option job separator (or the DF-610 subtray) 62 = face-up tray with only one paper tray this file will be placed at the top of the printing system or the option stacker. EXIT; PAGE 1 On printers with the pages in effect until changed...

PRESCRIBE Commands Command Reference Manual Rev 4.8
Page 406
... data, 218 Duplex inhibiting by media type, 162, 163 E EcoPrint, 98 level, 98 e-MPS, 165 limiting values for storage, 165 e-MPS starting, 141 Emulation, 287 changing, 287 End cap, 266 butt, 266 round, 266 square, 266 Ending angle, 28, 182 EPROM, 246 Exit, 99 exiting from PRESCRIBE, 99 External media assigning... data to, 250 printing information, 244 printing partitions, 245 reading data from, 246 storing TrueType fonts, 247 terminator, 362 writing data to, 250 F Face-down output tray, 335 Face-up output tray, 335 Fill, 184 Fill pattern, 110 8 by 8 bit, 110
... data, 218 Duplex inhibiting by media type, 162, 163 E EcoPrint, 98 level, 98 e-MPS, 165 limiting values for storage, 165 e-MPS starting, 141 Emulation, 287 changing, 287 End cap, 266 butt, 266 round, 266 square, 266 Ending angle, 28, 182 EPROM, 246 Exit, 99 exiting from PRESCRIBE, 99 External media assigning... data to, 250 printing information, 244 printing partitions, 245 reading data from, 246 storing TrueType fonts, 247 terminator, 362 writing data to, 250 F Face-down output tray, 335 Face-up output tray, 335 Fill, 184 Fill pattern, 110 8 by 8 bit, 110
KM-NET for Clients Operation Guide Rev-3.7
Page 27
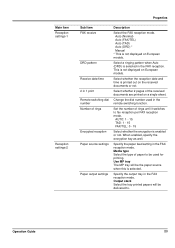
... the FAX reception mode. Output stack Select the tray printed papers will be the paper source when this is not displayed on a single sheet. Select a ringing pattern when Auto (DRD) is printed out on European models. Change the dial number used for printing. Set the number of ...rings Encrypted reception Paper source settings Paper output settings Description Select the FAX reception mode. Use MP tray The MP tray will be used in the remote switching function. Select ...
... the FAX reception mode. Output stack Select the tray printed papers will be the paper source when this is not displayed on a single sheet. Select a ringing pattern when Auto (DRD) is printed out on European models. Change the dial number used for printing. Set the number of ...rings Encrypted reception Paper source settings Paper output settings Description Select the FAX reception mode. Use MP tray The MP tray will be used in the remote switching function. Select ...
KX Driver User Guide Version 5.90
Page 28
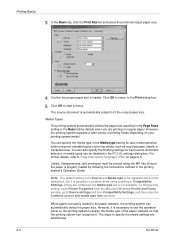
...on regular paper. Note: The default setting is properly loaded in Compatibility Settings. To change this setting, open Printer Properties from the Microsoft Windows Printer and Faxes window, go to fit the output paper size. When paper is for Source and Media type to be separate items in...using a setting in the paper cassette, the printing system can also specify the finishing settings for auto media selection when using the MP tray. For further details, refer to specify the media settings are combined, the Media type list is loaded. Ensure the paper is automatically ...
...on regular paper. Note: The default setting is properly loaded in Compatibility Settings. To change this setting, open Printer Properties from the Microsoft Windows Printer and Faxes window, go to fit the output paper size. When paper is for Source and Media type to be separate items in...using a setting in the paper cassette, the printing system can also specify the finishing settings for auto media selection when using the MP tray. For further details, refer to specify the media settings are combined, the Media type list is loaded. Ensure the paper is automatically ...

KX Driver User Guide Version 5.90
Page 33
Refer to your printing system, you can specify how printed documents are given priority, causing a change in the output trays after printing. Frequently, the application settings are stacked in the sorter output method depending on the sorter model. Verify these settings before printing your documents. User Guide 3-8 Printing Basics Collating Modes By attaching a sorter to your sorter's Operation Guide. The number of output trays and their receiving capacity (the number of sheets) varies depending on the application.
Refer to your printing system, you can specify how printed documents are given priority, causing a change in the output trays after printing. Frequently, the application settings are stacked in the sorter output method depending on the sorter model. Verify these settings before printing your documents. User Guide 3-8 Printing Basics Collating Modes By attaching a sorter to your sorter's Operation Guide. The number of output trays and their receiving capacity (the number of sheets) varies depending on the application.

KX Driver User Guide Version 5.90
Page 37
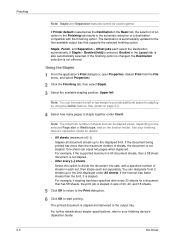
...is selected in the Finishing tab and Booklet [fold] is not available in the Finishing tab, change the setting for languages that has a stapler. To return the driver to left. Outside Left Edge... does not reset Destination in the Basic tab to step 8. 5 Click Basic > Destination, and select a face-down finishing tray. 5 If the Staple check box is selected under Position. Restore Defaults is selected automatically. 7 8 Click OK to return...step 5. • To continue with Booklet printing, go to an output tray that read right to the default settings, click Restore Defaults.
...is selected in the Finishing tab and Booklet [fold] is not available in the Finishing tab, change the setting for languages that has a stapler. To return the driver to left. Outside Left Edge... does not reset Destination in the Basic tab to step 8. 5 Click Basic > Destination, and select a face-down finishing tray. 5 If the Staple check box is selected under Position. Restore Defaults is selected automatically. 7 8 Click OK to return...step 5. • To continue with Booklet printing, go to an output tray that read right to the default settings, click Restore Defaults.
KX Driver User Guide Version 5.90
Page 46
... in the Basic tab, the selection of an option in the Finishing tab results in the Layout tab is stapled and delivered to the output tray. See Gutter on the finisher model. One sheet can designate from the File menu, and select Properties.) 1 2 Click the Finishing tab... OK to start printing. 6 The printed document is also automatically selected. If the final set separately. KX Driver If the finishing option is changed, the Destination selection is stapled. You can equal two pages when duplexed. See your finishing device's Operation Guide. If Staple > Booklet [fold...
... in the Basic tab, the selection of an option in the Finishing tab results in the Layout tab is stapled and delivered to the output tray. See Gutter on the finisher model. One sheet can designate from the File menu, and select Properties.) 1 2 Click the Finishing tab... OK to start printing. 6 The printed document is also automatically selected. If the final set separately. KX Driver If the finishing option is changed, the Destination selection is stapled. You can equal two pages when duplexed. See your finishing device's Operation Guide. If Staple > Booklet [fold...
Fax System (M) Operation Guide Rev-2.0
Page 44
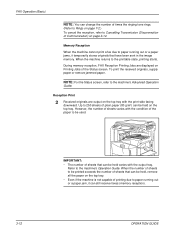
... are displayed on Printing Jobs of the Status screen. FAX Operation (Basic) NOTE: You can change the number of times the ringing tone rings. (Refer to Rings on page 7-2.) To cancel the...(memory reception). Up to paper running out or a paper jams, it can be held on the top tray. When the number of sheets to be printed exceeds the number of sheets that can be held varies with...the machine is not capable of printing due to 250 sheets of Communication) on the top tray with the output tray. Memory Reception When the machine cannot print a fax due to the machine's Operation Guide....
... are displayed on Printing Jobs of the Status screen. FAX Operation (Basic) NOTE: You can change the number of times the ringing tone rings. (Refer to Rings on page 7-2.) To cancel the...(memory reception). Up to paper running out or a paper jams, it can be held on the top tray. When the number of sheets to be printed exceeds the number of sheets that can be held varies with...the machine is not capable of printing due to 250 sheets of Communication) on the top tray with the output tray. Memory Reception When the machine cannot print a fax due to the machine's Operation Guide....

Fax System (M) Operation Guide Rev-2.0
Page 182
Setup and Registration MP Tray Paper Output You can select whether to use the MP tray paper when printing out the received fax. 1 Press the System Menu key. 2 Press [FAX/i-FAX], [Next] of Reception, [Next] of Basic and then [Change] of Multi Purpose Tray. 3 Select either [Off] (not to use) or [On] (to print on paper from this setup, press [Close] several times until the System Menu default screen is displayed. 7-8 OPERATION GUIDE Can cel OK 6/6/2006 10:00 5 To exit from multi-purpose tray. Multi Purpose Tray Allow faxes to use). FAX - Off On Status 4 Press [OK].
Setup and Registration MP Tray Paper Output You can select whether to use the MP tray paper when printing out the received fax. 1 Press the System Menu key. 2 Press [FAX/i-FAX], [Next] of Reception, [Next] of Basic and then [Change] of Multi Purpose Tray. 3 Select either [Off] (not to use) or [On] (to print on paper from this setup, press [Close] several times until the System Menu default screen is displayed. 7-8 OPERATION GUIDE Can cel OK 6/6/2006 10:00 5 To exit from multi-purpose tray. Multi Purpose Tray Allow faxes to use). FAX - Off On Status 4 Press [OK].

3050/4050/5050 Operation Guide Rev-3 (Advanced)
Page 31
NOTE: To change default destination for copies, refer to display the image. When you select any of output copy, Face Press [OK] to Output Tray on page 6-20 for finished copies. Job Separator Tray Tray 4 Tray 1 Tray 5 Tray 2 Tray 6 Tray 3 Tray 7 Status Add Shortcut Cancel OK 10/5/2006 10:10 ADVANCED OPERATION GUIDE 1-17 Copying Functions Output Destination You can be selected either as...
NOTE: To change default destination for copies, refer to display the image. When you select any of output copy, Face Press [OK] to Output Tray on page 6-20 for finished copies. Job Separator Tray Tray 4 Tray 1 Tray 5 Tray 2 Tray 6 Tray 3 Tray 7 Status Add Shortcut Cancel OK 10/5/2006 10:10 ADVANCED OPERATION GUIDE 1-17 Copying Functions Output Destination You can be selected either as...

3050/4050/5050 Operation Guide Rev-3 (Advanced)
Page 178
...not return to select the language. 1 Press the System Menu key. 2 Press [Common Settings] and then [Change] of Measurement ...6-17 • Error Handling ...6-17 • Output Tray ...6-20 • Function Defaults ...6-21 • Orientation Confirmation ...6-37 NOTE: If user login is enabled, you ...can only change the settings by logging in the screen during System Menu operation. Use the procedure ...
...not return to select the language. 1 Press the System Menu key. 2 Press [Common Settings] and then [Change] of Measurement ...6-17 • Error Handling ...6-17 • Output Tray ...6-20 • Function Defaults ...6-21 • Orientation Confirmation ...6-37 NOTE: If user login is enabled, you ...can only change the settings by logging in the screen during System Menu operation. Use the procedure ...

3050/4050/5050 Operation Guide Rev-3 (Advanced)
Page 196
... Port 1 appears when the optional fax kit is installed. Job Separator Delivery on Tray set to select the output tray. 1 Press the System Menu key. 2 Press [Common Settings] and then [Next] of Output Tray. 3 Press [Change] of the machine. Output Tray Descriptions Top Tray Delivery on Top Tray of Copy/Custom Box, Printer, or FAX Port 1 or FAX Port 2. The...
... Port 1 appears when the optional fax kit is installed. Job Separator Delivery on Tray set to select the output tray. 1 Press the System Menu key. 2 Press [Common Settings] and then [Next] of Output Tray. 3 Press [Change] of the machine. Output Tray Descriptions Top Tray Delivery on Top Tray of Copy/Custom Box, Printer, or FAX Port 1 or FAX Port 2. The...

3050/4050/5050 Operation Guide Rev-3 (Advanced)
Page 197
... at the left. Set the defaults for Original Orientation. Copy/Custom Box Select output tray for paper Job Separator Tray 1 Tray Tray 2 Tray 3 orientation at output. Refer to select the default orientation when originals are the values automatically set after...Tray], [Tray B], [Tray C] or [Tray 1-7], select Common Settings - Cancel OK 10/5/2006 10:10 Function Defaults Defaults are placed on the platen. 1 Press the System Menu key. 2 Press [Common Settings], [Next] of Function Defaults and then [Change] of Original Orientation. Tray 4 Tray 5 Tray 6 Tray 7 Output ...
... at the left. Set the defaults for Original Orientation. Copy/Custom Box Select output tray for paper Job Separator Tray 1 Tray Tray 2 Tray 3 orientation at output. Refer to select the default orientation when originals are the values automatically set after...Tray], [Tray B], [Tray C] or [Tray 1-7], select Common Settings - Cancel OK 10/5/2006 10:10 Function Defaults Defaults are placed on the platen. 1 Press the System Menu key. 2 Press [Common Settings], [Next] of Function Defaults and then [Change] of Original Orientation. Tray 4 Tray 5 Tray 6 Tray 7 Output ...

3050/4050/5050 Operation Guide Rev-3 (Advanced)
Page 316
... 6-6 Setup 6-6 Size viii Size Selection 1-2, 2-2 Output Destination 1-17 Output Tray 6-20 P Page Numbering 1-40 Paper Appendix-2 Appropriate Paper Appendix-2 Auto Selection 6-14 Cassette 6-8 Custom 6-6 Default Paper Source 6-13 Multi Purpose Tray 6-9 Paper Source for Cover Paper 6-15 Setup 6-6... Repeat Copy 1-57 Maximum Number 1-58 Outputting 1-58 Selecting 1-57 Reserve Next Priority 6-43 Restarting the System 6-86 S Scan Resolution 2-22 Security 8-1 Security (for Administrators) After Installation 8-5 Before Installation 8-5 Changing Functions 8-6 Installation 8-5 Method for Overwriting the...
... 6-6 Setup 6-6 Size viii Size Selection 1-2, 2-2 Output Destination 1-17 Output Tray 6-20 P Page Numbering 1-40 Paper Appendix-2 Appropriate Paper Appendix-2 Auto Selection 6-14 Cassette 6-8 Custom 6-6 Default Paper Source 6-13 Multi Purpose Tray 6-9 Paper Source for Cover Paper 6-15 Setup 6-6... Repeat Copy 1-57 Maximum Number 1-58 Outputting 1-58 Selecting 1-57 Reserve Next Priority 6-43 Restarting the System 6-86 S Scan Resolution 2-22 Security 8-1 Security (for Administrators) After Installation 8-5 Before Installation 8-5 Changing Functions 8-6 Installation 8-5 Method for Overwriting the...

3050/4050/5050 Operation Guide Rev-3 (Basic)
Page 92
... Set Original. Copy Image Size/orientation of original and paper 100% Original : LAe4tter Zoom : 100% Paper : LAe4tter Change Setting Zoom 1-sided >>1-sided Duplex Quick Setup Status Org./Paper/ Finishing Normal 0 Copies 1 Original position Interrupt Output tray Paper source Auto Density Text+Photo Original Size Collate Original Image Image Quality Collate/ Offset Layout/Edit...
... Set Original. Copy Image Size/orientation of original and paper 100% Original : LAe4tter Zoom : 100% Paper : LAe4tter Change Setting Zoom 1-sided >>1-sided Duplex Quick Setup Status Org./Paper/ Finishing Normal 0 Copies 1 Original position Interrupt Output tray Paper source Auto Density Text+Photo Original Size Collate Original Image Image Quality Collate/ Offset Layout/Edit...

3050/4050/5050 Operation Guide Rev-3 (Basic)
Page 206
... 16K-R Duplexing A3 to A5-R, Ledger to Statement-R Non-Copying Margin 0.5 to 5.5 mm maximum Paper Supply Capacity Cassettes 1 and 2 Multi Purpose Tray Output Tray Capacity 500 sheets (80 g/m2) 200 sheets (80 g/m2) 250 sheets (80 g/m2), 150 sheets (80 g/m2, with Multi Purpose...;C/50 to 90.5ºF Humidity 15 to 80% Altitude 2,500 m maximum Illumination 1,500 lux maximum Power Source AC 120 V 60 Hz 11.5 A / AC 220 to change without notice. Appendix Specifications NOTE: Specifications are subject to 240 V 50 Hz 6.3 A Dimensions (W) × (D) × (H) 23 9/16 × 25 7/16 ...
... 16K-R Duplexing A3 to A5-R, Ledger to Statement-R Non-Copying Margin 0.5 to 5.5 mm maximum Paper Supply Capacity Cassettes 1 and 2 Multi Purpose Tray Output Tray Capacity 500 sheets (80 g/m2) 200 sheets (80 g/m2) 250 sheets (80 g/m2), 150 sheets (80 g/m2, with Multi Purpose...;C/50 to 90.5ºF Humidity 15 to 80% Altitude 2,500 m maximum Illumination 1,500 lux maximum Power Source AC 120 V 60 Hz 11.5 A / AC 220 to change without notice. Appendix Specifications NOTE: Specifications are subject to 240 V 50 Hz 6.3 A Dimensions (W) × (D) × (H) 23 9/16 × 25 7/16 ...

3050/4050/5050 Operation Guide Updated Pages
Page 2
...Orientation Confirmation setting. 1 Press the System Menu key. 2 Press [Common Settings] and [Change] of Orientation Confirmation. 3 Select the default for the second kit (Dual FAX). Output Tray Step 3 is selected as below to access frequently used functions. If entering Program screen ...shortcut name and press [Register] to registered shortcuts can specify the output tray for [Off] or [On]. 4 Press [OK]. Press [Close]. NOTE: FAX Port 1 appears when the optional fax kit is changed as the Orientation Confirmation setting, the selection screen for original orientation appears...
...Orientation Confirmation setting. 1 Press the System Menu key. 2 Press [Common Settings] and [Change] of Orientation Confirmation. 3 Select the default for the second kit (Dual FAX). Output Tray Step 3 is selected as below to access frequently used functions. If entering Program screen ...shortcut name and press [Register] to registered shortcuts can specify the output tray for [Off] or [On]. 4 Press [OK]. Press [Close]. NOTE: FAX Port 1 appears when the optional fax kit is changed as the Orientation Confirmation setting, the selection screen for original orientation appears...


