
User Guide
Page 1
i1800 Series Scanners User's Guide A-61555
i1800 Series Scanners User's Guide A-61555

User Guide
Page 2
... 1-6 United States 1-6 Japan 1-6 Taiwan 1-6 Peoples Republic of China 1-7 Korean 1-7 European Union 1-7 Acoustic emission 1-7 Power system connection 1-7 2 Getting Started 2-1 Scanner components 2-1 Front view 2-1 Internal components 2-4 Rear view 2-5 3 Using the Scanner 3-1 Turning the scanner on 3-1 Turning the scanner off 3-3 Starting and stopping scanning 3-3 Document preparation 3-3 Adjusting the input elevator 3-5 Adjusting the side guides 3-5 Selecting your feeding...
... 1-6 United States 1-6 Japan 1-6 Taiwan 1-6 Peoples Republic of China 1-7 Korean 1-7 European Union 1-7 Acoustic emission 1-7 Power system connection 1-7 2 Getting Started 2-1 Scanner components 2-1 Front view 2-1 Internal components 2-4 Rear view 2-5 3 Using the Scanner 3-1 Turning the scanner on 3-1 Turning the scanner off 3-3 Starting and stopping scanning 3-3 Document preparation 3-3 Adjusting the input elevator 3-5 Adjusting the side guides 3-5 Selecting your feeding...

User Guide
Page 3
... volume 3-20 Selecting the tone 3-21 Selecting a language 3-22 Enabling/disabling image addressing 3-23 Calibrating the scanner 3-25 Idle screen 3-27 Operator Log 3-28 Accessing scanner information 3-29 Count only mode 3-30 Performing a Print test 3-31 Performing a Patch test 3-32 Performing... 3-33 Using function keys when scanning 3-34 Changing image address levels 3-34 Manually pausing and resuming the scanner 3-35 Automatically pausing and resuming the scanner 3-35 Power Saver mode 3-36 Viewing messages 3-36 4 The Enhanced Printer/Patch Readers 4-1 Enhanced Printer overview...
... volume 3-20 Selecting the tone 3-21 Selecting a language 3-22 Enabling/disabling image addressing 3-23 Calibrating the scanner 3-25 Idle screen 3-27 Operator Log 3-28 Accessing scanner information 3-29 Count only mode 3-30 Performing a Print test 3-31 Performing a Patch test 3-32 Performing... 3-33 Using function keys when scanning 3-34 Changing image address levels 3-34 Manually pausing and resuming the scanner 3-35 Automatically pausing and resuming the scanner 3-35 Power Saver mode 3-36 Viewing messages 3-36 4 The Enhanced Printer/Patch Readers 4-1 Enhanced Printer overview...

User Guide
Page 5
.... provides a listing of the specifications for clearing a document jam and a listing of internal and external scanner components. Chapter 2, Getting Started - Chapter 5, Maintenance - Chapter 1, Introduction - Chapter 3, Using the Scanner - Appendix A, Accessories - A-61555 March 2007 1-1 provides procedures for the Kodak i1860 Scanner only. NOTE: Patch Reader functionality is for using and maintaining the Enhanced Printer and the...
.... provides a listing of the specifications for clearing a document jam and a listing of internal and external scanner components. Chapter 2, Getting Started - Chapter 5, Maintenance - Chapter 1, Introduction - Chapter 3, Using the Scanner - Appendix A, Accessories - A-61555 March 2007 1-1 provides procedures for the Kodak i1860 Scanner only. NOTE: Patch Reader functionality is for using and maintaining the Enhanced Printer and the...

User Guide
Page 6
Black-and-white: 200, 240, 300, 400 - Color: 100, 150, 200, 240, 300 - Scanner features • Excellent paper handling, image quality, and reliability. • Color or grayscale at the same speed as by multiple ultrasonic ...by length detection. • Automatic and manual feeding. • JPEG compression for color and grayscale images. • Image processing features include Kodak's Perfect Page technology for the Kodak i1860 Scanner only. • Includes the Brightness and Contrast Control which allows you to stand-workspace table • 500-sheet input elevator. •...
Black-and-white: 200, 240, 300, 400 - Color: 100, 150, 200, 240, 300 - Scanner features • Excellent paper handling, image quality, and reliability. • Color or grayscale at the same speed as by multiple ultrasonic ...by length detection. • Automatic and manual feeding. • JPEG compression for color and grayscale images. • Image processing features include Kodak's Perfect Page technology for the Kodak i1860 Scanner only. • Includes the Brightness and Contrast Control which allows you to stand-workspace table • 500-sheet input elevator. •...

User Guide
Page 7
..., choice of this document provides instructions on how to install and use the Ultra-Lightweight Feed Module. • Kodak Manual Feeder for basic scanner use. • Brightness and Contrast Control Reference Guide, A-61587- when you purchase the Ultra-Lightweight Feeder Accessory...Professional/ Home) • 512 MB RAM Supporting documentation The following documentation is the minimum recommended system configuration to run the Kodak i1800 Series Scanners. when you purchase the manual feeder this User's Guide and intended to be necessary to obtain the rated throughput. •...
..., choice of this document provides instructions on how to install and use the Ultra-Lightweight Feed Module. • Kodak Manual Feeder for basic scanner use. • Brightness and Contrast Control Reference Guide, A-61587- when you purchase the Ultra-Lightweight Feeder Accessory...Professional/ Home) • 512 MB RAM Supporting documentation The following documentation is the minimum recommended system configuration to run the Kodak i1800 Series Scanners. when you purchase the manual feeder this User's Guide and intended to be necessary to obtain the rated throughput. •...

User Guide
Page 8
...or Service Agreement. If you are moving down the hall, to drive your scanner, Kodak can be taken and a Kodak Field Engineer will return the call. Only a trained scanner operator should place a call is not covered under your Service Agreement Terms ... numbers: • United States and Canada: Kodak Field Service: 1-800-356-3253 Kodak Professional Services: 1-800-525-6325 • Other locations: the Kodak Field Engineer who installs your scanner will also unpack and test your applications. - Kodak Capture Software Application Development. Customized consulting services. ...
...or Service Agreement. If you are moving down the hall, to drive your scanner, Kodak can be taken and a Kodak Field Engineer will return the call. Only a trained scanner operator should place a call is not covered under your Service Agreement Terms ... numbers: • United States and Canada: Kodak Field Service: 1-800-356-3253 Kodak Professional Services: 1-800-525-6325 • Other locations: the Kodak Field Engineer who installs your scanner will also unpack and test your applications. - Kodak Capture Software Application Development. Customized consulting services. ...

User Guide
Page 9
...MSDSs from the area that could be drawn into the machine. • Take sufficient breaks to be required to provide the catalog number of the scanner or any machinery. Supervisors should be kept short, using a hair net if needed, or tying long hair up in a bundle. •...review their employer need to observe the common sense precautions applicable to repair the gas springs. These include, but are available on the Kodak website at: www.kodak.com/go/msds. A-61555 March 2007 1-5 Users and their practices and make compliance with these precautions a part of any mechanical ...
...MSDSs from the area that could be drawn into the machine. • Take sufficient breaks to be required to provide the catalog number of the scanner or any machinery. Supervisors should be kept short, using a hair net if needed, or tying long hair up in a bundle. •...review their employer need to observe the common sense precautions applicable to repair the gas springs. These include, but are available on the Kodak website at: www.kodak.com/go/msds. A-61555 March 2007 1-5 Users and their practices and make compliance with these precautions a part of any mechanical ...

User Guide
Page 10
...8226; The product packaging is recyclable. • The i1800 Series Scanners are Energy Star compliant and are designed to www.kodak.com/go/recycle for additional information on the standard of your local Kodak representative or refer to provide reasonable protection against harmful interference when the... equipment is operated in which case the user will be required to radio communications. Please contact your Kodak i1800 Series Scanners use the shielded data cable provided. These limits are shipped from the factory with the instruction manual, may be shielded...
...8226; The product packaging is recyclable. • The i1800 Series Scanners are Energy Star compliant and are designed to www.kodak.com/go/recycle for additional information on the standard of your local Kodak representative or refer to provide reasonable protection against harmful interference when the... equipment is operated in which case the user will be required to radio communications. Please contact your Kodak i1800 Series Scanners use the shielded data cable provided. These limits are shipped from the factory with the instruction manual, may be shielded...

User Guide
Page 12
... extender - detects the presence of various sizes, thicknesses and textures. 6 Paper present sensor - allows you want to accommodate documents of 25-, 100-, 250- 2 Getting Started Scanner components Front view 2 3 1 5 6 7 4 1 Power switch - The input elevator can be locked into position if desired. 5 Feed module - open the input elevator extender to accommodate long...
... extender - detects the presence of various sizes, thicknesses and textures. 6 Paper present sensor - allows you want to accommodate documents of 25-, 100-, 250- 2 Getting Started Scanner components Front view 2 3 1 5 6 7 4 1 Power switch - The input elevator can be locked into position if desired. 5 Feed module - open the input elevator extender to accommodate long...

User Guide
Page 13
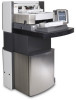
... using the touchscreen. The workspace table can be raised or lowered approximately 10 inches up the POD release latch when you need to move the scanner, the touchscreen can be asked to raise the front of the output tray. 2-2 A-61555 March 2007 aids in photo), this sticker is the ...number you need to access the inside of functions can be pulled out to provide when placing a call Kodak Service. 9 POD release latch - LED is steady green when the scanner is in Power Saver/Energy Star mode; used to access the front printer for changing printer positions and maintenance. ...
... using the touchscreen. The workspace table can be raised or lowered approximately 10 inches up the POD release latch when you need to move the scanner, the touchscreen can be asked to raise the front of the output tray. 2-2 A-61555 March 2007 aids in photo), this sticker is the ...number you need to access the inside of functions can be pulled out to provide when placing a call Kodak Service. 9 POD release latch - LED is steady green when the scanner is in Power Saver/Energy Star mode; used to access the front printer for changing printer positions and maintenance. ...
User Guide
Page 15
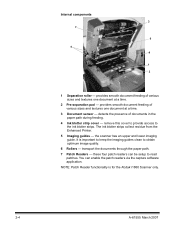
... at a time. 3 Document sensor - The ink blotter strips collect residue from the Enhanced Printer. 5 Imaging guides - It is for the Kodak i1860 Scanner only. 2-4 A-61555 March 2007 NOTE: Patch Reader functionality is important to keep the imaging guides clean to read patches. provides smooth document feeding... of documents in the paper path during feeding. 4 Ink blotter strip cover - the scanner has an upper and lower imaging guide. You can be setup to obtain optimum image quality. 6 Rollers - these four patch readers ...
... at a time. 3 Document sensor - The ink blotter strips collect residue from the Enhanced Printer. 5 Imaging guides - It is for the Kodak i1860 Scanner only. 2-4 A-61555 March 2007 NOTE: Patch Reader functionality is important to keep the imaging guides clean to read patches. provides smooth document feeding... of documents in the paper path during feeding. 4 Ink blotter strip cover - the scanner has an upper and lower imaging guide. You can be setup to obtain optimum image quality. 6 Rollers - these four patch readers ...

User Guide
Page 16
... the power cord appropriate for the FireWire cable. Connect the power cord first to the scanner, then to the space in the back of the scanner for a computer (not shown in illustration). 4 FireWire (IEEE-1394) connection - the scanner has three (ultrasonic) multifeed detection sensors. provides a port for your location and connect it accordingly...
... the power cord appropriate for the FireWire cable. Connect the power cord first to the scanner, then to the space in the back of the scanner for a computer (not shown in illustration). 4 FireWire (IEEE-1394) connection - the scanner has three (ultrasonic) multifeed detection sensors. provides a port for your location and connect it accordingly...

User Guide
Page 17
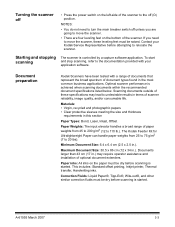
...elevator • Adjusting the output tray • Adjusting the height of the scanner to the on position (I). After turning on the main breaker switch, press the power switch on the left side of the scanner • Scanning documents • Automatic, continuous and manual feeding • ...Using the touchscreen Turning the scanner on the main breaker switch first. Under normal circumstances the main breaker switch should ...
...elevator • Adjusting the output tray • Adjusting the height of the scanner to the on position (I). After turning on the main breaker switch, press the power switch on the left side of the scanner • Scanning documents • Automatic, continuous and manual feeding • ...Using the touchscreen Turning the scanner on the main breaker switch first. Under normal circumstances the main breaker switch should ...

User Guide
Page 18
See the section entitled, Using the touchscreen" later in this chapter for information about the Idle screen. IMPORTANT: Always power up the host computer to its ready state before powering up the scanner. 3-2 A-61555 March 2007 When the scanner completes the power-up sequence, the Idle screen will be displayed. After you power up the scanner, the following screen will be displayed.
See the section entitled, Using the touchscreen" later in this chapter for information about the Idle screen. IMPORTANT: Always power up the host computer to its ready state before powering up the scanner. 3-2 A-61555 March 2007 When the scanner completes the power-up sequence, the Idle screen will be displayed. After you power up the scanner, the following screen will be displayed.
User Guide
Page 19
... . Scanning documents outside of these leveling feet must be raised. The Kodak Feeder Kit for Ultralightweight Paper can handle paper weights from 45 to 200 g/m2 (12 to relocate the scanner. A-61555 March 2007 3-3 Optimal scanner performance is controlled by a capture software application. Documents larger than 43 ... the broad spectrum of document types found in .) may require operator assistance and installation of optional document extenders. Document preparation Kodak Scanners have been tested with your Kodak Service Representative before scanning is started .
... . Scanning documents outside of these leveling feet must be raised. The Kodak Feeder Kit for Ultralightweight Paper can handle paper weights from 45 to 200 g/m2 (12 to relocate the scanner. A-61555 March 2007 3-3 Optimal scanner performance is controlled by a capture software application. Documents larger than 43 ... the broad spectrum of document types found in .) may require operator assistance and installation of optional document extenders. Document preparation Kodak Scanners have been tested with your Kodak Service Representative before scanning is started .

User Guide
Page 20
...offset feeding, especially when using the Enhanced Printer. • If in doubt about whether a specific damaged document can be transported through the scanner, place the document in a clear protective sleeve with the lead edge of the document aligned with missing corners, perforated edges, hole punches... in the margins, irregular and curled edges, torn, damaged, or crushed pages can be transported successfully through the scanner easily. • A stack of documents to be arranged so the leading edges of the sleeve. NOTE: When scanning documents in addition ...
...offset feeding, especially when using the Enhanced Printer. • If in doubt about whether a specific damaged document can be transported through the scanner, place the document in a clear protective sleeve with the lead edge of the document aligned with missing corners, perforated edges, hole punches... in the margins, irregular and curled edges, torn, damaged, or crushed pages can be transported successfully through the scanner easily. • A stack of documents to be arranged so the leading edges of the sleeve. NOTE: When scanning documents in addition ...

User Guide
Page 23
.... Factors which determine the optimum output tray position are size and weight of the document extender into position. A-61555 March 2007 3-7 Output tray options The scanner is shipped with a standard output tray and a short document tray. Installing the document extender • Insert the ends of your stacking needs.
.... Factors which determine the optimum output tray position are size and weight of the document extender into position. A-61555 March 2007 3-7 Output tray options The scanner is shipped with a standard output tray and a short document tray. Installing the document extender • Insert the ends of your stacking needs.

User Guide
Page 30
... rear access doors are securely closed. • Be sure the workspace table is not already in its highest or lowest position. • Be sure the scanner is on and is not in .) from its lowest position for your comfort when you are sitting or standing at the... scanner. When you are raising or lowering the workspace table, be sure that there is nothing close to the scanner that would interfere with the upward and downward movement (e.g., chair, table, etc.). • Press the upper...
... rear access doors are securely closed. • Be sure the workspace table is not already in its highest or lowest position. • Be sure the scanner is on and is not in .) from its lowest position for your comfort when you are sitting or standing at the... scanner. When you are raising or lowering the workspace table, be sure that there is nothing close to the scanner that would interfere with the upward and downward movement (e.g., chair, table, etc.). • Press the upper...

User Guide
Page 31
...quantity, etc., outlined in the "Document preparation" section. Depending on the touchscreen to begin feeding documents. Feeding documents using multi-feed detection The scanner has three multi-feed detection sensors that can be independently enabled or disabled. Automatic feeding To scan a stack of the stacked documents. 2. For...clips before scanning. 1. When multi-feed detection is configured, your documents will automatically start feeding, or you may damage the scanner. Position the stack of the documents, face up in landscape orientation (longer side as the leading edge).
...quantity, etc., outlined in the "Document preparation" section. Depending on the touchscreen to begin feeding documents. Feeding documents using multi-feed detection The scanner has three multi-feed detection sensors that can be independently enabled or disabled. Automatic feeding To scan a stack of the stacked documents. 2. For...clips before scanning. 1. When multi-feed detection is configured, your documents will automatically start feeding, or you may damage the scanner. Position the stack of the documents, face up in landscape orientation (longer side as the leading edge).


